As the symbol of Ireland, the three-leaf plant has a history dating back centuries. A group of people called Druids used to ward evil with it. They believe that it can magically offer protection.
These days, this plant is considered good luck and symbolizes faith, hope, and love. Here are ten kid-friendly shamrock crafts perfect for a St. Patrick’s Day celebration for preschoolers.
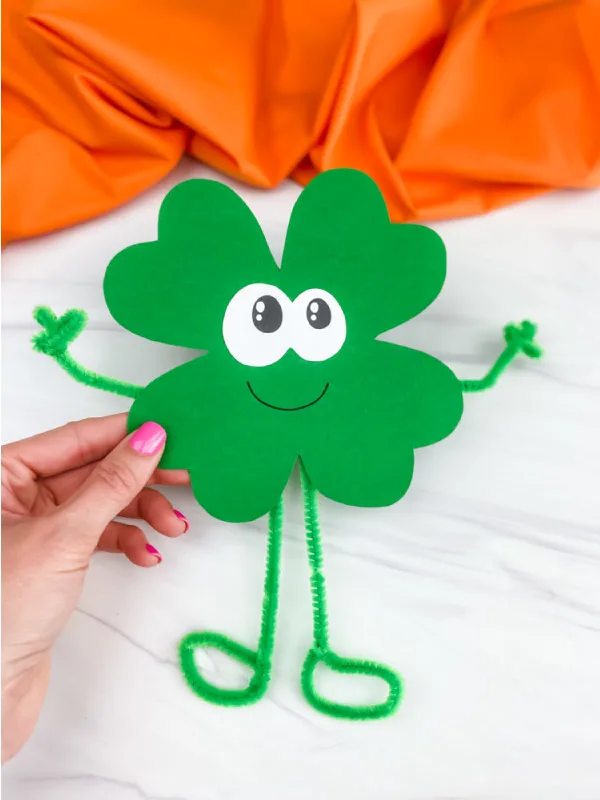
This shamrock craft is relatively easy to make and can be used to teach children about movement. Make several of these and bend the pipe cleaners to get the right pose that children will try to imitate.
For example, for arms upward, bend both arms so they look like they are reaching the sky. Bend them straight on the side for arms sideward or turn them in front for arms forward.
Bend both legs for the squatting pose or bend one leg for children to stand on one leg. Place all the shamrocks in a bag and tell children to copy the movement as one is taken out. Make it more challenging for older children by combining both arm and leg poses.
To make the shamrock people, download and print the free shamrock template from the site. Cut out the pieces. Trace the shamrock leaf on green cardstock. Draw the mouth using a black marker.
Next, glue the eyes on the leaf. Make the legs by twisting the end of the pipe cleaners to form a “b” shape. Stick them to the back of the shamrock. Make the arms by folding the end to create three fingers. Attach them to the back of the leaf.
For this craft, you will need:
- Printed shamrock template
- Green cardstock
- Green pipe cleaners
- Black marker
- Glue
- tape
For more information on this activity, go to SimpleEverydayMom.com.
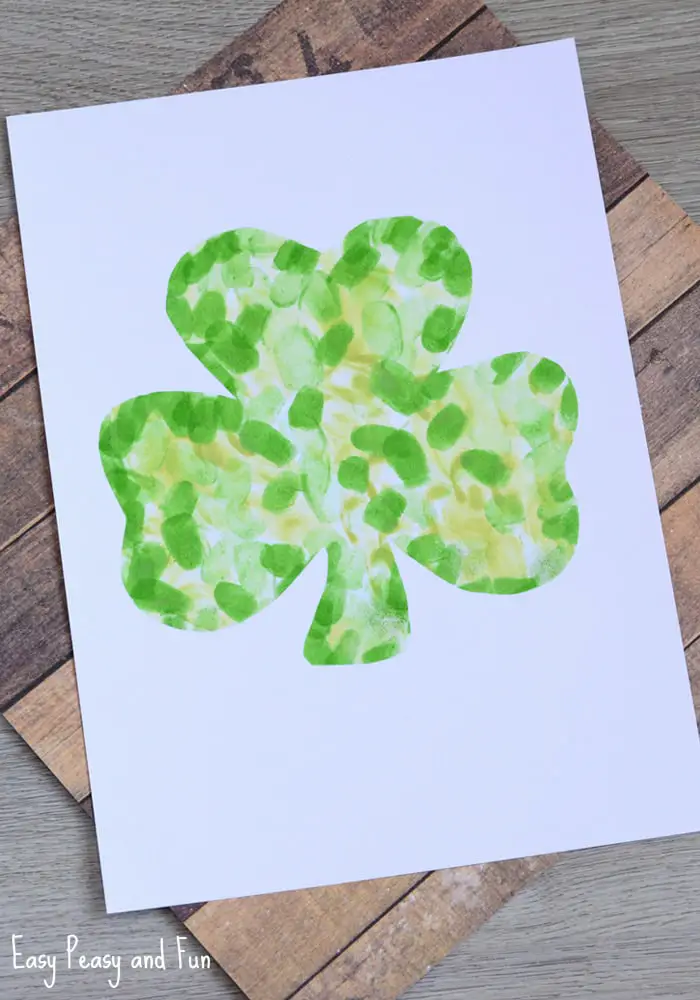
Stenciling and stamping are the art techniques used in this shamrock craft. Let children explore these ways of creating prints by engaging them in this green leaf activity that will provide lots of fun.
This art process is a great activity to teach children about art techniques, color mixing, and layering. Use this to design cards or to display.
Make the stencil by outlining the shamrock on white cardstock. Cut out the shamrock leaving the outline hollow. Place this on another white cardstock and secure the sides with tape to prevent it from moving.
Doing this step will guarantee that the finished product will take on the shape of the shamrock. The stencil will provide sensory feedback and act as a boundary that children will be aware of during the stamping.
Next, have the children dip their fingers in green and yellow ink alternately and press them onto the cardstock. Repeat this process until the whole shamrock is covered with color. Take off the stencil on top and let the stamped shamrock dry before using.
For this craft, you will need:
- White cardstock
- Black marker
- Green and yellow ink
- Scissors
- Duct tape
For more information on this activity, go to EasyPeasyAndFun.com.
Here’s a shamrock craft perfect for those last-minute ideas when pressed for time or when faced with limited materials to work with.
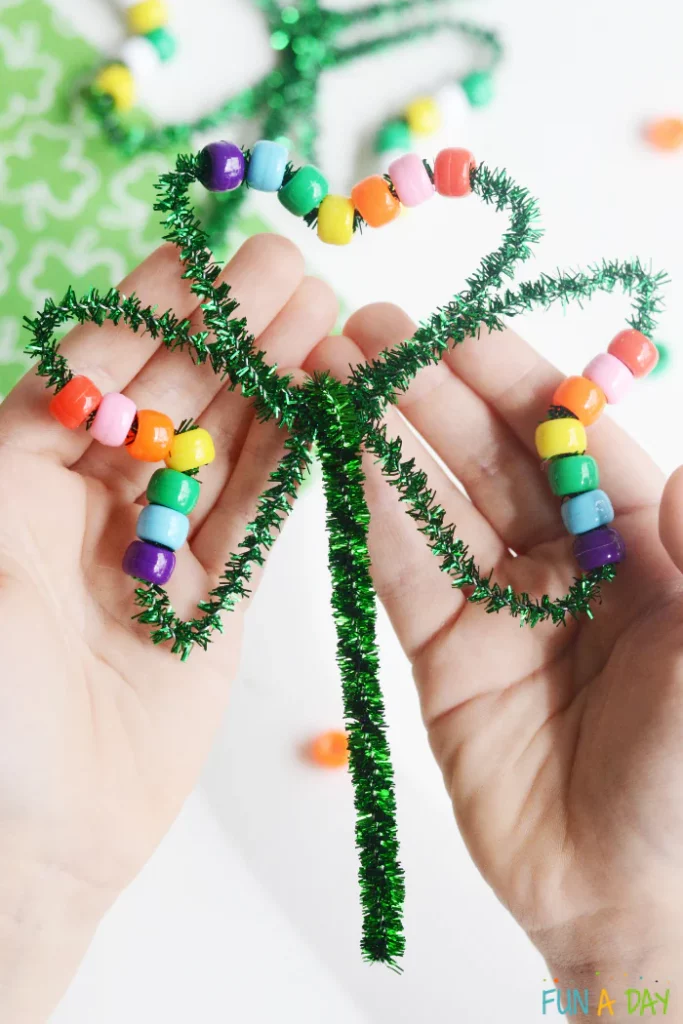
This pipe cleaner shamrock will help children bend the wires with precision, and their eye-hand motor skills will improve as they insert the beads. While this craft is simple, for younger children, this requires a good amount of concentration and patience.
Here are other suggestions to make this craft a tool for learning. Alternate the colored beads to teach children about patterns. Vary the number of beads for children to practice their counting skills.
To make the shamrock, start by twisting two pipe cleaners in a straight direction. The site suggests the use of the shiny kind. This part will become the stem. Twist the third pipe cleaner to resemble a shamrock by making three heart shapes.
Add the pony beads. The site suggests not adding too many beads. Distribute the beads on each of the hearts. Attach this to the stem by twisting it to secure it well.
For this craft, you will need:
- Green pipe cleaners
- Pony beads
For more information on this activity, go to Fun-A-Day.com.
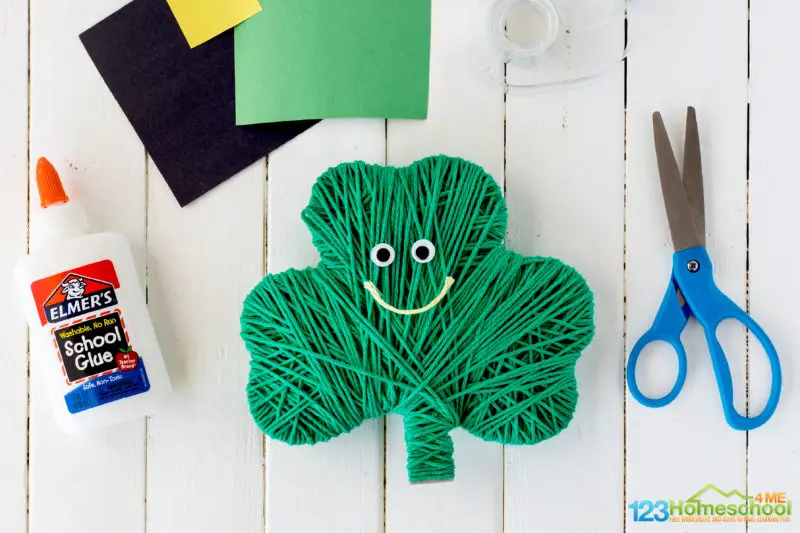
Mr. Lucky Shamrock is sure to bring cheers and smiles to anyone to notices it. This craft is perfect for young children struggling with hand-eye coordination skills.
This particular skill requires concentration and patience. This craft will provide good practice for these learners as one hand wraps the yarn tightly while the other moves the cardboard in a direction that will cover it with color.
Start by downloading and printing the free shamrock template. Cut this out and trace it on cardboard. Start wrapping the stem with green yarn and proceed to the heart-shaped part of the leaf.
Children are required to wrap the yarn in no specific order or direction. Have them cover the cardboard continuously, overlapping them until the cardboard is completely hidden and only the green yarn is visible.
Cut a small piece of yellow yarn to make the mouth. Attach this, along with the googly eyes to make its face. Next, cut out the hat from the green construction paper. Add a black strap and a yellow buckle to complete the look. Attach this to the shamrock.
For this craft, you will need:
- Printed shamrock template
- Cardboard
- Green, black, and yellow construction paper
- Googly eyes
- Yellow and green yarn
- Scissors
- Glue
For more information on this activity, go to123Homeschool4Me.com.
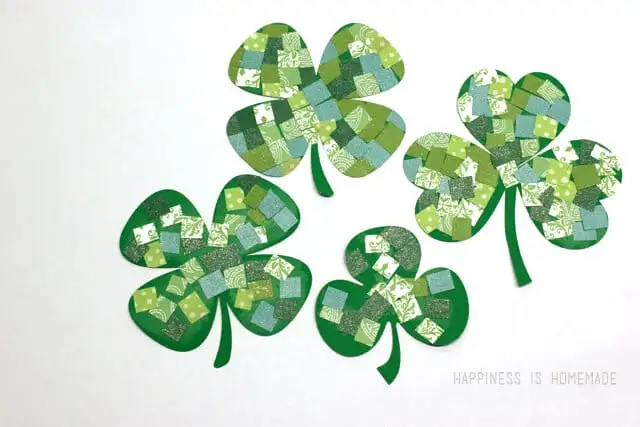
Teach children the concept of mosaics as they create patterned shamrocks using small pieces of paper to add an exciting layer of colors and patterns. Show children pictures of the different types of mosaics.
Let children understand that in ancient times, these were highly valued types of art techniques. Explain the process of covering the base of the shamrock with different shades of paper to create a unique design in the same shade as the shamrock.
As children cut and paste, their fine motor skills will improve.
Start with choosing papers that will become the mosaic tiles. Choose papers within the shades of green. If possible, recycle paper from gift wrappers, magazines, or scrapbooking.
Cut the tiles into small squares. Make the shamrock by outlining it on green cardstock. Cut this out and apply glue to it. Have the children add the mosaic tiles one at a time. Let this dry and cut out the excess from the shamrock’s edge.
For this craft, you will need:
- Green cardstock
- Plain and patterned paper in different shades of green
- Scissors
- Glue
For more information on this activity, go to HappinessIsHomemade.net.
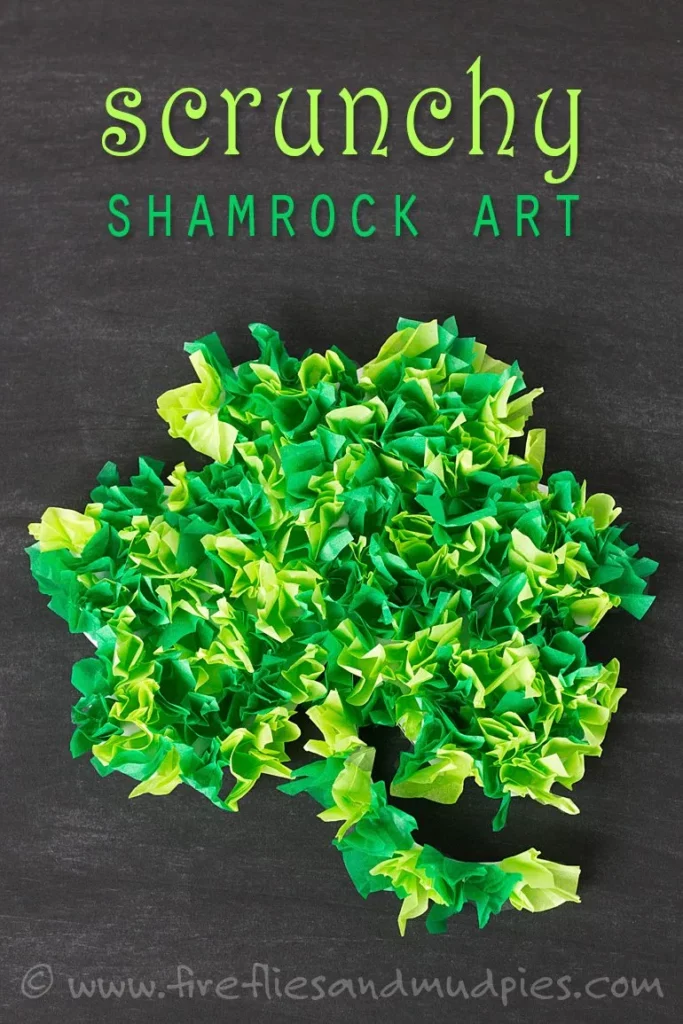
This shamrock craft is perfect for children practicing strengthening their finger muscles. This craft is completed by gluing scrunched-up paper that will cover the entire template.
Use this craft to go with the book “Green Shamrocks” by Eve Bunting. This is a story about a rabbit that grew shamrocks but lost them. Hide the shamrock craft and let the children role-play by pretending to be the rabbit looking for it.
Their oral language skills will improve as they ask the different characters in the book. This activity is an excellent opportunity to practice sentences repetitively, such as “Have you seen my shamrock?” or “Did you take my yellow pot of shamrock?”
Download and print the free shamrock template from the site. Cut this out.
Make the shamrock green by first cutting the tissue paper into small squares. Use two shades of green to add layers and texture. Next, scrunch each square of tissue paper on a pencil and dip it in glue to adhere to the shamrock.
See the pictures on the site for this step. Repeat the process until the whole shamrock is covered in green. Let this dry before using.
For this craft, you will need:
- Printed shamrock template
- Green tissue
- Craft glue
- Scissors
- Pencil
For more information on this activity, go to FirefliesAndMudpies.com.
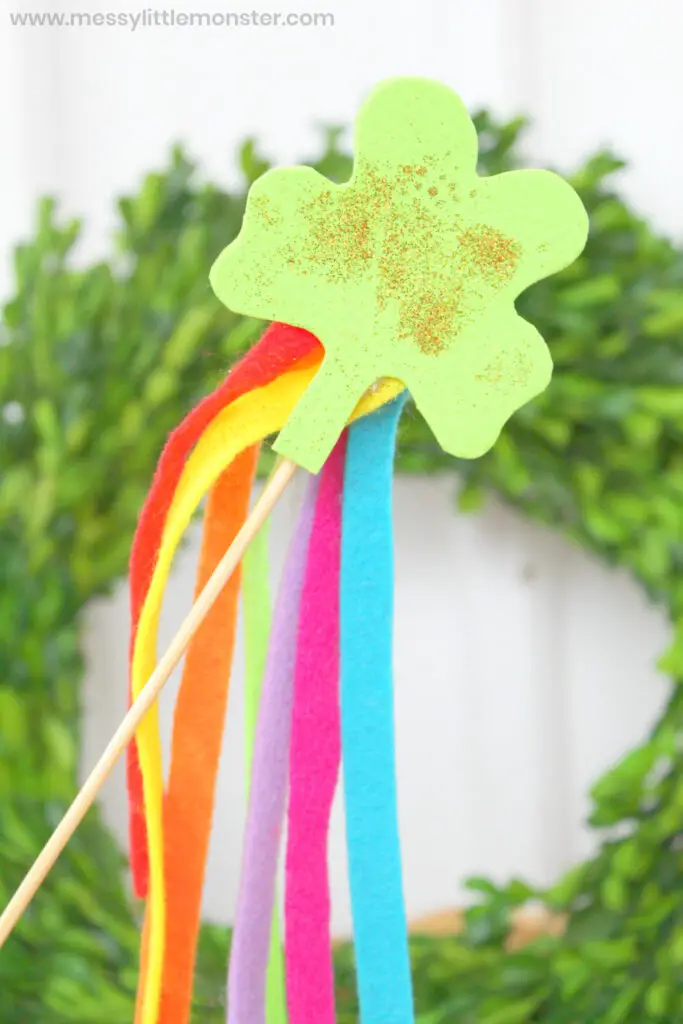
Children will be the bearers of good luck as they play and pretend to bestow magical blessings on everyone, including friends and families. The craft requires simple tasks such as cutting and pasting.
Take advantage of the simplicity of this task to help children learn to follow directions. Children will become more attentive as they listen to directions on the steps to complete their wand. Listening skills will improve as they take part in this activity.
Start by cutting the strips of rainbow-colored felt. Cut them to about six inches long and half an inch in width. Next, download and print the free shamrock template from the site.
Cut this out and use it to trace on the green craft foam. Cut and stick the wooden dowel on it. Once dry, add the rainbow strips of felt using glue. Finally, spread a thin layer of glue on the front part of the shamrock. Sprinkle some glitter and let it dry.
For this craft, you will need:
- Printed template
- Scissors
- Glue
- Wooden dowel
- Craft felt
- Craft foam
- Gold glitter
For more information on this activity, go to MessyLittleMonster.com.
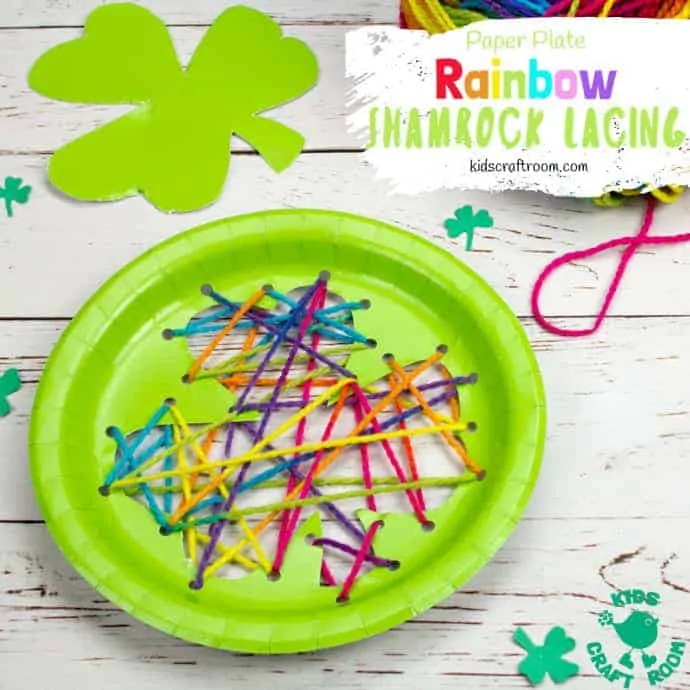
Lacing activities may seem challenging for children, but learning is an important skill. With this skill, they can tie their shoes, improve their hand-eye coordination skills, and three-finger grasp.
Incorporate this task with a St. Patrick’s Day craft to make it more enjoyable. Children will love making decorative crafts to adorn their homes and classrooms.
Start by outlining a shamrock on the back part of the green paper plate. Cut the shamrock from the center without going through the edge of the plate. A craft knife is a perfect tool for this step.
Punch holes all around the shamrock for threading holes. Have children use different colors of yarn, preferably rainbow colors. Doing this will make the shamrock colorful and exciting.
Insert the first yarn into any of the holes. Secure the end with sticky tape on the back of the paper plate. Continue working until all the holes are filled. Change the colors of the yarn by sticking the last yarn using tape.
For this craft, you will need:
- Green paper plate
- Pencil
- Scissors
- Yarn
- Craft knife
- Hole puncher
- Sticky tape
For more information on this activity, go to KidsCraftRoom.com.
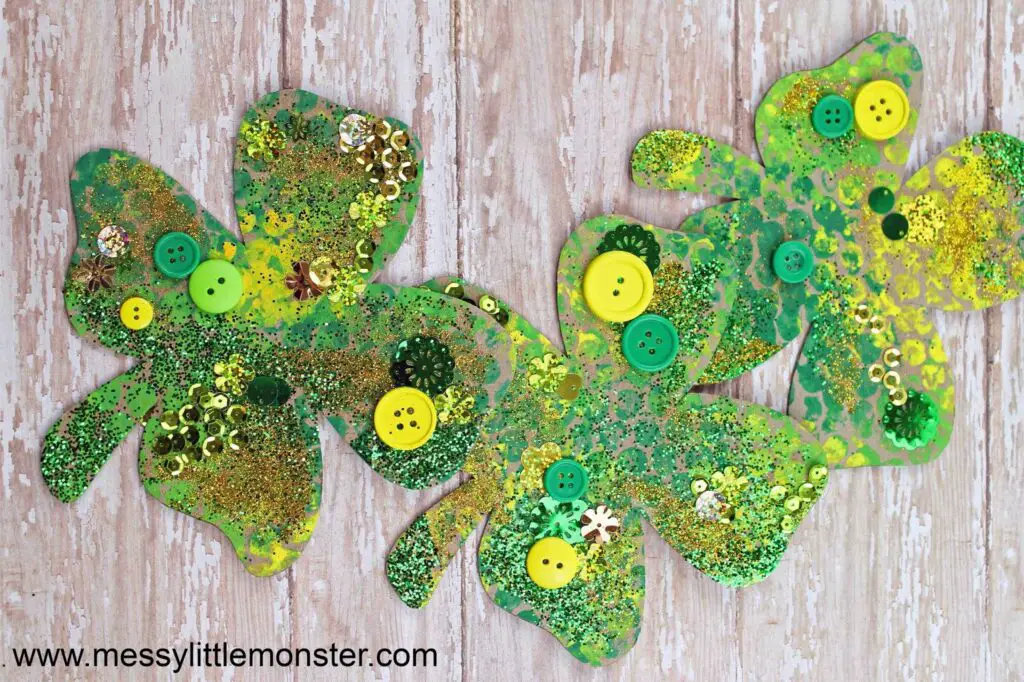
Make a shamrock sparkly and glam fit for the celebrity in every child. Use colorful buttons and other embellishments to create a sensory experience that children will enjoy.
The layers of colors from the bubble wrap topped with sparkly glue add a unique feature. This process of art will look fantastic and different. Let children customize their shamrock as they choose the embellishments and the amount they will use on the craft.
Start with downloading, printing, and cutting the shamrock template. Trace on cardstock and cut this out. Spread bubble wrap flat on a surface to add the paint. Use the paintbrush to add color.
Ensure that the bubble wrap is bigger than the shamrock on the cardstock. Use different shades of green for a significant layer of colors. Carefully press the bubble wrap on the cardstock to create an interesting print.
Let this dry. Decorate the shamrock by adding a thin layer of glue. Sprinkle the glitter. Add the rest of the embellishments to complete the shamrock.
For this craft, you will need:
- Printed shamrock template
- Bubble wrap
- Green paint in different shades
- Glitter
- Scissors
- Glue
- Buttons, glitters, sequins, and other embellishments
- Paintbrush
- Cardstock
For more information on this activity, go to MessyLittleMonster.com.
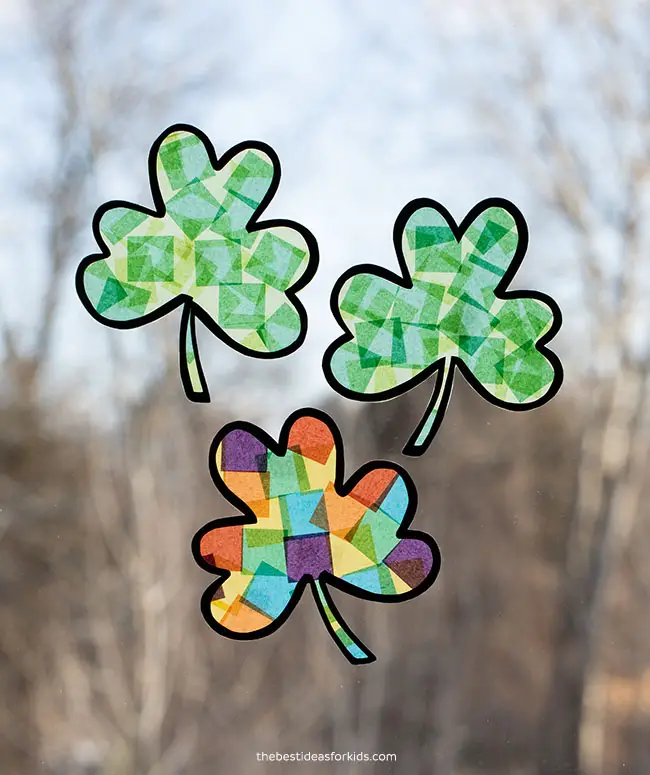
Suncatchers are a great way to add that pop of color to a room filled with sunshine. Make these shamrock suncatchers for children to marvel at as the sun shines through the colors.
With this activity, children will learn and have an opportunity to practice their cutting and pasting skills. Make several of these in different colors for color recognition. Or make them in different shapes to improve children’s shape-recognition skills.
Download and print the free shamrock template from the site. Cut this out and trace it onto black cardstock. Next, cut the center without cutting the edges. This step will leave a black outline on the cardstock.
Use a craft knife to make a slit in the middle before cutting around the outline. Assist children on this part. Attach the black shamrock outline on clear contact paper.
Cut out small squares of colored tissue paper. Use different shades of green or rainbow colors. Gently place them on the shamrock until it is fully covered with colors. Cut out the edges of the contact paper following the shape of the shamrock.
Finally, stick this on the window where the sun could shine to make the colors stand out.
For this craft, you will need:
- Printed shamrock template
- Tissue paper
- Clear contact paper
- Scissors
- Black cardstock
For more information on this activity, go to TheBestIdeasForKids.com.
Conclusion
This list of ten shamrock crafts is excellent to make for St. Patrick’s Day or any day. They are simple and can be tailored to fit the children’s skills and abilities. Use this craft to talk about this Irish symbol and its historical significance. Thanks for checking out our suggestions! Come back again soon to check out more fun topics!
See more crafts and activities you might like:


