Bees are crucial in our environment. They are one of the best pollinators that help us have food on our table. Here are ten bee crafts to help children explore how amazing these animals are.
Let children have fun learning about this beautiful insect as they understand its value in our world.

This easy-to-make bumblebee craft is perfect for little children to work on their fine motor skills. Children will paint, cut, and twist pipe cleaners. These tasks will help improve their fine motor skills.
This bee can be used in different ways. Use it for children to learn letters, numbers, shapes, or colors. Place uppercase or lowercase letter cards underneath for children to identify.
Modify the number of stripes on the bee to teach children counting and numbers. Place an item with different colors or shapes under it so children can identify them.
Make the bee by painting the back of the paper plate yellow. Once the paint dries, paint three black stripes. Next, outline and cut out two wings from the contact paper. Attach these to the bumblebee and add the googly eyes.
Next, poke holes near the eyes and insert pipe cleaners to make the antennas. Poke three holes on each side. Add the legs by cutting one pipe cleaner in three. Do this twice to make six legs. Insert them in the holes and twist them to secure them.
For this activity, you will need:
- Paper plate
- Paint
- Paintbrush
- Pipe cleaners
- Googly eyes
- Glue
For more information on this activity, go to TeachingMama.org.
This cute bee craft is great to hang as decoration. Make several of these for children to count. Stick a piece of paper with a letter of the alphabet, a number, or a shape on its body and let children identify it. These are perfect to place at centers.
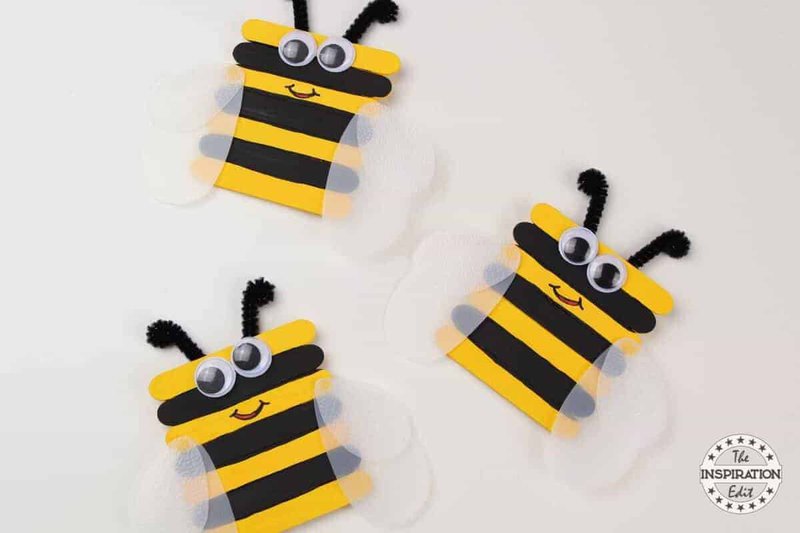
This craft also uses recycled milk jugs. This is a perfect opportunity to explain why recycling is vital to our environment.
Start with ensuring the milk jug is clean and dry. Cut out parts of it and use the flat pieces to make the wings. Draw two teardrop shapes and cut them out. Cut out a smaller set of teardrop shapes. Set these aside.
Stick seven craft sticks together using glue and let these dry. Paint the sticks yellow. Once the paint dries, paint every other stick black. Refer to the pictures on site for this step.
Stick the bigger wings on the craft stick. Next, stick the smaller wings on top. Add the googly eyes. Cut a black pipe cleaner to make the antennas. Twirl the ends and stick on the bee. Lastly, use the colored marker to draw the mouth.
For this activity, you will need:
- Mini craft sticks
- Milk jug
- Paint
- Paintbrush
- Marker
- Colored pens
- Scissors
- Glue
- Pipe cleaners
- Googly eyes
For more information on this activity, go to TheInspirationEdit.com.
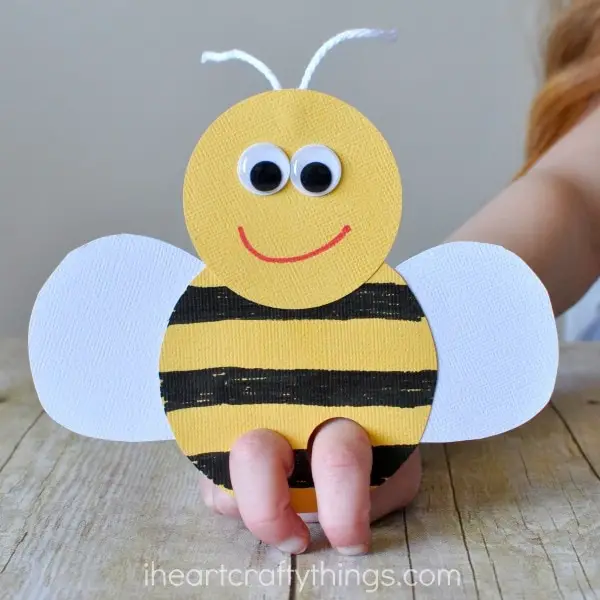
Finger puppets are a great way to help children improve their finger coordination. This adorable bee can help children move their fingers and strengthen them.
Use this craft to tell stories, to go with books, or to play games while teaching preschool concepts. For example, to review numbers lay out some number cards. Tell the child, “Little bee, little bee, what do you see?”
Let the child answer by moving the puppet to the number while saying, “I see the number three looking at me!” Ensure that the numbers are far apart to increase finger movement.
Cut out two circles from the yellow cardstock. One circle should be bigger than the other. The bigger part will be for the bee’s body, while the smaller is for the bee’s head.
Use the marker to draw stripes on the body. Next, punch out holes in the bottom part of the circle. Glue the smaller head on the body. Add the eyes and the string to the back of the head for the antennas.
Cut out two wings from the white cardstock and stick them to the back of the bee’s body.
For this activity, you will need:
- Yellow and white cardstock
- Circle puncher
- Scissors
- Googly eyes
- String
- Marker
- Glue
For more information on this activity, go to IHeartCraftyThings.com.
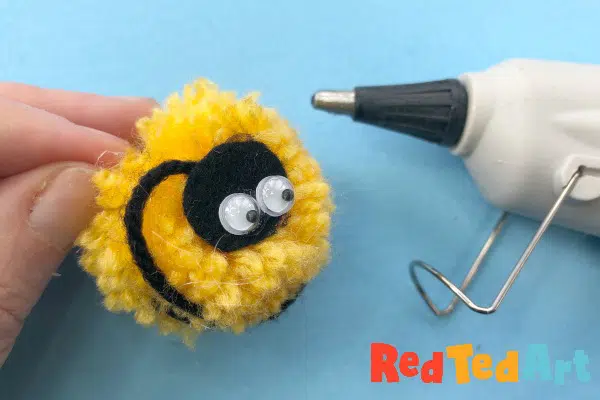
This bee is a great decor to hang in class. Make several to use as counters for counting centers. Another great idea is to use them as voice-level indicators for children.
Using this bee as a quiet tool is a wonderful trick to teach children to become mindful and improve their social-emotional skills. This can be very helpful for children who tend to be loud when others are still working on their tasks.
Explain to the children that the little bee’s buzzing sounds are low whenever they see the pompom bee out. This means they must use their low voice, especially when talking to others.
Make the basic yellow pompom using the pompom maker. Refer to the step-by-step instruction on the site for this.
Use the black yarn and tie it around the pompom several times to create the striped effect. Secure this with a hot glue gun. Next, cut out two wings from the white and a circle from the black felt.
Stick the wings on the pompom. Glue the eyes on the black circle and attach this to the pompom.
For this activity, you will need:
- Pompom maker
- White and black felt
- Googly eyes
- Yarn
- Hot glue gun
- Scissors
For more information on this activity, go to RedTedArt.com.

Paper ring bees are a hit for children who love wearables. Make the rings bigger and fit on the wrist for a special bee bracelet. Children can use these in pretend play areas to go with their special outfits or as a source of their superpowers.
Use the bee and the hexagons to teach reading sight words or number words. Place or write some words on a strip of paper and stick one on each hexagon. Lay them on the table.
Say to the children, “The bee is flying, flying, flying. It will land on the word “- five.” All hands wearing the bee ring must place their hand on the correct hexagon.
To make the hexagons for the beehive, paint bubble wrap that is the same size as the white cardstock with orange and yellow. Secure the wrap by adding sticky tape on the sides, so it will not move.
Next, press the cardstock firmly on the bubble wrap to transfer the print. Get the cardstock off the wrap and let the paint dry. Cut out the hexagons and set them aside.
Make the bee by cutting a teardrop shape from the yellow cardstock for the body and a strip to make the ring. Cut a circle, two stripes, and two antennas from the black cardstock. Cut two teardrop shapes from the white cardstock for the wings.
Assemble the bee by gluing the parts together. Stick the ring to the underside of the bee. Adjust the ring to fit the child’s finger.
For this activity, you will need:
- Bubble wrap
- Cardstock
- Paint
- Paintbrush
- Scissors
- Sticky tape
For more information on this activity, go to CapturingParenthood.com.
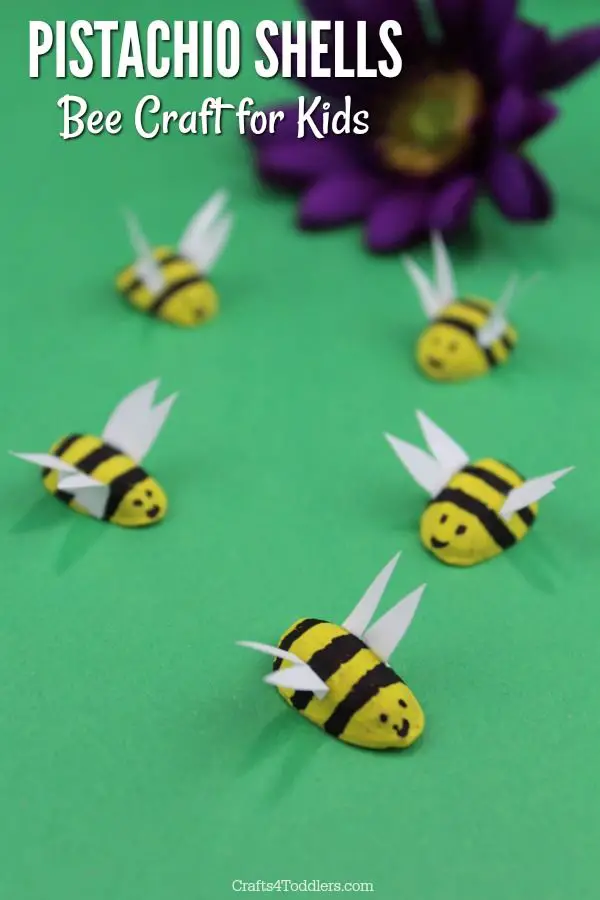
Next time you eat pistachio, do not throw out the shells. Instead, save them up to make these tiny yet adorable bees. These bees are perfect to use as counters in math centers.
Poke tiny holes and let the children string them together to make wind chimes or door charms. This activity will help them improve their hand-eye and bilateral coordination.
Choose shells that are intact and have no cracks. Ensure that they are clean. Scrape off hardened bits of salt or debris to make it easier to paint.
Next, color the pistachio yellow. Use a yellow marker or paint for this step. Let the paint dry. Use the black marker to add stripes on the shell. To keep the shells from moving while painting, use sticky tape to keep them steady.
Working with small objects might be difficult for young children. Assist when necessary.
Cut four tiny wings for each bee. Stick these on the shell. Draw the eyes and mouth to complete the craft.
For this activity, you will need:
- Empty pistachio shells
- Markers
- White paper
- Glue
- Scissors
For more information on this activity, go to Crafts4Toddlers.com.
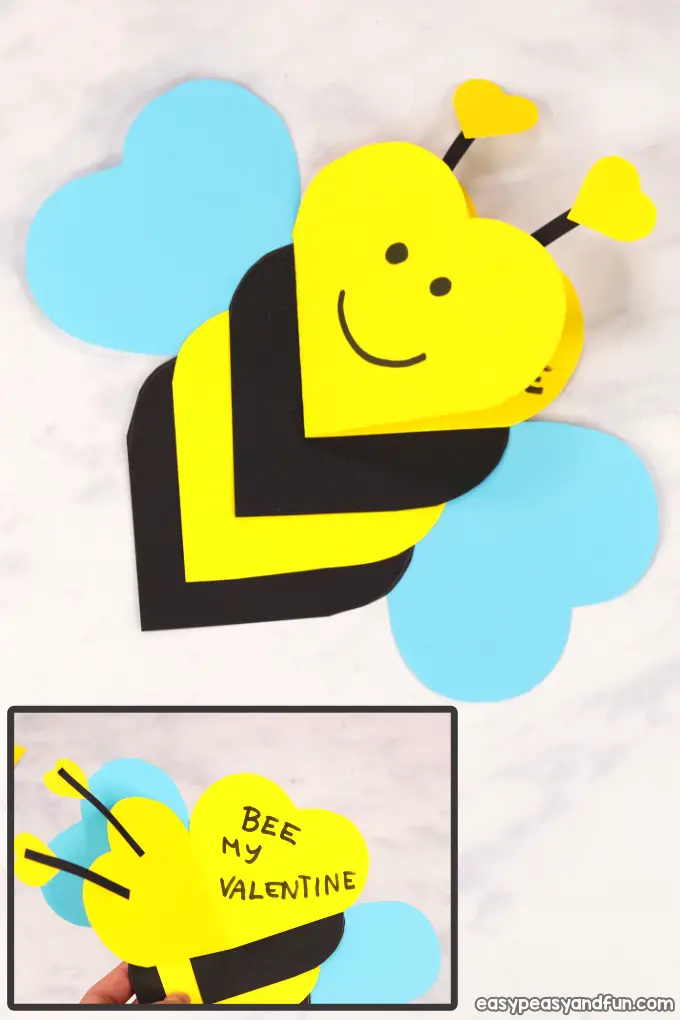
A heart-shaped bee is a perfect way to express love on Valentine’s Day and any day of the year. This craft is an excellent way to teach children about the heart shape.
They will need to trace and cut several hearts to make the bee. These tasks will help improve their fine motor skills since the shape requires some precise techniques to cut it correctly.
Download and print the heart template from the site. There are two types of hearts in the template: a single and a double heart. Trace the double heart once on yellow construction paper and cut. Fold these in half to make the card.
Trace the single heart once on yellow, twice on black, and twice on blue. Cut these out. Next, make the antennas by cutting two thin strips from the black paper. Cut out two tiny hearts and stick these on top of the black strips.
Stick the hearts in order. First, glue one black heart under the double heart. Next, glue the yellow followed by the black. Lastly, glue the blue heart wings to the back of the bee and add the antennas.
Use the marker to draw the eyes and mouth. Googly eyes can also be used if available.
For this activity, you will need:
- Printed heart template
- Construction paper
- Marker
- Scissors
- Glue
- Googly eyes
For more information on this activity, go to EasyPeasyAndFun.com.
See more preschool heart crafts here.

An egg carton craft perfect for little hands to hold and play. Use this adorable bee to go with the book “The Honeybee” by Kristen Hall. Let children use the bee to mimic the different movements the honeybee makes.
This is a great activity to teach children different action words. Some words in the book are tapping, flying, landing, and turning. These actions are a great way to make the story interactive and fun and will help them become attentive and alert.
Cut out the egg carton. Each bee should have three connected cups. Paint the cups yellow and let them dry. Cut out a black yarn and wrap it around the midsection of the cups to make the stripe.
Secure the ends by tying them. Repeat this step in the second section to make the second stripe. Next, cut out two teardrop shapes from white construction paper. Stick these on the first stripe.
Stick the googly eyes and use the marker to draw the mouth.
Finally, make the antennas by cutting a thin strip of black paper and folding it in accordion style. Glue these on top of the bee’s head.
For this activity, you will need:
- Egg carton
- Scissors
- Paint
- Yarn
- Construction paper
- Glue
- Googly eyes
For more information on this activity, go to BuggyAndBuddy.com.
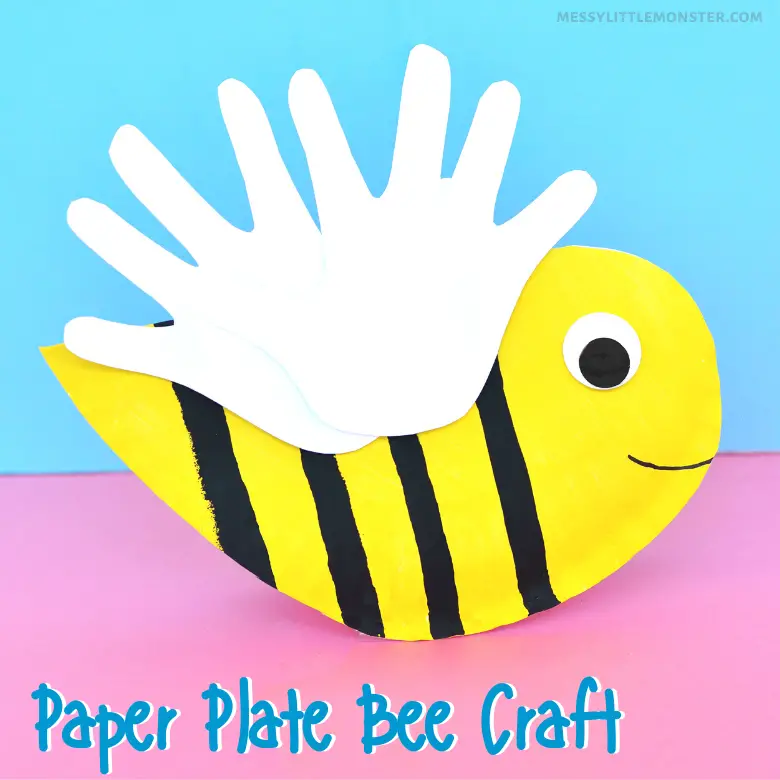
Show off these bees that are great to hang as a classroom or household decor. This craft is an excellent opportunity for children to practice tracing their hands. This step requires skill and is a great way to help children improve their fine motor skills.
The number of stripes on the bee can also be modified for children to practice their counting skills. Make four more bees to go with the rhyme “Five Little Bees.” This activity is a beautiful way to teach children to count backward.
Have the children paint the paper plate yellow and allow it to dry. Next, paint some black stripes and let it dry. Fold the paper plate in half and trim off the end to make a pointy stinger.
This step will allow the bee to stand on a flat surface. Keep the bottom part of the paper plate uncut to enable the bee to rock back and forth when finished.
Make the handprint wings by tracing the child’s hands on white cardstock and cutting them out. Stick these on the bee and add the googly eye. Use the marker to draw the bee’s mouth.
For this activity, you will need:
- Paper plate
- Paint
- Googly eye
- Glue
- Scissors
- Cardstock
- Marker
For more information on this activity, go to MessyLittleMonster.com.
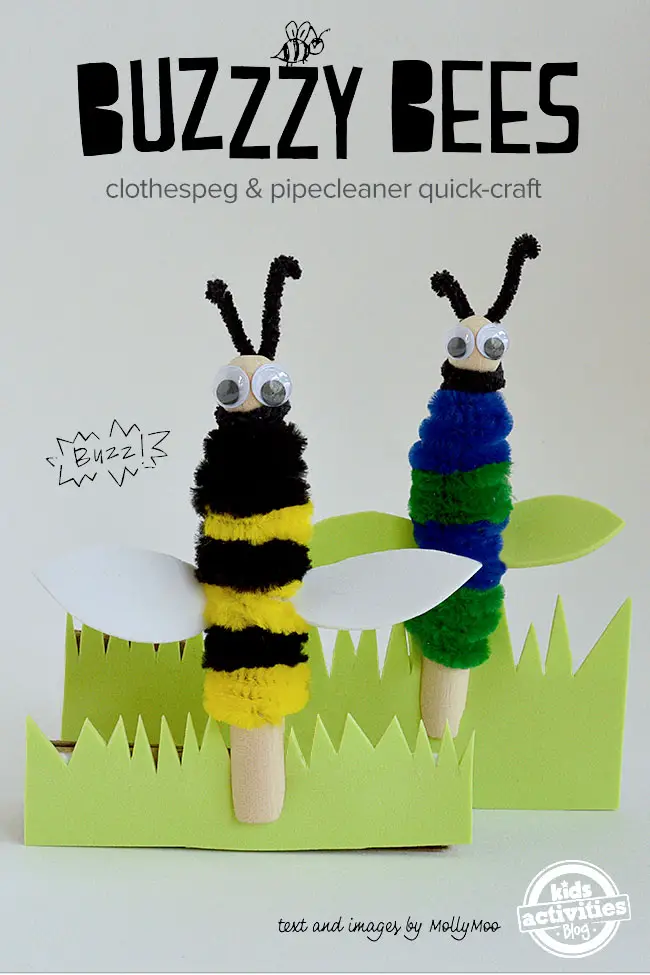
These clothespeg bees may not hold clothes on the line, but they are a great way to help children improve their hand coordination skills as they wind the pipe cleaner around the wooden pegs.
They can hold the letter or number of the day/week. They can be used to teach colors by using different colors of pipe cleaners and craft foams.
These bees in various colors can be used to teach patterns, matching activities, same and different activities, and finding the one odd out.
Start by cutting out the craft foam to make the wings. Refer to the site’s picture for this since no template is provided. Insert this in the peg. Next, wrap around one yellow pipe cleaner to secure the wings.
Alternately wrap the black and yellow pipe cleaners to cover the whole wooden peg except for the rounded top and about half an inch on the bottom. Wrap a black pipe cleaner below the head of the peg and twist it upwards to make the antennas.
Stick the googly eyes using glue. Add embellishments such as beads and fuzz wool for the hair, if possible, just as the site recommends.
For this activity, you will need:
- Wooden clothespeg
- Pipe cleaners
- Craft foam
- Googly eyes
- Craft glue
For more information on this activity, go to KidsActivitiesBlog.com.
Conclusion
The bee crafts on this list are simple and easy to make for children. These will make lessons fun and enjoyable while getting them interested in the lives of bees. Use these crafts to teach about the bees’ lives and the threats they face in our world.
This is an excellent opportunity for children to be aware of bees’ plight and to be informed of how wonderful and essential they are to our everyday life. Thank you for reading!
For more crafts and activities, check these out:


