There are many kinds of turtles in our world. Some turtles live on land, while some live in water. Children will have fun learning about these animals as they make these easy and adorable crafts to go with the lessons on Life Science.
Check out these ten crafts children will love to make and use for play.
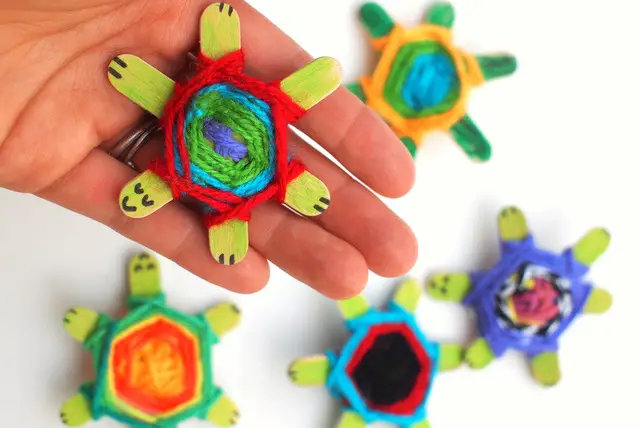
These tiny turtles are great to look at, play with, and even better to use as counters for Math activities. Use these to go with the book “Turtle Splash! Countdown at the Pond” by Cathryn Falwell, which teaches counting backwards.
Make several of these and help children learn the basics of weaving as they follow the process of securing the yarn onto the craft sticks.
Start with painting the three mini craft sticks green and let these dry. Put together the craft sticks using a hot glue gun. They should like an asterisk when glued together. Use a fine black marker to draw the eyes, mouth, and toes.
Tie the yarn to the center stick. Leave a few inches from the end hanging to tie the last yarn with this. Wrap several times over the center. Next, move to the next stick and wrap again. This step should create an X.
Refer to the pictures on the site for the step-by-step process of weaving.
Continue with the next stick. Keep wrapping the yarn on the sticks until it creates a bump that resembles the turtle’s shell. To change the yarn with a different color, tie a new yarn onto the last. Secure the end by connecting the last yarn with the first.
For this activity, you will need:
- Three mini craft sticks
- Yarn
- Paint
- Paintbrush
- Hot glue gun
- Black marker
For more information on this activity, go to PinkStripeySocks.com.

This turtle craft is perfect for young children. It is simple to make and will help children improve their fine motor skills as they put pressure on the potato masher to create a stamped pattern on the paper.
This craft is also a good way to practice children’s cutting and pasting skills.
Squeeze some paint into a bowl. Ensure the bowl is large enough to fit the whole potato masher. Dip the potato masher into the bowl, covering it fully with paint.
Tap the excess paint on the side of the bowl to prevent spills. This step will also ensure that the pattern on the potato masher becomes more prominent. Press the masher on a blue construction paper.
Repeat the process to make several turtles. Make sure to evenly space them apart so that the legs and head can be added. Let the paint dry.
Meanwhile, cut out the legs, tail, and head from the green construction paper. Glue these on the stamped print and add the googly eyes.
For this activity, you will need:
- Potato masher
- Green and blue construction paper
- Scissors
- Glue
- Green paint
- Googly eyes
- Bowl
For more information on this activity, go to HappyToddlerPlaytime.com.
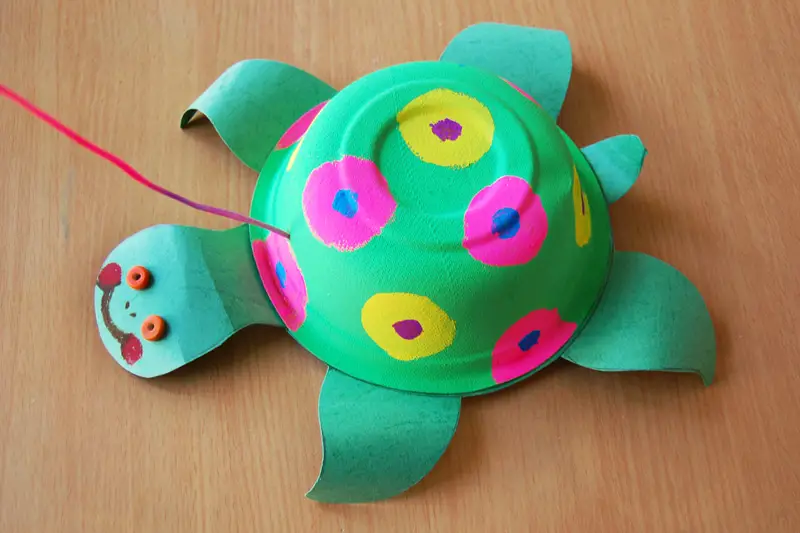
This wonderful pull-along turtle craft is a great toy to teach children directions and prepositions. Let them pull the turtle toward a given direction, such as left, right, behind, under, etc.
Use this craft to go with the book “I’ll Follow the Moon” by Stephanie Lisa Tara. Children will have fun pulling this little turtle in the right direction to meet the mama turtle.
Trace the paper bowl on green construction paper to make a circle. Draw the rest of the turtle’s body parts. Draw the head, the four legs, and the tail.
Cut this out and use the pencil to curl the end part of the legs. Draw the nose and mouth using a marker. Stick the eyes on the head. See the pictures on the site for this step.
Paint the paper bowl green and let this dry. Add details like patterns or preferred designs like colored dots on the shell. Allow the paint to dry.
Add the string by poking a hole and inserting the string. Tie the end with a bead to keep the string in place.
Finally, glue the bowl on the turtle’s body and let it dry before using it.
For this activity, you will need:
- Paper bowl
- Green construction paper
- Paint
- Paintbrush
- Crayons
- String
- Googly eyes
- Glue
- Scissors
- Pencil
- Marker
For more information on this activity, go to FirstPalette.com.
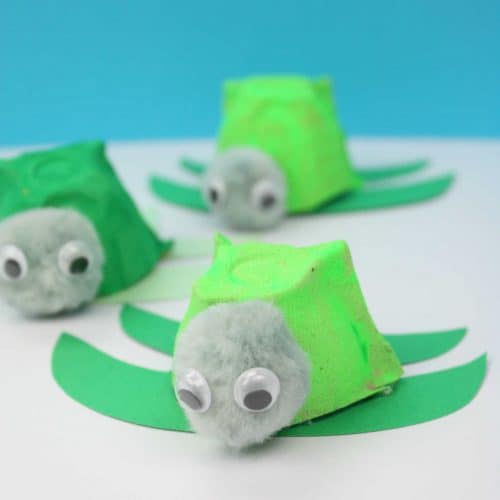
These adorable turtles are great to use in centers or as manipulatives. Make several of these for children to use as counters.
They will also go perfectly with the rhyme “Five Little Turtles” during circle time. Place a single turtle at the beginning of the rhyme. Keep adding another turtle until the rhyme ends.
Children will be able to practice their cutting and painting skills as they complete this project.
Start with cutting the individual shells from the egg carton. Have the children paint the shells with green color. The site recommends using three shades of green to create a mottled effect on the shells. Let the paint dry.
Download, print, and cut out the free turtle template from the site. Trace the template on green construction paper and cut it out. Glue the green egg carton shell on the top of the template.
Attach the head by gluing the pompom on the shell. Stick the googly eyes to complete the turtle.
For this activity, you will need:
- Printed turtle template
- Egg carton
- Pompoms
- Construction paper
- Googly eyes
- Craft glue
For more information on this activity, go to EmmaOwl.com.
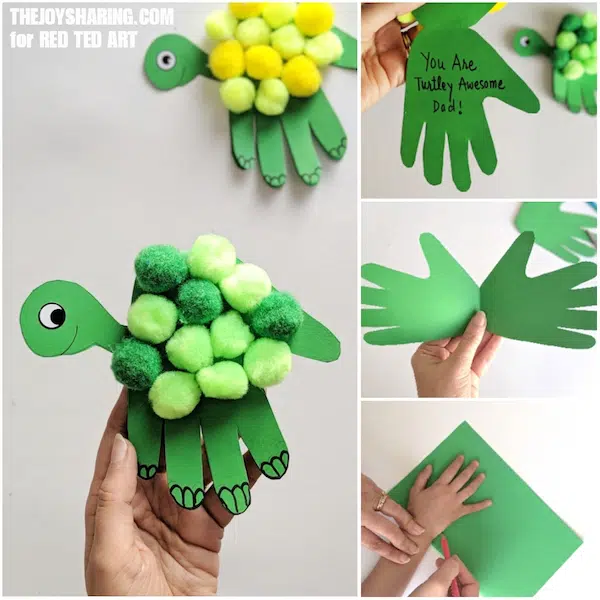
Make this adorable turtle card from the child’s handprint to make Father’s Day special. This is an easy craft to make, and children will be amazed as their handprints transform into cute green animals that will bring cheers to the card’s recipient.
Turn this into a fun educational game by making several cards and using them as mystery hands. Draw shapes or write an alphabet letter on one of the hands.
Tell children that these turtle hands hold a secret. Allow them to guess what is inside the turtle hands. Let them identify what is written or drawn as they open the card. They can draw a matching shape or letter for each of these secrets.
Make the card by folding the green paper in half. Trace the children’s hands on the paper, ensuring that the wrist is on the creased part of the paper while the fingers rest on the flaps.
Outline the turtle’s head. No template is provided for this, but it can easily be made by copying the shape from pictures on the site. Cut out the handprints and the head. Have the children write their message inside the handprint.
Attach the head to the handprint. Glue the eyes on the head. Stick the pompoms on the hand. Let this dry completely to ensure that the pompoms are adhered to and will not fall off.
For this activity, you will need:
- Green construction paper
- Pencil
- Scissors
- Pompoms
- Black marker
- Craft glue
For more information on this activity, go to RedTedArt.com.
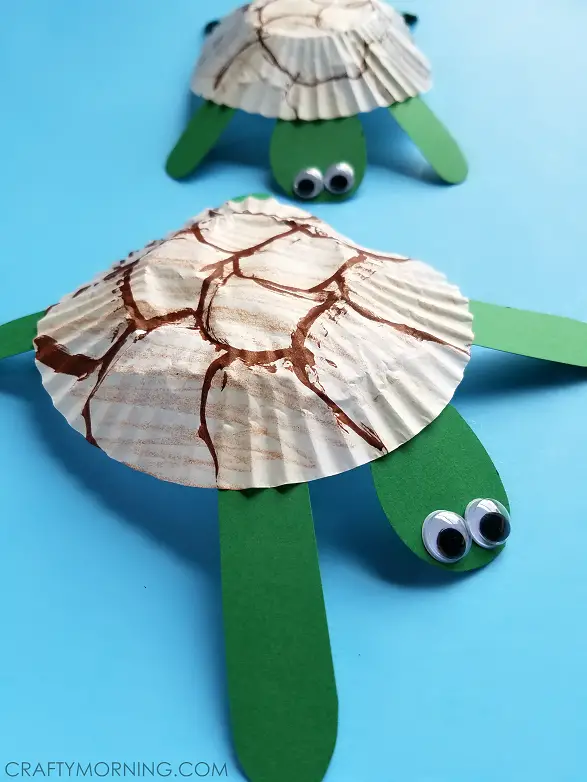
These turtles are easy to make and look like they are walking and moving. This craft is excellent for teaching children prepositions. Say to the children, “The turtle is walking. I wonder where it will go?”
Place the turtle in different locations, such as on the table, under the chair, behind the chair, etc. Once the children can answer correctly, repeat the line and move the turtle to its new location.
Cut two strips of green construction paper. These should be longer than the cupcake liner. Trim the edges of the paper strips so that they are rounded. Glue them in the middle to form an X.
Make the head by cutting a shorter strip of green paper and trimming its sides. Glue the googly eyes and attach the head to the X part. Let this dry.
Take the cupcake liner and use the brown marker to make markings on the shell. Make interconnected scallop shapes that resemble that of a real turtle shell. Use the brown crayon to add some light shading to the shell.
For this activity, you will need:
- Cupcake liner
- Green construction paper
- Scissors
- Glue
- Googly eyes
- Brown marker
- Brown crayon
For more information on this activity, go to CraftyMorning.com.
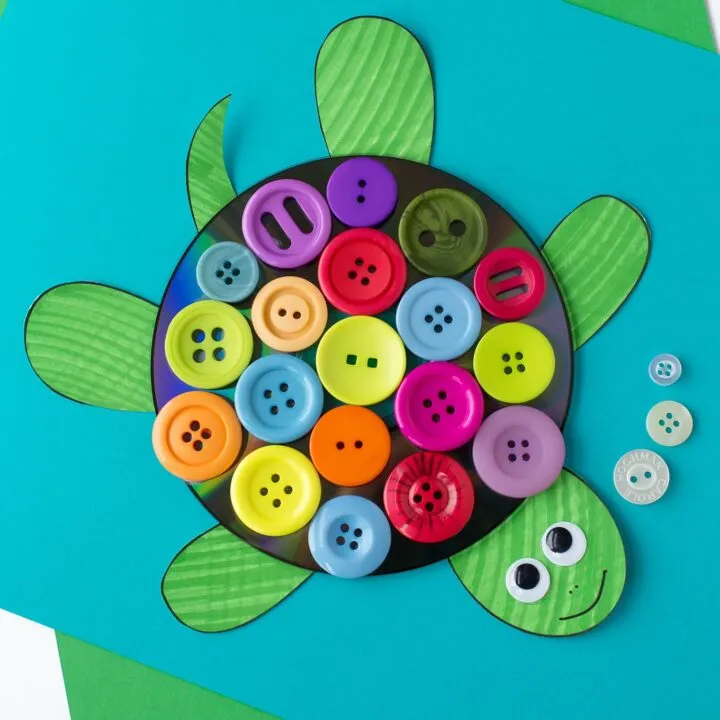
This craft is one of the ways to recycle those old CDs that are accumulating dust. This turtle craft is versatile in that it can be used to teach different concepts to young children.
Here are some ideas to make this an engaging learning task for children. Choose two identical buttons. Glue one of the buttons on the first turtle and the other button on the second turtle.
Have children find the matching button. This activity will improve their scanning and matching skills. Children can also count the number of buttons on each turtle. Vary the number of buttons for children to compare using fewer or more words. Let this dry.
Have the children glue the buttons on the CD. Give children enough buttons to cover most of the flat surface on the CD. Next, download and print the free turtle template from the site. Have the children color the turtle parts using a green marker.
Let the children cut out the pieces. Attach the eyes on the oval head. Use the black marker to add the nose and mouth. Attach the parts on the CD to complete the craft.
For this activity, you will need:
- Printed template
- Scissors
- Glue
- Buttons
- Old CD
- Green and black marker
- Googly eyes
- Sticky tape
For more information on this activity, go to FirefliesAndMudpies.com.

This unusually shaped turtle is perfect for teaching young learners about the triangle shape. Instead of the octagons to make the details on the turtle’s shell, cut out small triangles to supplement the idea. Let children count the number of triangles.
Teach children number order by writing the numbers one to ten on the octagons. Have them arrange the numbers in order as they glue them on the turtle’s shell.
Start by painting three craft sticks green. Let this dry. Next, glue the ends of the sticks together to form a triangle and let it dry. Trace the triangle on dark green paper. Attach this to the triangle craft stick. This part will be the shell.
Download and print the free turtle template. Cut out the pieces and trace them onto light green paper. Cut these out and use a green marker to add line details on each part of the turtle’s body.
Glue these on the triangle shell. Attach the googly eyes and the octagons on the triangle.
For this activity, you will need:
- Printed turtle template
- Craft sticks
- Dark and light green construction paper
- Glue
- Scissors
- Googly eyes
- Green marker
For more information on this activity, go to InTheBagKidsCraft.com.
See also: Triangle Worksheets for Preschool
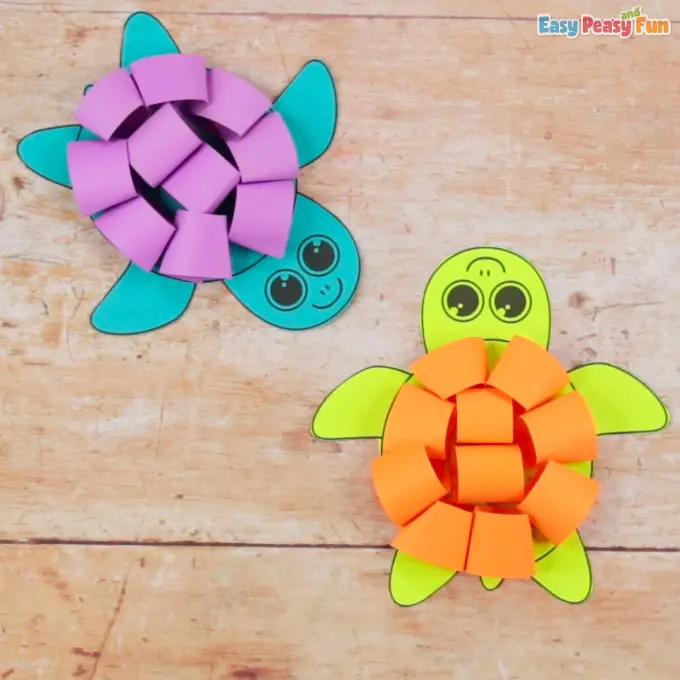
A turtle craft that can be completed in a few minutes is a perfect last-minute activity for children in need of some creative juice. This turtle craft is a basic cut-and-paste activity perfect for young children to practice their cutting skills.
Children will learn to cut straight lines with the paper strips to make the loops. Also, cutting curved lines by turning the scissors and moving the paper with the other hand will increase hand-eye coordination and precision.
Download and print the turtle craft from the site on colored paper. Have the children cut the pieces. Use different colors of paper to make a variety of turtles. Cut the strips of paper following the template.
Make a loop by gluing the ends of the paper strip. Continue making loops until there are enough to fill the turtle’s shell. Stick them on the turtle’s shell to complete the craft.
Use this craft to go with the book “Emma’s Turtle” by Eve Bunting. Discuss what makes the turtle a unique pet animal. Talk about its habitat, food, and care.
For this activity, you will need:
- Printed turtle template
- Colored papers
- Scissors
- Glue
For more information on this activity, go to EasyPeasyAndFun.com.
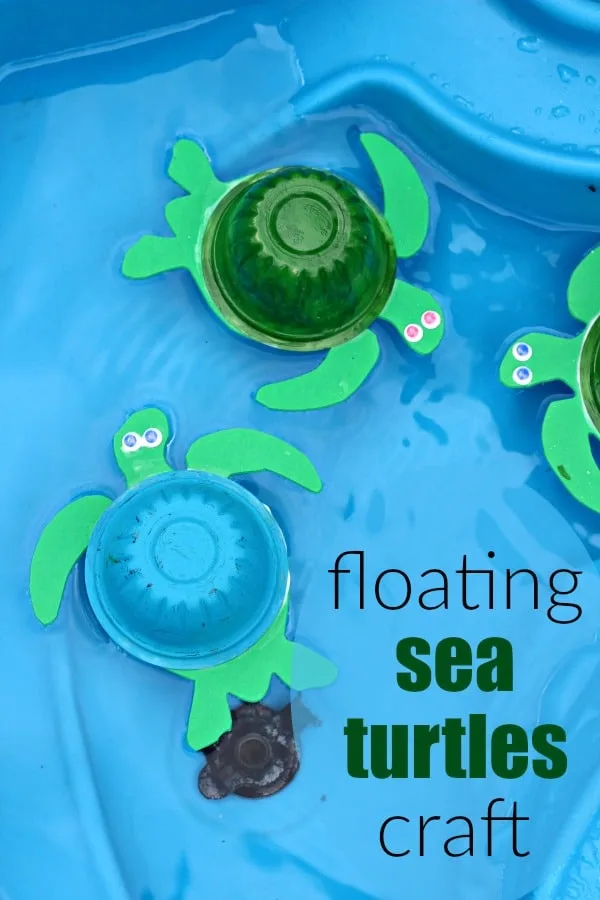
This activity is a great way to talk about sea turtles. Have a Life Science discussion about the life cycle of turtles, their habitat, food, and the dangers they face in the ocean.
Talk about the benefits sea turtles provide to our environment. Show children videos and read books to find ways how they can be protected and combat the threats to their survival.
Make the turtle by painting the plastic container green and setting it aside to dry. Download and print the free turtle template from the site. Cut it out and trace it on the craft foam. Cut and attach this to the container using the hot glue gun.
Flip the container and glue the edges on the craft foam. Ensure all the edges are sealed with glue to prevent the water from coming in during water play. If a spot is missed, seal it with a hot glue gun.
Add the googly eyes, and they’re ready for play. Use these turtles in centers and for water play.
For this activity, you will need:
- Printed turtle template
- Green craft foam
- Plastic containers
- Googly eyes
- Paint
- Paintbrush
- Hot glue gun
For more information on this activity, go to SoEasyBeingGreen-Blog.com.
Conclusion
Turtles are one of the most adored reptiles. Help children understand the importance of these creatures in our world with crafts and activities that showcase their unique features. Allow them to explore and be fascinated as they discover amazing things about this animal.
Consider using these crafts to go with an ocean or reptile theme. We hope you like our list. Thank you for reading.
Related crafts and activities for kids:


