Alligator crafts are fun to make in preschool. There are tons of activities that can be used to make these crafts useful in the classroom. These crafts are adorable and easy to make.
This list does not include scary-looking beasts. It promises a fun-filled time for children, even those with different skill levels.
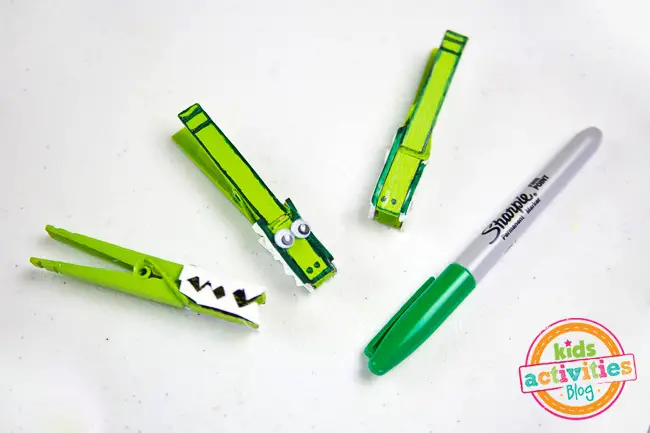
This functional alligator craft can be used as a prop for alligator rhymes and songs. It can also be a clip to hold things or as a toy for children to practice their “biting and chomping” moves.
As they play with these clothespins, they increase the strength of their pincer grasp. This grasp is the simultaneous movement of the thumb, index, and middle together. It is essential to hold the writing implements such as pencils and paintbrushes.
To make this craft, paint the clothespin green and let it dry. Cut a strip of white foam or cardstock that will fit on the side of the clothespin.
Cut zigzags to make rows of sharp teeth. Use the hot glue gun to attach these to the sides of the clothespin.
Outline the edges of the clothespin with a black marker, then use the green marker over the black. Draw two dots for the nose and stick on the googly eyes. Let this dry before using.
You will need the following for this craft:
- Wooden clothespin
- Green Paint
- Green and Black Marker
- White foam or cardstock
- Googly eyes
- Scissors
- Hot glue gun
- Glue
For more information on this activity, head over to KidsActivitiesBlog.com
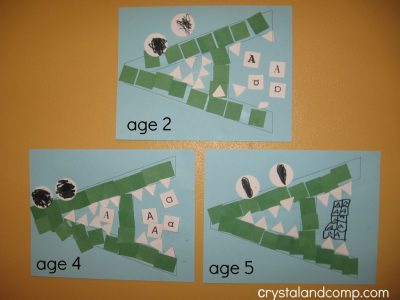
Make a craft that enables the child to learn the letter A and the color green. This craft is a great activity to help improve cutting and pasting skills. The site recommends modifying the task based on the child’s ability.
Outline the uppercase A on the light blue construction paper. Cut small squares using green paper. These will be for the body of the alligator.
Cut small triangles from the white paper. These will become the teeth of the alligator. Cut two circles for the eyes. Use the black marker to draw the pupils.
Glue the small green squares on the letter A outline. Flip the paper so that the letter A is on its side. This way, it will look like an alligator with an open mouth. Stick the teeth on the mouth. Add the eyes.
For children who are writing, have them write the uppercase and lowercase A on the mouth. For younger children, provide cutouts of the letter A to stick on the mouth.
For this craft, you will need the following:
- Construction papers in green, light blue, and white.
- Scissors
- Glue
- Black marker
For more information on this craft, head to FunFamilyCrafts.com
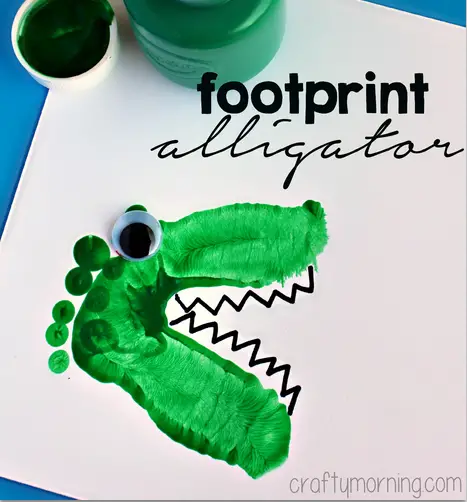
Footprint crafts are great for teaching creativity and as a growth chart. Recreate the same footprint craft yearly to show how much the child has grown. This footprint craft turns paint into a green chomper.
Start with painting the child’s foot green. If the child is ticklish, have a tray or a big plate to hold the paint. Carefully guide the child to dip the foot into the color slightly. Ensure that the whole sole is covered with paint.
Place the foot covered with paint on white cardstock. Repaint the same foot and guide the child as a second footprint is made.
Remember that the result should look like an alligator’s head with an open mouth. Therefore, ensure that the footprints create an angle by allowing the toes and the top part of the feet to overlap.
The heel parts will be the opening of the mouth. Once the footprints are dry, use the black marker to draw rows of sharp teeth and attach the googly eye.
Make this same craft next year and file them in an album for the child’s alligator growth chart.
For this craft, you will need the following:
- White cardstock
- Black marker
- Green paint
- Googly eye
For more information on this craft, check out CraftyMorning.com
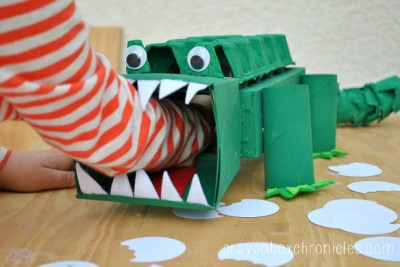
This alligator craft is designed to create a box filled with inspiring and encouraging notes to help children build confidence and a positive mindset. However, this alligator box can be used in endless ways.
One is to practice learned concepts such as identifying numbers and letters. As the child correctly identifies the number or letter, feed it to the alligator by placing it inside its mouth.
Have the children paint the tissue boxes, toilet paper rolls, and egg cartons green. Allow the paint to dry. Cut the first egg carton into single cups and stack them.
Use hot glue to stick them together. This part will form the alligator’s tail. Attach this to the narrow end of the longer tissue box.
Trace the toilet paper rolls on the green felt to make a circle. Add five triangles on top of the circle and cut. Add a lighter shade of triangles to make the claws. Attach these to the toilet paper rolls. These will become the legs and feet.
Attach the four legs on the sides of the tissue box. Attach the second egg carton on top of the tissue box, covering the top part where the tissue passes through. On one of its narrow sides, make a huge opening for the mouth.
Use the shorter tissue box for the head. Attach this to the long box. Cut triangles for the teeth from white felt and attach them to the mouth.
Use two painted egg cups from the egg carton to make the eyes stand out. Glue these on top of the head. Stick the googly eyes on them.
Cut a red strip of felt and stick it inside the mouth. Cut or punch one-inch circles using white paper. Trim the top with scallop shapes for the alligator’s bite marks. Write encouraging words on the paper.
Allow the child to take out one encouraging word each day.
For this craft, you will need:
- Two paper egg cartons
- Tissue boxes in different sizes
- Four toilet paper rolls or two paper towel rolls cut in half
- Green paint
- Paintbrush
- Scissors
- Hot glue
- White glue
- Googly eyes
- White, green, and red felt
- White paper
- Pen
For more details on this craft, go to FunFamilyCrafts.com
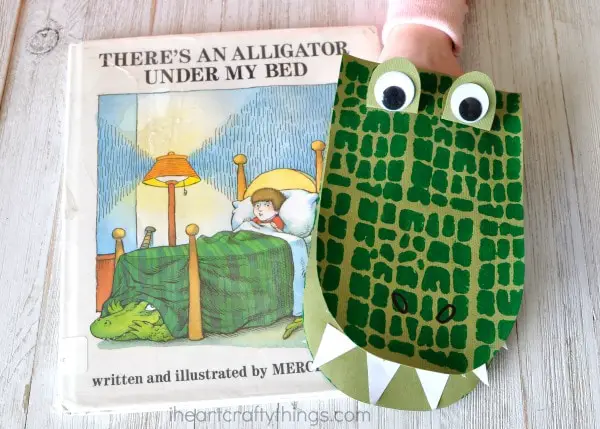
This puppet is a perfect companion for the book “There’s an Alligator Under My Bed” by Mercer Mayer. Using this puppet will make the story engaging and fun for young children.
Cut one side of the envelope. Fold it in half and seal the envelope. These openings will be for the hands. Cut two arch shapes from the green cardstock.
These should be big enough to cover the envelope. Use the stencil to make the skin markings on the green cardstock. Lay the stencil flat and use the sponge to control the amount of paint. Too much color will not show the unique pattern.
Let this dry. Attach each of these to the top and bottom part of the folded envelope. To make the eyes, use the scrap from the green cardstock. Fold in half and cut two half circles.
Glue one of the half part on the head and repeat. These will make the eyes look like it is standing. Attach the googly eyes on them.
For this activity, you will need:
- #10 white envelope
- Green cardstock
- Green paint
- Paintbrush or foam brush
- Reptile skin stencil
- Googly eyes
- White paper
- Scissors
- Glue
For more information, go to IHeartCraftyThings.com
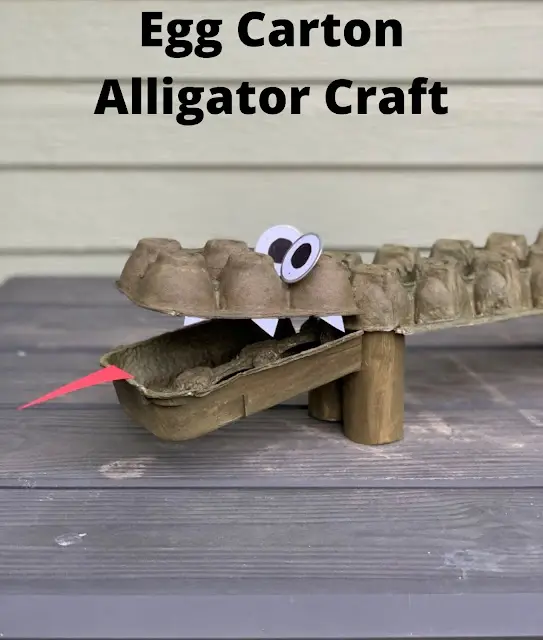
This alligator craft is a great toy. This project is a great way to recycle egg cartons that will end up in the bin.
A practical way to use this craft is to turn it into a tray when teaching patterns. Use different sizes and colors of pompoms. Put them in the alligator’s mouth. Children can follow the patterns using pre-printed pattern cards.
Have the children line the correct pompoms on the back of the alligator. Repeat using different sizes of pompoms. For older children, use patterns that combine colors and sizes.
To make the craft, cut the first egg carton in half. Cut the folded flap of the carton right through the middle.
The flap where the cups are will become the back part of the alligator, while the flap with the flat surface will become the mouth. Cut this flap in half horizontally.
Use only one to make the alligator’s lower jaw. For the upper jaw, cut the exact size of the flap with cups using the second egg carton.
Insert the toilet paper roll on the underside of the flap with cups. Secure them with glue. Attach the upper and lower jaws on the body to make the head. Paint the alligator green.
Once the paint is dry, stick the googly eyes. Cut white triangles to make the teeth and a long pointy strip to make the tongue. Attach them on the head.
For this craft, you will need:
- Two cardboard egg cartons
- Green paint
- Googly eyes
- Four toilet paper rolls
- Red and White construction paper
- Paintbrush
- Glue
- Scissors
For more details on this craft, go to GardenWithKim.blogpost.com
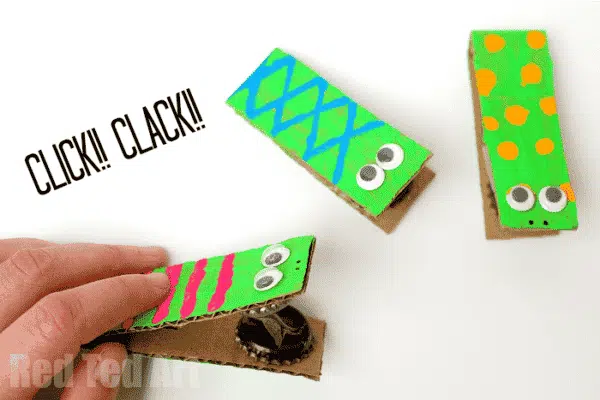
Try this bottle cap alligator castanets for a great handmade and recyclable musical instrument. This craft is simple to make and even simpler to use.
Children will enjoy using this to accompany the book “Chomp Goes the Alligator” by Matthew Van Fleet. Use the castanets to make clicking sounds as the text goes, “chomp, chomp, chomp,” and when counting the animals it ate.
To make this craft, cut the cardboard into a strip twice the size of the final castanets. Estimate the measurement using the child’s hand. They should be long enough for children to use comfortably.
Paint the castanet green. Decorate the cardboard using paint to make patterns and markings. Use stickers and other decorative materials once the paint is dry. Fold the cardboard in half.
Use craft glue to attach the metal bottle caps. Ensure that the bottle caps touch each other once the castanets are used. Attach the googly eyes. Let it dry before using.
For this craft, you will need:
- Metal bottle caps
- Cardboard
- Paint
- Paintbrush
- Small googly eyes
- Craft glue
For more information about this craft, go to RedTedArt.com
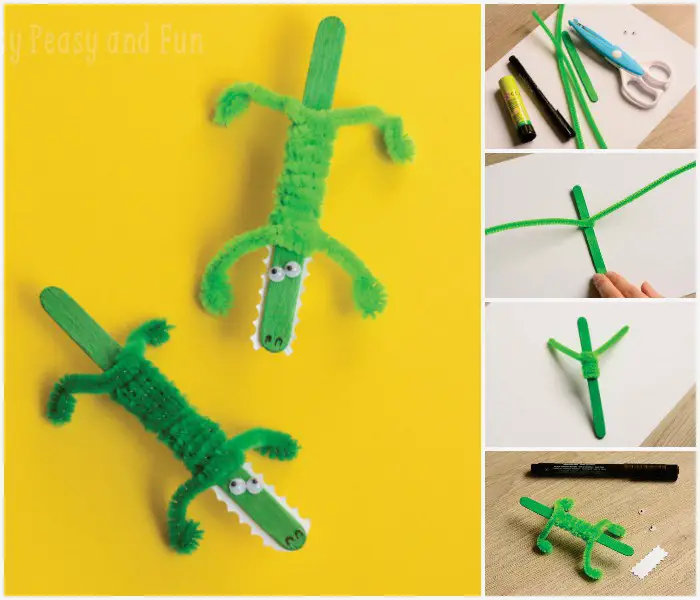
These alligators seem to be ready for action. Make more of these to use as counters for counting.
Use large and regular sized popsicle sticks to write uppercase and lowercase letters on their tails. Tell the children they need to match the mommy and baby alligators by finding the matching letters. This craft is excellent for swamp themes, color green, and reptile lessons.
Start making the craft by folding the pipe cleaner in half. Place the popsicle stick in the middle. Wrap the green pipe cleaner in the middle of the green popsicle stick. If there are no green sticks, use green paint to add color.
Leave an inch on both ends of the pipe cleaner uncoiled to the stick. This part will become the front legs. Twist the edges to enable the craft to stand on its own. Repeat the process for the hind legs.
Cut a strip of paper using decorative scissors. This tool will create sharp edges for the alligator’s teeth. Attach the underside of the stick where the head should be. Add the googly eyes. Use the black marker to make the nose.
Make as many of these as you want and let kids count and play with their new creation.
For this craft you will need:
- Green popsicle sticks
- Decorative scissors (preferably sawtooth design)
- Green pipe cleaners
- Googly eyes
- Black marker
- Glue
For more information on this craft, check out EasyPeasyAndFun.com
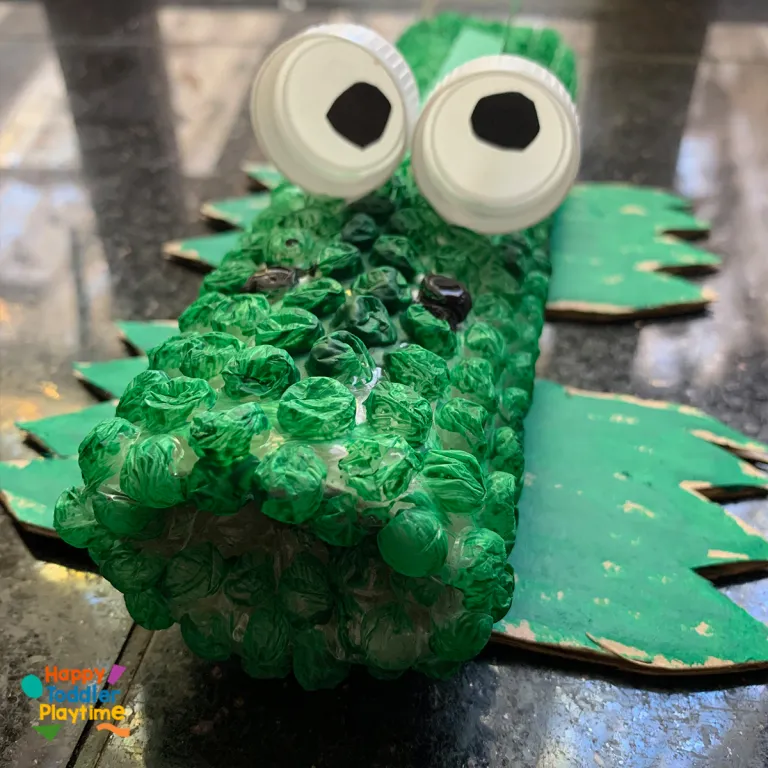
Almost all materials to make this alligator are bound for the trash. Teach children that recycling these is good for our environment. Through creativity, waste can become a toy they will enjoy playing with for hours.
Start with cutting bubble wrap that will fit around a paper towel roll. Wrap it around, secure it with double-sided tape, and tuck the edges inside the roll on one side.
Leave the other end as is but secure it with tape. This part will become the tail. Next, use paint to make it green. Let the paint dry completely.
Cut some cardboard to make the feet and paint them green. Refer to the picture on the site for this. Cut the spikes using green construction paper and two black circles for the eyes.
Stick the black circles in the bottle caps and attach them to the body. Stick the feet and the spikes on. Finally, add two dots using black paint for the nose.
This craft could pass for what the lady used in the book “The Lady with an Alligator Purse” by Nadine Bernard Westcott. Just use a long narrow box instead of a paper towel roll.
To turn it into a bag, cut a slit on the alligator’s back to make an opening and add a long yarn or ribbon to make the strap. Use this as a prop when telling the story.
For this craft, you will need the following:
- Paper towel roll
- Bubble wrap
- White bottle caps
- Green, white, and black acrylic paints
- Paintbrush or foam brush
- Double-sided tape
- Green and black construction paper
- Craft glue
For more information on this craft, head over to HappyToddlerAndPlaytime.com
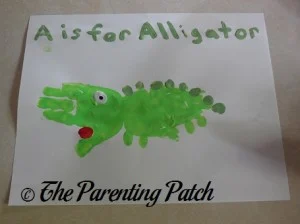
This craft is easy to make and can be perfect for younger children who might not be able to sit down for a long time. This activity is excellent for teaching the letter A, the color green, and for some science concepts about alligators.
Begin with placing enough dark green paint on a paper plate. Have the children dip their hands to cover their palms with color. Another way is to spread the green paint on the children’s palms using a cotton ball or paintbrush.
Next, guide the children as they make the first handprint. Ensure that all fingers are together and the thumb is stretched. This part will look like an open mouth.
Make the second handprint by overlapping it on the first one with all fingers close to each other and pointing at the opposite side. This part will become the body.
Have the children make light green dots using their fingers dipped in paint to make the spikes on the back of the alligator. Add a red dot on the mouth for the tongue.
Use white paint to make a dot for the eye. Add a smaller black dot using a paintbrush. Let the paint dry completely.
For this craft you will need:
- Paints (dark and light green, red, black, and white)
- White cardstock
- Paper plate
- Cotton ball
- Paintbrush
For more details on this craft, go to ParentingPatch.com
Conclusion
These alligator crafts help children improve their fine motor skills, and many ideas related to this can be used in the classroom. These green reptiles deserve some attention from younger children.
Discuss some real-life concepts about these animals. They may be vicious-looking, but they are essential in our ecosystem. Let the children know that these animals have special characteristics that make them unique from the others.
We hope you like our list. Thank you for reading!
Other crafts and activities you might find helpful:


