Art isn’t just confined to a fine painting or anatomically correct sculptures. Art is a creative expression of human imagination. Hence, we should nurture and support our little ones’ creative approach.
These are nice examples of art in which you could collaborate with your young ones. Not everyone would think of scarecrow art projects when thinking of art but let’s challenge their creativity!
Kids prefer an art project they can play with and use rather than a project they can only display. How about a mask that they could use to scare someone?
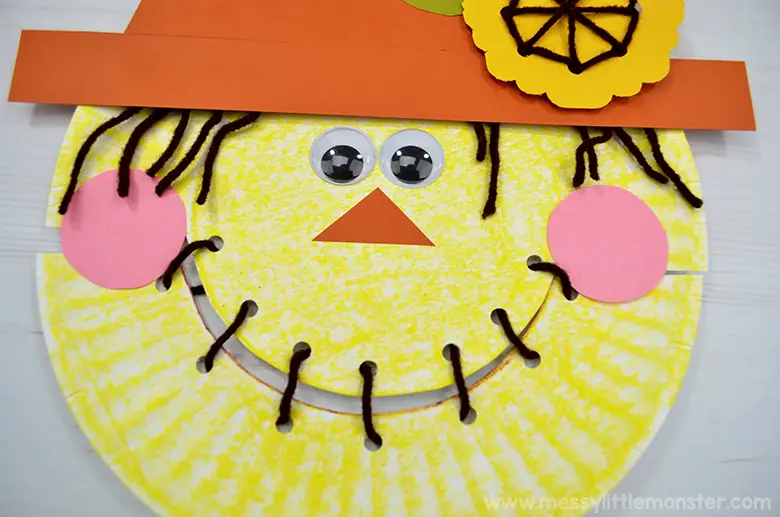
This paper plate scarecrow craft sounds simple, and it definitely is! Another thing is it only requires the simplest of materials. As the name suggests, the primary material needed is a paper plate.
This craft is a perfect project to challenge and enhance a kid’s fine motor skills. It is an excellent activity for a group of children than in a one-on-one setting. It is suitable during the fall or the Halloween season.
Here are the materials to create a Paper Plate Scarecrow Craft, most of which are readily available at home:
● Craft paper – pink, orange/brown, green, and yellow
● Crayons – yellow and brown
● Paper plates
● Scissors
● Hole punch
● School glue
● Glue stick
● Large googly eyes
● Dark brown yarn
Creating a Paper Plate Scarecrow Craft is easy. Gather your supplies, then make a scarecrow face on your paper plate. Consider decorating the scarecrow’s hat with a sunflower. Cut a sunflower and glue it on the scarecrow’s hat. Next, thread the scarecrow’s smile to give it a Halloween feel. Finally, let the kids’ creativity flow and let them do the finishing touches on the scarecrow’s face.
For more information about this and other fun activities, please visit MessyLittleMonster.com.
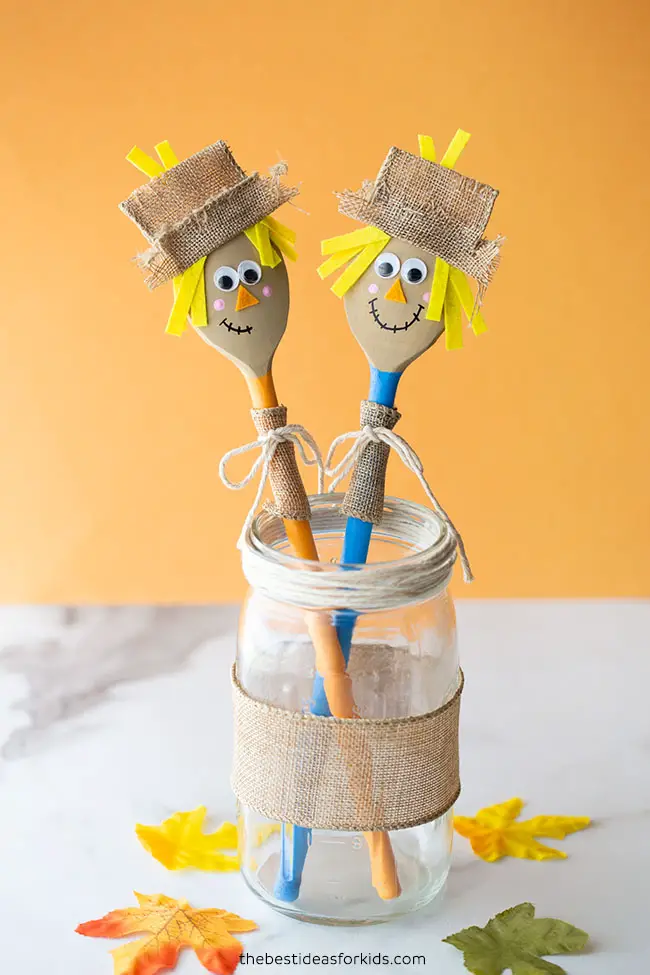
Nowadays, when talking about kitchen utensils especially spoon, we think of metal ones. It is only during outdoor activities or picnics that we might use plastic ones. Traditional cooking still favors wooden spoons, but their widespread use is in decline.
Today, we found another use for them! It is time to challenge your little ones’ creativity! Let your kids have a go and create their wooden spoon scarecrows!
This craft may be considered a Halloween project suitable for fall and is usually done in a classroom or home setting.
Here are the materials needed to create Wooden Spoon Scarecrows;
● Wooden Spoons
● Small googly eyes
● Fine point sharpie
● Acrylic Paint – we used light brown, pink, blue, and orange
● Felt – we used yellow felt for the hair and orange for the nose.
● Twine
● Burlap Ribbon
● Hot glue – using hot glue will help the hat and other elements stay on better. Adult supervision is required.
Here’s how you can make your own wooden spoon scarecrow. You may start by painting the spoon with non-acrylic paint. We did the top light brown and blue and orange on the bottom. Then create a scarecrow hat with the burlap ribbon and glue it on the top of the spoon.
Afterward, glue the two googly eyes and the triangle nose from the orange felt. Paint the scarecrow mouth with your sharpie and let the kid do the finishing touches. You may add the yellow cut-out strip as the hair of the scarecrow.
For more information about this and some other fun activities, please visit TheBestIdeasForKids.com
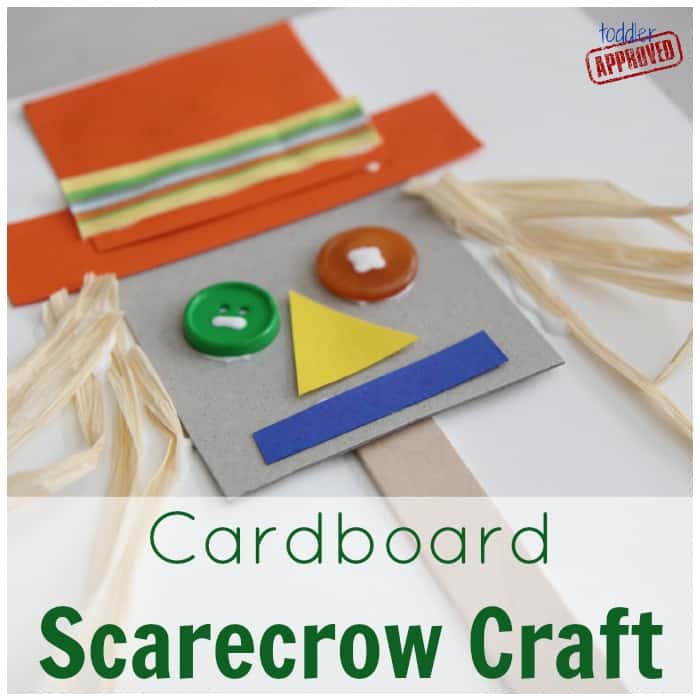
Get ready to create this perfect Halloween craft. Inspired by the book Barn Dance! by Bill Martin Jr., this project completely complements the playful fright of the book.
The steps in creating this craft are pretty simple, and you can find the materials easily. It is usually done collectively in a classroom or at home with all your little ones. This activity would create a cute fright out of your kid’s Halloween!
Here’s what you’ll need:
● Cardboard (a cereal box piece is great!)
● Scissors
● Cardstock
● Ribbon
● Elmers glue
● Buttons
● Raffia (or yarn) for hair
● Popsicle stick
Here’s how to make your own scarecrow craft. First, cut out triangles, squares, and rectangles from colored cardstock and a large square from cardboard. Then, we glued a big square piece of cardboard onto a popsicle stick and a bit of cardstock.
Scarecrows are stuck to poles in the ground (or big stakes), so we used the popsicle stick as our stake. Next, we glued on colored rectangles for his straw hat and a piece of ribbon to jazz up the hat a bit. Then, we added button eyes, a triangle nose, a rectangle mouth, and some raffia for his straw hair. Finally, grab some letter stickers and just had fun building our names on our scarecrow stakes.
For more information on this and other playful yet frightening projects, you may check out ToddlerApproved.com.
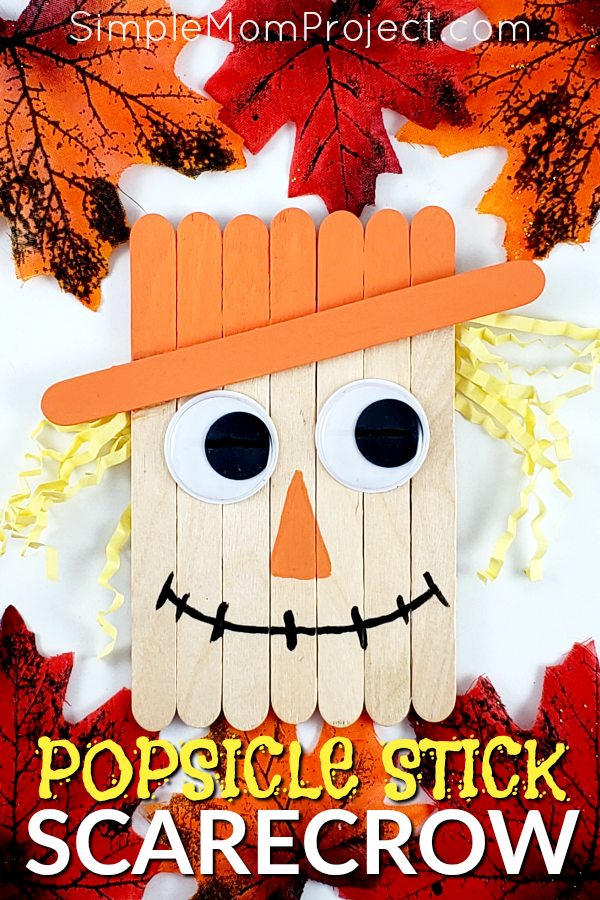
How about a project that turns waste materials into practical and aesthetic products? This recycling project will come in handy. Children and parents can create this simple craft with a popsicle stick- an often thrown leftover from children’s all-time favorite popsicle!
The better part is this craft could also be used as a present to family members (especially moms), and they could use it as a magnet craft for refrigerators!
Kids would also love making these into popsicle stick puppets! A perfect project during Halloween but can also be enjoyable work year-long. You may also teach children this project in a classroom or at home!
Supplies to Make This Scarecrow Craft:
● Small Popsicle Sticks
● Mini Popsicle Sticks
● Paint
● Wood Glue
● Googly Eyes
This popsicle stick scarecrow is fun and easy to make. First, Line up eight small popsicle sticks in an even, vertical row. Next, glue one small popsicle stick diagonally about one inch down from the top of your scarecrow.
After the glue settles, paint the diagonal stick and the space above it orange. Then, glue some googly eyes to his face. Cut out a long triangle for his nose and glue it on. We traced ours with a pencil and then painted it black for his mouth. If you have a steady hand, you can skip penciling first, while for his hair, we used paper yellow grass. For more projects to connect with your little ones, please check out SimpleMomProject.com.
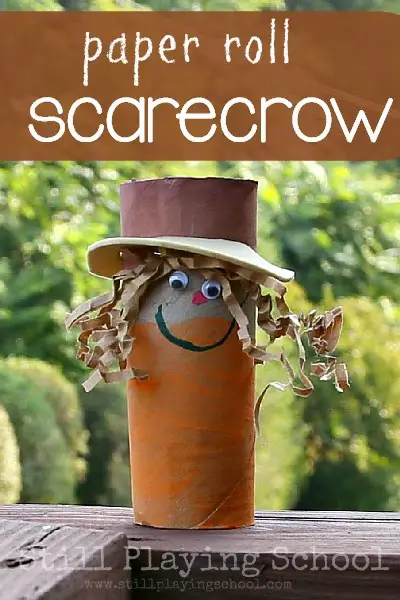
From another recycling-inspired project to another, we move on with Toilet Paper Roll Scarecrow. A great project considering it uses a material (toilet paper roll) that usually consumes a lot of space in your trash bin!
A great collaboration project between parents/instructors and their little ones could teach the lessons and benefits of recycling during the project. It is a great project to work on during Halloween but can also be an enjoyable craft year-long. Suitable in a classroom or home setting.
Here is what you’ll need for the Toilet Paper Roll Scarecrow craft:
● Toilet Paper Roll
● Water Color
● Crinkle Paper
● Pair of scissors
● Craft Foam
● Googly Eyes
● Construction paper
● Glue
Creating a Toilet Paper Roll Scarecrow is easy. First, paint the top 1/4 of the toilet paper roll brown and the bottom 1/2 orange. We left the face of the scarecrow unpainted. The fun part about this is that the children can choose any colors they’d like so that a whole class set would be adorable together!
The example stapled crinkle paper right below the brown section, then cut a matching brown foam ring to slide down on the roll to complete the hat. Next, glue on the eyes and a construction paper nose, then draw on his mouth.
For more information about this Toilet Paper Roll Scarecrow Project and other exciting toilet paper projects to collaborate with your little ones, check out StillPlayingSchool.com.
Another project which can easily be collaborated on with your little ones is Paper Scarecrow Craft. The materials for this craft can easily be obtained and are basically cheap! (estimated at under $10!) Great decoration that your little ones can make with minimal to zero supervision! Kids would be amused to see their crafts displayed as Halloween decor! A Halloween-inspired craft that is easily collaborated in a classroom or home setting.
Here are the easily-accessible materials for this project:
● Paper
● Glue
● Couple of googly eyes
Here is how to make your own creation. First, make a paper pinwheel which you can learn here. Then create a scarecrow cutout with this pattern. Next, have the kids trace the hat template onto a fall paper color and cut it out. Cut raffia to the length of scarecrow hair desired. You will only need two little stacks for either side of the hat.
Afterward, glue down the raffia by making a pile of glue on both sides of the pinwheel. You can lay down your hat as a guide to where the hair should go. It will be a mess, and glue will be dripping down the cracks. Just know that the white glue will dry, and the raffia will stick. You don’t want to mess with it much. Then, add glue across the top where the hat should sit. Lay the hat in place. Again, it will stick when the glue begins to dry.
Next, using white glue, glue a ribbon on the hat. Then, glue googly eyes in place. Cut out a triangle paper nose, and glue it to the center. Then, glue on a mouth. Finally, let it all dry completely before moving it around much.
Your little ones would definitely enjoy this craft and so many other kids’ crafts at AllFreeKidsCrafts.com.
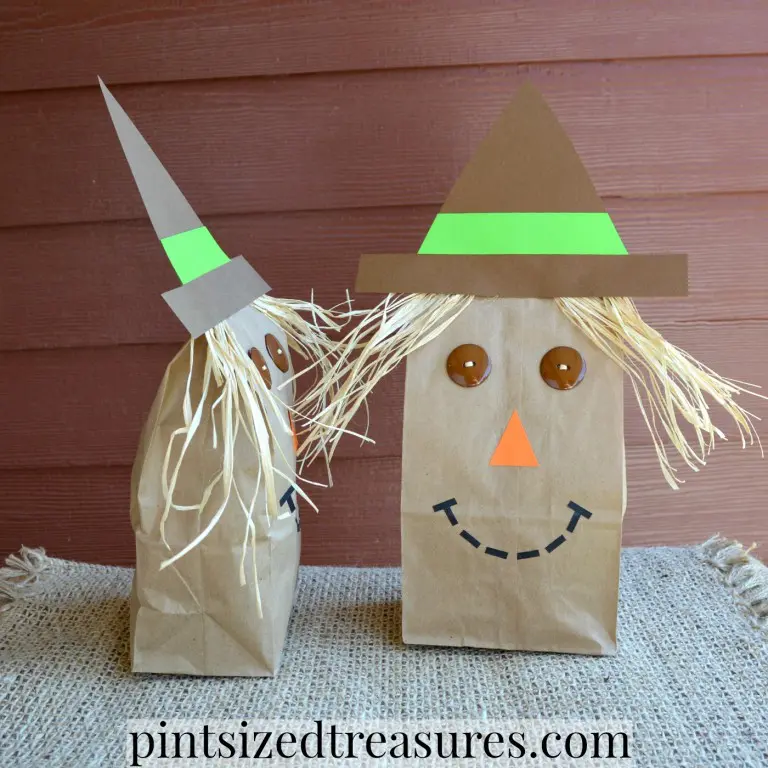
Many environmentalists advocate using paper bags instead of plastics, as paper bags are biodegradable and easily dissolve when disposed of as compared with plastics. The good news is, you may use these used paper bags as the main material on an exciting paper bag craft in which you can collaborate with your little ones!
Kids would surely feel excited adding their own handiwork to your Halloween decorations at home. This is a Halloween-inspired project which can be collaborated on with kids in a classroom or home setting.
Here is what you’ll need for this Paper Bag Scarecrow Craft;
● Card stock (black, green, orange, brown)
● Buttons
● Scissors
● Glue stick
● Brown paper bag
● Raffia
● Scrap paper
Get started on your paper bag scarecrow. First, thread a piece of raffia through a button twice. Tie it, cut off the excess, and repeat with the other button. Next, cut out the shape of a hat from the brown card stock, ensuring the base is a little wider than the brown bag. Then, cut out a tiny orange triangle and several small black lines about 1/2 inch long. Cut out a strip of green card stock, about 1 inch wide, and glue it onto the hat. Finally, trim off any excess.
For more information on this cute project or another exciting work to collaborate with kids, please visit PintsizedTreasures.com.
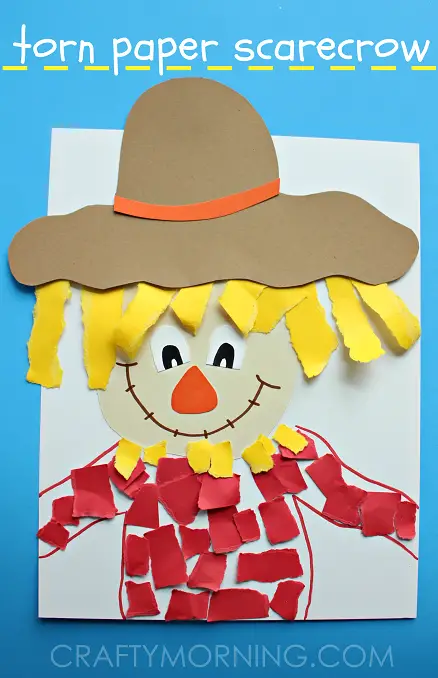
Many parents are quite annoyed with torn papers scattered in kids’ rooms and work desks. But do you know that these paper shards can be used as crafting materials for a cute Halloween project as decoration?
Reminding kids of the value and lessons of recycling is an additional perk In collaborating on this project with them! You will also notice a hint of pride from your little ones once you’ve displayed their work among the Halloween decorations at your home! This is a suitable collaboration project with your young ones during Halloween. It could also be worked on in a classroom or home setting.
Here’s what you’ll need for this simple yet exciting craft;
● Brown, orange, red, yellow, tan, and white card stock paper
● Glue
● Brown/black/red marker
● Scissors
Here’s how to get started. First, cut out a tan circle for the face, hat, nose, and eyes. Grab a red marker and hand-draw the scarecrow’s body. Then have the kids tear up pieces of red and yellow paper. Tell them to make longer yellow ones to make it look like straw for the hair. Finally, Glue all the pieces down.
For more information about this craft and any other cute handiwork, you may visit CraftyMorning.com.
This is a kid-friendly project which requires little adult supervision as the materials are kid-friendly! This Paper Bowl Scarecrow Craft is an adorable project where you can collaborate with your young ones during Halloween.
The primary material, a paper bowl, is also easily-accessible; on some occasions, a used paper bowl would also suffice. A great Halloween-inspired project but can also be enjoyable work all year long!
Also, this is a suitable collaboration project at home or in a classroom setting. Please be reminded this post contains affiliate links to the products mentioned, but this won’t cost much!
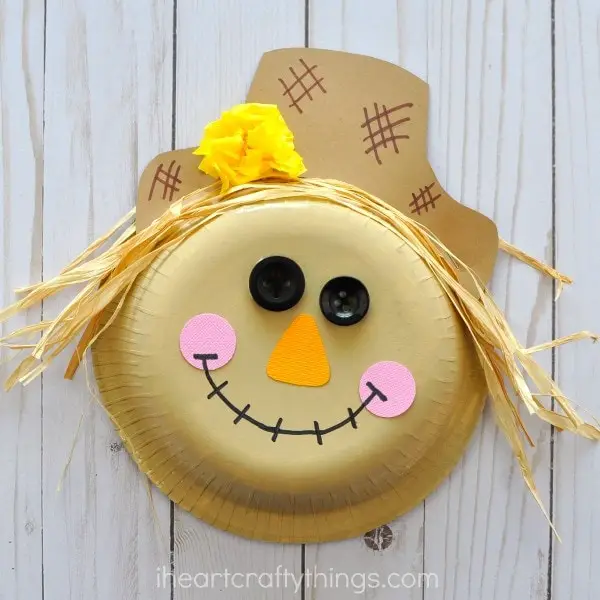
Here’s what you’ll need for a cute Halloween-inspired Paper Bowl Scarecrow Craft:
● Scarecrow Craft Pattern
● Paper bowls (We used 20 oz size from Target.)
● Tan paint
● Paintbrush
● Black buttons
● Raffia (You can also use yellow construction paper strips)
● Yellow tissue paper
● Orange, pink, and brown cardstock or construction paper
● Black and brown marker
● Scissors
● Stapler
● Tacky Glue
Grab your materials and follow these instructions to make your paper bowl scarecrow. First, paint the bottom of your paper bowl with your tan paint. Set it aside to dry completely.
Next, print out the scarecrow craft pattern and use it to cut out a brown scarecrow hat and an orange scarecrow nose and print scarecrow cheeks. Then, cut off several sections of raffia about 12-inches long. Then, staple the brown scarecrow hat to the top lip of the paper plate.
Glue black button eyes onto your scarecrow craft. Then glue on your scarecrow nose and cheeks. Layer three yellow tissue paper squares and scrunch them together to make a yellow flower. Glue it onto your scarecrow hat. Finally, use your black marker to draw a mouth with stitches on your scarecrow and add some markings to the scarecrow hat with your brown marker.
For more information on this cute project and get the printable template, please check out IHeartCraftyThings.com.
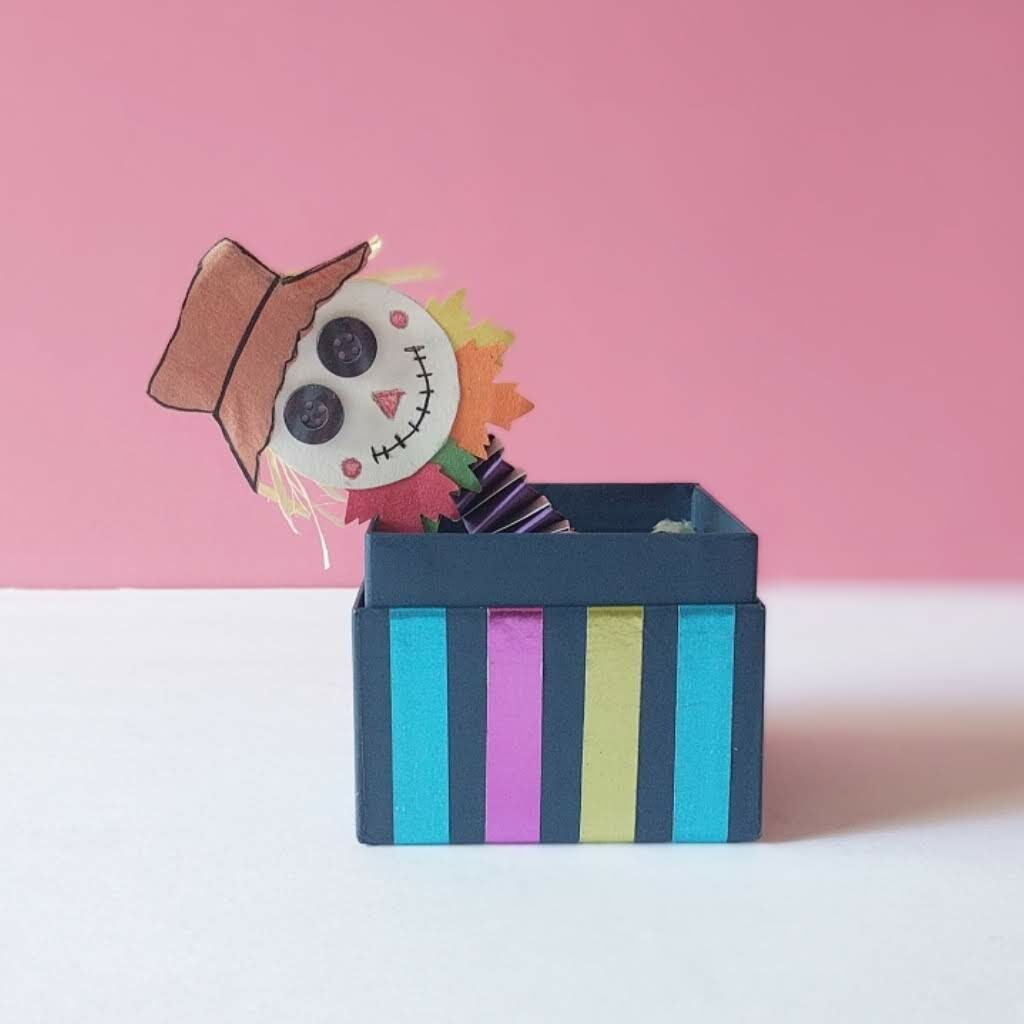
Kids are huge fans of peek-a-boo games; hence, the spring-a-surprise box toy became an all-time favorite! Your little ones would have extra motivation in creating this project, considering they could play with it!
Sprinkle it with a Halloween-theme idea, and surely kids will get excited about working on this project with you! A Halloween-inspired project but is also fun work any season of the year. It could also be a great collaboration project in a classroom and home setting.
Here’s what you’ll need for this Scarecrow Fall and Halloween Craft:
● Cardstock Paper
● Box
● Sharpie Marker
● Maple Leaf Punch
● Buttons
● Raffia Ribbon
● Washi Tape
● Glue
● Scissor
Creating a Paper Bowl Scarecrow Craft is easy. First, cut out a circle from white cardstock paper. Then, cut out a scarecrow hat from brown paper and glue it to the face. Next, punch a few maple leaves from fall color papers using maple leaf punch and glue a few leaves on the scarecrow. Add a few 1-inch strands of raffia ribbon on both sides of the hat, making the scarecrow hair. And the scarecrow is ready.
For the paper string, cut two paper strips and glue them perpendicularly. Start folding the alternate strip. Make three of them and glue them together to fit in the box. We used an old jewelry box and decorated it with washi tape. You can also use a paper mache box. Then, glue the paper spring in the box.
Tip: Use masking tape to test before permanently gluing the spring in the box. Next, Glue the scarecrow’s face to the spring. Tip: Use masking tape to try first before you permanently glue the face.
For more information on this fun and exciting project or any other collaboration project with your young ones, please visit TheJoySharing.com.
Conclusion
Kids are naturally creative as they are born explorers. What better way to nurture and take advantage of this than collaborating on a project with them on Halloween-inspired crafts?
Most of this project uses materials that parents will otherwise dispose of, so working on these kinds of Halloween-inspired art could also be used as an opportunity to teach them the lessons and benefits of recycling!
For more Halloween crafts, check these out:


