Countless stories of fantasy, castles, valiant princes and distressed princesses are brought to life by Disney animation and, for some, a real-life adaptation.
Throughout the years, children have grown to love and prefer beloved Disney characters.
Here is a list of ten crafts inspired by some of the most common favorite characters among children.
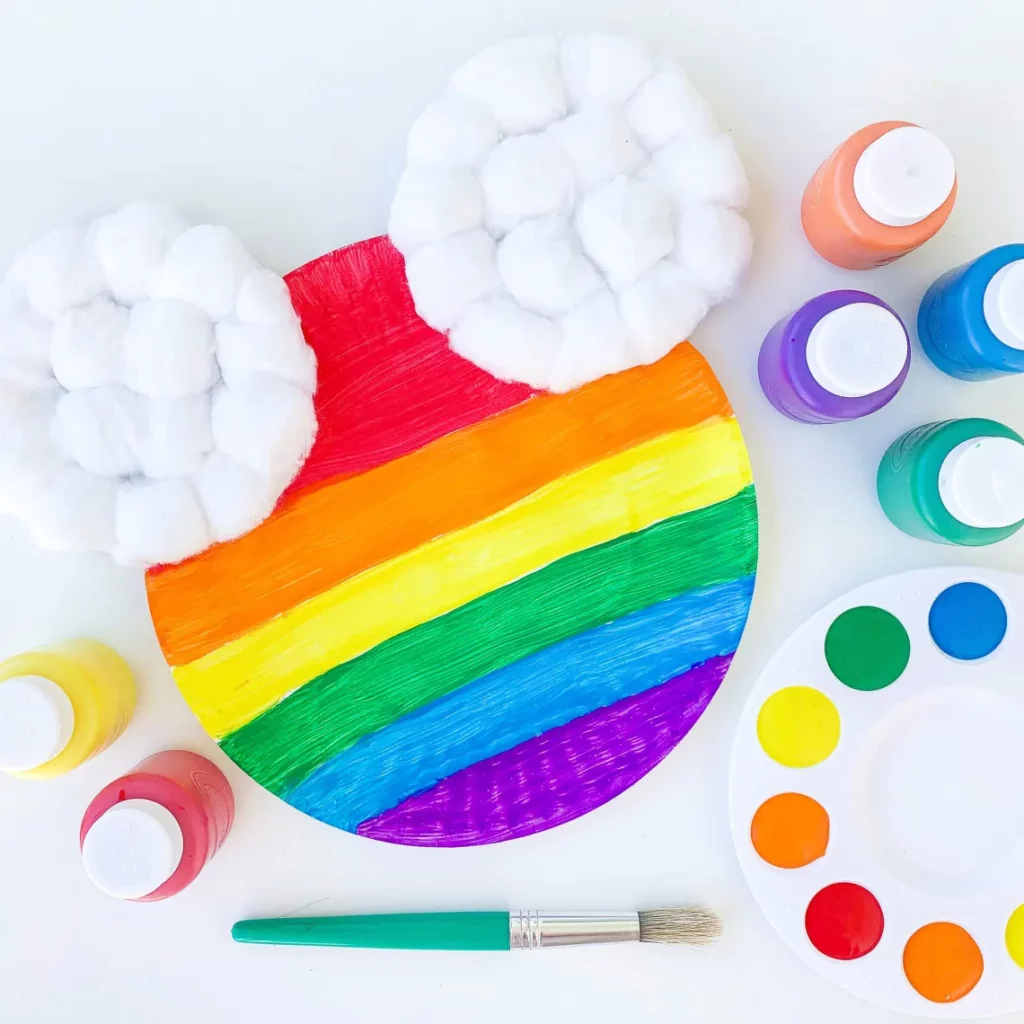
Ditch the classic black and white Mickey for this colorful and fun rainbow-inspired craft. Children will be able to practice their ROY-G-BIV (red, orange, yellow, green, blue, indigo, and violet) order of colors in this Mickey Mouse craft.
Start with painting the paper plate with rainbow colors. The site suggests drawing lines as a guide for children to follow. These will create boundaries so that children will be mindful when painting. Allow the paint to dry.
Cut out the center part of the two paper plates to make the base for the mouse’s ears. Use the glue to adhere the cotton balls on the base. Allow this to dry before sticking these on the rainbow-colored paper plate.
Position both ears on the paper plate. Part of the ear should overhang from the rainbow plate to mimic the Mickey Mouse outline.
Use this craft to learn about rainbows and clouds, to go with a Mickey Mouse show or storybook, or to use as a prop for storytelling.
For this activity, you will need:
- Paper plates
- Cotton balls
- Craft glue
- Paint
- Scissors
For more information on this activity, go to GraceGigglesAndNaptime.com.
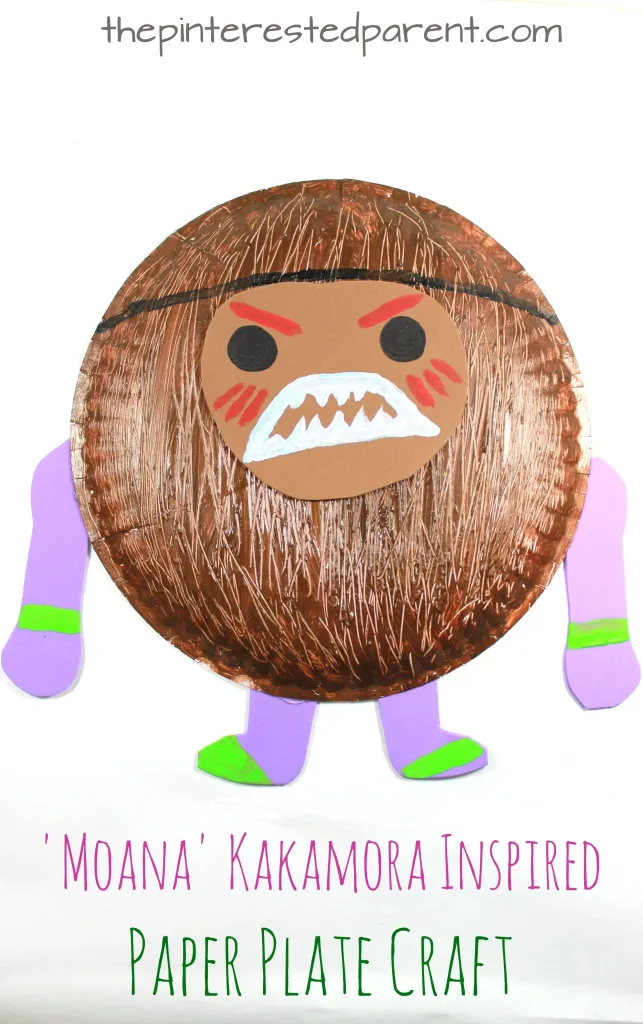
The vicious-looking coconut pirates are the star of this activity. Create a coconut look using a special tool- a fork. That’s right! Using a fork will mimic the fibers on the coconut shell.
Children will learn a technique in art as they create textures using simple tools. They will also improve their cutting skills as they cut out the rest of the pirate’s parts and copying skills as they copy the facial details from the animated character.
Flip the paper plate, so the concave part rests on a flat surface. Squeeze an equal amount of two different shades of brown on it. Use a paintbrush to cover the paper plate with color.
While the paint is wet, use the fork to create markings by scraping the paper plate to reveal some white streaks. Do this for the whole plate and let the paint dry.
Next, cut out the legs and arms from the purple craft foam and attach them to the brown coconut. Add some stripes on the body parts. See the pictures on the site for this step.
Create the face by cutting an oval shape from the brown cardstock. Use paint to add the warrior face to it. Attach this to the coconut. Finally, add the black stripe on the coconut using a black marker.
For this activity, you will need:
- Paper plate
- Paints
- Paintbrush
- Fork
- Craft foam
- Brown cardstock
- Black marker
For more information on this activity, go to ThePinterestedParent.com.
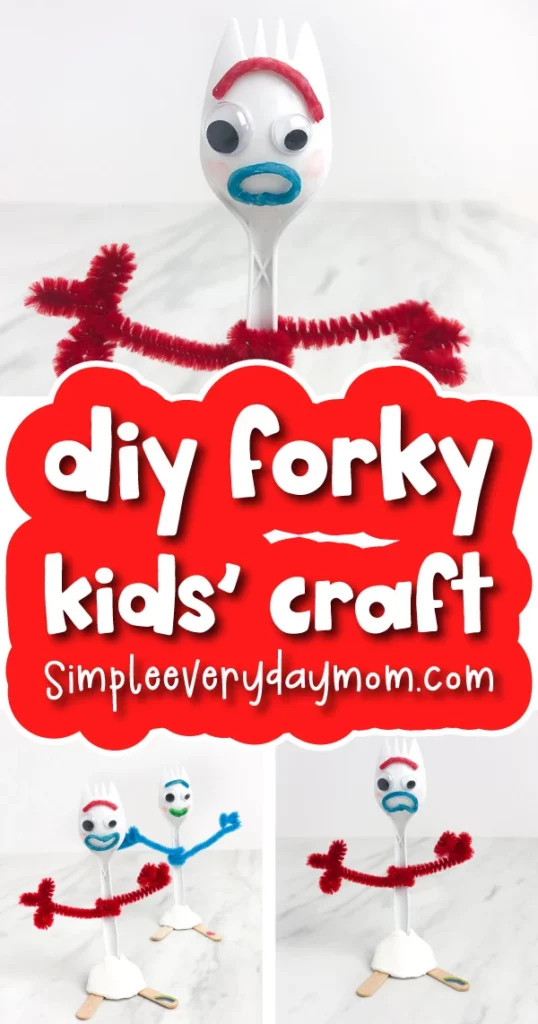
Who could ever forget Forky, who made his debut in the movie “Toy Story 4”? Bonnie, the new owner of the toys, created Forky from scratch. It’s a simple toy that was the product of a little child’s imagination but has provided loads of fun and lessons to learn from.
Children will have fun making their version of Forky with this activity. They will improve their fine motor skills as they bend the pipe cleaners and Wikki Stix, mold clay, and assemble the craft.
Cut the craft stick in half to make Forky’s feet. Stick them underneath a ball of white clay. Make the mouth and his eyebrow using Wikki Stix. Bend them to the desired shape and press on the spork. See the pictures on the site as a reference for this step.
Attach the eyes on the spork. The site suggests using self-adhesive googly eyes, but double-sided tape can be an option. Use two different sizes of eyes for a more authentic-looking Forky.
Stick Forky into the clay ball and wrap a red pipe cleaner around the spork’s handle to make his hands. Add red blushed cheeks using a marker. Lastly, add the child’s name under one of the feet.
For this activity, you will need:
- Spork
- Googly eyes
- Pipe cleaners
- White clay
- Rainbow stickers
- Craft stick
- Wikki stix
- Markers
- Scissors
For more information on this activity, go to SimpleEverydayMom.com.
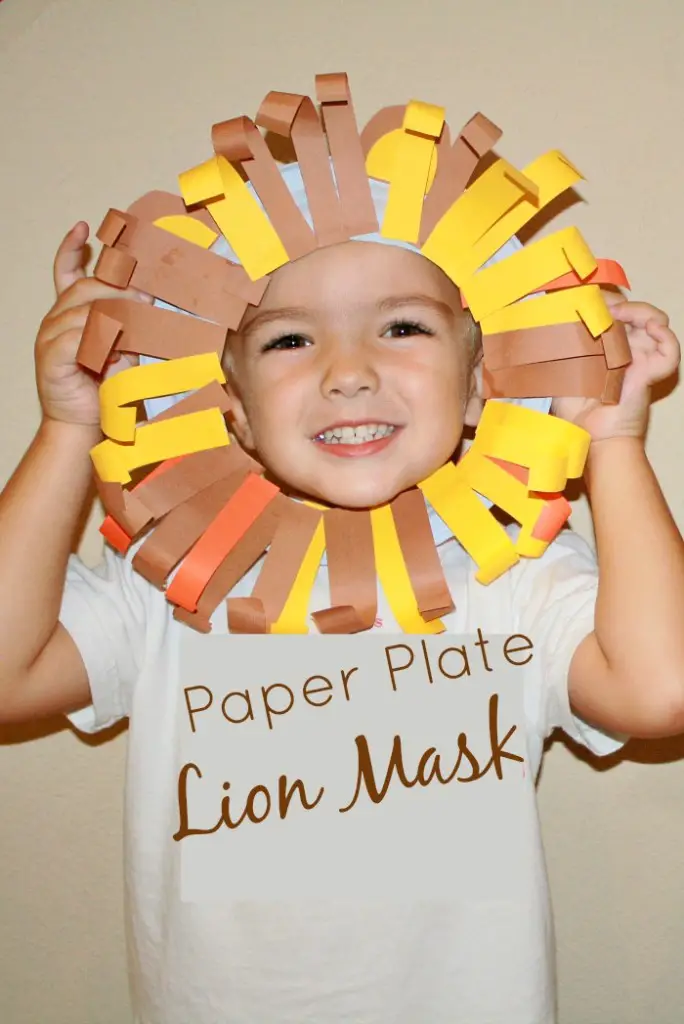
Hear the kids give a mighty roar with this lion mask. A fantastic wearable while watching the beloved classic, this is easy to make, even for young children.
It can also be used to go with the book “How Leo Learned to be a King” by Marcus Pfister, as the site suggests.
Cut a large hole in the center of the paper plate large enough for the child’s face to fit. Next, cut out strips of orange, brown, and yellow construction papers for the lion’s mane. The site recommends cutting them to three inches by half an inch.
Have the children alternately glue these strips on the paper plate so that colors are well spread. Let this dry, and use a pencil to curl the end part of the paper strips that have not adhered to the paper plate.
The site recommends using this craft to retell the story and to use in role plays that discuss different issues at home or school. Some of these can be about sharing toys and helping a friend.
This activity will help children become mindful of others while improving their oral language skills.
For this activity, you will need:
- Paper plate
- Orange, brown, and yellow construction papers
- Glue
- Scissors
For more information on this activity, go to FantasticFunAndLearning.com.
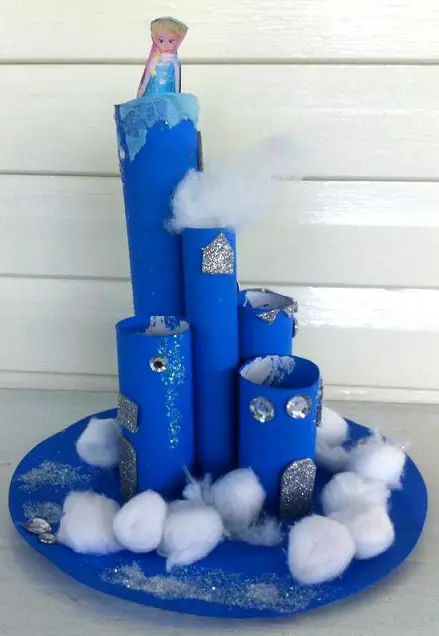
This Frozen-themed activity is not about building a snowman or going on an adventure with a moose. Elsa’s castle is made of towering structures that can rival any evil queen’s abode.
Young children will be able to hone their painting skills as they add color to these towers and improve their three-finger grasp as they pick up and stick the cotton balls on the castle’s base.
Start with deciding the number of towers the castle should have. Paint enough paper rolls blue to make the castle and let them dry. The length will vary when using different paper rolls, but this should not be an issue.
Next, arrange the paper rolls on the paper plate to get the desired look. Stick these using glue on the paper plate and let them dry.
Add embellishments such as glitters, sequins, and gems for details such as doors and windows on each tower. Lastly, stick some cotton balls to mimic the snow Elsa can make with her magical power.
For this activity, you will need:
- Paper plate
- Cotton balls
- Glitters, sequins, gems, and other decorative elements
- Glue
- Toilet paper rolls
- Paper towel rolls
- Paint
- Paintbrush
For more information on this activity, go to CraftyMorning.com.
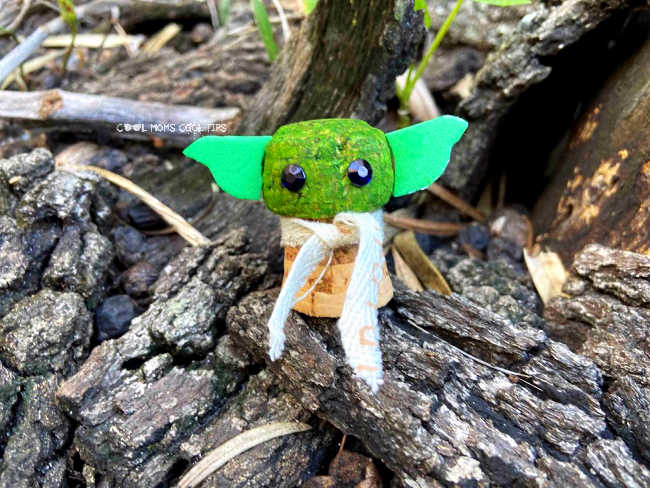
The great Jedi Master once said, “Pass on what you have learned.” That is why the secret to making this adorable wisdom keeper-baby edition is revealed.
The force of creativity is awakened in children as they assemble this Baby Yoda cupcake topper. Have children understand the need to use recyclable materials in projects like this.
Cutting, painting, and tying a strip of cloth may sound simple, but it is challenging when the materials used are small and when the fingers working with them are tiny and needs more dexterity. Therefore, assist whenever necessary.
Use this craft to provide an opportunity to practice these skills. Ensure all the materials needed for this craft are clean and dry. Paint the top part of the champagne cork green and allow it to dry.
Cut out ears from the green foam. Use the hot glue gun to attach the ears to the cork. Add the black eyes. Lastly, tie a beige cloth or ribbon to complete the look. Refer to the photos on the site for the step-by-step procedure.
For this activity, you will need:
- Champagne cork
- Paint
- Paintbrush
- Black sequins or plastic gems
- Beige cloth or ribbon
- Green foam
- Hot glue gun
For more information on this activity, go to CoolMomsCoolTips.com.
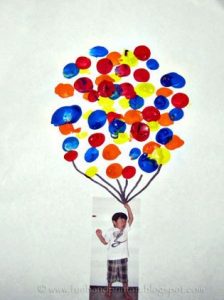
This thumbprint craft can be described as easy and doable even by young children. Fingerpainting to create a cluster of balloons is ingenious! And the addition of the child’s picture makes this craft adorable and perfect for many occasions.
Use this activity to teach colors and counting. Have children name the colors they will use to do this project. They can also point at each balloon as they count them.
Start by downloading and printing the coloring page from the site. This coloring activity sheet is inspired by the movie “Up,” with a bunch of balloons connected to a house that is floating away.
Mark each balloon by placing dots of colors from paints. This step will guide children on what color to put in each balloon. Have children dip their thumbs in the paint and carefully create a thumbprint inside the balloon.
Repeat this process until all balloons are covered with colors. Next, cut out the child’s picture and place it on the page, making it look like the child is holding the balloons.
For this activity, you will need:
- Printed coloring page
- Finger paints
- Small container
- Photo of the child posed as one holding the balloons
- Glue
For more information on this activity, go to FunHandPrintArtBlog.com.
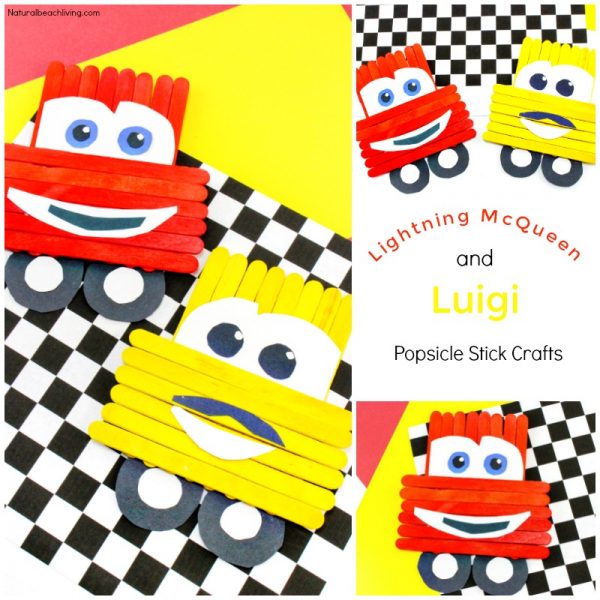
Make the superstars Luigi and Lighting McQueen from the world of cars using humble craft sticks.
This activity is an excellent opportunity to get to know the characters in the movie “Cars” and to learn other concepts such as counting, colors, parts of the face, and emotions.
Let children count the number of craft sticks used as the craft is put together. Ask them about the colors of the finished cars. Point to the parts on the face for them to identify.
Lastly, discuss emotions and decide on a shape for the mouths of the cars. Place the mouth downward to indicate sad and upward for happy.
Make the cars by arranging eight red craft sticks together. Cut two red sticks to fit the lined-up sticks. Attach them horizontally to secure the eight sticks together using the hot glue gun.
This part will become the back of the craft. Repeat these steps with the yellow craft sticks.
Flip the set of sticks and add six sticks horizontally. Cut out different sizes of circles from the black, white, and blue construction papers to make the eyes. Cut out curved mouths from black and white papers. Attach these to the cars.
For this activity, you will need:
- Sixteen yellow craft sticks
- Sixteen blue craft sticks
- Construction paper
- Hot glue gun
- Craft glue
- Scissors
For more information on this activity, go to NaturalBeachLiving.com.
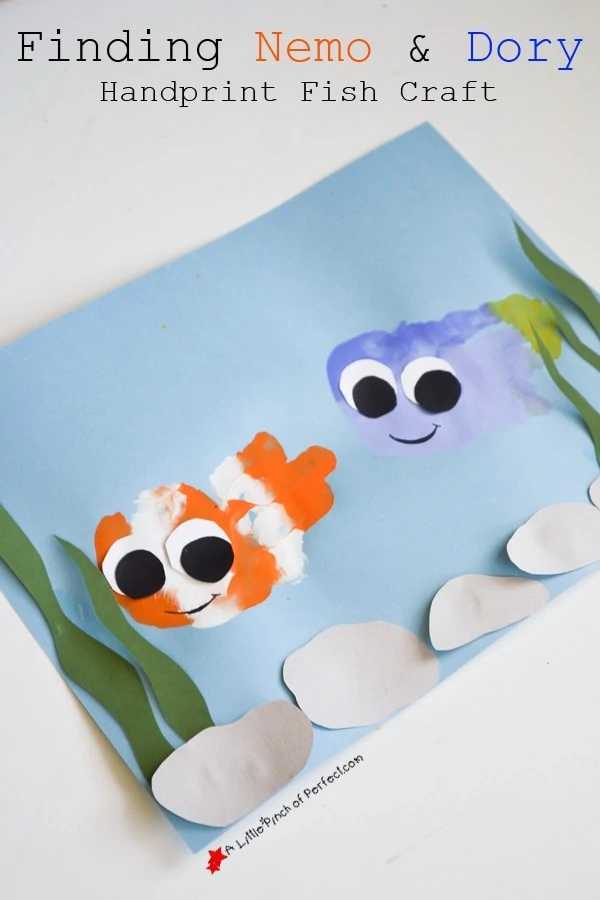
Nemo and Dory found each other in this ocean-themed craft that children will enjoy making. They will keep swimming with this elaborate handprint activity that will wow every kid.
This activity will allow children to enjoy and learn painting, cutting, and pasting. Use this craft to talk about how unique these types of fish are. For example, the clownfish lives with an anemone, and the blue tang has sharp and poisonous spines.
Start with a clean hand to make Nemo. Add colors by alternately painting the child’s hand with orange and white. The tip of the fingers should be orange, followed by white. Repeat this process until there are three orange and two white stripes.
Press the painted hands on the light blue paper. Let this dry.
With a clean hand, make Dory by painting it blue. Use two shades of blue to make this fish. Divide the hand into two sections-left, and right-to add the colors accordingly.
On the left section, where the thumb is, use the darker shade of blue. On the right section of the hand, use a lighter shade of blue.
Make sure that the tips of the index, middle, and ring fingers have yellow instead of blue for Dory’s tail. Press this on the paper and let it dry.
Cut out seaweed from green paper and rocks from gray paper. Glue them on blue paper to complete the ocean landscape.
For this activity, you will need:
- Craft paper
- Paint
- Paintbrush
- Glue
- Scissors
- Marker
For more information on this activity, go to ALittlePinchOfPerfect.com.
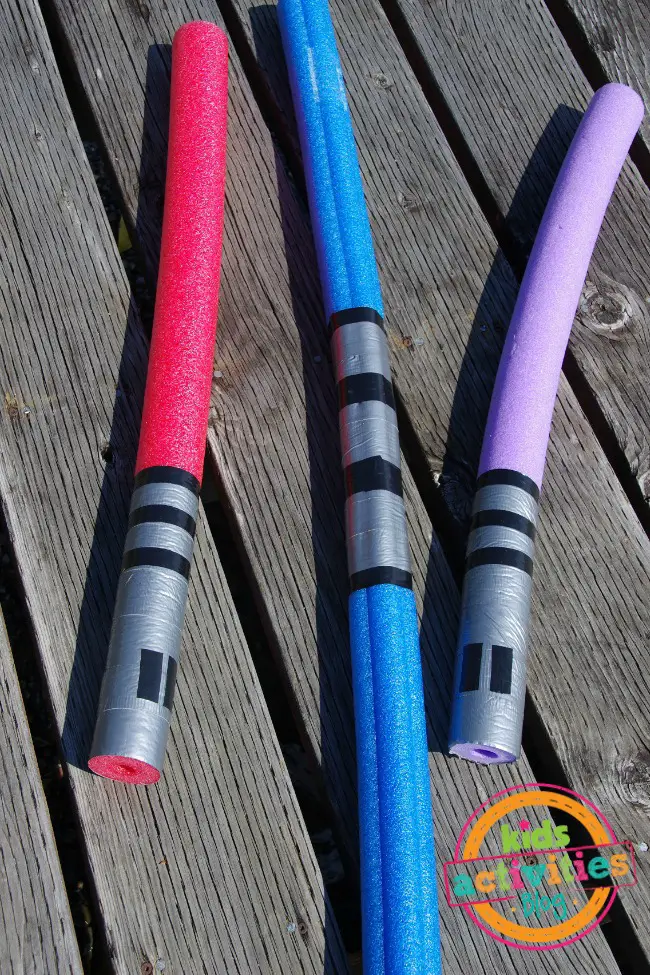
The force is with every child as they make and play with these simple and easy-to-make lightsabers that will awaken the Jedi in them.
The site suggests using them for water play, but they can also be used in many other ways, such as hitting targets in obstacle courses. It can be a tool to learn about the basics of sword fighting, such as lunge and parry.
Use a serrated knife to cut the pool noodles according to the desired size. Consider the child who will use it to determine the length. If you make it too long, it would not be easy to handle and use.
Wrap the bottom of the pool noodle with duct tape. Cut six equal lengths that will go around the noodle. Wrap these one at a time to cover a good area for the handle. Add black electrical tape to make a striped design on the handle.
Check out the pictures on the site for the complete visual instructions and the modifications that can be done to make a double light saber and a light saber that lights up.
Some safety instructions are also provided for accident-free hours of fun playtime.
For this activity, you will need:
- Pool noodles
- Black electrical tape
- Duct tape
- Serrated knife
- Cutting board
For more information on this activity, go to KidsActivitiesBlog.com.
Conclusion
These Disney-inspired crafts have taken on some of the most iconic characters, turning them into fun toys to play with and beautiful artwork. Let children explore and enjoy the world of fun as they make these crafts.
Take the opportunity to teach children fantastic concepts through these simple projects. Learning is never boring with these unique crafts. Stop by again soon for more craft ideas.
For more crafts and activities, check these out:


