Come one, come all! The circus is in town!
Let children explore the circus as a happy place filled with tricks and thrilling adventures for everyone to enjoy. Use books to partner with the crafts on this list.
Children will enjoy listening to circus stories and use these crafts during pretend play.
A realistic trapeze artist craft that can be paired with some books such as “You See a Circus, I see…” by Mike Downs is a great way to introduce children to the circus world.
Make this trapeze artist by cutting the straw in half and inserting the string or yarn. To make it easier for the string to get through, wrap the end with sticky tape.
Take off the tape and tie the ends of the string together. The trapeze is now ready. Now, for the artist. Outline on white paper a person whose hands are outstretched and feet apart.
Have the children color and add details to their artist. Use colored pencils on both sides of the paper. Once finished, cut out and attach to the trapeze. Explore different ways the artist could dangle from the trapeze.
It can be hanging upside down or hanging by its arms. It could be standing on the trapeze or with just one leg.
For this craft, you will need:
- Straw
- String
- Colored pencils
- Glue
- Copy of trapeze artist
For more information on this craft, go to BoyMamaTeacherMama.com.
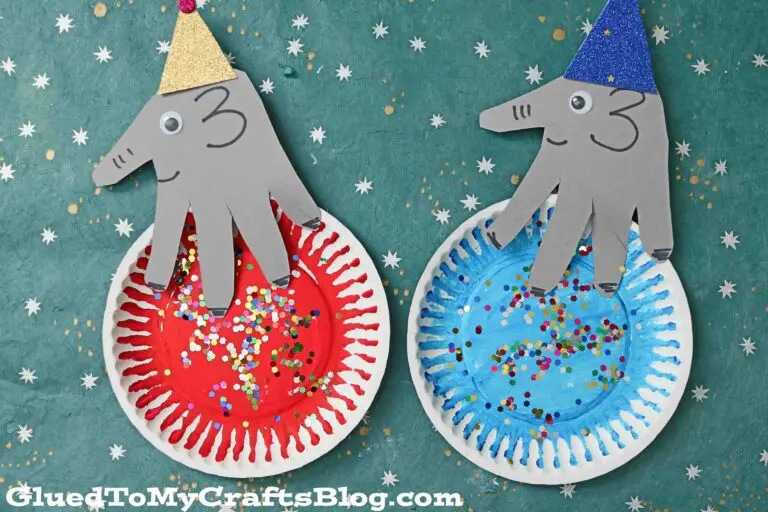
This charming elephant craft is easy to make. Children would require limited assistance from adults to complete this project.
Make this craft as colorful as possible by allowing children to customize the color of the elephant’s hat and paper plate ball. Use glitter with caution. Punched colored papers can be an option for glitter.
Have children paint the paper plate with their chosen colors. Add the glitter before the paint dries up. The glitter will be able to adhere to the wet paint better.
While waiting for the paint to dry, trace the children’s hands on gray cardstock. Ensure that the fingers are far apart as possible.
Cut out and use the black marker to add details. Draw the ears, mouth, and lines for the trunk and feet. Stick the googly eye.
For the hat, cut a triangle with a rounded top. Paint and add glitter. Use red glitter for the rounded end of the hat. A pompom is also a good option. Stick the hat on the elephant.
Staple the elephant on the paper plate. It is now ready for the show!
For this craft, you will need:
- Small paper plate
- Paint
- Paintbrushes
- Gray cardstock
- Black marker
- Scissors
- Glue
- Googly eye
- Stapler
- Glitter
For more information on this craft, go to GluedToMyCraftsBlog.com.
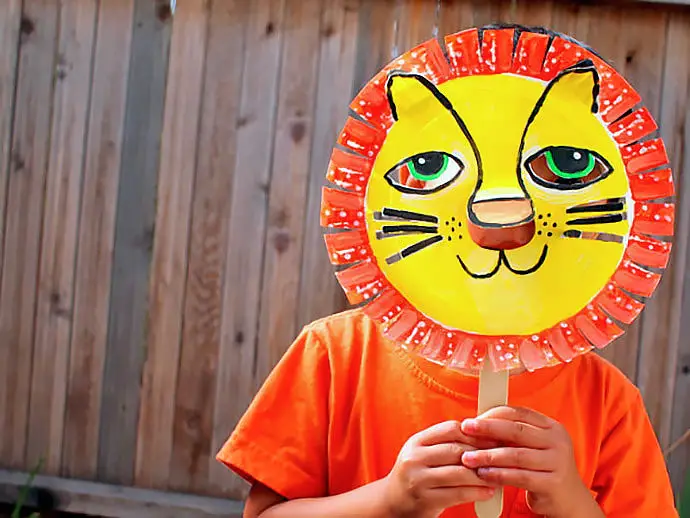
This lion mask is excellent to use for circus-themed plays or even for storytelling. This craft will use a craft knife. Provide the necessary assistance to children.
Draw the lion on the paper plate. Refer to the site on how to do this. Paint the lion. Use yellow for the face. Paint orange for the wavy part of the plate. This part will be the lion’s mane. Allow the paint to dry.
Use black paint to draw lines for the eyes, whiskers, nose, and mouth. Add dots between the nose and whiskers. Keep the background of the eyes unpainted, but use black and green for the pupil. Add a white dot for the animal’s eye shine.
Once this is dry, use the craft knife to cut the whiskers partly. Bend them to add dimension. Do the same for the nose and ears.
Next, cut the white part of the eyes. Use scissors to snip off some parts of the mane. Refer to the pictures on HandmadeCharlotte.com for the details on cutting the pieces.
Once finished, attach a popsicle stick with masking tape for children to hold while playing with it.
For this craft, you will need:
- Paper plate
- Pencil
- Cutting mat
- Scissors
- Craft knife
- Paintbrush
- Paint
- Large popsicle stick
- Masking tape
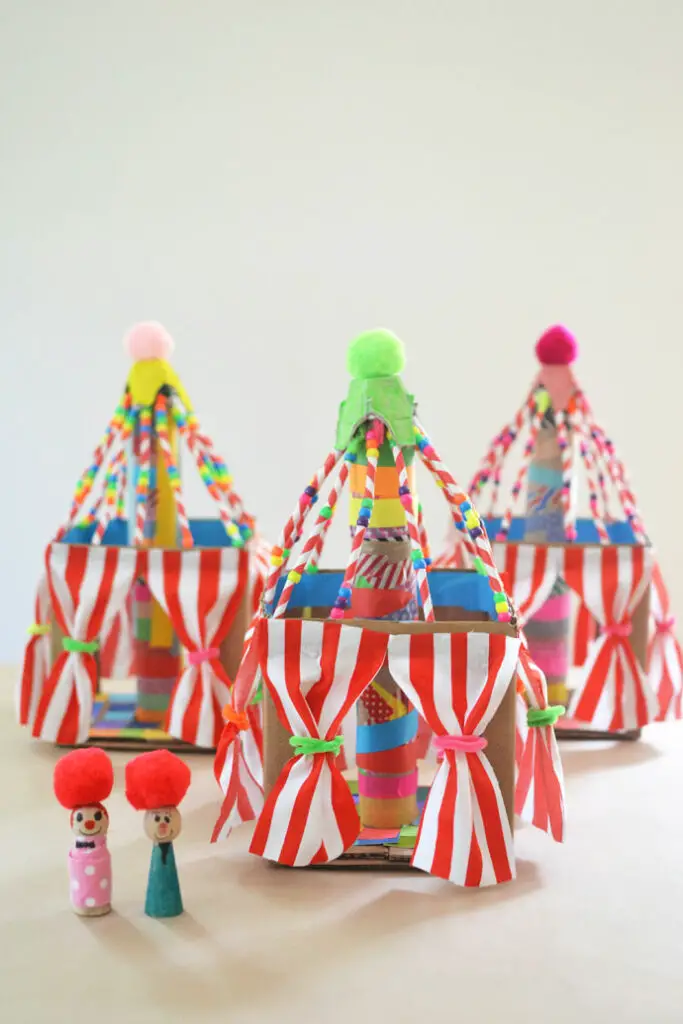
This craft may require some effort, but it’s worth it. Just look at how adorable and realistic this tent is. Children will fall in love at the sight of this circus tent.
Prepare the box by outlining an arch and cutting it with a craft knife. Do this on all four sides. Cut a circle in the middle of the box, using the paper towel roll as a guide.
Punch holes on one of the edges of the roll. This part is where the pipe cleaners will be attached. Have the children decorate the paper towel roll with washi tape.
Next, insert the roll in the hole and use craft glue to secure it. Make sure that the part with the holes is positioned upright.
String beads and cut-up paper straws using a pipe cleaner. Attach one end to the hole of the paper towel roll and use duct tape to secure the other inside the box. The roof is now complete once all the pipe cleaners are attached.
Decorate the tent’s floor by having the children cut small squares from the paper of different colors. Glue them on the tent’s floor. Paint the egg carton cup and allow it to dry.
Attach the egg carton on top of the paper towel roll to cover the ends of the pipe cleaners. Stick a pompom on top of the cup.
Lastly, cut the red-striped fabric and attach it to the opening. Tie these with the remaining pipe cleaners.
For this craft, you will need:
- Small cardboard box
- Scissors and craft knife
- Paper towel roll
- Hole punch
- Glue
- Washi tape
- Pipe cleaners
- Beads and cut-up paper straws
- Duct tape
- Colored paper
- Red-striped fabric
- Egg carton cup
- Paint
- Paintbrush
- pompoms
For more information on this craft, go to HandmadeCharlotte.com.
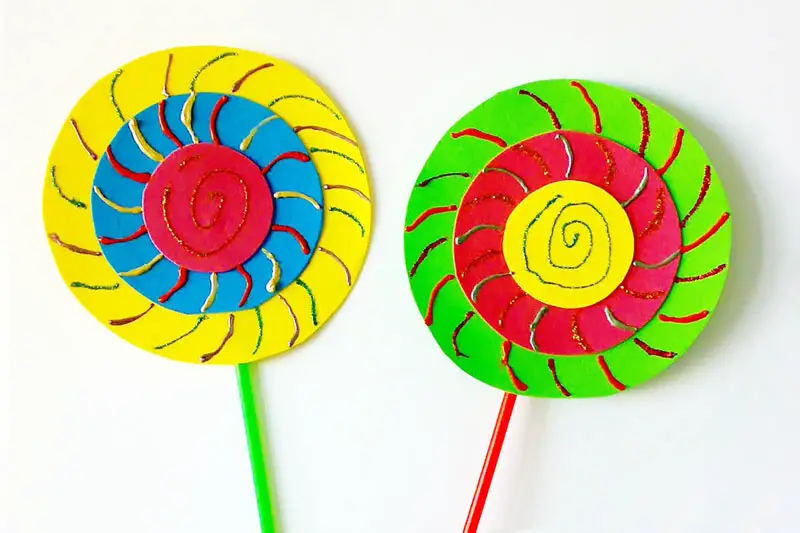
Colorful and swirly, lollipops are essential edibles found in circuses and carnivals. These round, sugary sensations are a hit among children to munch on as they explore the festivities.
Use a compass to create perfect circles. If unavailable, choose rounded objects of different sizes to use as a guide. Trace them on craft foam or cardstock. Use three different colors for each lollipop.
Stack them together, having the smallest on top and secure with glue. Use sticky tape to attach the straw to the back of the lollipop. Finally, use markers, glitter glue, or puffy paint to decorate with swirls.
Extend this activity by introducing art lessons to children. Discuss Kadinsky circles in class. This artwork is a popular art activity for children since it is effortless to make.
Have them create their version of colorful concentric circles using different mediums such as paints, paper, cloth, and other materials.
Use this activity also to teach order and patterns. Children will learn to compare sizes and create different types of patterns through this craft.
For this craft, you will need:
- Craft foam or cardstock in different colors
- Drinking straw
- Glue
- Sticky tape
- Scissors
- Compass
- Markers in different colors
- Glitter glue or puffy paint
For more information about this craft, go to FirstPalette.com.
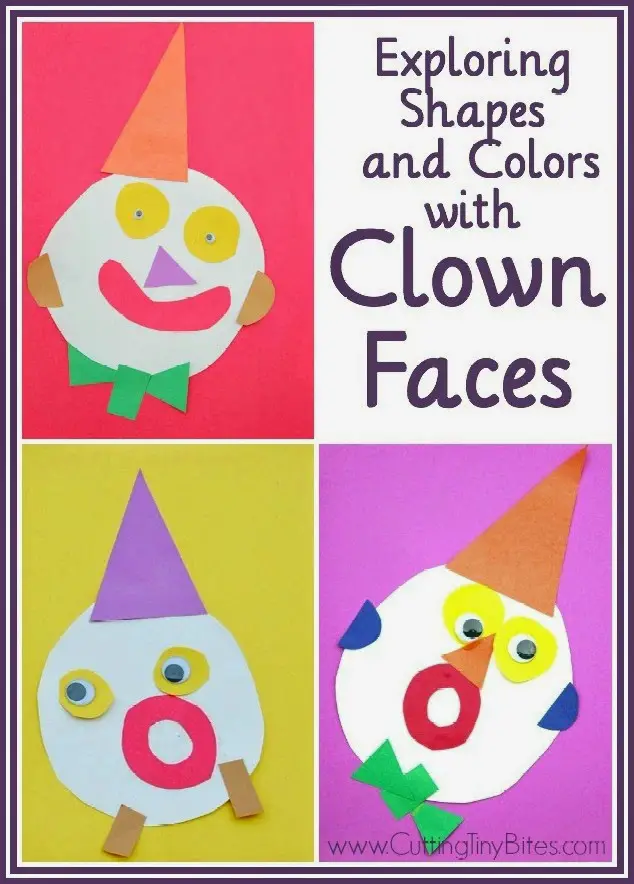
A make-your-own-clown face activity is an excellent way to help children master their concept of shapes. It will also help improve their cutting skills and enable creativity to shine as they put together pieces to build their clowns.
The materials are readily available, and the instructions are simple. Even young children will find this activity doable and engaging. Shapes may be given to children pre-cut, but it is encouraged to have children cut the papers themselves.
Trace different shapes and sizes of circles, triangles, squares, and rectangles on the colored construction papers. Trace a big circle on white construction paper for the head.
Cut all the pieces. Assist children who may be struggling with using scissors. Next, explain the assembly of the face by putting together the different shapes. Stick them with glue.
Googly eyes are optional. Use black circles cut-outs instead.
Let children experiment with combining different shapes and colors, but inform them that facial parts should be visible and identifiable in their final output.
For this craft, you will need:
- Construction papers in different colors
- Glue
- Scissors
- Googly eyes
For more information on this craft, head over to Paper-And-Glue.com.
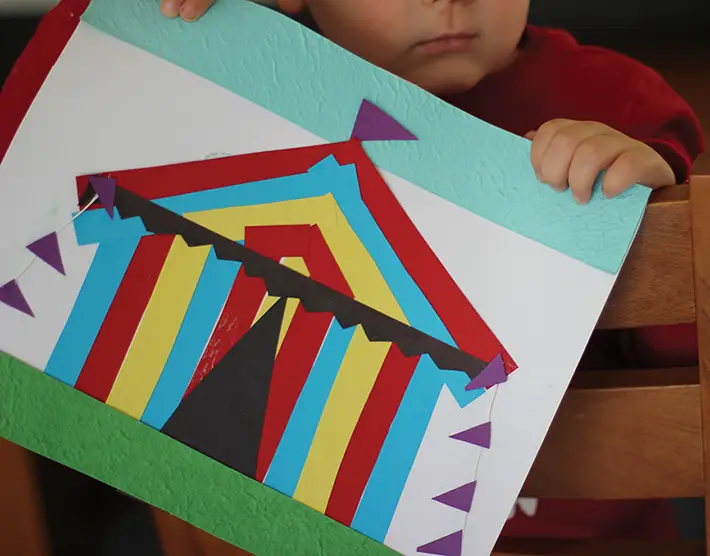
Another colorful cut and past activity that is easy but produces impressive results is this Circus tent craft. Aside from helping children improve their cutting and pasting skills. This craft can be converted into a mystery box for the circus theme.
To make this tent craft, have children cut strips of paper in 19 different colors about 135 mm long using construction paper. Use a pencil and ruler to make lines as a guide, making it easier for children to cut.
Cut a zigzag pattern on a black strip of paper, a triangle for the tent’s opening. Cut purple triangles and a thick strip of blue and green. The triangles are for the bunting and flag. The blue strip is for the sky, and the green is for the grass.
Stick the strips of paper alternately using glue. Refer to the step-by-step pictures on how to assemble this on PeninsulaKids.com.au. Stick the strings with triangles on the side of the roof to the ground part and add the flag on top.
Lastly, add the strips of green on the bottom and blue on top. To convert this into a mystery box, use a box the same size as the construction paper. Paint the inside of the box black. Glue the tent craft on the box.
Cut an opening in the triangle shape in both the box and the tent. Glue the tip of the black triangle on top to create a flap where children can insert their hands.
Place different plastic animals and other things found in a circus. Use this activity to go with the book “Spot Goes to the Circus” by Eric Hill. If possible, use plastic animals that Spot encountered in the book.
For this craft, you will need:
- White cardstock
- Construction papers in different colors
- String
- Glue
- Pencil
- Ruler
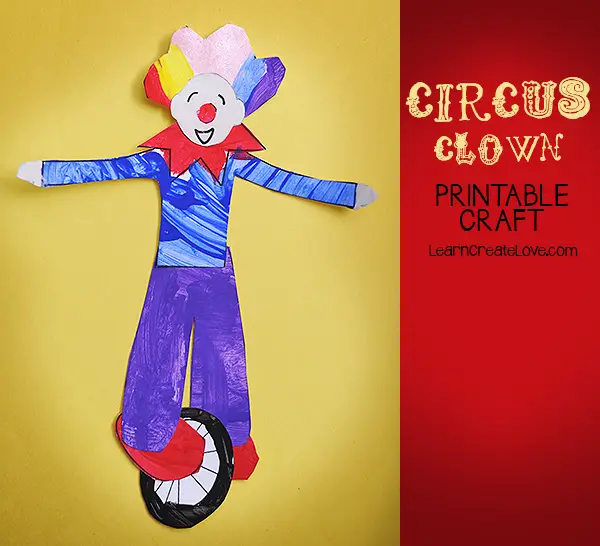
This clown craft is another cut, color, and paste activity that is easy to make. However, the shapes can be somewhat challenging for younger children, so give them a pre-cut version of the pieces.
Download the free template for this clown. Print this on white paper. Cut the pieces and color them. Cut and trace each of the pieces on cardstock for a sturdier craft.
Color and assemble the clown. Encourage children to make their clowns unique by using a lot of colors. Explain that the clown is riding a unicycle, and most of the time, clowns juggle objects while on the wheel.
Extend this activity in two ways. First, use this as a matching mat. Cut small circles to resemble balls. Write letters and numbers, or draw shapes. Use the clown’s outstretched arms to place the balls.
For example, place the letter E on the left, and the child will place the lowercase e on the right. Another idea is to place a green triangle on the left and have the child find the matching shape or color to place on the left.
Second, use this clown as a mat to teach number concepts. Glue the clown on a cardstock. Draw three circles the size of the balls from the left hand to the right in an arch shape.
Write numbers on the balls. Give the child a set of three random numbers to arrange in order. Place the smallest number on the left hand to the largest on the right.
For this craft, you will need:
- Clown template
- Markers, colored pencils, or crayons
- Scissors
- Glue
For more information on this craft, go to LearnCreateLove.com.
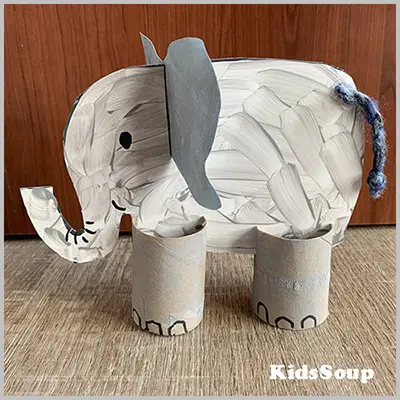
Elephants showcasing their balancing skills, funny antics, and intelligence are popular circus acts. Make several of these elephant crafts to show elephants on parade. Children will have a lot of fun lining up the elephants.
Download and print the free elephant template from the site. Cut and trace the pieces on the white cardstock. Cut the pieces and allow the children to mix white and black paint to make their shade of gray.
Paint the elephant parts and the toilet paper rolls. Allow them to dry. Cut two opposite slits on the toilet paper rolls. Use the black marker to draw the details on the elephant. Use a googly eye for the elephant’s eye.
Insert the elephant on the toilet paper rolls. Next, place the ears on the head of the elephant. Attach the gray yarn for the tail.
The template from KidsSoup.com provides two types of ears. Make both Asian and African elephants as a way to extend this activity by exploring their similarities and differences.
For this craft, you will need:
- Elephant template
- Toilet paper roll (two rolls for every elephant)
- White cardstock
- White and black paints
- Paintbrush
- Scissors
- Glue
- Black marker
- Gray yarn
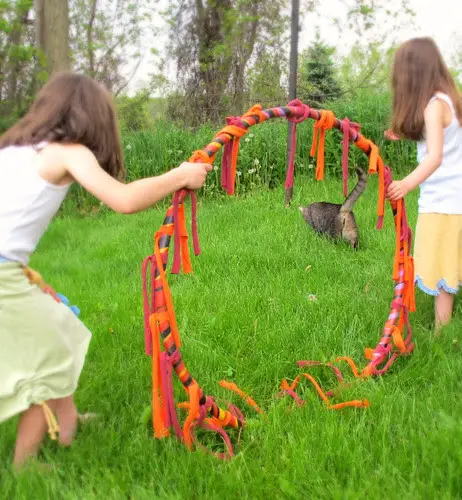
The tigers jumping through fiery rings are heart-pounding. Seeing how fearless they are as they go through the ring of fire is always a fantastic sight.
Replicate this idea by incorporating this activity into the children’s gross motor activities. Make a fiery ring by tying strips of red and orange cloth on a hula hoop.
Use scraps from old shirts or cloth for this activity. Vary the length of the strips of fabric. Inform them that they are like the brave tigers in a circus and would need to pass through the ring fire.
Have children put on something that resembles a tiger, such as an orange shirt or a tiger mask, as they go through the hoops. Vary the difficulty of this task by making several hula hoops.
Attach the hoops to poles or on the back of a sturdy chair. Add additional challenges to make an obstacle course. Provide small balls to juggle like a clown or a giant beach ball to balance like the elephant.
For this craft, you will need:
- Hula hoops
- Red and orange strips of cloth
For more information on this activity, go to MayaMade.blogspot.com.
Conclusion
Circus is one of the most colorful and exciting themes in preschool. Children will enjoy making the crafts on this list. Most of them are easy to make and require readily available materials.
Encourage children to do tasks independently and reward them with popcorn or other food found in a circus. We hope you like our list of circus crafts. Thank you for reading!
For more crafts and activities, check these out:


