When skeletons adorn every corner, it’s a sign that Halloween is fast approaching. These images of bones and skulls give that spooky vibe.
Turn simple materials into a skeleton craft that children will love and enjoy making. Check out our list of eerie skeleton activities perfect for every occasion and lesson.
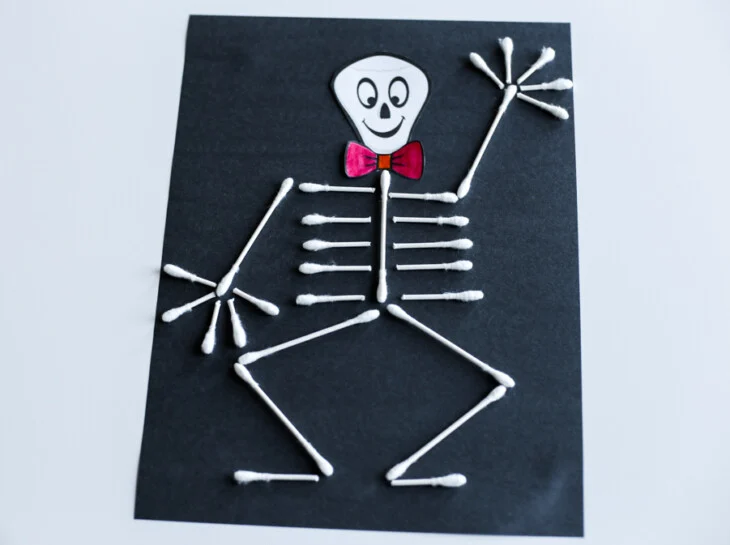
When cotton swabs are cut and positioned correctly, they resemble bones. Put together these bones to make an adorable skeleton craft perfect for both boys and girls.
This craft is an excellent activity to help improve the children’s fine motor skills through cutting and pasting. It can also be used to teach counting and lengths. Allow children to count the number of bones based on the swabs glued on paper.
Download and print the free skull template for the site. Cut out both the skull and bow. The bow may be added to the head like a hair accessory for girls. It can be added to the neck like a bow tie for boys.
Plan the layout of the skeleton by playing with the swabs. The body will need seven uncut swabs-two for the arms, one for the torso, two for the thighs, and two for the legs. Glue these on black construction paper.
Next, cut ten tips of the swabs to make the fingers. Glue five of these on each arm. Cut another ten tips of the swabs, this time a little longer than the fingers. These will be the ribs. Glue these on the torso with the tips facing outward.
Cut two tips and glue each on the legs to make the feet. Complete the skeleton by adding the bow. Use a marker or crayon to add color to the bow. Let this dry.
For this activity, you will need:
- Cotton swabs
- Printed skull template
- Marker or crayon
- Black construction paper
- Glue
- Scissors
For more information on this activity, go to ThrivingHomeBlog.com.
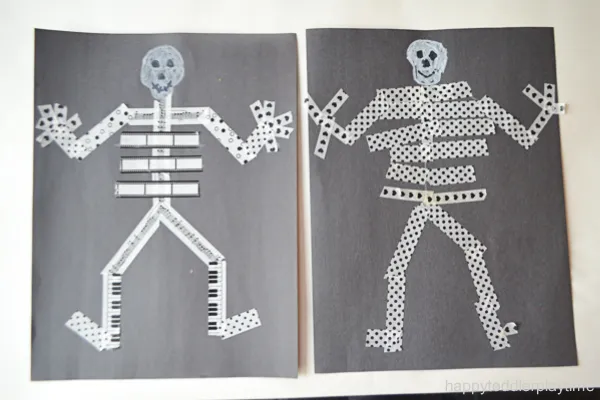
Get out those washi tape collections and help children improve their fine motor skills by cutting a different material other than paper.
Children may find it challenging to cut a thin material, but making this craft will encourage them to practice their skills.
This craft is also excellent in helping children improve their visual-motor skills as they attempt to stick the tape on the lines that act as a guide.
Have the child draw the skull using the white marker on black construction paper. Add lines for the body. Assist the child on this step so that the output may have enough lines that resemble a skeleton.
Have the child cut the washi tape and stick them on the lines. The site recommends attaching the washi tape on the edge of a chair or table and having the child cut this into smaller pieces.
This step will make it more manageable for children to do the task independently.
For this activity, you will need:
- Black construction paper
- White marker
- Scissors
- Washi tape
For more information on this activity, go to HappyToddlerPlaytime.com.
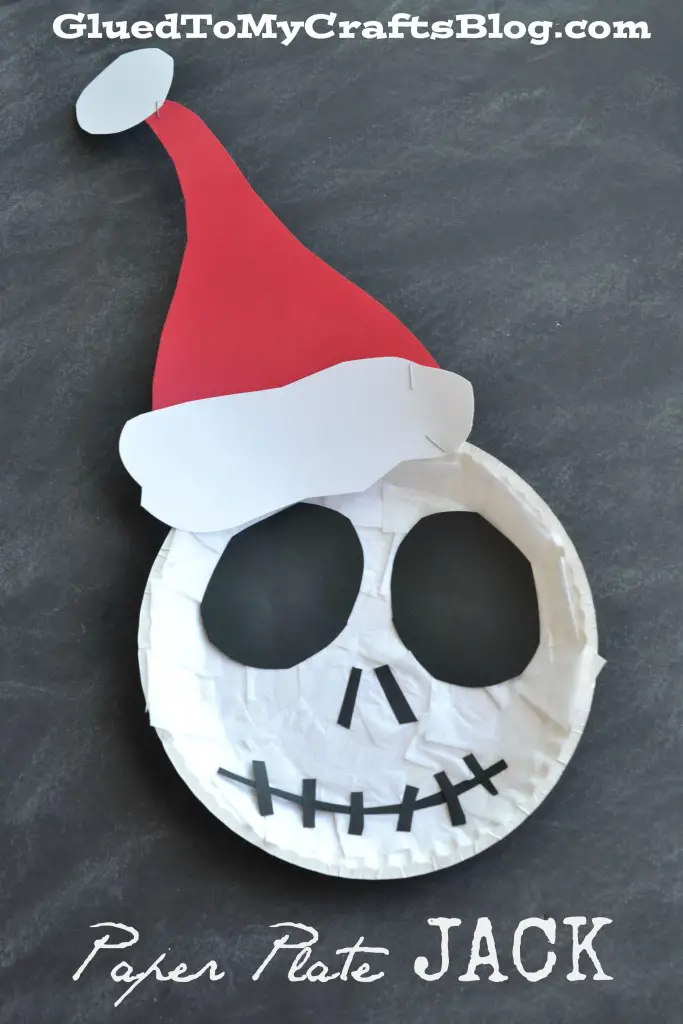
This iconic character from the movie “The Nightmare Before Christmas” is one of the most loved skeletons of all time. Relive Jack Skellington through this easy-to-make paper plate craft.
This activity will teach children to cut simple shapes such as squares and circles. They can also practice cutting thin strips of paper, which may be challenging for some children.
Have the children cut squares out of the white tissue paper. Glue these on the paper plate. Let this dry.
Cut out two large circles from the construction paper. These will become the eyes. Glue these on the paper plate.
Cut one long strip of paper for the mouth and glue it on the paper plate. Cut shorter strips and glue them vertically on the mouth to make a stitched pattern.
The site recommends adding a Santa hat by cutting out the red and white cardstock shapes. Staple this on the paper plate. Use this craft as a companion for the movie or the book.
For this activity, you will need:
- Paper plate
- White tissue paper
- Scissors
- Glue
- Black cardstock
For more information on this activity, go to GluedToMyCraftsBlog.com.
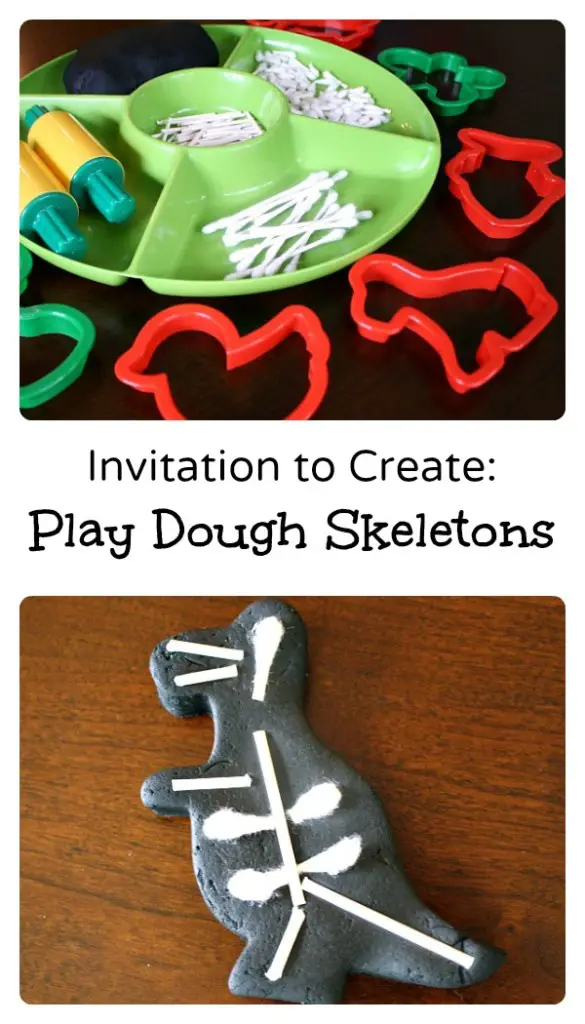
If spooky is not the child’s cup of tea, this craft may be a more appropriate option. Using playdough animal shapes will make children understand that bones are part of the bodies of most living creatures.
This task can be part of the Science lessons on x-rays or archeology. This craft can be a perfect activity for centers or free play.
Playing with playdough will strengthen the children’s hand muscles as they roll, squeeze, shape, and press the cookie cutter on it to make their desired animal shapes.
Have children choose the animal they want to make from the play dough. Let them flatten the clay or use a toy rolling pin if available.
Next, let the children press the chosen cookie cutter. Take out the shaped dough and remove the excess. Cut up some cotton swabs and arrange them on the clay animal. Vary the bones by using long and short cotton swabs.
For this activity, you will need:
- Black playdough
- Cotton swabs
- Animal cookie cutters
For more information on this activity, go to FantasticFunAndLearning.com.
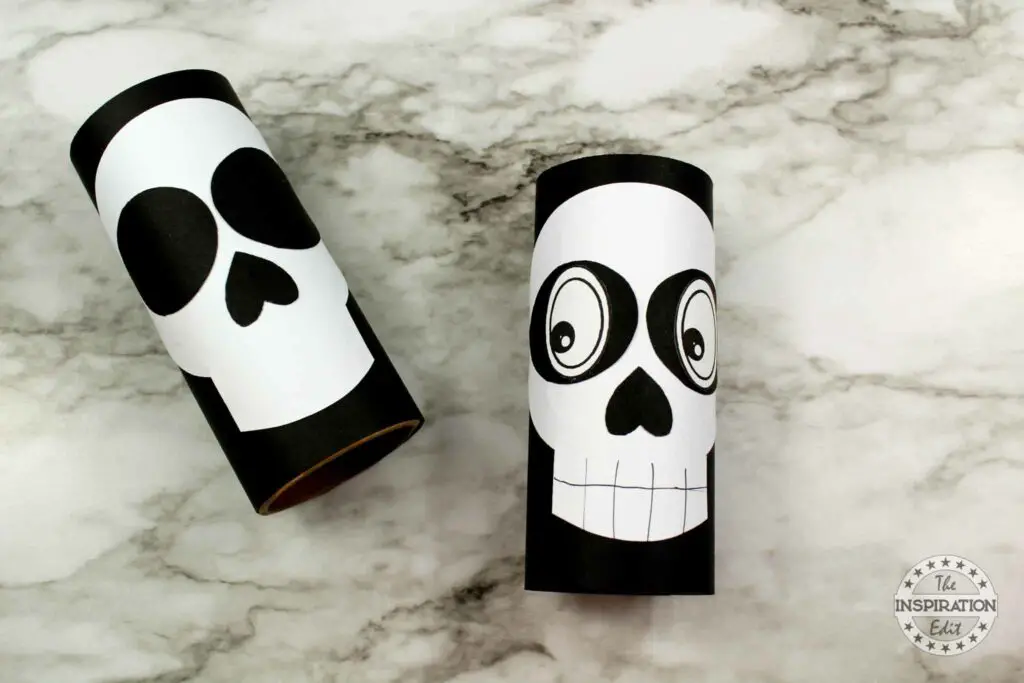
Never throw away those toilet paper rolls because they can be repurposed for many things, such as this spooky skeleton craft. This activity is a simple cut-and-paste craft that children may complete independently.
Younger children may require assistance attaching the black paper to the tissue roll. This skeleton craft is a great activity to practice children’s scissors skills as they cut curved shapes such as circles and hearts.
Download and print the skull template from the site. Trace the large rectangle on black construction paper. Wrap it around the toilet roll. Next, cut out the template for the skull, including a circle for the eyes and a heart for the nose.
Trace the skull on white paper while the nose and eyes are on black. Cut these out. Assemble the rest of the craft by gluing the head, eyes, and nose on the toilet roll. Use markers to add details such as the mouth and pupils for the eyes.
Use this craft to go with the pop-up book “Silly Skeletons” by Janet Lawler and Renee Jablow. Children will surely enjoy playing with these toilet paper skeletons as they follow the story.
For this activity, you will need:
- Toilet paper roll
- Printed skull template
- Construction paper
- Scissors
- Glue
- Markers
For more information on this activity, go to TheInspirationEdit.com.
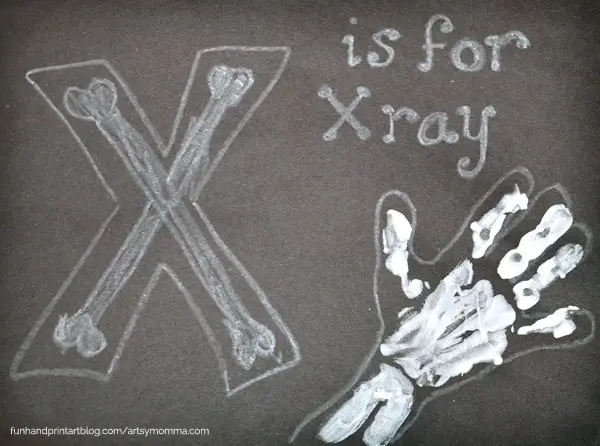
Here’s a bone craft that can be used for teaching the letter X and the concept of bones. Children may not be aware that inside our bodies is a set of bones connected to each other.
This x-ray activity is simple to make and can be used to accompany the book “Dry Bones” by Kate Edmunds, a creative take on the song “Dem Bones.”
Outline the letter X on one side of the black construction paper. Draw the crossbones inside the letter. Let the children color the bones. Next, trace the child’s hand on the other side of the paper.
Inside the hand, paint the bones inside. Remember to remind children not to cover the whole hand with white paint. It would be better to draw the bones inside the hand for children to use as a guide when painting.
Ensure that there is enough black background between the outline of the hand and the bones. This step will make this x-ray craft more authentic.
For this activity, you will need:
- Black construction paper
- White crayon or marker
- White paint
- Paintbrush
For more information on this activity, go to ArtsyMomma.com. You might also want to check out our list of Letter X crafts and activities!
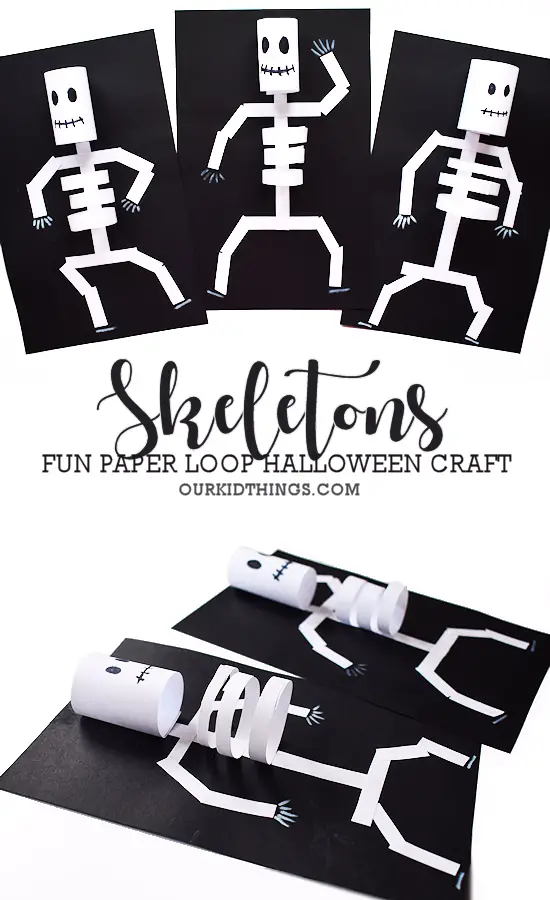
Children will enjoy playing with this skeleton craft with a 3D head and ribcage. The hands and legs can be modified to create different poses. These are simple to make and can be good practice for cutting straight lines.
For younger children, draw lines on paper using a pencil or marker. This guide will make it easier for children to cut paper strips.
Make this craft by folding the black construction paper and cutting it in half. Cut a long strip of white paper and glue it vertically in the middle of the black paper. This part will be the skeleton’s torso.
Next, cut shorter strips of paper and assemble the legs and arms. Cut a rectangle and draw the eyes and the stitched mouth using a black marker. This part will be the skull. Attach both ends to form a tube. Glue this on the skeleton.
Cut three strips of paper and attach them to the torso. Start gluing both ends of each of the strips to form loops. This part is the rib cage. Finally, use the white marker to add other details, such as the fingers and toes. Let this dry.
For this activity, you will need:
- Black and white construction paper
- Black and white markers
- Glue
- Scissors
For more information on this activity, go to OurKidThings.com.
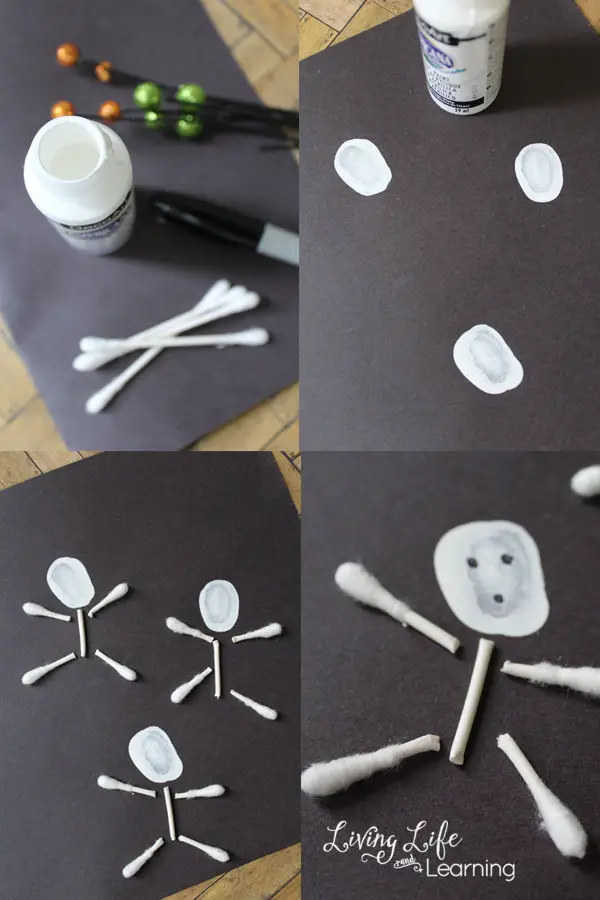
Children will love making their thumbprints on paper with this skeleton craft. This craft is great for younger children with limited cutting skills.
To make this craft, dip the child’s finger in white paint. Press it gently on the black construction paper. Cut up the cotton swabs to make the bones.
Cut the tips of two swabs for the arms and legs. Use the middle part of the swab for the torso. Glue the torso vertically just below the fingerprint. Add the arms and legs. Let this dry. Add the eyes and mouth using the black marker.
Make several of these fingerprint crafts to use for a counting activity. Either make several on one piece of paper or cut them out for children to use as counters when counting.
The site also recommends several books to go with this craft. It is also recommended to stick this on the refrigerator or to hang it on the window as decor.
For this activity, you will need:
- Black construction paper
- Cotton swabs
- White paint
- Black marker
- Scissors
- Glue
For more information on this activity, go to LivingLifeAndLearning.com.
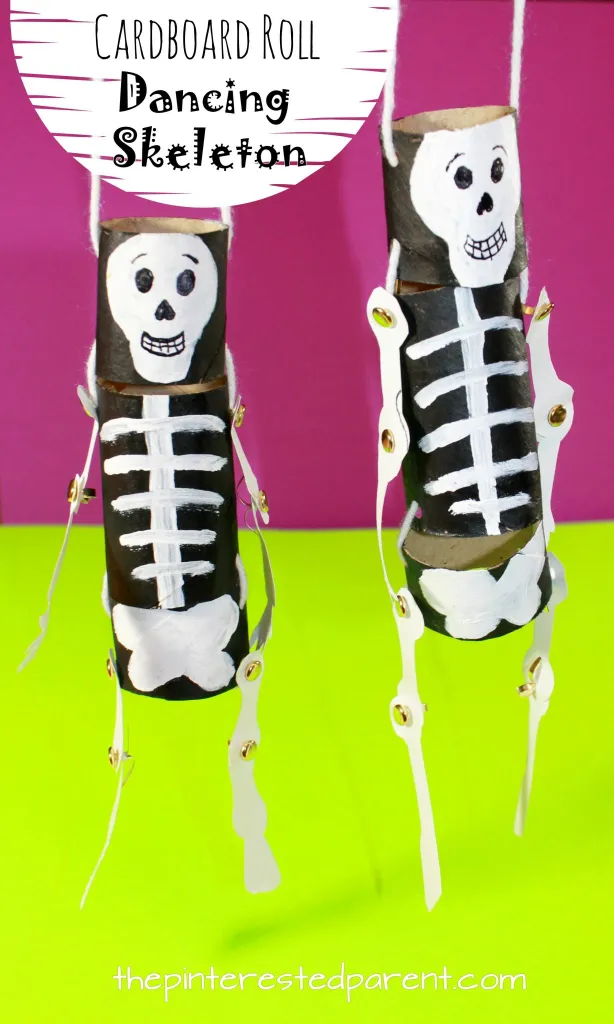
What’s better than a spooky skeleton craft? A movable skeleton craft! Children will love playing with this string puppet craft for hours. This craft may take more effort, but the final result is terrific!
Use this craft to go with the book “Skeleton Hiccups” by Margery Cuyler. Children may use this to retell the story and imitate the movements of the skeleton in the book to get rid of the hiccups.
Cut the paper towel rolls into three pieces, each longer than the others. Paint these black and let them dry. Use white paint to add the bones to the torso. Draw the skull, ribcage, and pelvic bone and paint it white. Allow the paint to dry.
Download and print the free bones template from the site. Cut these out and poke holes on each end. Attach them with the single-hole fasteners to form the legs and arms. Set these aside.
Meanwhile, once the parts for the torso are ready, use the hole puncher to make four holes in each piece. Attach these using yarn.
Carefully insert the yarn into the holes and leave some space between the paper rolls for the torso to move freely. Attach the arms and legs on the torso to complete this craft.
For this activity, you will need:
- Paper towel rolls
- Printed skeleton bones template
- Black and white paint
- Paintbrush
- Hole puncher
- Single hole fastener
- Yarn
- Scissors
For more information on this activity, go to ThePinterestedParent.com.
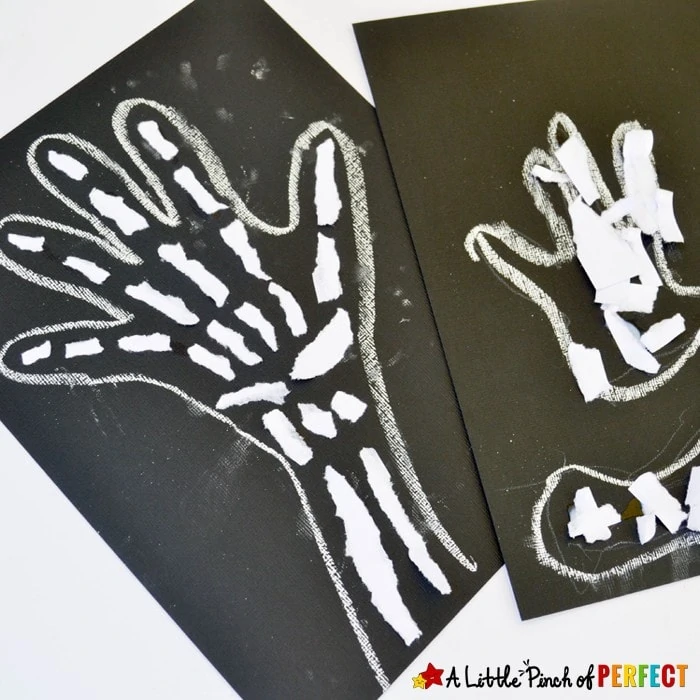
This ripped paper craft will help children strengthen their finger muscles, which is essential for writing. They will also improve their hand-eye coordination skills by tracing their body parts on paper.
It will also help them understand that inside their bodies, there are bones that come in different shapes and sizes. This craft can be used for lessons on the human body, x-ray, or hospital visits.
Give each child chalk to trace their hand, foot, or body parts on black construction paper. Assist younger children in this step.
Have the children rip pieces of white paper. Instruct them to pull the pieces into different lengths. Demonstrate how this should be done if necessary.
Explain that some bones are longer, like the arm bones, while some are shorter, like the finger bones.
Help them form these into bones inside the outlines. Position them before using glue to stick them. Explain that this craft looks like an x-ray of someone’s hand or foot.
For this activity, you will need:
- Black construction paper
- Chalk
For more information on this activity, go to ALittlePinchOfPerfect.com.
Conclusion
These skeleton activities are not just great for Halloween. They are also perfect for teaching children that bones are part of their bodies. This list provides different ways to learn about the skeleton while having fun.
These crafts can be used as toys, decor, and tools for learning new things. We hope you like our list. Thank you for reading!
For more Halloween crafts and activities, check these out:


