Whoo doesn’t love owls? These talented birds are undeniably popular among kids and star in countless children’s books and films like The Owls of Ga’Hoole, Harry Potter series, and many Disney movies, too. While it is best to admire owls from afar, owl crafts are still as adorable and fascinating to kids as the real thing.
We scoured the internet to bring you this list of easy owl crafts that are sure to be a hoot with preschoolers! Use these ideas for forest-themed class, nocturnal animals study unit, letter Oo activities, or just for fun and quality family bonding time on chilly autumn days.
Great Owl Crafts for Preschool
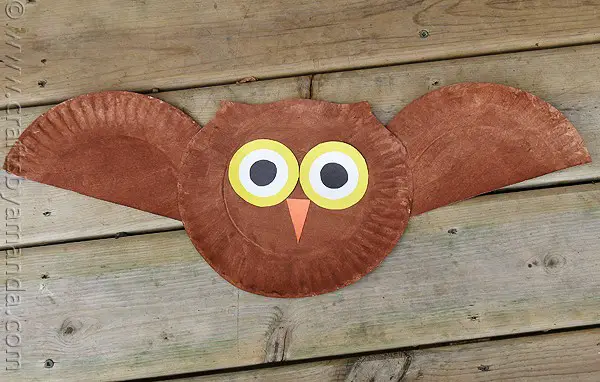
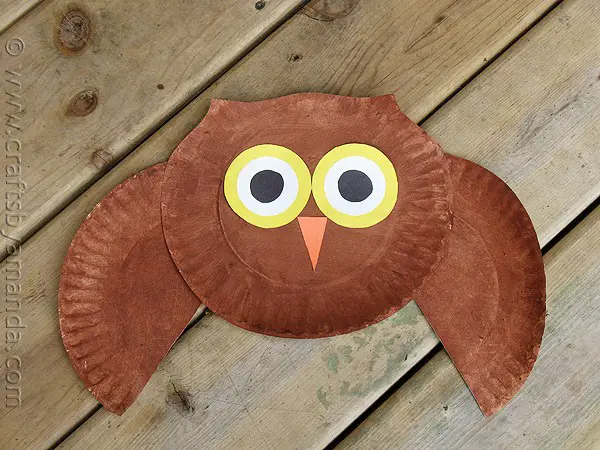
This paper plate owl craft is just too cute and easy to pass up! Since it only involves painting, tracing/drawing basic shapes, and cutting, kids could do this project with little to no help from adults. Cutting circles that form the owl eyes though, can be a bit difficult for younger kids and so require some guidance or advance prep work. However, this is a good opportunity for them to practice cutting curved lines.
To put this together, gather first the materials you’ll need:
- Paper plates
- Brown paint
- Construction paper in yellow, black, white, and orange
- Scissors
- Glue
- Yarn (optional)
Paint two paper plates brown and set them aside to let dry. Trace the pattern provided for free by CraftsByAmanda or draw yourselves the following: 2 large yellow circles, 2 medium white circles, 2 small black circles, and 1 orange triangle. Cut out the shapes and glue the circles in order from largest to smallest (yellow, black, and white) to make the eyes.
Glue the eyes and the triangle beak below them onto the center of one of your paper plates. Then cut out the other plate in half for the wings. Finally, make your owl more adorable by trimming the top of the paper plate to form two ears. You can also tape a piece of yarn to the back to hang your owl up if you wish.
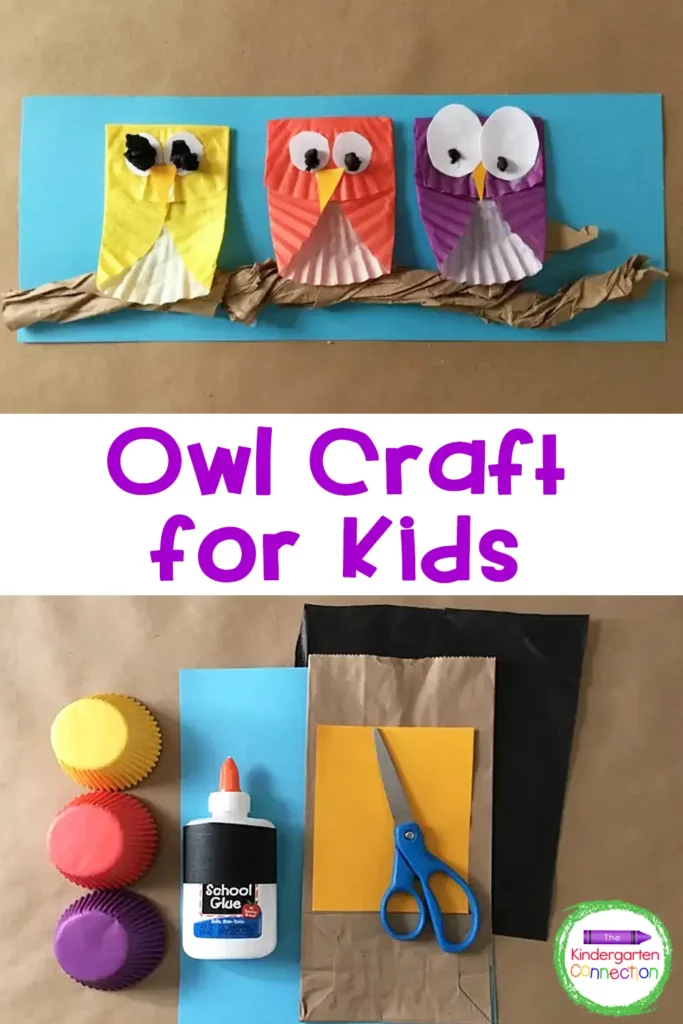
If you have some cupcake liner leftovers from baking and thinking of other creative ways to use them, then this is one of those! This cupcake liner owl craft is so quick and easy that it will take you minutes to create not only one but a parliament of owls.
These are the materials you’ll need to recreate this:
- Cupcake liners
- Blue, yellow, and white construction paper
- Brown paper bag
- Black tissue paper
- Glue
Make your backdrop first by cutting the bottom of your paper bag and asking kids to roll it up to look like a branch. Glue the branch along the bottom of the construction paper cut in half. Then to make the owl’s body, fold each side of a cupcake liner towards the center to create wings, and fold the top edge down for the head. As for the eyes, simply cut circles out of white paper and glue on pupils made from small pieces of black tissue rolled up into balls. Finish it off by adding a beak cut out from yellow construction paper.
Three owls should fit in one paper bag branch, but you can definitely make as many as you desire for extended fun and fine motor practice.
For helpful tips and some usage ideas, visit TheKindergartenConnection.
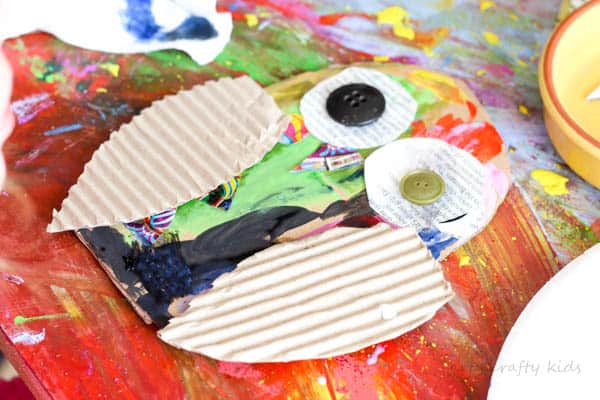

Get your child’s creativity flowing with this owl craft made entirely from recyclables! Aside from being a great fine motor and tactile activity, this cardboard owl craft will cost you next to nothing as it only requires unused at-home items like:
- Cardboard boxes
- Magazines
- Buttons
- Paint
- PVA glue
- Scissors
What’s amazing about this craft is there is really no right or wrong way to put this together. It’s free and open to your kid’s creativity. However, do help those little hands in making the owl body by cutting out a large oval shape from the cardboard, with the head section slightly larger than the bottom. Have kids decorate the body with paint, cutouts from magazines, or both.
For the owl wings and eyes, you may want to opt for contrast by using the textured part of your cardboard box the same as with ArtyCraftyKid’s clever idea. Then glue on the buttons as eye pupils, and from there, kids can continue decorating until they feel that their owls are complete and ready to be displayed in the house or classroom.
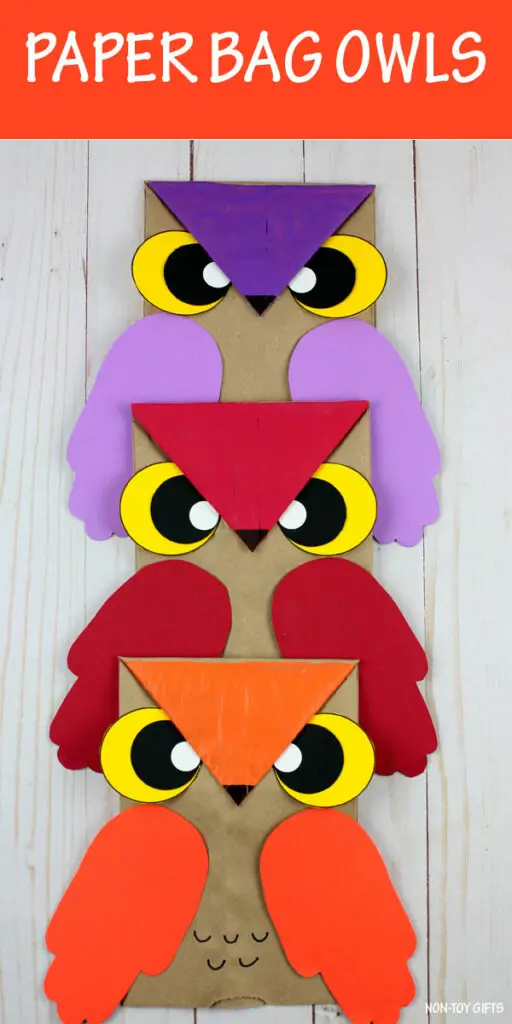
A paper bag is a staple in the crafts storage of every family who loves anything cheap and easy to do like this owl project! Not only is this super simple to make, but it also doubles as a puppet that kids can use for playing pretend. This also makes a fantastic pair for owl book reading in the classroom or at home.
To get started, prepare the following materials:
- Brown paper lunch bags
- Construction paper: yellow, black, white, and another color of your choice
- Paint of your choice
- Black marker
- Scissors
- Glue
- Owl template (optional)
- Circle punches (optional)
Simply paint the bottom of your paper bag in the color of your choice. While letting it dry completely, print out NonToyGift’s owl template or just draw and cut out three different size circles. The biggest circle needs to be yellow, the medium one black, and the smallest circle white. Glue them together to make an eye and repeat to do the other pair.
Next, fold down the sides of the painted bottom of your paper bag to form a triangle, slide in the eyes, and secure with glue. Using a black marker, shade the tip of the triangle to make the beak. Now it’s time to make your paper bag owl a bit more special by attaching wings made from your kid’s handprints. Easy keepsake!
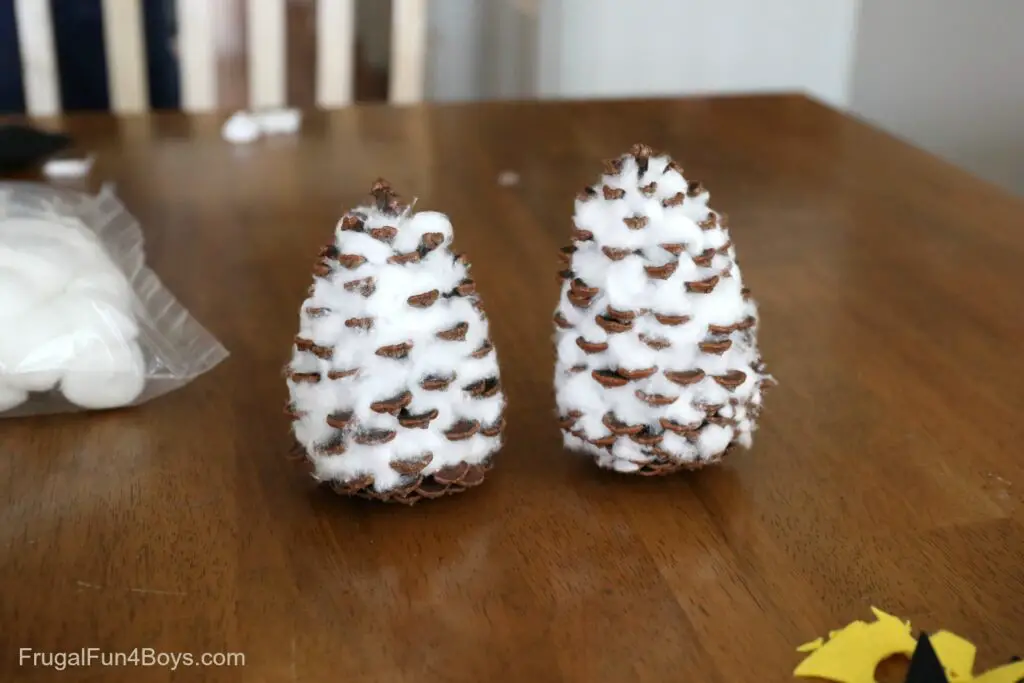
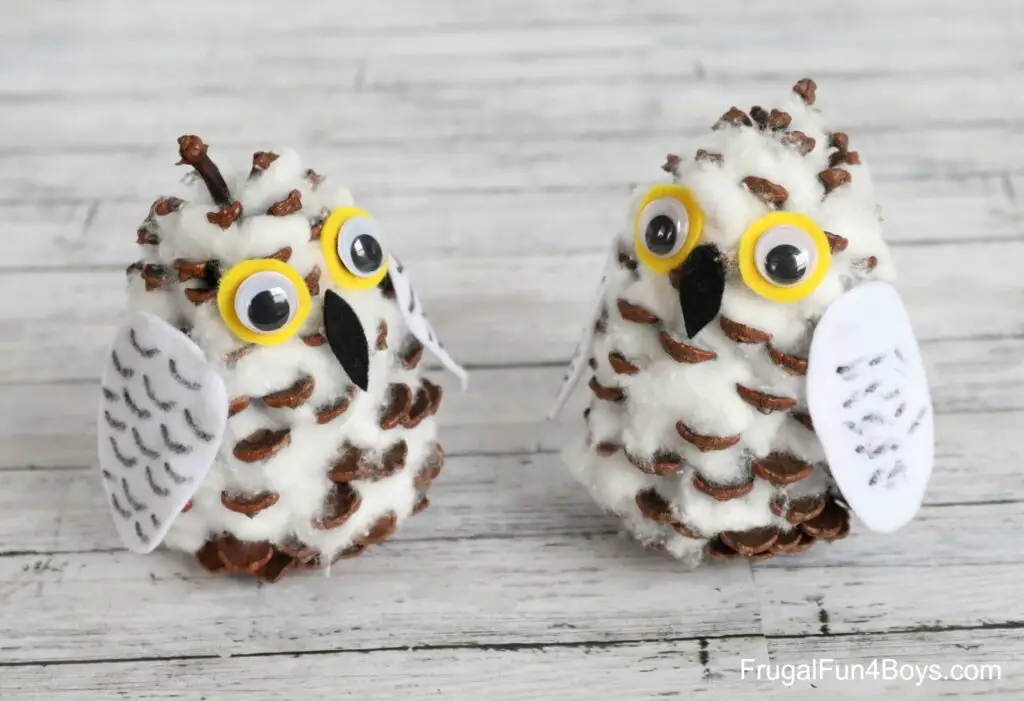
Now, this owl craft is a great excuse to get your kids outdoors to pick up some fallen pine cones! Preschoolers will have a blast working on their fine motor skills filling the pine cones with cotton balls, while grown-ups help with cutting out smaller owl details from felt.
For this, you’ll need these materials:
- Pine cones (good/average size)
- Felt paper (black, yellow, and white)
- Cotton balls (about 15 pcs per owl)
- Large googly eyes
- Marker
- Hot glue or tacky glue
Have kids get started with pulling the cotton balls apart into smaller pieces and poking them in between cone scales. This serves as the owl’s body. Once your pine cone is fluffy and snowy enough, it’s time to attach the cutout parts: wings from white felt, a black felt beak, and googly eyes on top of yellow circle felt. And that’s it! You now have an adorable snowy owl perfect as seasonal home decor.
For precise instructions and more craft ideas, click over to FrugalFun4Boys!
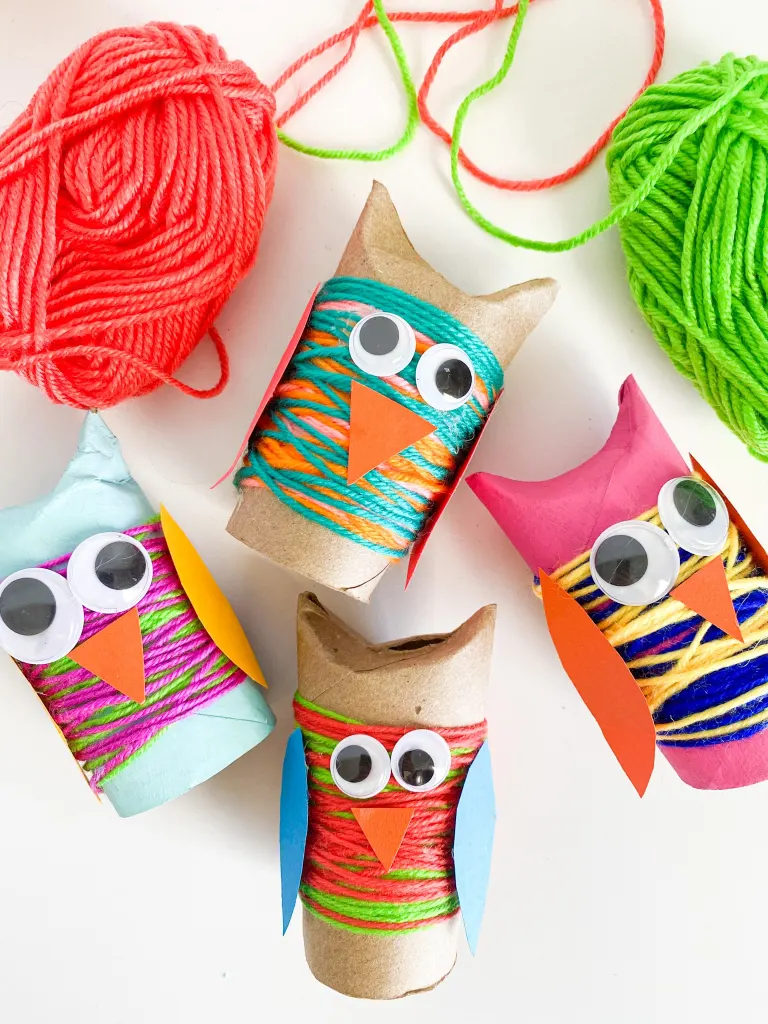
Do you know the beauty of toilet paper roll crafts? They’re total time savers as they’re easy to do and you always have the main material on hand! This toilet paper roll owl craft is an excellent project if you’re looking for fun fine motor practice, but you’re too squeezed for time (and cash).
You’ll only need the following materials:
- Toilet paper rolls
- Yarn (colors you like)
- Scissors
- Googly eyes
- Hot glue
- Cardstock paper
- Acrylic paint (optional)
Begin by painting your toilet rolls in a color that you like, or you can leave them the way they are, especially if they’re brown. Cut two small slits at the bottom of the tube in the back to tuck the yarn through. Stick the first yarn and wrap it around the tube a few times. And if you want your owl to be fancier, add another color, repeat that process until the middle area is covered, and bring the yarn back to the bottom slits and cut. Complete your owl by gluing the googly eyes, beak, and wings on.
ABCDeeLearning has an amazing lineup of owl crafts for preschoolers so be sure to check them out!
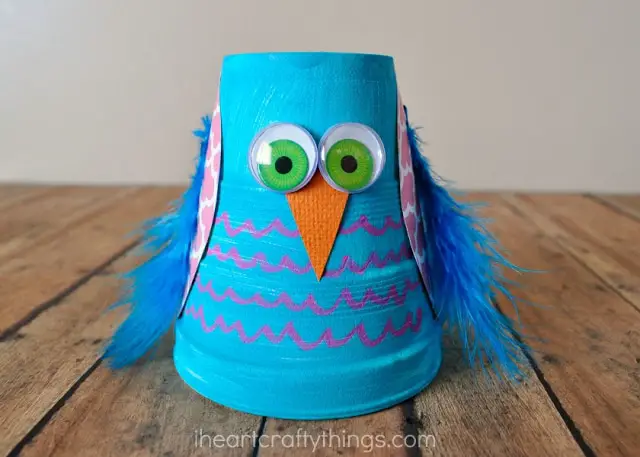

Who knew a Styrofoam cup would make a fantastic owl body? This cute and colorful Styrofoam owl craft from iHeartCraftyThings will be a HOOT with preschoolers who love being creative with different colors and patterns. They also get to improve their small hand muscles through painting, cutting, and pasting.
For this project, you’ll only need just a little bit more than the basic craft materials:
- Styrofoam cups (one per owl)
- Paint (color of your choice)
- Chalk markers
- Patterned scrapbook paper
- Colored feathers
- Googly eyes
- Orange cardstock
- Tacky glue or glue stick
To recreate this, start by painting your Styrofoam cup on the outside and bottom. While waiting for it to dry, cut out two leaf-shaped wings from scrapbook paper and a triangle-shaped beak from the orange cardstock. Once your cup is ready, have fun using chalk markers to draw on scallop lines along the cup to look like owl feathers. Then finish it off by gluing on the pair of wings and feathers on each side of the cup, googly eyes, and beak.
One or a parliament of these cup owls is sure to liven up a classroom or room of owl-loving kids!
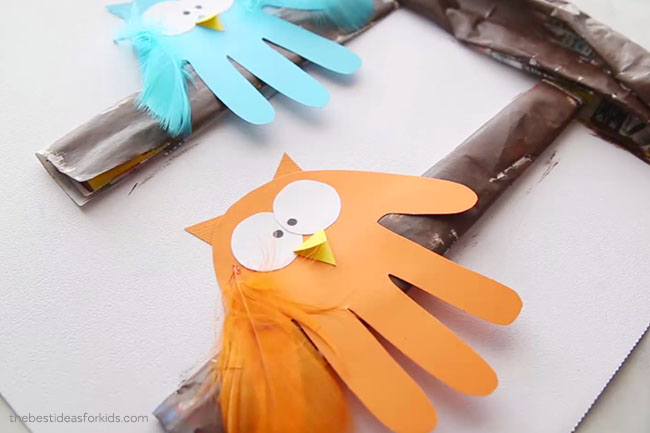

This handprint owl pulls double duty as a keepsake and a fall decoration! Kids will be thrilled that the main star of this craft is made from their handprints. This also gives them plenty of motor practice targeting their grasp and hand strength.
If you’re up for it, prepare the following materials:
- Cardstock (blue, orange, yellow, and green)
- Newspaper
- Brown paint
- White 12×12 cardstock
- Feathers
- Marker
Start with making your tree and branches by rolling and scrunching up strips of newspaper to the length and size you desire. You’ll want to make your trunk much wider than the branches though. Depending on your kid’s paintbrush control, you can paint the newspaper before or after gluing them onto the white 12×12 cardstock.
As for the owls, you know the drill! Trace and cut out your child’s handprint that serves as the body. Use the colored cardstock to create the rest of the features: two white eyes, one yellow triangle-shaped beak, and another two for the beak (should be the same color as the body). Draw on the pupils using a black marker and lastly, fancify your owl by gluing feathers to the thumb and pinky finger. You can also cut out and glue on green cardstock leaves or anything you’d like to your owl tree craft. Perhaps, a moon at the top?
For more craft inspiration, check out TheBestIdeasForKids!
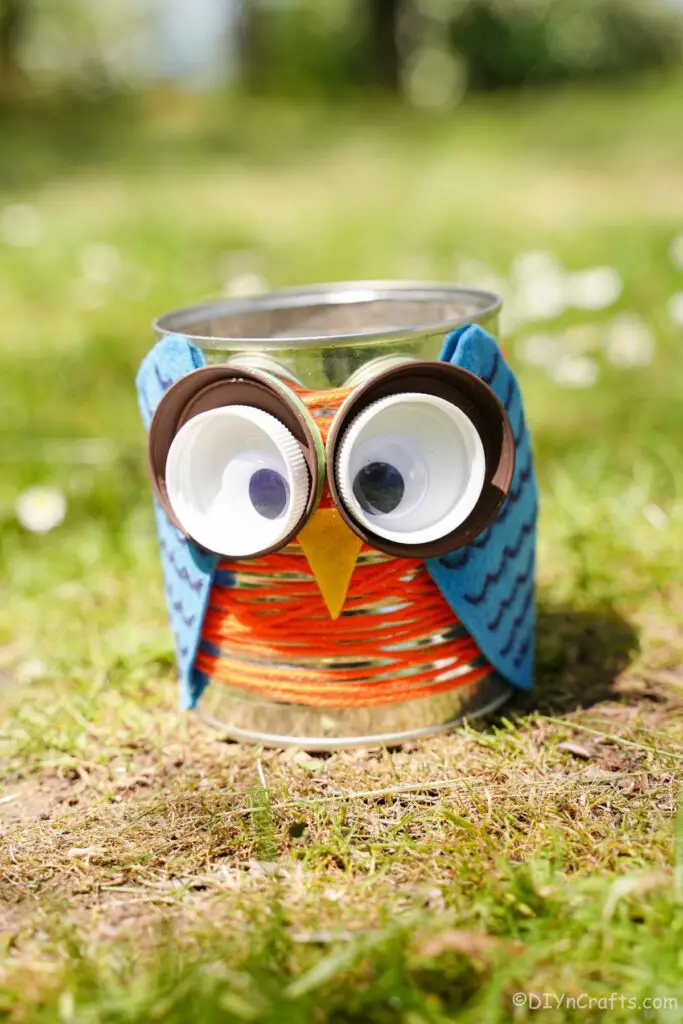
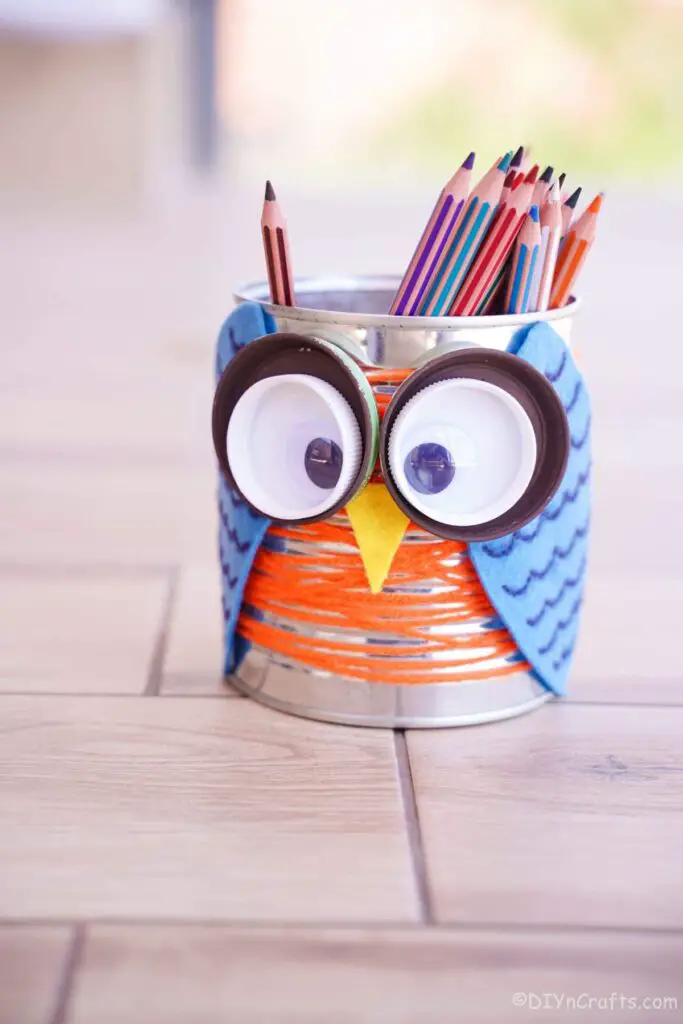
If you’re looking for something adorably creative to gift owl-loving kids, look no further than this tin can owl organizer! This repurposed tin can craft can be used by preschoolers to hold pencils, desk supplies, candles, and even flowers.
To make this, gather these materials:
- Tin can
- Yellow and blue foam paper
- Orange yarn
- Brown paint
- Bottle caps (2 large and 2 medium-sized)
- Googly eyes
- Black marker
- Hot glue gun and glue sticks
- Scissors
Begin by painting the inside of the two bigger bottle caps brown and set them aside to dry. On your clean and dry tin can, attach the end of the orange yarn with hot glue and wrap it around, intentionally leaving it loose with gaps between each thread. Create wings by folding your blue foam paper in half and cutting a leaf shape out of the folded area. Decorate it with scallop lines using the black marker.
Now, it’s time to glue the owl parts! Attach the wings on either side of the can, the eyes assembled by gluing together the brown bottle cap, smaller cap, and googly eyes, and lastly, a beak cut out from yellow foam paper.
Over at DIYnCrafts, they have detailed instructions and helpful tips in putting this together easier.

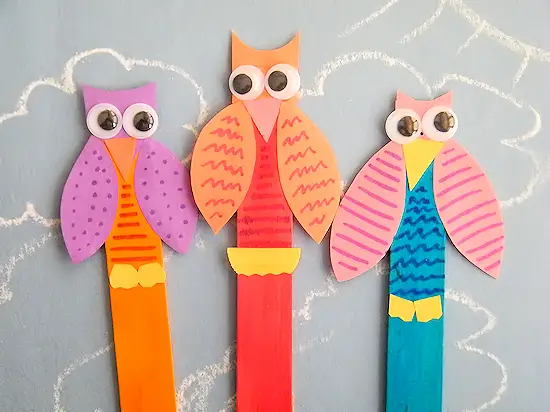
Creative lines and patterns are the secrets to this adorable craft stick owl! Kids are free to make their stick owl as playful and colorful as they want. They can also be in charge of cutting and gluing depending on their hand control, while the adults take care of hole punching.
To do this, you’ll need these materials:
- Large colored craft sticks (or paint your own)
- Colored construction paper
- Colored markers
- Googly eyes (small-medium sized)
- Glue
- Scissors
- 1″ hole punch (optional)
- Pinking shears (optional)
Simple and straightforward, all you need to do is make the smaller owl features out of paper with a different color from your craft stick. First, cut out a pair of petal shapes for the wings and a triangle beak. For the ears, you can either cut out a rectangle the same width as your craft stick and use a hole punch to punch out the top area or manually trim it with scissors. Then for the feet, use your pinking shears to give the shape a wavy edge.
Glue everything in place and let your creativity flow, drawing patterns all over your stick owl craft with colorful markers.
Check out the owl enthusiast from OurKidThings for useful tips and more preschool craft ideas!
Conclusion
As versatile as the real creatures, these owl crafts can be used creatively in ways that benefit kids in preschool. To name a few, they work perfectly as an indoor craft on cold or rainy days, are helpful in engaging kids in woodland unit study, and are such a great source of fine motor skills development.
Make sure you bookmark this post to make any of these awesome owl crafts for preschoolers soon!
For more preschool fall crafts and activities, check these out.


