Dragons are mythical creatures that have fascinated people for centuries. They can be scary or friendly, and they come in all sorts of shapes and sizes. If you’re looking for a fun craft project with your preschooler, why not try making some dragons?
Great Dragon Crafts for Preschoolers
You can make all sorts of dragon crafts, from simple paper dragons to more complex ones made out of cupcake liners or even recycled materials. And the best part is that your preschooler will love helping to create them! Here are 10 terrific dragon crafts for preschoolers:
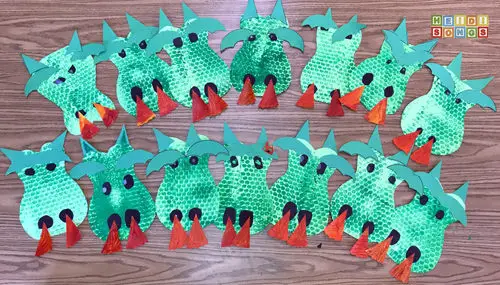
Introducing the Bubble Wrap Painted Dragon craft! This fun and easy project are perfect for preschoolers and young children. Your little ones can create colorful dragons with just a few simple supplies!
Here are the supplies you’ll need:
- Paint (Use bubble wrap to give the dragon’s scales a fun texture!)
- Paper (For the dragon’s head, ears, eyebrows, eyes, nostrils, and flames)
- Scissors
- Glue
Instructions:
1. Cut out all the paper pieces ahead of time: the head, eyebrows, ears, flames, nostrils, and eyes. Paint the paper for the head using bubble wrap in advance and let it dry.
2. Paint the paper for the dragon’s head using bubble wrap.
3. Duplicate the pieces for the ears, eyebrows, head, and flames.
4. Assemble the dragon’s features by gluing them onto the head.
5. Let your child’s imagination run wild and enjoy their one-of-a-kind dragon creation!
For more information about this activity, please visit Heidisongs.blogspot.com.
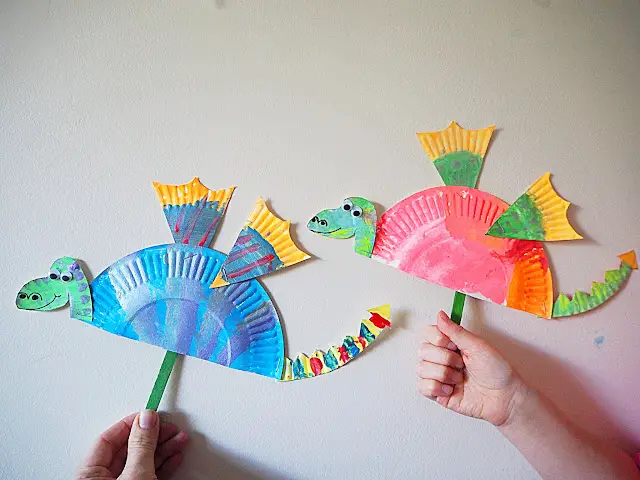
Are you looking for a fun and easy craft with your preschooler? Look no further than the Simple Paper Plate Dragon! This craft is perfect for little ones just learning to use scissors and paint. And it’s a great way to teach them about different shapes too!
To make this craft, you will need:
- One paper plate
- Paint
- Googly eyes
- Scissors
- Fabric and/or paper scraps
- Pen
- Stick
- Stapler or tape
Instructions:
1. Cut a paper plate in half. Cut one of the halves in half, then cut one of the quarters into 2 pieces (2 one-eighth sections).
2. Cut the wavy edge off of the quarter-plate piece. To create the tail, cut small triangles from the plate wavy rim piece and sketch a dragon head on the remaining portion.
3. Cut out your dragon head and shape the wings from the one-eighth-sized pieces.
4. Paint your dragon however you like! You can use fabric or paper scraps to create a fun pattern on the wings.
5. Attach the wings to the body with a stapler or tape. Then, put the craft stick on the back of the dragon so it can fly!
There you have it! Your very own Simple Paper Plate Dragon!
Check out the details about this craft by visiting Learnwithplayathome.com.
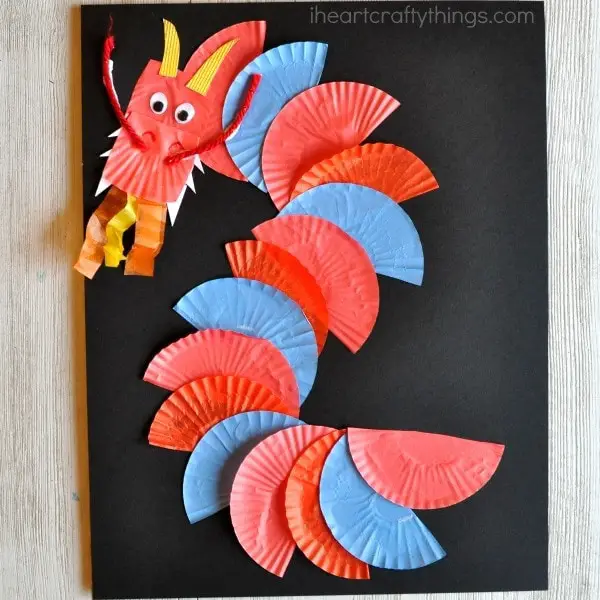
The Cupcake Liner Dragon Craft is a great way to teach your preschoolers about colors and shapes. This craft requires your child to use their fine motor skills to assemble the dragon.
Supplies needed for this craft are:
- Gold, black, and white cardstock
- Googly eyes
- Mini cupcake liners (any colors)
- Yarn (red)
- Tissue paper (orange and yellow)
- Red marker
- Glue
- Scissors
Instructions:
1. To start, cut eight mini cupcake liners in half. Then, take one of the halves and glue it onto your black cardstock paper near the top, with the round curve pointing towards the left side of the page. This is the beginning of your dragon’s body. Continue adding more halved cupcake liners to form your dragon’s body by layering them down your page. Depending on your preference, you can also add curves to give your dragon some shape or keep it straight.
2. Make your dragon head out of two cupcake liners. You’ll need two half-moon cupcake liners. Fold the other liner in half and cut it in half. Cut both pieces down the center, then glue the two sections together to make a dragon head, ensuring that the folded section opens and closes at the bottom of the face.
3. Glue the dragon head on top of your dragon body. Cut wooden horns from your gold cardstock and attach them to your dragon. On the inside of the dragon’s mouth, cut out white teeth and glue them in place.
4. To create your dragon’s mouth, cut out several small pieces of orange and yellow tissue paper. Next, glue the tissue paper to the inside of the dragon’s mouth. To make it look like the fire is coming out of the dragon’s mouth, crinkle the ends of the tissue paper a little. Finally, add a bit of glue on top so that you can close up the dragon’s mouth.
5. To complete your cupcake liner dragon craft, use a red marker to draw nostrils on the dragon’s face. Then, glue two short strands of red yarn from the sides of the dragon’s face like long whiskers. Finally, add two googly eyes to the dragon’s head; your craft is complete!
Visit Iheartcraftythings.com for details regarding this dragon activity.
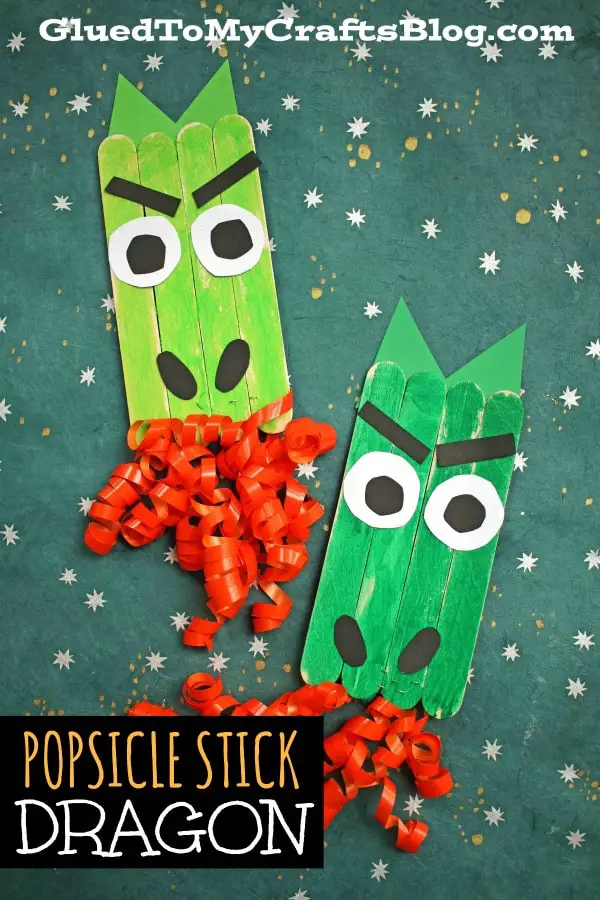
Do you have a little one who loves dragons? If so, they’ll love this simple Popsicle Stick Dragon craft! It’s perfect for preschoolers and requires only a few materials you probably already have at home.
To make your dragon, you’ll need:
- 4 Jumbo Popsicle Sticks
- 2 Mini Popsicle Sticks
- School Glue
- Paint (green)
- Foam Paint Brush
- Paper Plate (small)
- Colored Cardstock Paper (black, white, and green)
- Scissors
- Curling Ribbon (orange)
- Stapler
Instructions:
1. First, glue your popsicle sticks together to look like a fence. Set aside to let it dry completely. Repeat for each dragon you are making.
2. Next, grab your green craft paint and the paper plate. Squirt a small amount of paint on the plate. Take the paintbrush and paint the front of your newly made popsicle stick shape completely green. Set it aside to allow it to dry a bit.
3. While drying your dragon, you can prepare the cardstock pieces. Grab the black cardstock and cut out two small circles for the eyes. Cut two small triangles out of the green cardstock for ears. For the eyebrows, cut two thin rectangles out of the black cardstock. And finally, use the white cardstock to cut out two small ovals for nostrils.
4. To finish your Popsicle Stick Dragon kid craft – have children glue their cardstock pieces to the painted popsicle stick shape. Follow that up by gluing the orange curling ribbon flames on the back of the piece. Then let it all sit aside to let it dry completely.
And that’s it! Your child now has their own Popsicle Stick Dragon to play with and be proud of. This is a fun and easy craft for kids and can be done in under an hour. So gather up your supplies and get crafting!
If you’re unsure, you can drop by Gluedtomycraftsblog.com for more details.
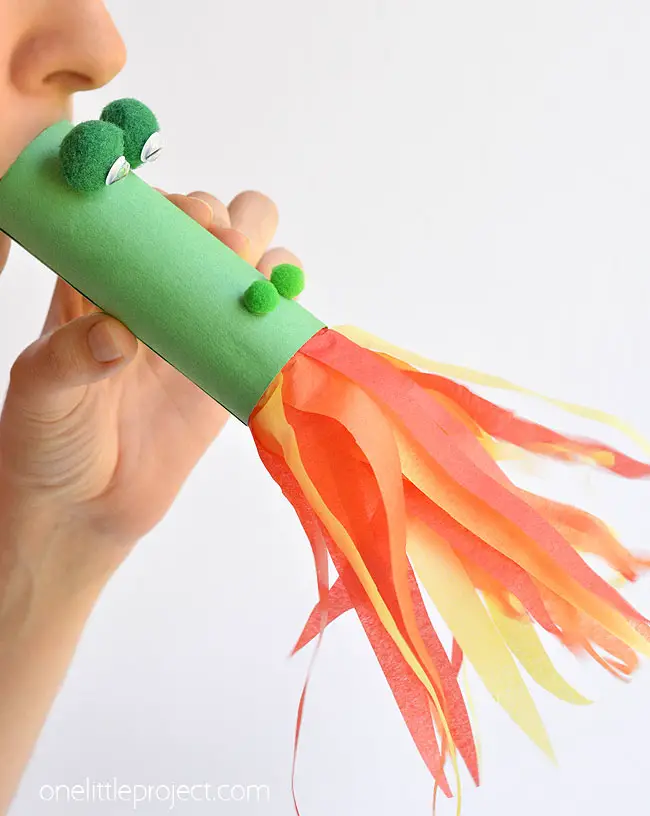
Do you have a little one at home who loves dragons? If so, they will love this TP Roll Fire Breathing Dragon craft! It’s a fun and easy project that the whole family can enjoy.
To make this dragon, you’ll need:
- Scissors
- Glue gun
- Glue stick
- Toilet paper roll
- Construction paper
- Small pom poms
- Bigger pom poms
- Googly eyes
- Scraps of tissue paper (any colors)
Instructions:
1. Start by cutting a portion of your construction paper of the same length as the paper roll. Apply the glue from your glue stick onto the first side of your paper, then line up and wrap the ends around each other until the paper fully covers the roll.
2. Attach one of the larger pom poms to a googly eye with a glue gun, or you can also use glue dots. Just repeat the process for the next googly eye and the bigger pom poms, using the same method. These will be your dragon eyes.
3. Attach one end of the paper tube to a glue gun, then adhere to the dragon’s eyes. Attach the two tinier pom poms close to the other rear of your paper tube to create the dragon’s nose with a glue gun.
4. For the craft’s fire, make long, narrow strips of orange, red, and yellow tissue paper, each about 9″ or 10″ long. Apply glue straight to the end of one of your tissue papers and then adhere it to the inner surface of your paper roll underneath the dragon’s nose. Continue gluing your tissue paper to the inside surface of the paper roll as you go around.
5. The only tissue paper that should be glued is the one shown in the photo. If you glue tissue paper around the bottom of the roll under the nose, gravity will pull it down, and it won’t move when blown into.
6. Once all the tissue paper is glued on, your TP Roll Fire Breathing Dragon is complete! Time to have some fun!
Blow into the dragon’s mouth and watch the fire breath out! This craft is perfect for a rainy day activity or as a decoration for a dragon-themed birthday party. Your little ones are sure to love it!
Visit Onelittleproject.com to know more about this activity!
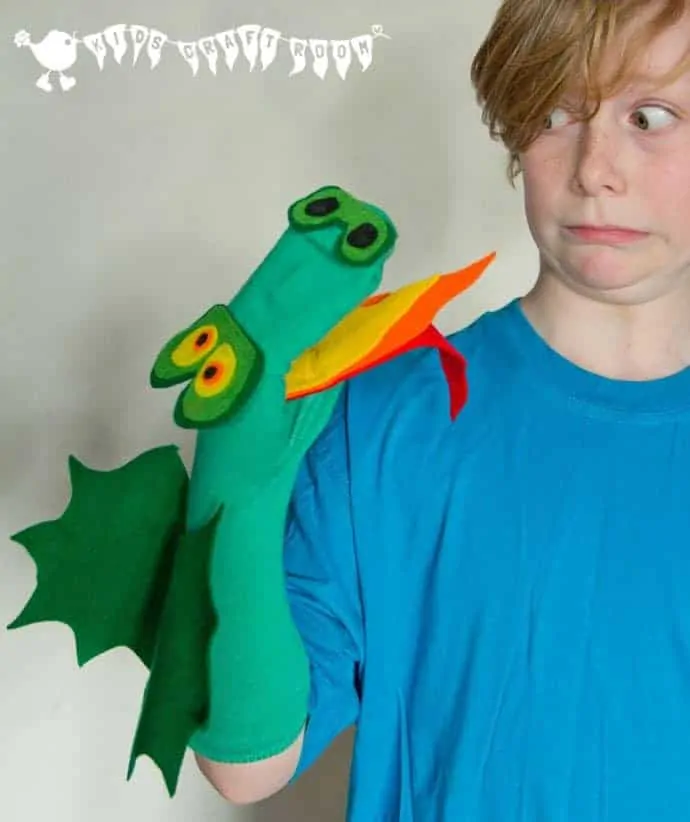
A no-sew dragon sock puppet is a fun and easy craft you can make with your kids. It’s a great way to teach them basic sewing skills; they’ll love playing with their new sock puppet friend.
Here’s what you’ll need to make a no-sew dragon sock puppet:
- A sock
- Felt
- Glue
- Scissors
- Old newspaper
Here’s how to make this craft:
1. Cut out the individual shapes from the two pages of the Dragon Sock Puppet Pattern.
2. Place the pattern pieces on a felt color palette and cut them out.
3. Allow the tongue, eyes, and nose to dry after gluing them together.
4. Glue the newspaper into your sock. This is so that when you apply your felt shapes, they won’t be too bulky.
5. Place your felt figures on the sock and allow them to dry.
6. That’s it! Your dragon sock puppet is finished and ready to play with.
For more information about this activity, visit kidscraftroom.com.

Looking for an easy and fun craft to do with your preschooler? Look no further than the egg carton dragon! This adorable dragon is made out of recycled egg cartons and can be easily customized to your liking. Plus, it’s a great way to teach your little one about recycling and upcycling!
Here are the supplies you’ll need for this craft:
- Egg cartons
- Spray paint (green)
- Cardboard (red)
- Paper (white and red)
- Black marker
- Glue stick
- Glue gun
- Scissors or knife
Instructions:
1. You will need one and a half egg cartons per dragon. To start, paint the egg cartons green, then let them dry completely. Once the paint is dried, glue pieces of one whole carton together.
2. Place the combined box upright on its side and lay it halfway back on top of the first carton, bottom side up, and offset. Draw two large black circles for the nose on the front of the bottom carton.
3. To make the eyes, cut two white circles out of paper. Then, draw black circles in the center of the white circle. Next, glue or stick the white circles to the front upper part of the second carton. Finally, cut out three strips of red paper that are 8-10 inches long.
4. Gather three strips of paper and roll one end of each with a pencil. Next, overlap the flat ends slightly and glue them together to create the dragon’s tongue sticking out.
5. For the top carton, cut a piece of cardboard or cardstock to fit, then cut one side into spikes or large triangles. In the center of the egg carton, glue this in position. Add more paint, sequins, ribbons, and other decorations as desired to continue decorating your egg carton dragon!
Check out more about this craft at Diyncrafts.com.
This is a fun and easy craft that your preschooler will love! It’s perfect for imagination and only requires a few supplies. Plus, it’s a great way to learn some new skills!
Here are the supplies you’ll need:
- Green construction paper
- A glue stick
- Scissors
- Tape
Instructions:
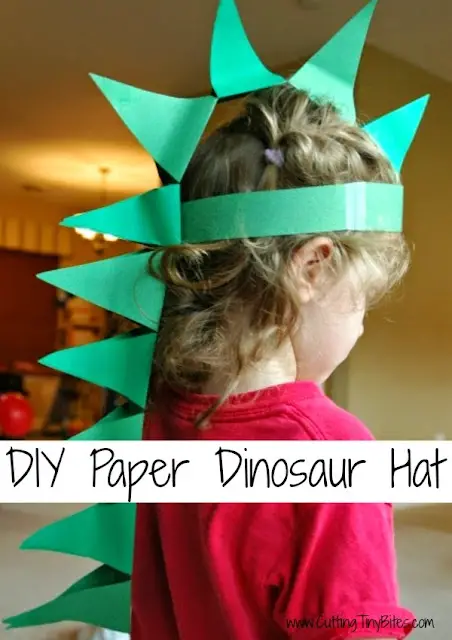
1. The first step is to cut four strips about 1″ wide along a piece of paper length. The headband will be made of two of these strips, and the remaining two will serve as cross pieces for attaching your spikes.
2. Cut your remaining two sheets of paper into strips that are approximately 2″ wide along the short side of the paper. This should give you around five strips per sheet. These will be used for your spikes.
3. Take each of your spike pieces and fold them in half. You’ll want to cut them to resemble a diamond, but with a flat section in the center. The point of your spike should be on the open edge of your folded paper, and you should cut diagonally down to around 1/2″ above the folded edge. Cut out all of your spikes.
4. Glue the spikes down in a row along the two long thin strips that form your cross pieces. While the glue sets, measure your two headband pieces to fit around your child’s head. We used tape to keep it in a circle. It doesn’t have to be tight since a cross piece will go over the top of the head and assist in its stay.
5. Your next steps are to take the cross piece and flip it over so that the spikes are facing downwards. Afterward, proceed to fold each spike up along the cross piece until you create a crease. Once you have done that, apply glue on one side before bringing both sides together and letting them meet in the middle. To keep both sides together while they dry, use paper clips as reinforcements.
6. After the glue has been set, simply attach the cross pieces to the headband. One should fit properly from front to rear, and one should fall below the back of the head.
7. Finally, put the hat on your child and enjoy their new look! You can add fake eyes or other decorations to bring the dinosaur to life. Have fun and be creative!
Visit Paper-and-glue.com for more details about this activity.
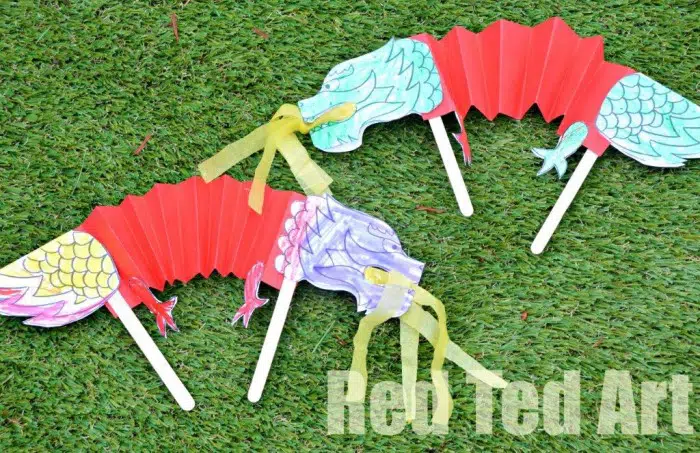
Chinese New Year is a time for family, friends, and celebrating. One of the most popular ways to celebrate is by decorating a paper dragon. This craft is perfect for preschoolers and can be easily done at home with just a few supplies.
Supplies needed:
- Paper for printing
- A printer
- Red paper for the body
- Crayons
- Tissue paper
- Lollipop sticks
- Glue
- Scissors
Instructions:
1. First, print the dragon printable. There is a double-sided head and tail part to fold later on. Allow the youngsters to color them and cut them after they are done.
2. Use a sheet of paper, and cut it into thirds lengthwise, each third representing one body.
3. Using glue, carefully attach your head, tail, feet, and lollipop sticks to your body.
4. Cut some tissue paper to create a fire effect.
5. Hang your dragon up to celebrate the Chinese New Year!
Your preschoolers will love making their paper dragons to help celebrate the Chinese New Year!
If you’re confused, don’t miss the details available on Redtedart.com.
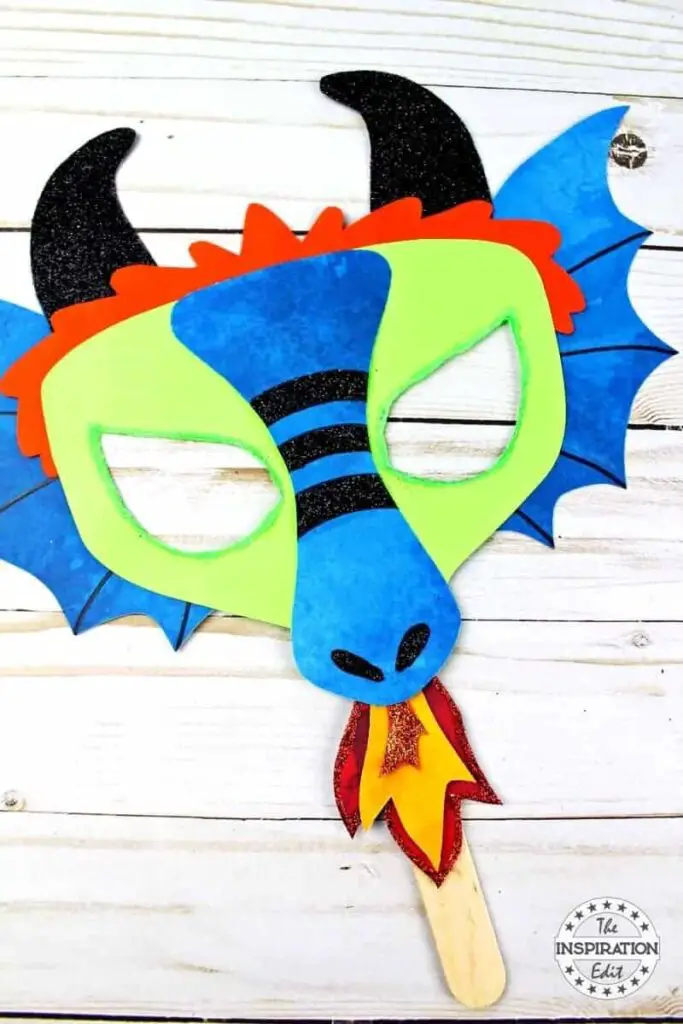
Making a dragon mask is a fun and easy way to get your preschooler excited about the Chinese New Year!
All you need is some supplies:
- Cardstock
- Glue
- Scissors
- Popsicle sticks
- Glitters
- A black marker
Follow these simple instructions, and you’ll have a dragon mask in no time!
1. Download the dragon mask forms and print them out. Make a paper cutout of your Chinese dragon mask template. Cut out the pattern on cardstock after tracing the template. Trace the template for the dragon’s nose and cut it out. Add detail with a black marker to the dragon’s nose once it has been sliced out.
2. Remove the dragon’s head scales and horns then set them aside. Cut out the yellow face template using a pair of scissors. To add detail to the dragon’s head, use a black marker. Glue the dragon’s scales down first before gluing on the top of the dragon’s head to the back of the mask. Cut out two white paper circles for eyes; these should be glued above the larger black circles.
3. Glue two tiny triangles above the eyes of the dragon to make its brows. Attach the two little horns on either side of the dragon’s head using tape. Cut a tiny rectangle from red paper and glue it under the nose to create the dragon’s mouth.
4. To make your dragon mask stand out, add some glitter! Glue glitter around the eyes, nose, and mouth. Let the glue dry, and then shake off any excess glitter. Adhere a popsicle stick to the back of the mask, and you’re good to go!
Your preschooler will have a blast running around pretending to be a dragon with their own Chinese dragon mask!
Check out the details at Theinspirationedit.com.
Conclusion
Encourage your preschooler’s creativity and imagination with these fun dragon craft activities. They can make dragons that are big and friendly or small and mischievous–it’s entirely up to them! And be sure to check back for more activities related to other themes.
For more engaging craftivities, check these out:


