Another activity week has been planned, with the mouse as the main character!
Whether you’re teaching the letter M, working on an animal unit, or just need a fun activity featuring a mouse, we’ve tracked down some of the best crafts out there. Browse our list to find the mouse craft that fits your curriculum best!
Great Mouse Crafts for Preschoolers
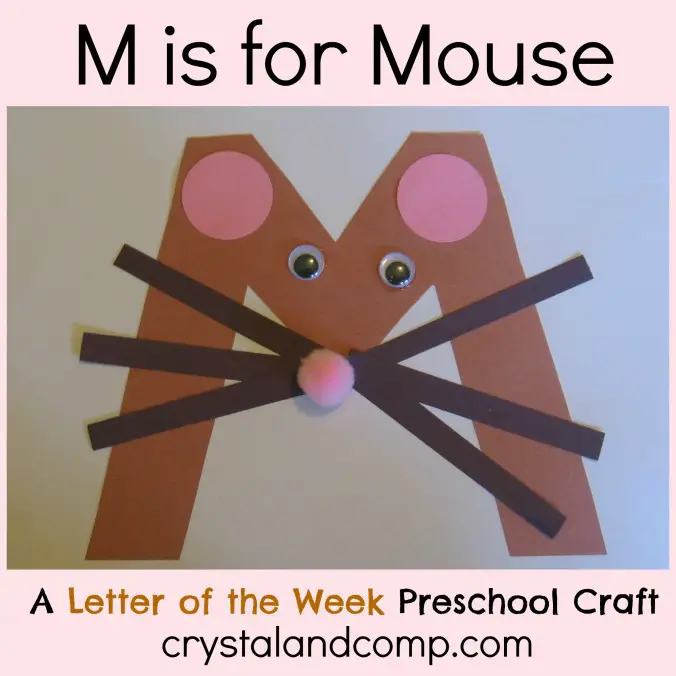
Learning letters can be difficult for preschoolers, but it will be much easier with their imagination. Teachers can use the M for mouse activity to help students recognize the letter M in a fun and creative way. This activity will help the children improve their craftmanship and recognition skills.
Educators must capture the attention of children aged three to six. Making an exciting work of art will pique their interest in how they can memorize each letter in the alphabet that will remain in their minds.
This craft will provide both parties the enjoyment and excitement of putting art materials together to create a mouse face on the letter M.
We will need the following materials to accomplish this:
- M is for Mouse printable template
- Brown, black, and white construction paper
- Scissors
- Glue
- Glue stick
- 1 small, pink pom pom
- 2 googly eyes
The free printable template provided by the blog makes this letter craft a lot easier for little kids. Simply print the template and begin by tracing and cutting the letter M outline out of brown or gray construction paper. Glue it down on your white construction paper.
From there, cut out and glue the rest of the mouse details – placing one circle on each top point on the M, and three strips of paper on each side, meeting at the center point of the M. Last are the pair of googly eyes and a small pink pom pom for the nose.
You can visit crystalandcomp.com to learn more about this craft.
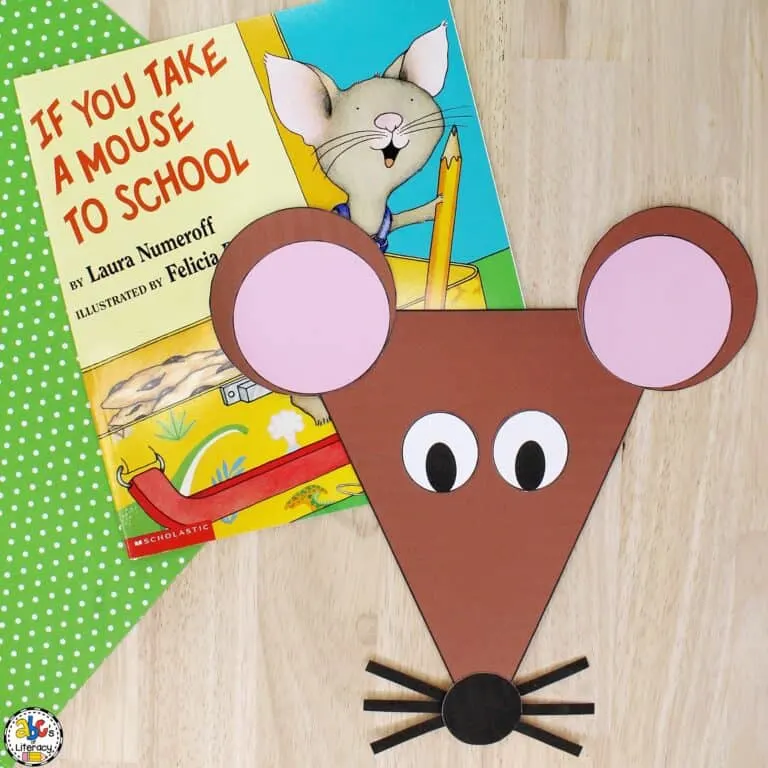
The Mouse Easy Shape Craft is another enjoyable and straightforward craftwork every child will enjoy. Educators should introduce this book-inspired activity to their preschoolers aged two to six. It will improve their fine motor skills, making shape recognition and naming easier and more fun.
Teachers will want to create an interactive activity in which students cut out the necessary materials from paper and glue them together to make a good mouse face.
This exercise will allow children to practice their muscle control while teaching about the facial organs required by mice. They can also learn more about the various shapes involved in this enjoyable activity.
Furthermore, teachers can assist students in improving their hand-eye coordination and hand-muscle control, which is necessary for writing preparation.
So, before we begin this activity, we will require the following materials:
- Mouse Shape Pattern
- Colored papers or building papers
- glue
- scissors
- crayons
You can either choose to print the template in black and white for kids to color in or use it to trace the shapes on brown, black, pink, and white construction paper. Let kids with enough scissors control cut all the shapes out.
Next is gluing the pieces together to create a mouse face. Begin with pasting the pink circles onto the brown circles to make ears. Next, glue the ears onto the vertices of the triangle, and the small black circle on the third vertex for the nose. As for the whisker, flip the face over and glue the black strips onto the back of the nose. Lastly, finish off your easy shapes mouse by gluing its pair of eyes onto the center.
Check out abcsofliteracy.com to learn more.
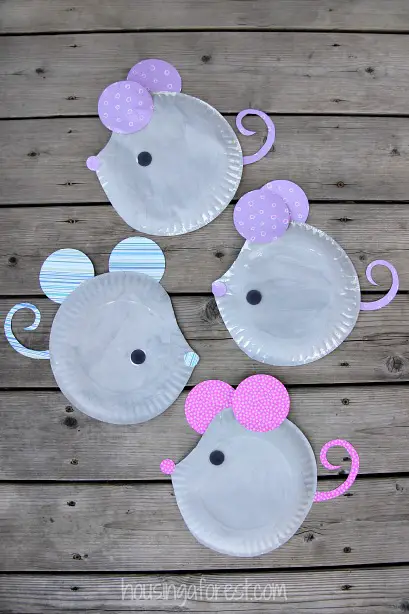
This paper plate mouse is also a fun activity for preschoolers that will help them improve their creative thinking, recognition skills, and environmental stewardship. This is an excellent exercise for teachers to give their students, especially if they have extra paper plates from school parties.
Cutting out materials is an excellent way for kids to practice their fine motor skills and attention to detail while making a good mouse. This project promotes recycling while stimulating the toddler’s imagination by creating a mouse out of this material. It will also demonstrate how well educators can deliver instructions for the children to follow.
Furthermore, teachers can assist their students in recognizing a mouse’s face while teaching them about letters to remember.
So, to proceed with this enjoyable activity for everyone, the following materials are required:
- paper plate
- scissors
- glue
- colorful papers
- construction papers
Start by cutting your paper plate into a mouse shape. Don’t worry if it’s not perfect, but if you’d like it to be, you can use the free mouse template provided by the site for free. Paint the paper plate grey. Before that, you may want to let kids explore and mix colors until they figure out what two colors make grey.
Once completely dry, glue two big circles for ears and a curly tail cut out from any color of construction paper you like. And that’s it! Quick and easy paper plate mouse craft.
You can learn more about the different faces you can make at housingaforest.com.
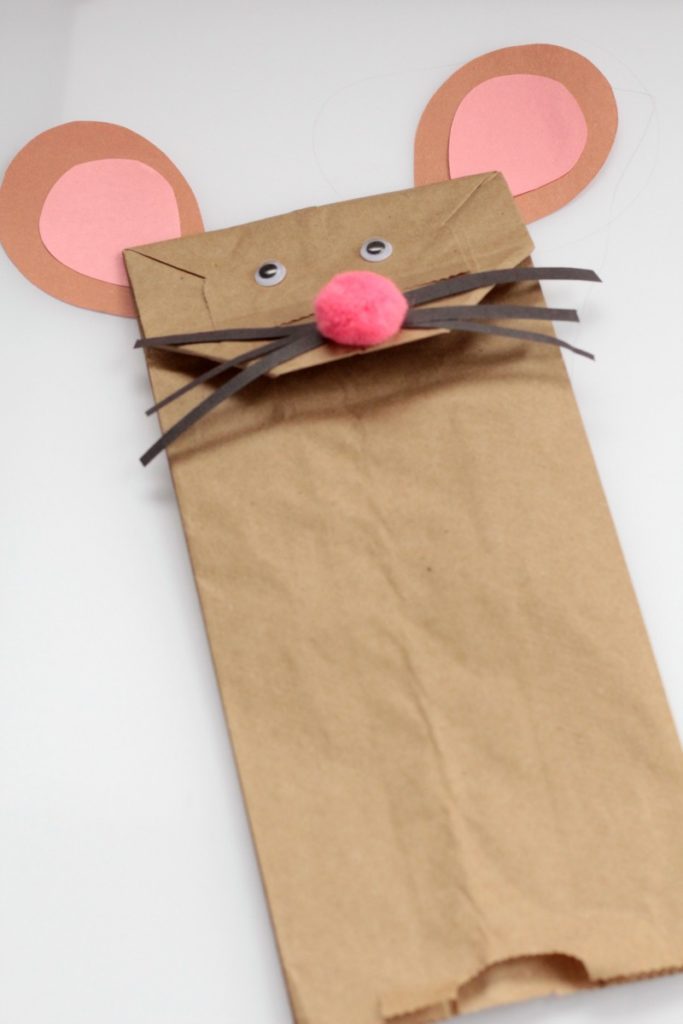
Another simple activity everyone will enjoy is making a paper bag mouse puppet. This activity will improve your preschooler’s crafting, thinking, and recognition abilities.
The objective of this activity is also to make good use of everyone’s lunch paper bags by transforming them into chatty mice that kids will adore.
Instructors will be able to teach pupils how to draw a mouse face on paper using their imaginations. At the same time, they will assist the children in practicing their fine motor skills, which are required to read and write. This exercise is a lot of fun; participants will enjoy mixing and matching colors to make a good face.
It also promotes environmental awareness by recycling paper bags.
So, before we begin crafting, we’ll need the following materials:
- paper bags
- construction papers
- glue
- scissors
- pink pompoms
- squinting or googly eyes
Putting this craft together is quick and easy as it only involves cutting, gluing, and folding paper. If you are going to do this with younger kids, you may want to prepare the cut-out ears (brown and pink for ear centers), and six, black strips in advance. Otherwise, let the kids cut those parts and set them aside.
Next, fold down two corners of the bottom of your paper bag and secure them with glue to turn your puppet into a more mouse-like shape. Glue on the cut-out ears, whiskers, a pair of small googly eyes, and lastly, a cute pink pom pom nose.
You can also glue on or draw a red oval shape on the flap under your mouse’s nose for the tongue to add to the fun.
Visit their website sightandsoundreading.com to learn more about this paper bag mouse puppet.
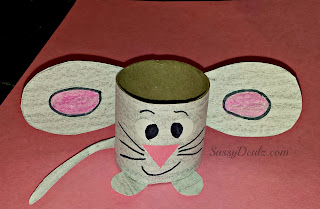
Why not make an easy mouse toilet paper for your preschoolers if you’re looking for another fun and crafty activity? This exercise will encourage your children to be more creative, focus on details, and recognize things.
This cut-and-paste artwork is more complicated than others. As a result, teachers must be careful when giving instructions to students so that everyone completes the task correctly.
This exercise requires close attention and clear instructions, from cutting to placing the mouse’s ears, eyes, nose, and whiskers on its face. The medium, a toilet roll, is not an easy material to stick the pieces into, so educators must assist the students.
Another advantage of this fun hands-on activity is that we can recycle the toilet paper roll and turn it into something interesting, such as a mouse display.
So before we do this artwork, we need the following materials:
- Toilet paper roll
- Construction papers
- Glue
- Scissors
- Black Marker
You will only need half of your toilet paper roll for this craft. To make gluing the pieces a lot easier, the site recommends wrapping the roll with grey-colored paper the draw the mouse face on. Then, simply add a pair of big ear cutouts secured on the opposite side of the face, two little feet, and a tail to the back.
Check out craftymorning.com for more details and photo guides.

The easy paper mouse activity is ideal for your crafting time if you’re looking for a simple mouse craft. This activity will also help children improve their recognition, cognitive, and social skills. Even better about this one is that teachers can give clear and straightforward instructions on making it work.
Teachers can provide a printable template for parents and children to follow, and the rest will be responsible for bringing their craft materials. However, this art craft requires a lot of cutting, so take precautions. It encourages bonding between the student and the teacher so that the latter can supervise them to produce better results.
The craft encourages good hand movement in children and prepares them to handle scissors and pens properly.
But, before we begin, the following materials are required:
- Printable Mouse Template
- Brown. Gray and White Construction Papers
- Blue, Pink, and Black Colored-Paper Scraps
- Eye Stickers
- Glue
- Scissors
- Blue or Pink Pom Poms
Start by printing out the free mouse template provided by the site. Trace the template onto grey cardstock or any color you like. Next, take the triangle mouse body and fold the base over to keep your mouse standing. Fold over the point of the triangle as well in the opposite direction for the mouse head.
Glue the inner ears onto the outer ears. Draw curves along the tail (both sides) using a marker. Next, glue the base of the tail to the back of the mouse’s body and the two black whiskers in a cross onto the point of the triangle face. Finish your craft by gluing the ears, eyes, and pom pom nose in place.
You can check kidscraftroom.com for step-by-step instructions.
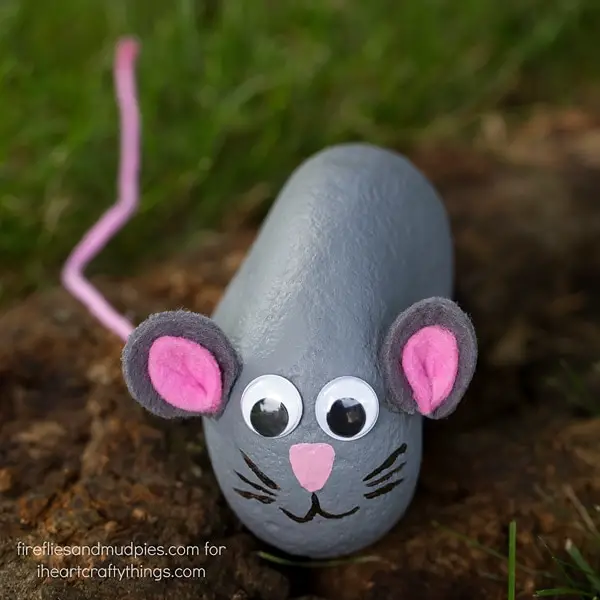
If you are a teacher and want to take your class outside, this painted mouse rock artwork will be a fun activity for the kids. This activity will help them develop their creativity, hunting skills, and recognition abilities.
Educators will appreciate providing excellent artwork to the children outside by finding a suitable rock as a medium. Aside from that, kids will enjoy getting their hands dirty to produce a good product they can later use to play hide-and-seek with their classmates.
Furthermore, the crafting lesson will encourage everyone to enjoy nature-related work and let their imaginations run wild with their creations.
As a result, before we begin this activity, we will require the following materials:
- Rocks
- Scissors
- Gray and Pink Felt Papers
- Gray, Pink, and Black Acrylic Paint
- Paintbrushes
- Glue Stick and Glue Gun
- Googly Eyes
- Yarn
Paint your rocks grey and let them dry. While waiting, prepare the mouse ears by cutting two grey ovals for the outer ear and two smaller pink ones for the inner ears, then glue them together. Fold the bottom and secure it with hot glue
While the paint is drying, make the mouse’s ears by cutting 2 grey ovals and 2 smaller pink ovals. Glue the pink ovals to the grey ovals, fold the bottom and secure with hot glue, then glue them to each side of the rocks.
As for your mouse’s face, glue on two wiggly eyes, and draw on a mouth, nose, and whiskers. And finally, attach a strand of pink yarn to the back of the tail.
To learn more about this craft, please visit the I Heart Crafty Things website.
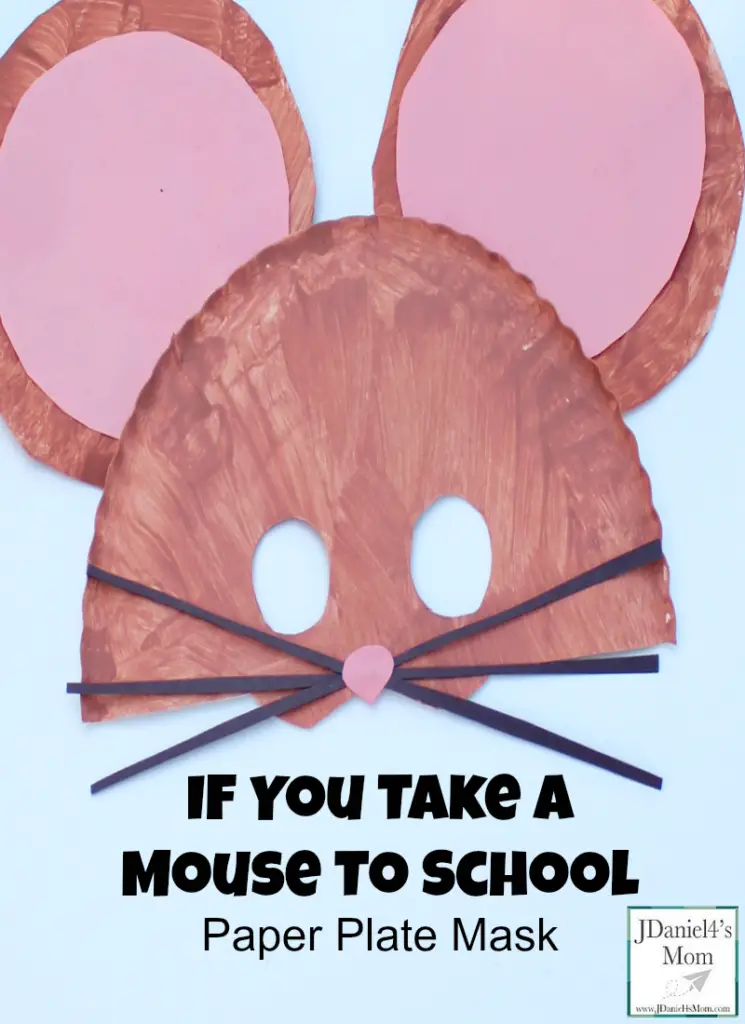
Teachers can make a cute paper plate mouse mask for Halloween trick-or-treating this year. This activity will inspire the children’s creativity, recognition, and cognitive skills as they create their covers for the costume. The exercise is enjoyable, and the materials required are inexpensive.
Educators will also want to teach children to listen and follow instructions to produce good results. It will allow the youngsters to practice their cutting and gripping skills, preparing them for when they begin to learn how to write.
Furthermore, teachers will educate the children on how to recycle paper plates and repurpose them for another fun event, which is a great move.
But, to make this wonderful creation, we must first gather the following materials:
- Paper Plates
- Scissors
- Brown and Gray Acrylic Paints
- Paintbrushes
- Small lid
- Black and Pink Construction Papers
- Black Marker
- Pencil
- Strings or Garter
You will need two paper plates for one mask. Cut the first plate just below the halfway point and cut along the straight edge to form the cheeks. To cut eye holes easier, fold the plate in half, trace a circle, and cut at once. On your second paper plate, trace and cut two circles for the ears and cut them out.
Next, coat your mouse head and ears with brown or tan paint. Once fully dry, you can then glue the other features cut out from construction papers – long black whiskers, pink inner ears, and nose.
Visit JDaniel4sMom.com to learn more about this exercise.
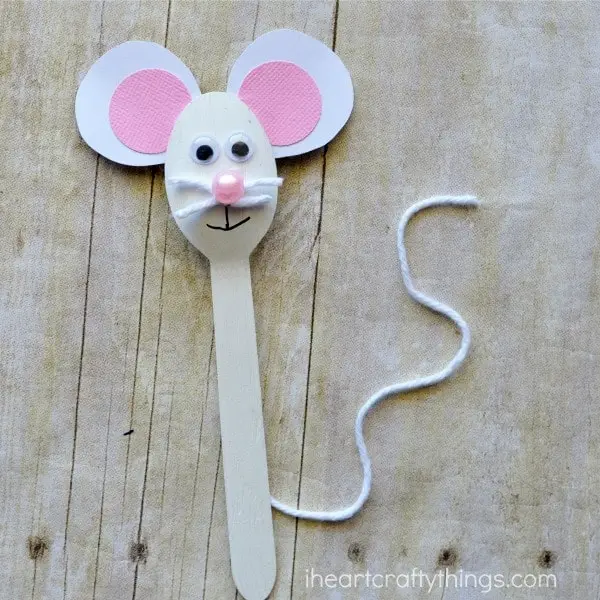
There is always a new activity for kids to do about mouse crafting. This wooden spoon mouse activity is another exciting and fun artwork for preschoolers to practice their recognition, social, and fine motor skills. The craftwork will also have a nature-inspired theme because we will use wooden spoons as a medium.
Making this piece is simple, and anyone can do it. Educators will be able to give children a good time by making a mouse face on the spoon’s head and a tail on its handle. Furthermore, children can learn to pay attention, and teachers can guide them through the step-by-step process of completing their output on time.
Aside from crafting, everyone will learn about recycling and environmental stewardship.
We will need the following tools to get started:
- Wooden Party Spoon regular size
- Acrylic Paint
- Paintbrush
- Scissors
- Glue
- White and Pink Construction Papers
- Any colored yarn
Coat the back of your wooden spoon with white or any color paint you like. As you wait for it to dry, cut out ear shapes from white or colored cardstock and another pair of pink circles for the inner ears. Stick the white and pink circles together and glue them onto the back of the mouse head when the paint dries.
Next, for the whiskers, cut two short white strings or yarn. Apply a dot of hot glue onto the middle of the mouse face and stick the strings in a crisscross. Add another dab of glue on top of the whiskers and attach your pink bead on for the nose. Lastly, glue another piece of string–longer this time– onto the back of the spoon handle to make a tail.
You can check out IHeartCraftyThings.com to know more about the particulars.
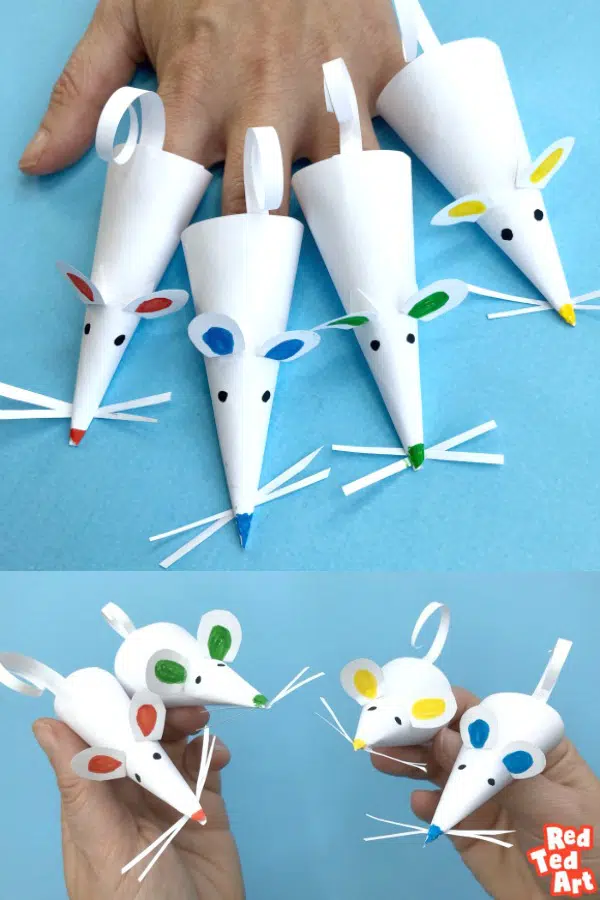
The mice finger puppets are another enjoyable activity that children and teachers enjoy. This craft will pique the children’s interest while improving their recognition, fine motor, and creative skills.
It will also promote good character representation if teachers use it when reading or performing the “Hickory Dickory Dock” nursery rhymes.
Educators will benefit from this output, which is cost-effective because you can make one from scratch bond paper. Furthermore, the kids will undoubtedly enjoy singing along with you and will be delighted to have those tiny little puppets at their fingertips.
The activity will boost the youngster’s confidence and sociability with their classmates as they perform a presentation using these outputs.
But, before we can make a good puppet play, we need the following materials:
- One letter size white bond paper
- Small plate for tracing a circle
- Scissors
- Glue
- Colored Pencils
Basically, for every paper finger mouse, you will need a quarter of a circle cut out. Apply glue along the edge of the quarter, roll it up, and secure it to make a cone shape. That serves as the mouse’s body.
From there, all you’re left to do is cut the rest of the mouse features out of scrap paper. Cut two tear drops for the ears, one long piece for the tail, and shorter thin strips for the whiskers. Glue them in place and use different color markers to finish off the details such as black eyes, and nose matching the ear color.
You can check redtedart.com for tips and a video guide!
Conclusion
Our activities will undoubtedly assist preschoolers in recognizing the letter M for the mouse. They will also learn and improve their skills, such as recognition and fine motor skills while making these enjoyable crafts.
So, if you want to make school learning more fun, check out some of our other craft or book pages. Thanks for reading! Happy teaching.
For more kids crafts and activities, check these out:


