Magnets are essential in our daily lives. They can be found in most appliances, and many devices and toys. Children will enjoy experiencing how magnets attract and repel metals through these creative activities.
Take a look at these ten engaging activities that are sure to light up curious minds and fascinate the little ones.
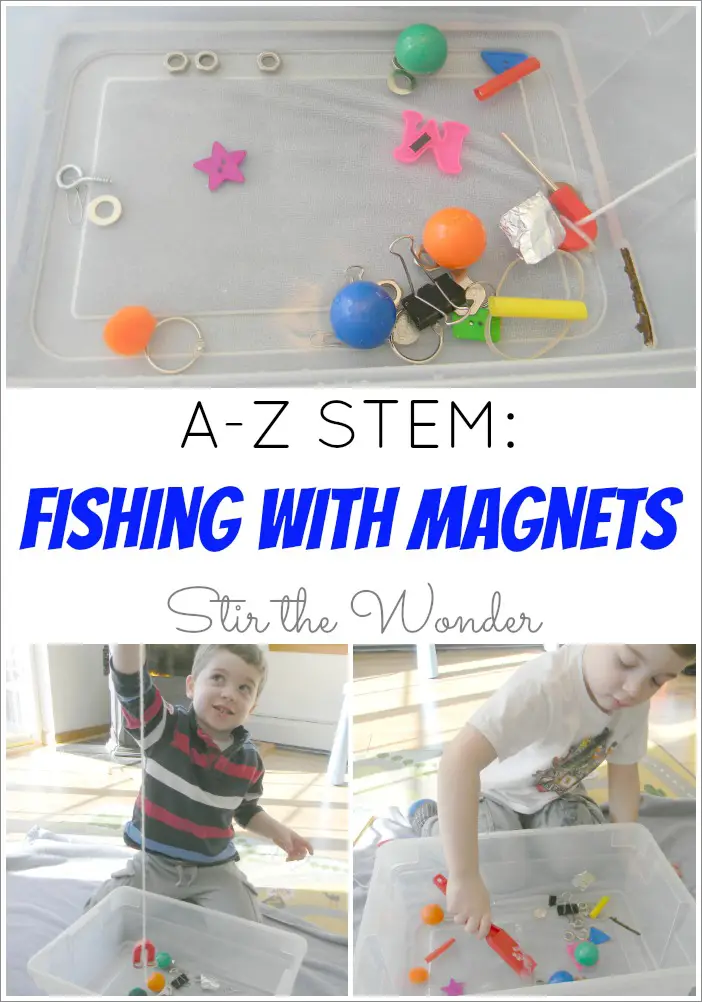
This experiment will answer the following question: What objects can a magnet attract? Fishing with magnets allows children to find the answer by trying to get the items as they attach them to the magnetic fishing pole.
Aside from learning about physical science, this is a great activity to develop coordination and motor skills. As children use the fishing pole, their arm muscles will become stronger, and they can use it efficiently to catch magnetic objects.
Create a “fishing pond” for this activity. Fill the bin with some water and place different objects that are magnetic. The site suggests using paper clips, nuts, bolts, washers, and keys.
Add other non-magnetic objects, such as twigs, rubber bands, foil, and buttons. Make a fishing pole by tying a string to a pencil. Attach a magnet at the end of the string.
Let the children find out what the magnet can catch and discuss why some objects did not cling to it.
For this activity, you will need:
- A bin with water
- Different objects that are magnetic and non-magnetic
- Pencil
- String
- Magnet
For more information on this activity, go to StirTheWonder.com.
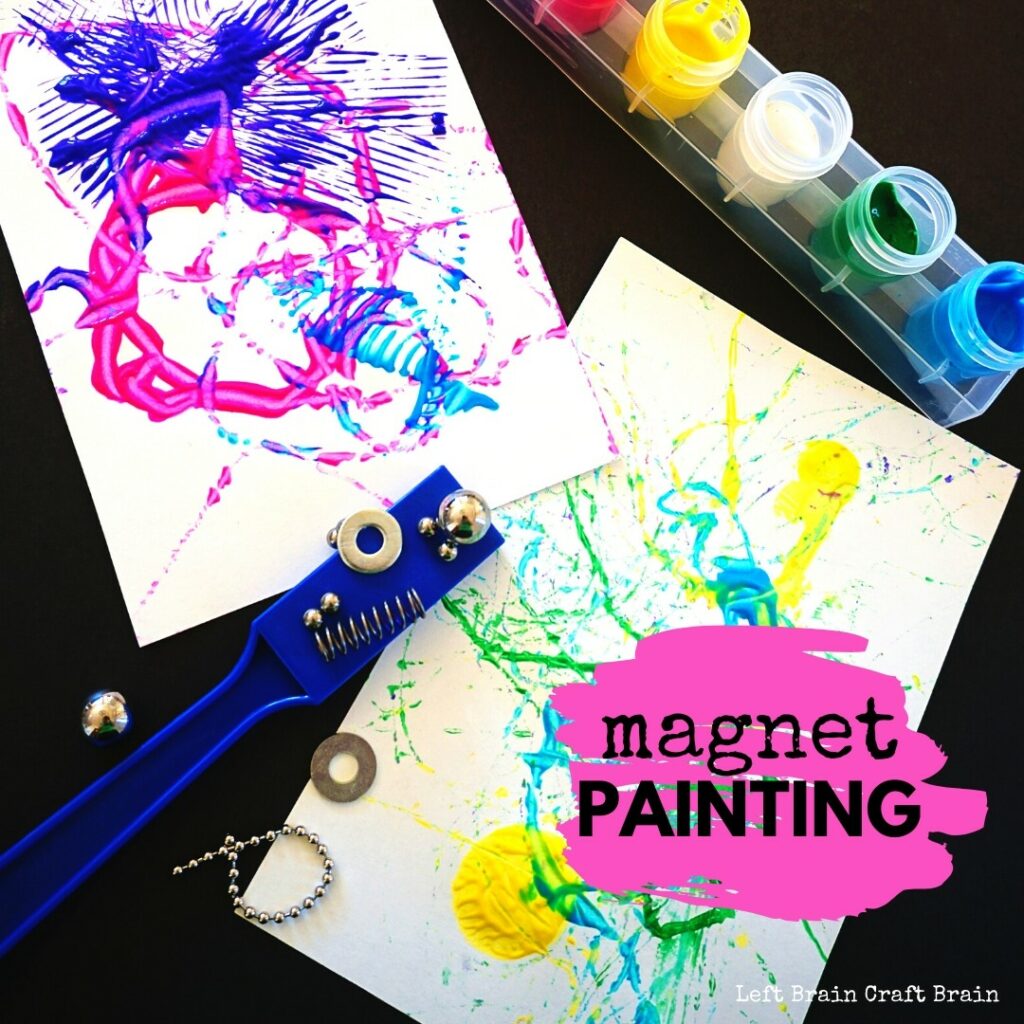
A combination of art and science, this process of art is a great way to teach children which magnets can attract everyday objects and which are not. This activity will also teach children color mixing, patterns, and designs.
Place a piece of paper into a tray. If the paper is too large for the tray, cut it to size.
Use small cups or a palette to hold the paint. Use small items such as screws, springs, nuts, bolts, marbles, and others to hold the paint. Place these items in paint one at a time.
Scoop them out using a spoon and transfer them into the paper. Use the magnet wand to make the objects move and spread the paint. Place the wand under the tray and move it around. Assist younger children with this step.
Repeat this step using a different object and a different color of paint. Inform children that magnets can make metals move.
Next, place paint-covered marbles on the tray. Let children find out if the magnet wand can move them. Since they are not magnetic, move the tray side to side to make them roll and spread the paint. Let their artwork dry.
For this activity, you will need:
- Magnet wand
- Metal and non-metal objects
- Paper
- Box
- Paint
- Small cups or palette
- Spoons
For more information on this activity, go to LeftBrainCraftBrain.com.
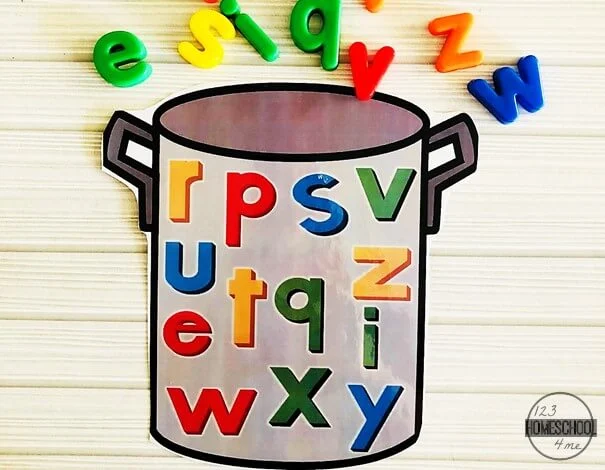
This activity focuses on teaching children letter recognition skills using magnetic letters. A free letter mat is provided from the site and can be used for children to match the letters of the alphabet.
Modify this activity to teach the science of magnetism by placing the mats on the refrigerator door or a cookie tray. This way, the magnetic letters will attach firmly to the paper.
Download and print the letter mats from the site. Cut these out. The site suggests laminating these for durability. The mats are in the shape of a pot. Inform children that matching the correct letters will make the alphabet soup.
Provide magnetic letters to children. Let them find an identical letter and match them. The site suggests a variation by hiding the magnetic letters for a scavenger hunt game.
Children will look for the hidden letter and match what they can find on the mat. Another way is for children to circle the letters on the mat based on what they have discovered during the scavenger hunt.
For this activity, you will need:
- Printed alphabet mats
- Magnetic letters
For more information on this activity, go to 123Homeschool4Me.com.
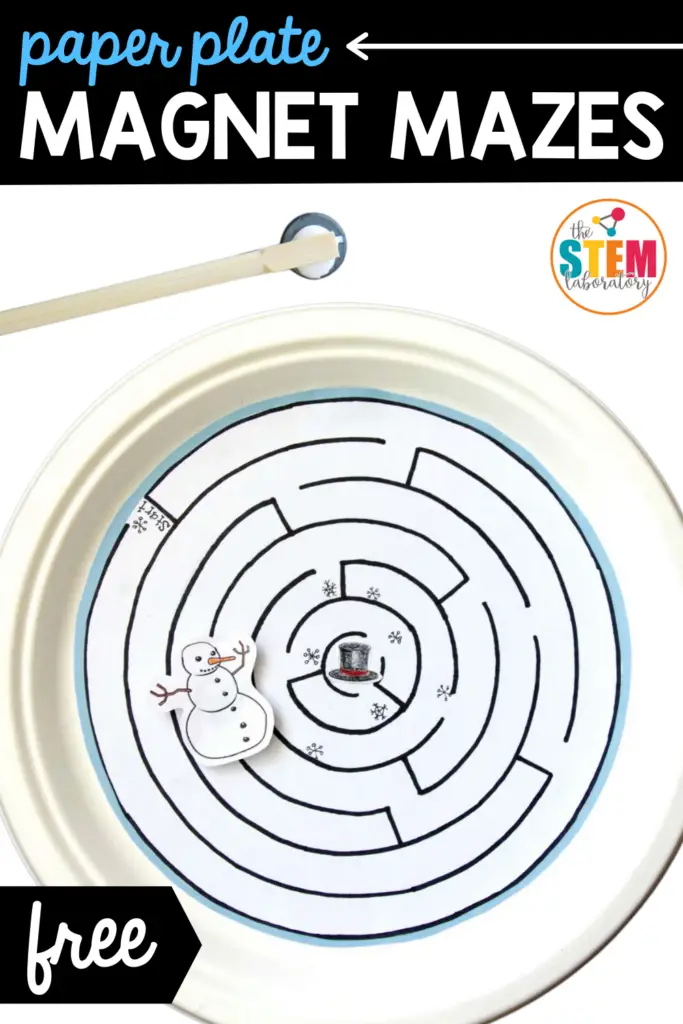
Can children help the snowman find his hat? This is the challenge posed for children to solve using magnets. While the task is more suited for older children, this activity will help even young ones appreciate the Science behind this idea.
As children progress through the maze, their fine motor and eye-hand coordination skills will improve. They will also learn directionality as they attempt to navigate the maze.
Download and print the free maze template from the site. Cut this out and glue it on a paper plate. There are two options for this maze. Aside from the snowman looking for a hat, another option is for a squirrel trying to find an acorn.
Cut out the snowman and hat. Glue the hat in the center of the maze. Glue the magnet to the back of the snowman. Attach the other magnet to the end of the chopstick using craft glue.
Ensure that the magnets are positioned to attract each other. Once the glue dries, place the snowman on the paper plate. Have the child move the snowman by placing the chopstick under the paper plate to make it move.
For this activity, you will need:
- Printed maze
- Cardstock
- Paper plates
- Strong magnets
- Chopsticks
- Colored pencil
- Glue
- Craft glue
- Scissors
For more information on this activity, go to TheStemLaboratory.com.
A slime that can be pulled and moved by magnets will cause excitement among children. Slimes provide a sensory experience for children as they play with them.
Take it a notch further to provide a STEM challenge that will engage students. Have children discover the slime’s features by testing it.
For example, find out how long it can be stretched by pulling it with a magnet or how fast it can swallow a magnet completely. Use the slime to determine which magnetic or non-magnetic objects will react to it.
Mix the ingredients for the slime in a bowl. Pour a quarter cup of white glue and two tablespoons of iron oxide powder. Mix well. Next, two tablespoons of liquid starch mix well.
Knead to incorporate the ingredients thoroughly and to reach the slime texture well. The site suggests adding more starch if the slime is too sticky or more glue if it is too stringy.
Ensure that the appropriate magnets to use for this slime are neodymium. Ordinary magnets will not work.
For this activity, you will need:
- Liquid starch
- White glue
- Iron oxide powder
- Bowl
- Plastic spoon
- Measuring cup
- Measuring spoon
- Neodymium magnet
For more information on this activity, go to FrugalFun4Boys.com.
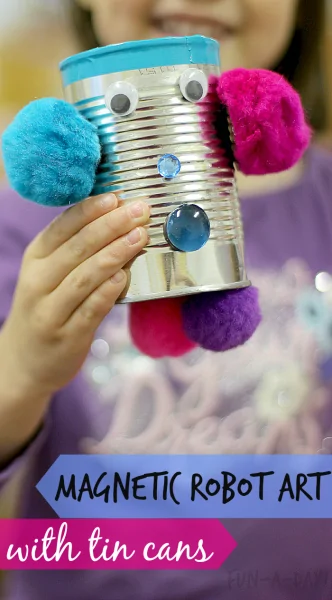
Recycle tin cans to make magnetic robots that can be customized. This activity will enhance children’s creativity while discovering how magnets work. It is also a great craft to introduce the concept of magnetism to children.
The robot can teach colors and counting, as it will act as a magnetic board for children to place different items with magnets. Use different colors of pompoms or jewels for children to count and for color recognition.
Choose tin cans that are clean and have no sharp edges. Take the extra measure to keep children safe while playing by covering the edges of the rim with duct tape.
Use the hot glue gun to attach the magnets and magnet strips on the pompoms, googly eyes, nuts and bolts, pipe cleaners, craft gems, and foam stickers.
Once these are ready, ask the child to stick these on the tin can to create their unique-looking robot. They can add as many or as fewer objects as that want. They can also name their robots.
For this activity, you will need:
- Tin cans
- Hot glue guns
- Magnets
- Magnet strips
- Pompoms
- Foam stickers
- Nuts and bolts
- Pipe cleaners
- Craft gems
- Googly eyes
- Duct tape
- Scissors
For more information on this activity, go to Fun-A-Day.com.
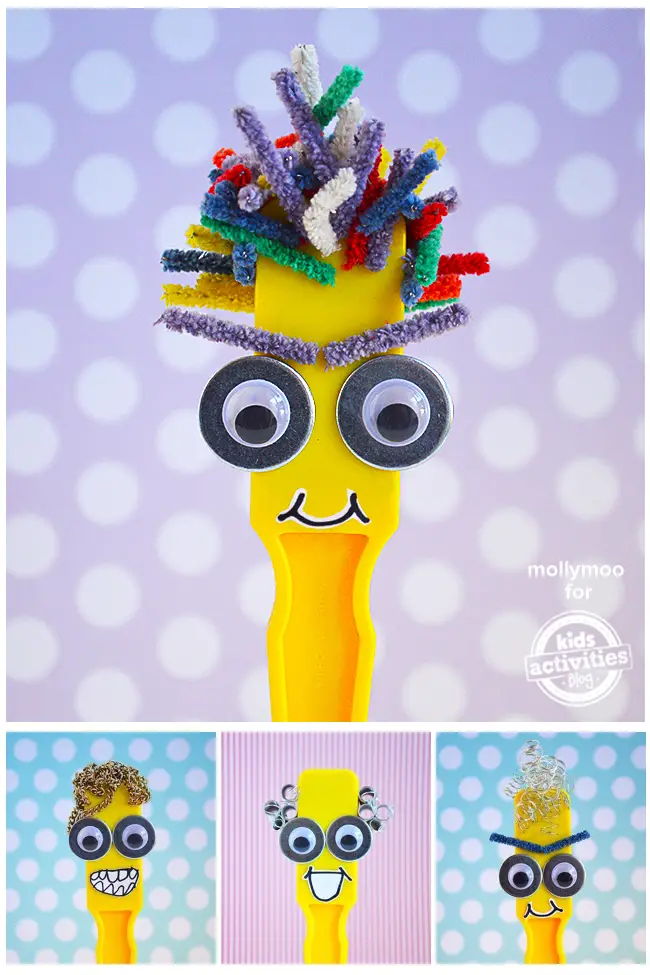
Turn these magnet wands into these happy-looking creatures that children will love during playtime. They also double as a tool for a science lesson on how magnets work.
Teach different emotions by changing the mouth to create other expressions. Let children be creative as they choose the materials to make their wands unique. Use the wands for storytelling, puppet show, and pretend play.
Point out that the wand is the head, and the children are to add the facial features. They can name their wands to make them more personalized.
Glue the eyes on the washer and stick them on the wand. Next, have the children can customize their wands by choosing different materials for the hair. Cut-up pipe cleaners make great hair strands, eyebrows, and mustaches. Chains and springs will also work.
Let children play with these to change their hairstyles. Draw different mouths on white cardstock using a black marker. Cut these out and stick them on the wand with sticky tape.
For this activity, you will need:
- Magnet wand
- Magnetic pieces, such as nuts and bolts
- Washers
- Pipe cleaner
- White cardstock
- Googly eyes
- Black marker
- Sticky tape
For more information on this activity, go to KidsActivitiesBlog.com.
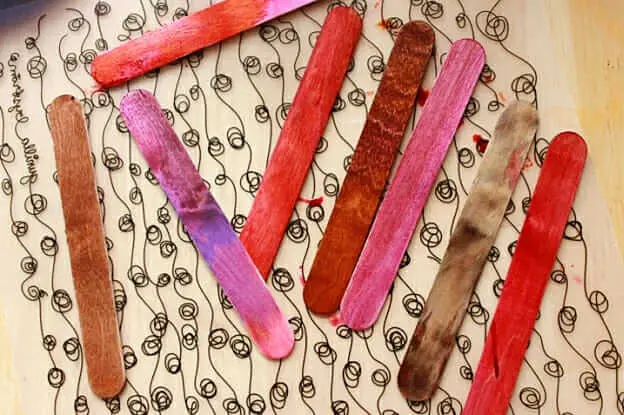
These craft sticks with magnets are very versatile for learning. Stick them on the refrigerator and let the children practice counting them. Form letters of the alphabet using these sticks for letter recognition skills. They can also form letters to make their names.
Children will improve their color recognition and matching skills by painting the sticks with different colors and asking them to find identical ones. Arranging the colored sticks in sequence will help teach them patterns.
Children can also make shapes with these sticks or use these as a tool for a non-standard form of measuring objects.
They may compare lengths using the sticks. For example, an adult’s shoe is about three sticks long, while a baby’s shoe is less than one stick.
Teach children the concept of magnetism through this craft. Use the sticks on different magnetic surfaces for children to find which areas the magnets will work.
Take the craft sticks and use a paintbrush to color them. Let these dry. Children may also add designs and details, such as dots and lines, to make them look more fun and colorful. Use the hot glue gun to attach the magnets to the sticks.
For this activity, you will need:
- Large craft sticks
- Magnet disks
- Hot glue gun
- Black marker
- Liquid watercolor
- Paintbrush
For more information on this activity, go to ArtfulParent.com.
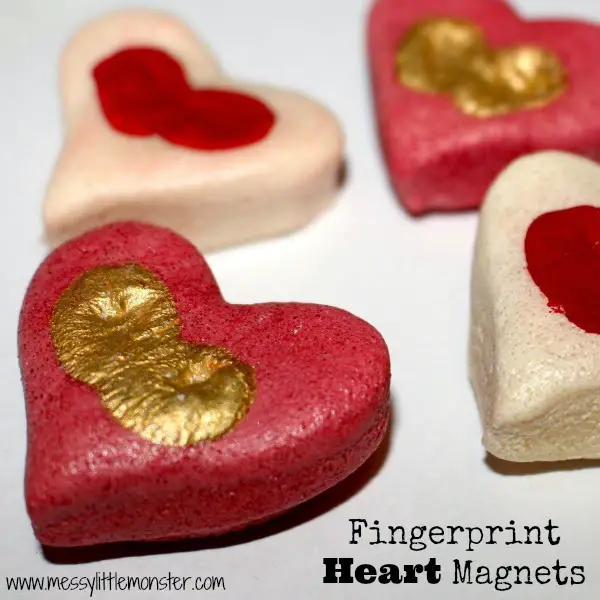
Salt dough is inexpensive to make decors for different events and helps children improve their fine motor skills. Their hand muscles will become stronger as children knead, roll, squeeze, and flatten the dough.
These heart magnets are perfect gifts for Valentine’s Day and Mother’s Day. Adding magnets makes them ideal for counting, teaching patterns and colors, and matching activities.
Start by getting the red and uncolored salt doughs ready. Refer to the instructions on the site for this part. Use the heart-shaped cookie cutters to make hearts. Use a smaller heart-shaped cookie cutter to make holes in the middle.
Next, mix and match the hearts to create an interesting pattern. For example, place a small red heart in the middle of an uncolored heart. These two-toned hearts are eye-catching and wonderful to look at.
Leave these to air dry for up to two days. These can also be baked at 150 degrees for several hours. Once dry, have the children paint the heart-shaped dough by dipping their fingers in the paint and pressing them on the hearts.
Let these dry, and use a sealer to protect the hearts. Finally, attach the magnets to the back using craft glue.
For this activity, you will need:
- Colored salt dough
- Heart cookie cutters
- Paint
- Sealer
- Magnets
- Craft glue
For more information on this activity, go to MessyLittleMonster.com.
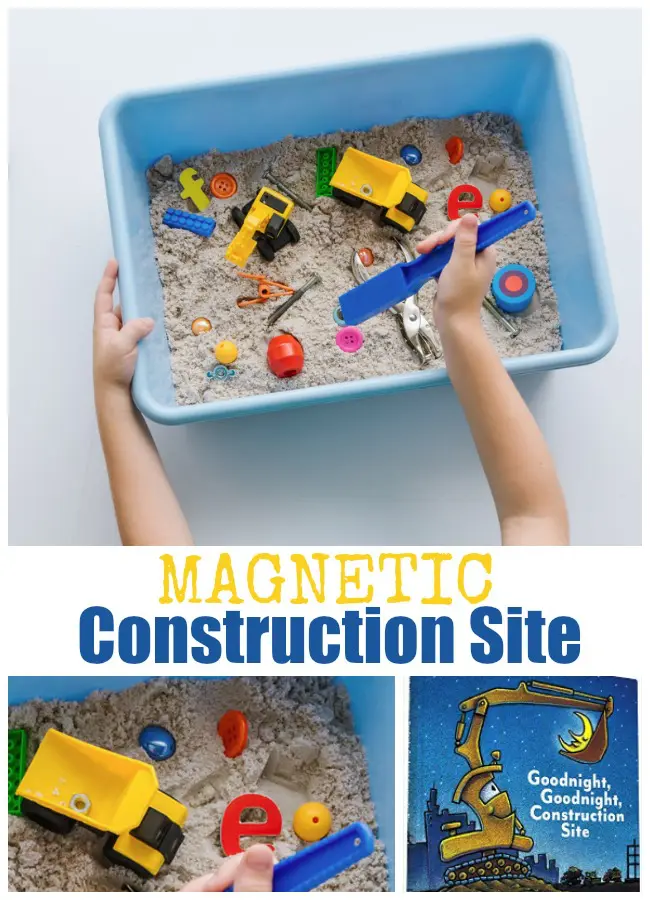
A bin full of construction toys is perfect for centers and play areas. Children will learn the science of magnetism by finding out which of the objects in the bin are magnetic using the magnet wand.
This bin will provide a great sensory experience for children as they dig through the sand and bury the toys. Children can sort the objects according to magnetic and non-magnetic, according to colors, size, and shape.
The site recommends using this activity to go with the building-themed book “Goodnight, Goodnight Construction Site” by Sherri Duskey Rinker. This activity can be for free play or as a game.
Fill the bin with enough sand and place the toys, including some construction vehicles. Hide some small toys and objects under the sand for children to dig.
Let children take turns getting toys out and testing if they will work on the magnet wand. Have them classify these by writing or drawing them on paper that says magnetic and non-magnetic.
For this activity, you will need:
- A large bin
- Sand
- Toys and objects that are magnetic and non-magnetic
- Magnet wand
For more information on this activity, go to TheEducatorsSpinOnIt.com.
Conclusion
Magnets are a fun tool for young children to explore. Children will find it fascinating that some objects around them can stick to magnets while others do not.
Let children explore the idea of magnets through fun and exciting activities that will increase their interest in the topic. These activities can also be incorporated with other learning objectives to teach different concepts.
Thank you for reading!
People Also Ask
Understanding what magnets are and how they work is an exciting topic for children. Finding out which objects around them will stick to magnets creates wonder among children.
Children will love exploring different possibilities as they use their magnets to test various objects they can find at home and school through playing and experimenting.
Help children increase their love of science through activities promoting magnetism. Children should understand that magnets create a force and are essential in many ways.
A magnet is a rock or a metal that pulls other metals to itself, even at a distance. This amazing discovery has become helpful in creating machinery for different uses.
Let children know that a magnet has two poles that will either attract or repel other magnetic objects.


