The fox is one of the woodland animals that inspired authors and illustrators to write countless stories and create wonderful illustrations that have become classics.
These creatures are brilliant and colorful, as portrayed in well-known storybooks. They are endearing characters that children will fall in love with.
Here are ten creative fox-inspired activities that children can do.
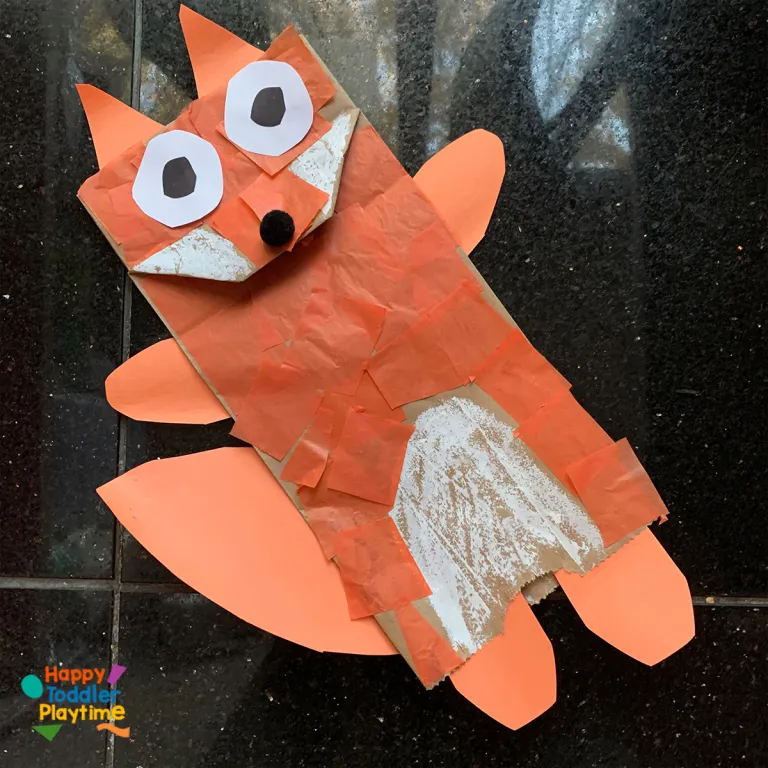
A brown lunch paper bag can be turned into a puppet with some creativity. Use this to retell fox stories like “My Lucky Day” by Keiko Kasza. Make a pig puppet to complete the characters of the story.
Cut up the orange tissue paper into small squares. Use these to cover the brown paper bag except for the small arch shape at the bottom and the folded part of the flap, which will become the sides of the mouth.
Fold both sides of the flap and secure them with glue. Use white paint or crayon to add color to the face and arch at the bottom of the bag. Refer to the picture on the website for this step.
Next, cut out two triangles for the ears, a pointy oval for its tail, and four legs from the orange construction paper. Attach them to the paper bag. For its eyes, use googly eyes or cut out circles using white and black paper.
Finally, attach the black pompom for the nose. Let this dry before using.
For this activity, you will need:
- Brown paper bag
- Orange tissue paper
- Orange construction paper
- White paint or white crayon
- Glue
- Scissors
For more information head over to HappyToddlerPlayTime.com.
This adorable fox can be used to teach children about mother and baby foxes. Make a smaller version using a small paper plate for the mother’s pup. Discuss their habitats and food.
The mother and baby pair are the perfect companion for Sandra Boynton’s book “Your Nose.” Children will enjoy the repetitive action of booping their noses with pompoms on these foxes.
The book is based on the song. Once children are familiar with the book, teach children the song and use the fox paper plate to make the actions.
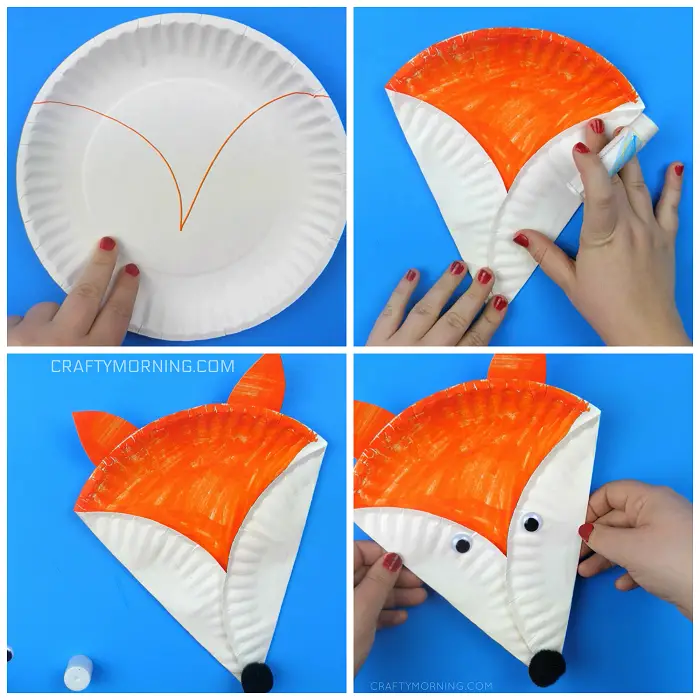
Make the fox by first drawing a V shape in the middle of the paper plate. Refer to the pictures on the site for this step. Paint inside the V orange and let it dry.
Cut two curved triangles for the fox’s ears and cover them with orange paint. Allow the paint to dry.
Fold the unpainted parts of the paper plate and secure them with glue. Attach the ears, googly eyes, and pompoms for the nose.
For this activity, you will need:
- Paper plate
- Orange paint
- Black pompom
- Googly eyes
- White cardstock
- Glue
- Scissors
For more information head over to CraftyMorning.com.
This simple handprint craft is simple and easy to make. It is excellent for children’s cutting and pasting skills. Use this craft as an extended activity for triangles, noting that the head and the ears are made from that shape.
Discuss the arctic fox’s unique features compared to the other foxes. Use the book “Daddy Honk Honk!” by Rosaline Bonnet to explore more about this animal’s habitat.
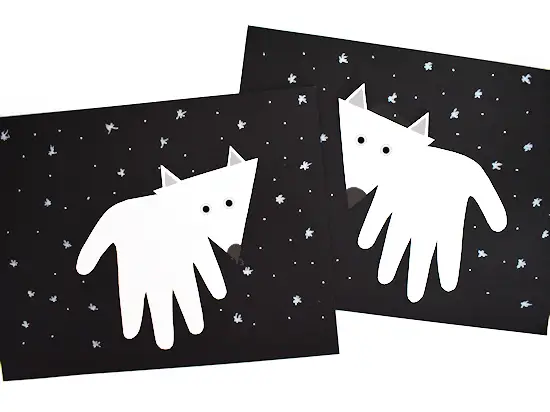
Start by tracing the children’s hands on the white cardstock. Allow children to do this step by themselves if they are capable. Cut out the handprints.
Cut out two small triangles for the ears and a large triangle for the head from the white cardstock.
Use the black marker to shade the tip of the nose on the large triangle. Use the silver marker to color the inside part of the ears. Stick the ears on the head.
Attach the head to the handprint on the pinky side. The thumb part will be the fox’s tail, while the rest of the fingers are the legs. Once finished, glue the fox on the black paper.
Use the white marker to add designs on the black paper, such as dots and snowflakes. The arctic fox will stand out against the great background.
For this activity, you will need:
- Black and white cardstock
- Googly eyes
- Black, white, and silver markers
- Glue and scissors
For more information head over to OurKidThings.com.

The inspiration for this craft is from watching foxes roam in the farm fields. This toilet paper craft is safe to play with and will not harm anyone.
Make several of these to use with the rhyme “Four Little Foxes Playing in the Woods.” Hide each fox whenever one stubs its toe.
Print out the free fox template from the site. Refer to the pictures on the site for the step-by-step process.
Cut out the pieces and trace them on construction paper. Trace part of its tail on red paper. Cut enough red paper to cover the toilet paper roll.
Use white paper for the front of its body, eyes, and the tip of its tail. Trace the feet, eyes, and nose onto black construction paper. Cut out all of these pieces. Roll the red paper on the paper roll.
Flatten the top part to create pointy edges that resemble the fox’s ears. Glue the eyes, nose, white part of its body, and feet.
Put together the two parts of the tail and attach them to the toilet paper roll. Let this dry before using it for play.
For this activity, you will need:
- Printed fox template
- Toilet paper roll
- Construction papers
- Pencil
- Glue
- Scissors
For more information head over to Easy-Crafts-For-Kids.com.
This fox craft is easy to make with just a little help from an adult when using the hot glue gun. It is a great tool to help children learn the triangle shape. Do this by asking the children the shape of this fox’s head.
This craft is also perfect for talking about parts of the face. Ask the children what parts of the face this fox has. Ask them if they have the same facial parts as the fox.
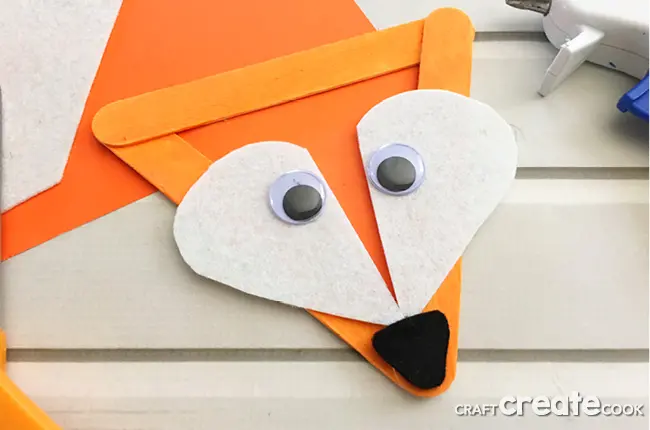
To make this fox, glue together three popsicle sticks to form a triangle and paint it orange. Let this dry. Attach the triangle on orange construction paper. Trim the excess on the sides.
Next, cut out a heart shape from the white felt. Cut out a V in the middle and attach it to the triangle using a hot glue gun. Add the googly eyes.
Lastly, cut a small piece of a triangle from the black felt to make the nose. Attach this to the fox’s head.
For this activity, you will need:
- Large popsicle sticks
- White and black felt paper
- Orange paint
- Paintbrush or paint sponge
- Googly eyes
- Orange construction paper
- Glue
- Scissors
- Hot glue gun
For more information head over to CraftCreateCook.com.
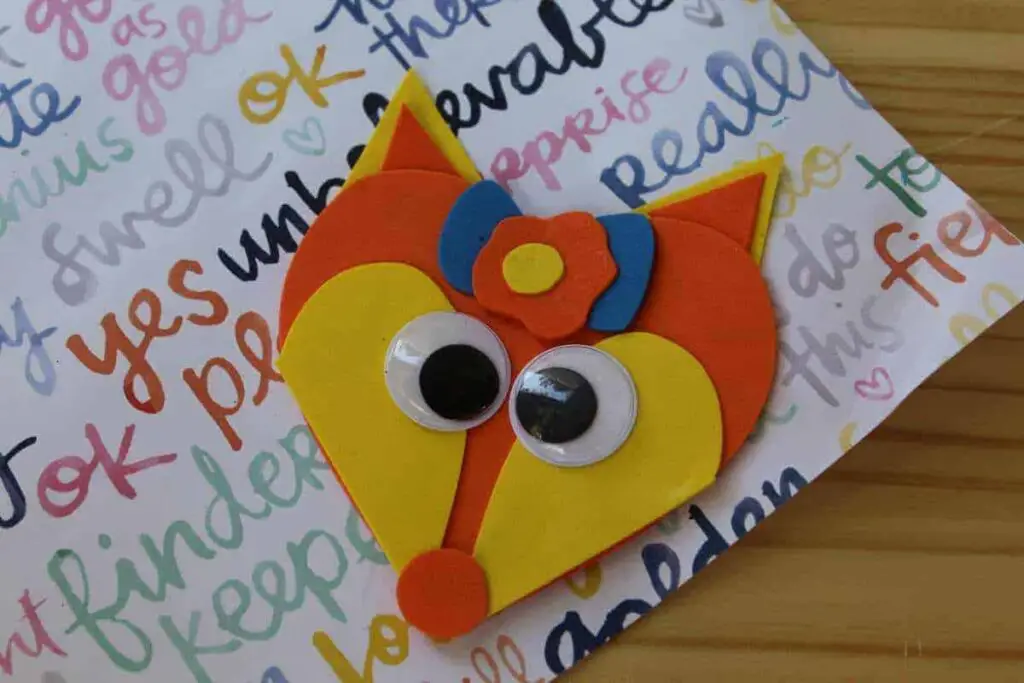
The use of foam in this fox craft makes this versatile. Here are some of the ways this craft can be used. Use this as a bookmark. Add a magnet on the back to make this a refrigerator magnet. Attach a large popsicle stick to make this a puppet.
Glue a ribbon to make this a necklace for pretend play. Add a double-sided tape to its back to turn it into a sticker. The possibilities are endless.
Cut out a heart from the orange foam. Fold the foam into two before cutting it to make a symmetrical shape. Next, cut a smaller heart from the yellow foam.
Divide the yellow heart in the middle. Flip these so that the straight edge is aligned with the orange heart. Use glue to adhere these pieces together.
Use a hole puncher to make a perfect circle for its nose. Cut two triangles from the yellow foam for the ears and a smaller pair of triangles from the orange foam for the inner ear. Attach these to the fox’s head.
Lastly, add the googly eyes. The ribbon and flower are optional. Use the scrap pieces of the craft foam for these.
For this activity, you will need:
- Craft foam in yellow, orange, and blue
- Googly eyes
- Scissors
- Glue
For more information head over to TheInspirationEdit.com.

This gallery-worthy fox is probably the most creative footprint painting conceived for young children.
The little ones will significantly appreciate this painting technique, an excellent way to get children interested in visual arts. Use a framed canvas instead of cardstock for this masterpiece.
This activity is excellent for teaching children about achieving different shades by mixing colors. Older children might find it interesting that pressure and brush strokes techniques produce different textures in their output.
Cover the child’s sole with red or brown paint. Use a paintbrush to distribute the color evenly. Gently press the child’s foot on white cardstock.
Position the footprint, so the heel part is where the head will be, and the toes are the fox’s legs. Use the same paint color to make a curved shape for the tail. Start from the ball part of the foot and extend beyond the toes.
The same color should be used for the head as well. Add round strokes on the heel part of the foot using a paintbrush. Add two ears. Next, mix some white with brown or red to make a lighter shade.
Use this shade to add details such as the tip of the fox’s tail, the furry part on the face and stomach, and the inner ears. For the eyes, use white paint. Add the rest of the details, such as the pupils, nose, mouth, and other outlines, with black paint.
For this activity, you will need:
- Paints
- Paintbrush
- White cardstock
For more information head over to ThePinterestedParent.com
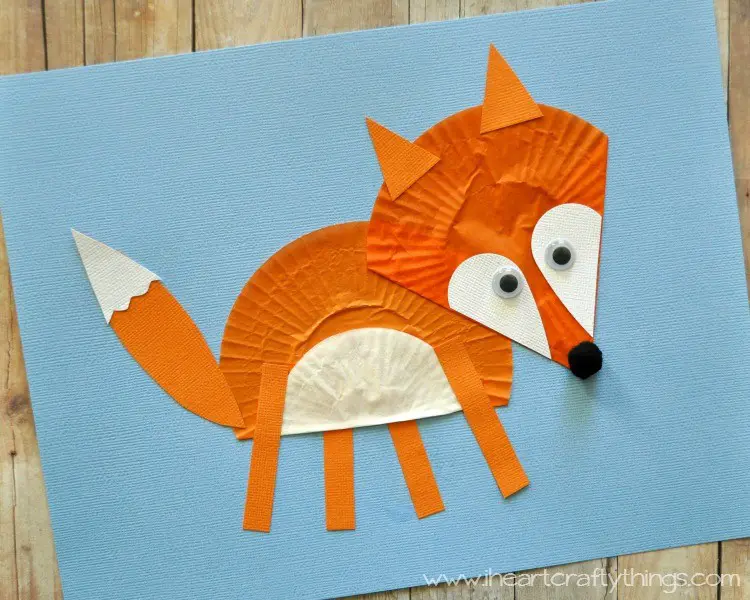
This bright-looking creature is simple and easy to put together. These can be used for the book “Babies in the Forest” by Ginger Swift.
Start with flattening the orange cupcake liner. Make a straight edge by folding the bottom part of the liner. This part will look almost like a half-circle. Stick this on the blue cardstock.
Next, cut the white mini cupcake liner in half. Glue this half circle on the orange liner, ensuring that the straight edges are aligned. Cut four strips of orange cardstock for the legs, a pointy tail, and two triangles for the ears.
Cut a heart shape for the fox’s face from the white cardstock. Divide this into two. Cut the tip of the tail and attach it to the orange tail.
Make the head by folding another orange cupcake liner on both edges to make it look like a slice of a pie. Glue this on the fox’s body with the pointy part in the same direction as the legs.
Add the cut-up hearts, ears, and nose. Complete the picture by adding googly eyes. Let this dry before using.
For this activity, you will need:
- Orange cupcake liner
- White mini cupcake liner
- Blue and orange cardstock
- Googly eyes
- Black pompoms
- Scissors
- Glue
For more information head over to IHeartCraftyThings.com

If a nature walk is part of your home or classroom routine, it is inevitable for children to bring home exciting finds. Here’s a great activity: turn those piles of leaves in the backyard or the children’s haul into artwork.
Transform these maple leaves into foxes using simple materials. Make several of these to learn about leaf shapes and the different sizes. Create different colors of the leaf foxes to teach children patterns and order.
Start with choosing the right leaf. Maple leaves are the perfect shape. If unavailable, find a leaf with the same form, such as sycamore.
Clean the leaves and make sure they are dry. Paint will less likely adhere to fresh leaves, and they tend to curl if not fully dry. To dry leaves, tuck each one between sheets of paper and weigh it down with a heavy book for days.
If possible, choose intact leaves with no tears or holes. Check for likely insects or rotting. Discard if there are any of these.
Once the leaves are ready, cover the whole leaf orange and let it dry. Cover parts of the bottom left and right blades with white paint in a flying V shape. Allow the paint to dry. Add black paint for the nose and googly eyes.
For this activity, you will need:
- Maple leaves
- Paint
- Paintbrush
- Googly eyes
- Glue
For more information head over to EasyPeasyAndFun.com
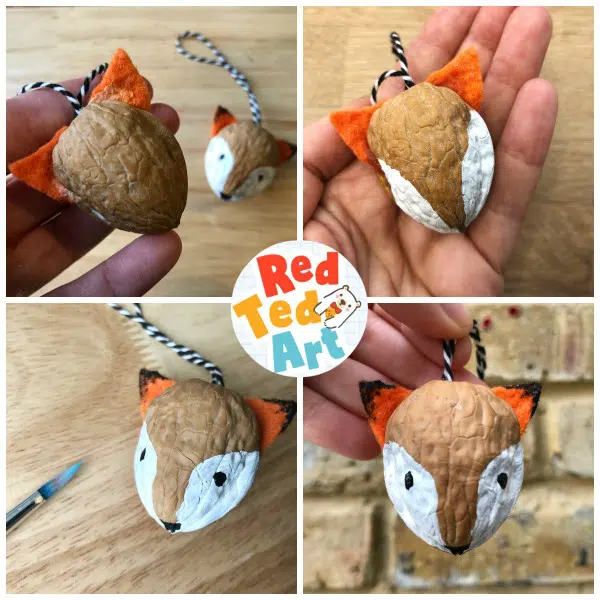
Repurpose walnut shells into these adorable ornaments for Christmas. They are great to hang on trees or as added decor in gifts.
For those who do not celebrate Christmas, do not turn your back. These can be used as counters for counting activities, board games markers, or even decor for a woodland-themed classroom.
Prepare the walnut shells in advance. They should be cut in half and cleaned. Ensure that the pieces given to the child are the pair from the whole nut. Otherwise, the mismatched shells may not align well when glued together.
Cut two orange triangles for the fox’s ears. Cut the right ribbon size for hanging, or omit this step if not used as an ornament.
Cover the edges of the walnut shells with glue, and carefully place the ears and the ribbon in one of the shells. Cover with the matching shell. Clean off the excess glue and let this dry. Refer to the pictures on the site for this step.
Use white paint to make the cheeks of the fox. Add the nose, eyes, and some markings on the ears. Let this dry before use.
For this activity, you will need:
- Walnuts
- Ribbon
- Orange felt
- Black and white paint
- Glue
- Scissors
For more information head over to RedTedArt.com.
Conclusion
The fox activities on this list are easy to make for children. They can be used in a variety of ways. Children will also learn more about this animal and improve their skills by putting together these projects.
Find ways to use these activities in your classroom or at home. Have fun making these crafts while learning.
We hope our list provided you with what you were looking for. Thank you for reading!
For more woodland theme crafts and activities, check these out:


