Whether you need a bunny craft for spring, Easter, or just something cute and fun to add to your lesson plans, these adorable crafts will give kids a hands-on activity to keep them busy. Learning feels like play when you get to make something all your own so check out these fun crafts today.
Hands-on Preschool Bunny Crafts
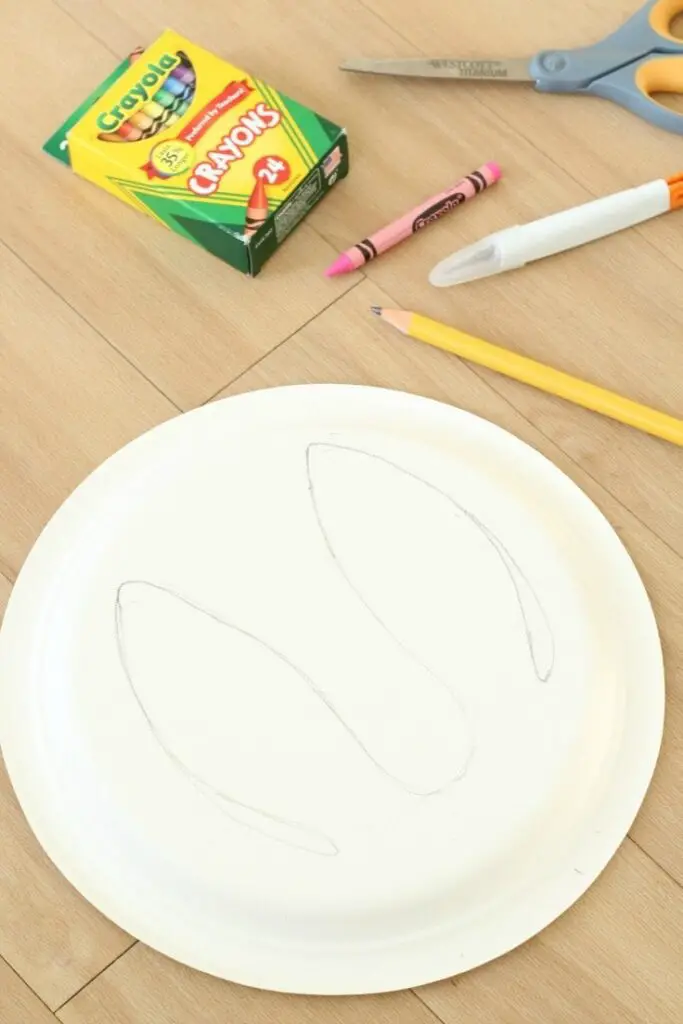
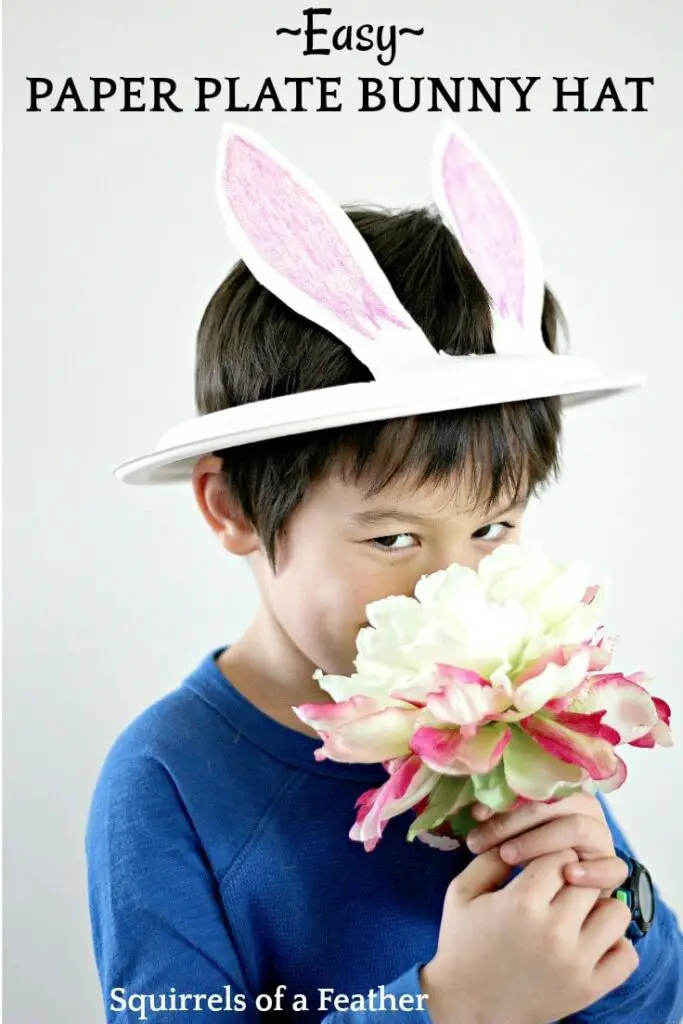
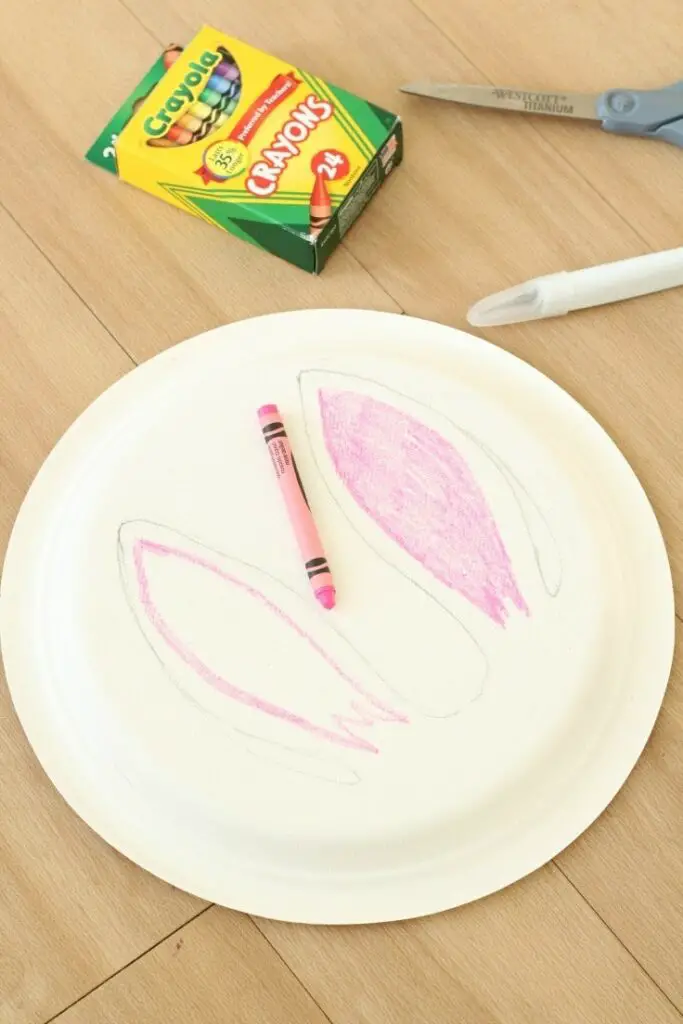
This is a cute, inexpensive way to give your child their own bunny ears. Estimate how large of a hole you need so that the plate will sit on top of your child’s head comfortably. Using that as a guide, lightly draw your bunny ears. They can be floppy, asymmetrical, symmetrical, big, small, or crooked. Whatever works for you and your child. Take the pink crayon and draw the inner part of the ear. Leave a band of white around the outside though. Allow the child to color the inner part of the ear.
The next part should be done by an adult. Using sharp scissors or a craft knife, cut around the ears, leaving the outer portion of the plate intact as a hat brim. Once everything that is not ears nor the brim is cut out, lift the ears up and bend so they stay somewhat upright. Place the plate flat on the child’s head and now they have bunny ears! This is such a quick, easy activity. Although some parts must be done by an adult, kids will love helping and then hopping all around with their new ears. Check out HomeschoolPreschool.net for more information.
Materials:
- Paper plate (thicker plates are more durable)
- Sharp scissors or craft knife
- Crayon (pink or any color you desire)
- A pencil

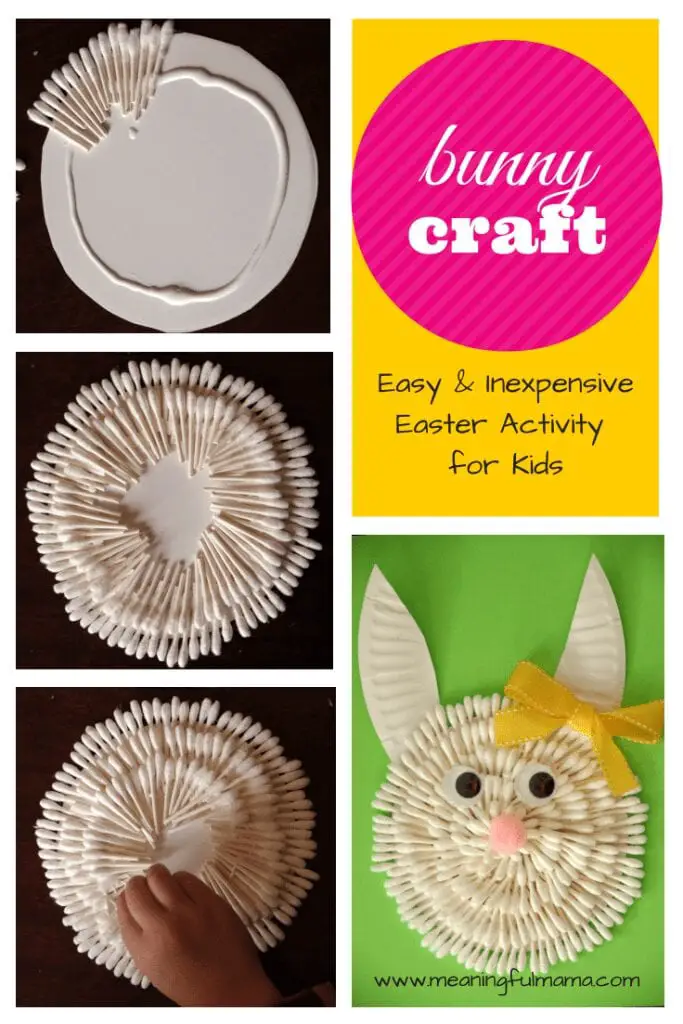
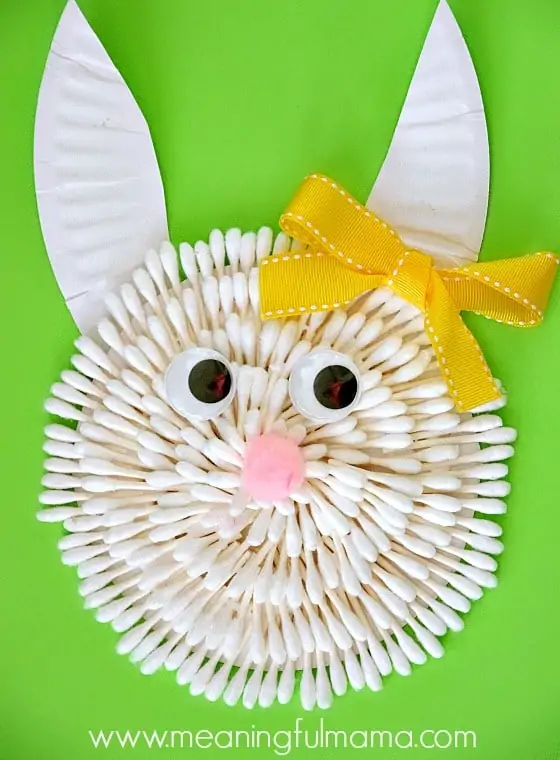
For an adorable decoration, this Q-Tip bunny face is fun, easy, and perfect for Easter or as a spring craft. Cut out the inner portion of a paper plate, leaving the outer rim as intact as possible for later. Then cut Q-Tips in half and glue them tip-end out to the edge of the plate. It doesn’t matter if they are exactly half or not, you can vary the lengths on the inner edge if needed.
Add more layers of Q-Tips, so that the tips nearly touch the tips a bit further out. Try to keep the Q-Tips in each layer as even as possible. Keep doing this until you reach the center (you may need these shorter as you get close to the middle. Use just the cotton-swab tips, if necessary. Next, cut out two ears from the outer portion of the plate and glue them to the back of the plate. Add a puff nose, eyes, and a bow (if desired). Voila! You have a bunny face that is perfect to display. For more crafts and details, visit SimpleEverydayMom.com.
Materials:
- Paper plate
- Lots of cotton swabs
- Scissors
- A puffball
- Glue
- Ribbon
- Large googly eyes
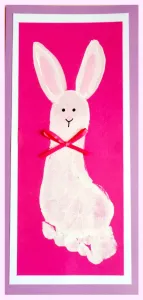

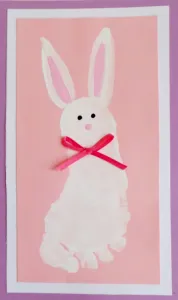
Make memories for yourself or other family members with this footprint craft. The truth is, what parent doesn’t love a craft made with your child’s own foot or handprints? This is an art project you can keep as a keepsake to remember when your preschooler’s feet were so small.
For this activity, you’ll cover the bottom of your child’s foot in white paint then press it onto a piece of cardstock attached to a cutting board. The cutting board gives a firm surface to press against. Once the footprint has been created, use a fine paintbrush to add ears to the heel side. Use pink paint to color the insides of the white ears and add a tiny, pink nose. Use a black scrapbooking pen or black paint to create eyes and a mouth. Finally, add a piece of ribbon tied in a bow below the bunny’s “face”, mount the cardstock to a slightly larger, different color of cardstock and if desired, add a third piece to frame the image fully. For detailed instructions and tips, visit TheMommyHoodClub.com.
Materials:
- Cardstock in various colors
- White and pink acrylic paint
- Black paint or black scrapbooking pen
- Craft glue
- Ribbon
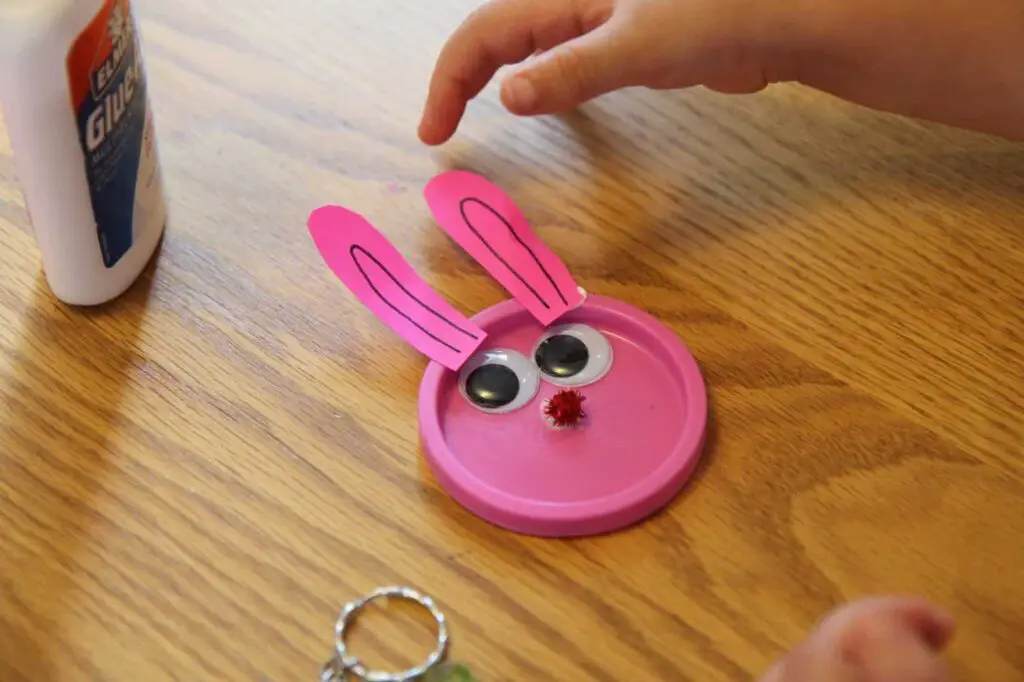
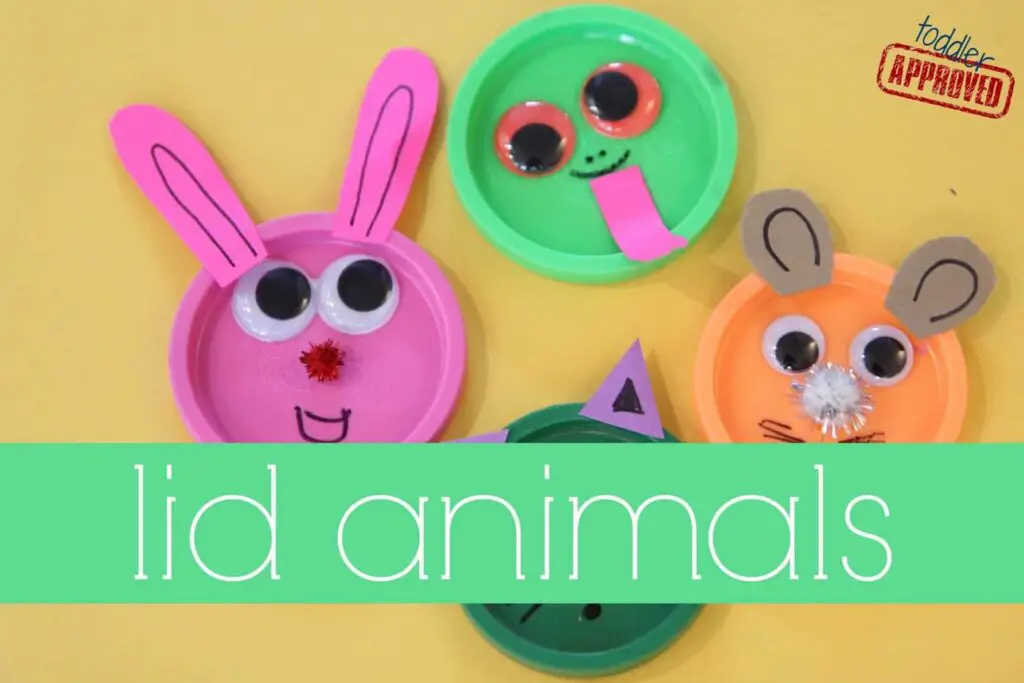
This fun idea from ToddlerApproved.com is a cute way to reuse materials. If you save round lids, such as those from Play-Doh containers, you can use these to create fun animals. Make a bunny and some friends if you have plenty of lids available. You can draw from recent stories or shows your child enjoys.
Gather your lids and cut various types of ears out of construction paper or cardstock. Glue ears to the outer edge of each lid, add a pom (the more glittery, the better) for a nose, some googly eyes, and draw a mouth with a permanent marker. Add some popsicle sticks to create puppets you can use to retell stories or make up your own.
Materials
- Lids
- Construction Paper
- Scissors
- Googly eyes
- Glittery poms
- Craft glue
- Markers
- Popsicle sticks (if desired)
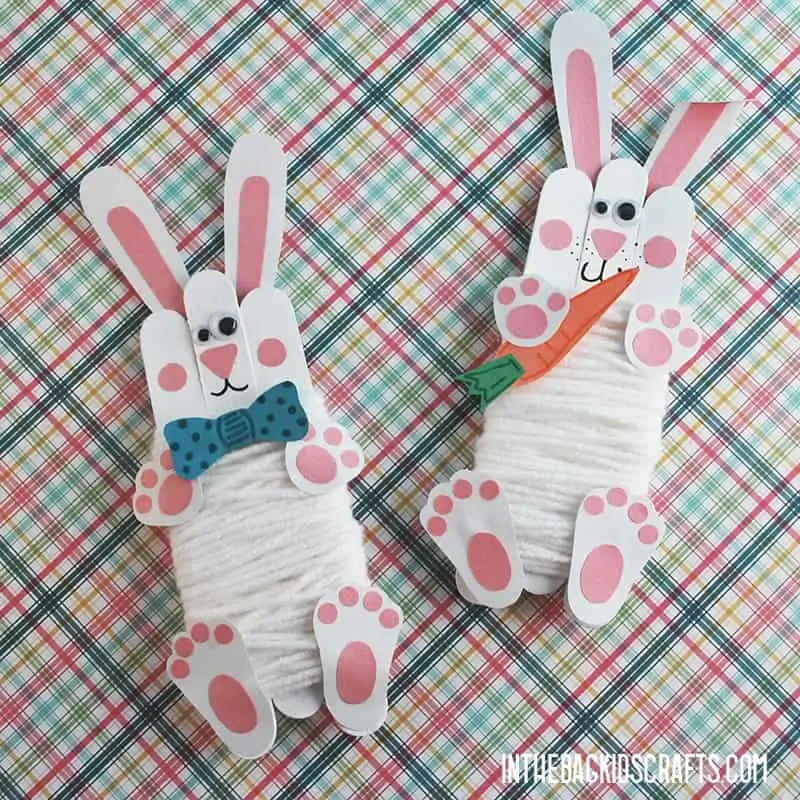
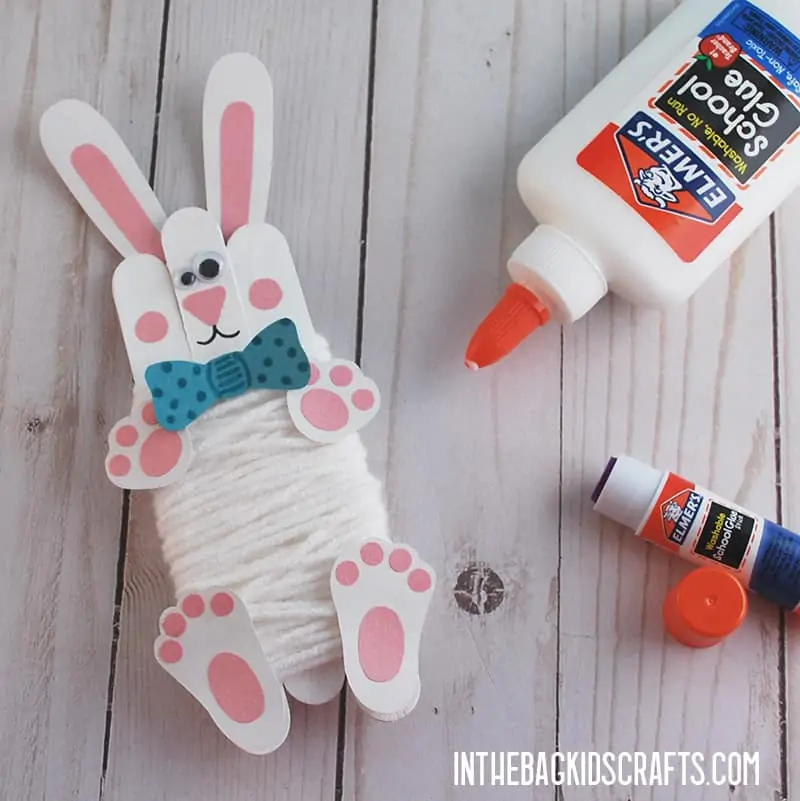
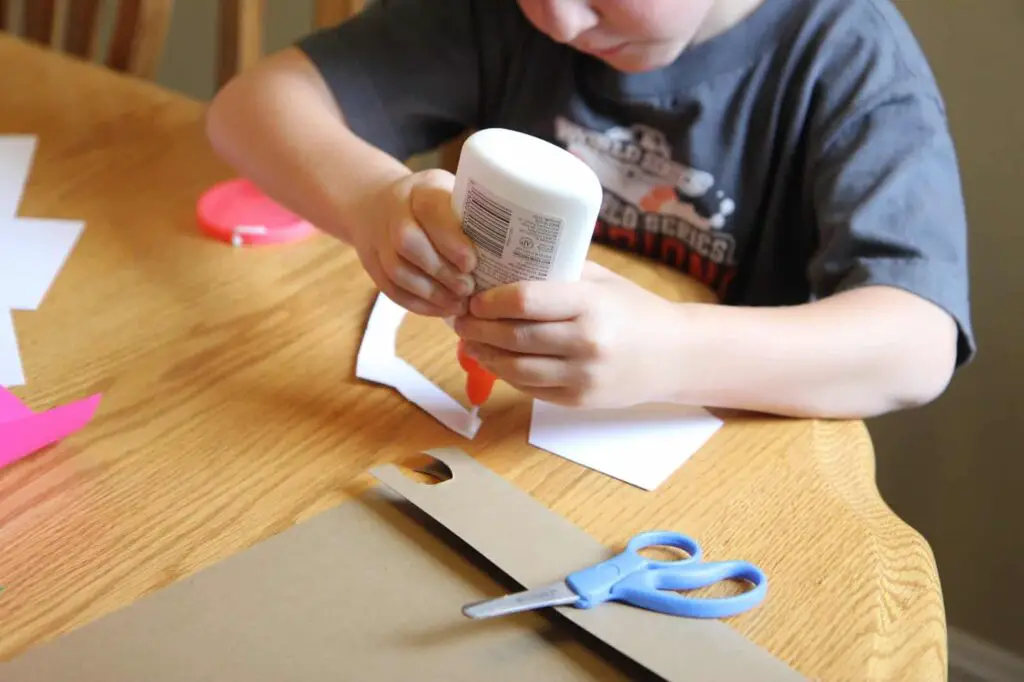
This fluffy popsicle stick bunny idea comes from InTheBagKidsCrafts.com and gives kids practice with fine motor skills as they make their bunny fluffy. Start by lining up 3 popsicle sticks and gluing a 4th diagonally to the back to hold them in place. Have your child paint the front side white and let that dry. Next, draw or print the individual bunny “parts” and cut each one out.
Tape a piece of white yarn to the back of the popsicle sticks and have the child wrap it around and around until only an inch and a half of bare popsicle sticks remains at the top. This practices coordination skills. Now, have your child add the appropriate bunny parts to the sticks. This can be used for storytime, pretend play, or as a decoration at Easter or for the spring.
Materials:
- 4 large popsicle sticks
- White paint
- Paintbrush or medium pom for painting
- White or pink paper for printing or drawing
- Scissors
- Black marker
- Googly eyes
- Glue
- White yarn
- Tape
- Printed bunny template (if desired)
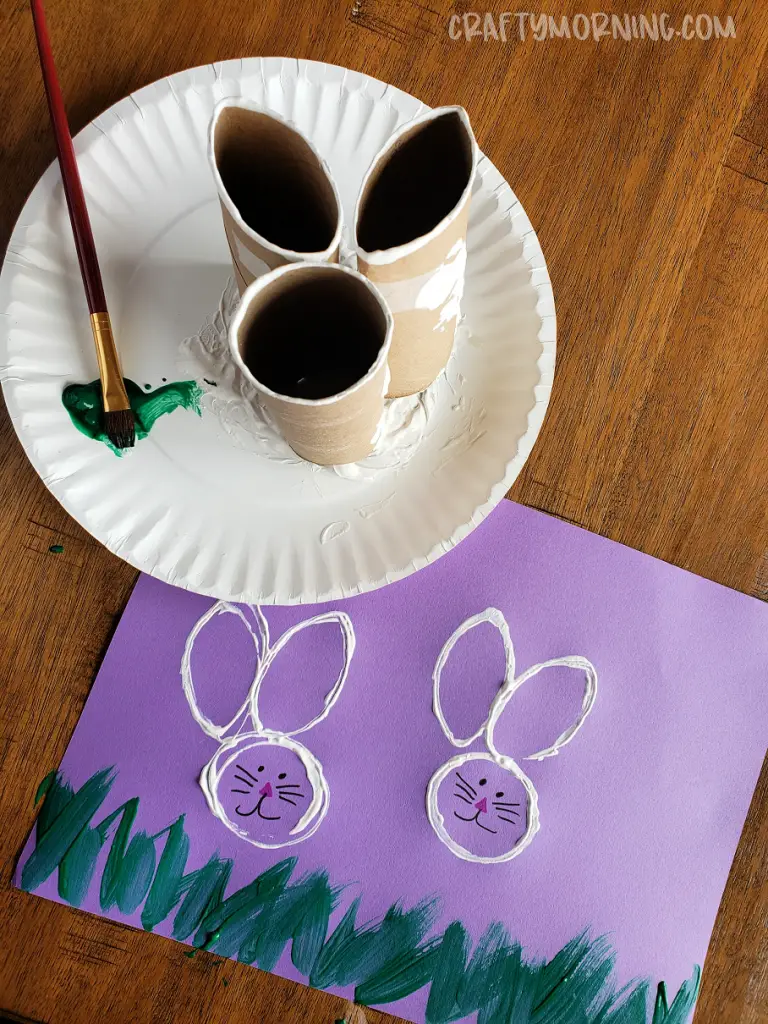
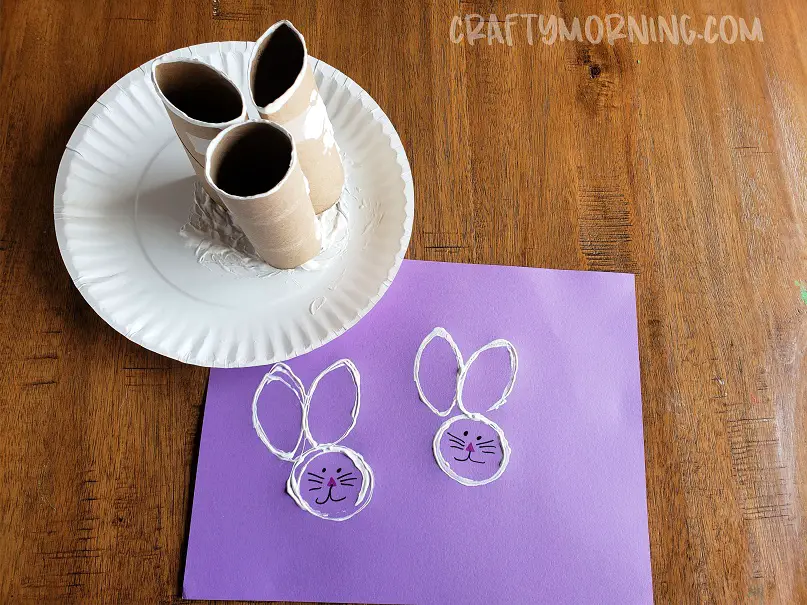
Make drawing bunnies easy with this craft idea from BooksandGiggles.com. I mean, you already use toilet paper, so save those rolls and put them to use. Drawing neatly can be difficult for small hands, so grab 3 toilet paper rolls (empty, of course), use glue, or for better results, glue dots to stick them together, and you have the perfect bunny stamp. You’ll want to squish two of them a bit so they are less round and more ear-shaped.
Dip the trio of rolls into white paint and press to a colored piece of construction paper. Now your child will have a head and two bunny ears! Add a face and draw a fun background or scene and you have a cute piece of art for Easter, spring, or just for fun. You can also squish all three rolls to make a set of Easter eggs instead.
Materials:
- Colored construction paper
- White paint
- Permanent markers and paint for face and background
- 3 empty toilet paper rolls
- Glue or glue dots
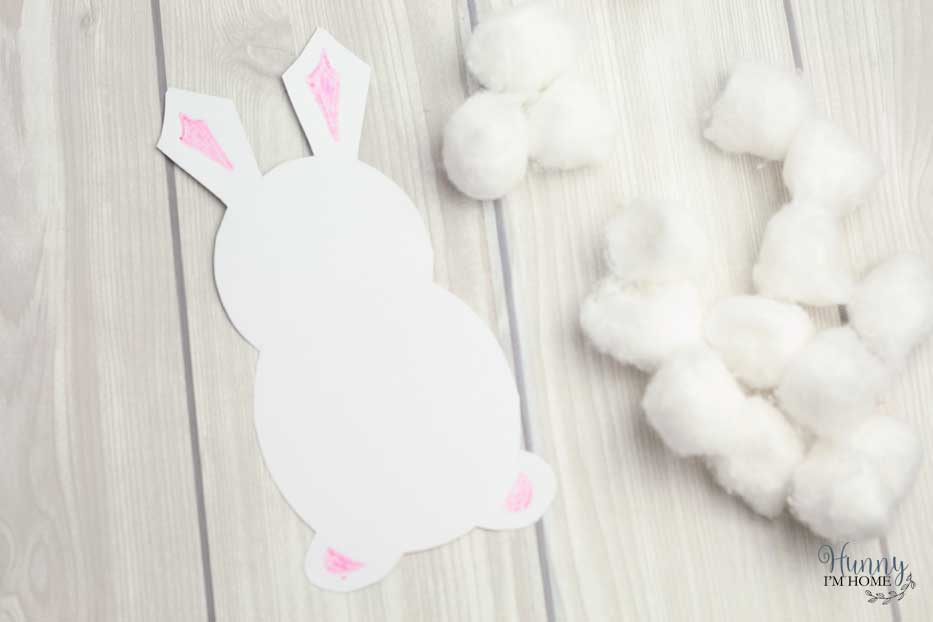
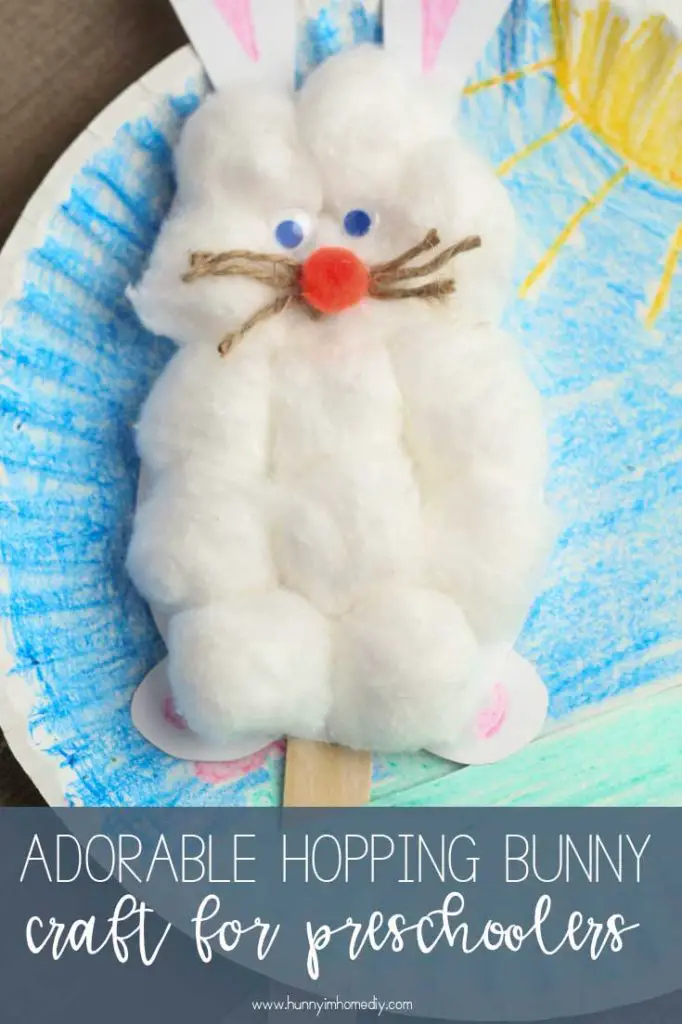
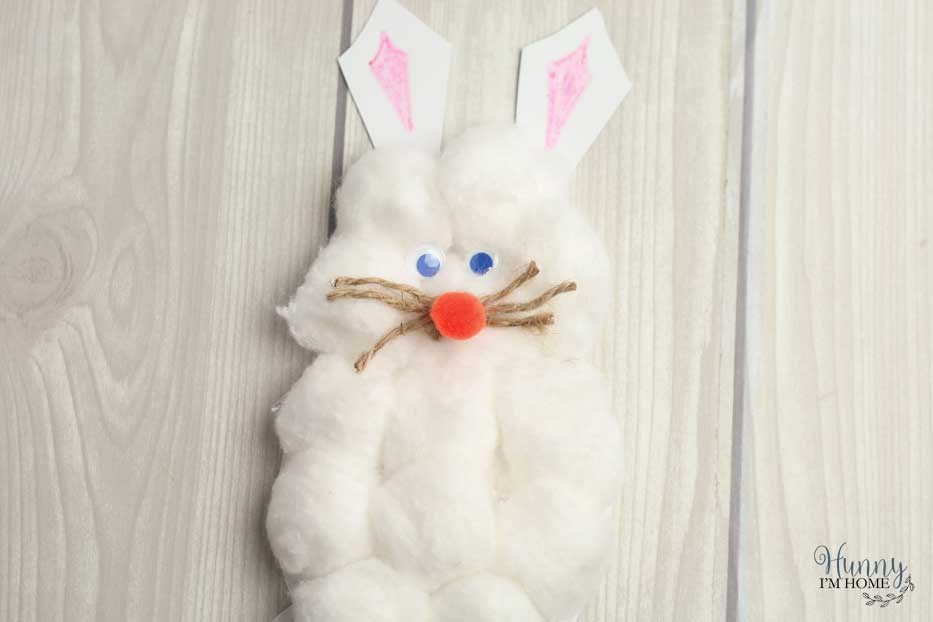
This cute bunny is fun and easy to make. Just print out the template from HoneyImHomeDIY.com, cut it out, and glue cotton balls to cover the entire bunny body. Then color the ears and feet, add googly eyes, a pom nose, and some twine whiskers.
Preschoolers will love creating their own bunny to play with or hang up. This also allows them to be creative and utilize fine motor skills as they add each cotton ball. Print out as many as you want and you can have an entire fluffle of bunnies to decorate for Easter or spring.
Materials:
- Printed bunny template
- Twine
- Googly eyes
- Pom
- Cotton balls
- Glue
- Pink crayon
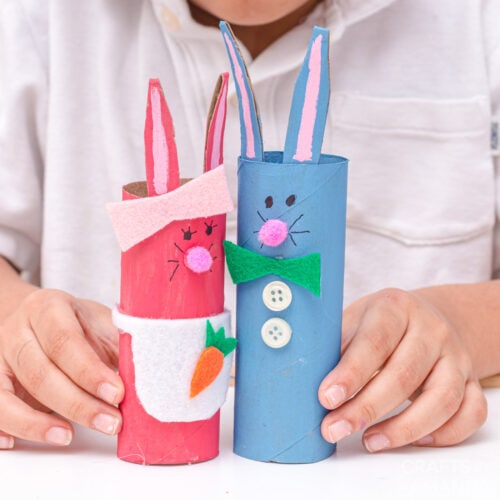
This fun activity from NaturalBeachLiving.com is great for Easter, spring, or just for imaginative play. Let your child create an entire family of bunnies to play with. These can be used in storytelling or pretend play. You could even find a bunny story to model the family after. Preschoolers will find endless ways to use and play with their new bunnies.
Start with several empty toilet paper rolls. Cut them to various sizes to represent different family members (kid bunnies will be much shorter than mommy or daddy bunnies). Also, cut a strip off the top to make the bunny ears. Paint each roll and its respective ears a different color. Then, glue the ears inside the roll, draw a face and paint the inner portion of the ears pink. Add bow ties, hairbows, and/or aprons cut from felt to the bunnies and add buttons (if desired) to the daddy bunny’s shirt.
Materials:
- Toilet paper rolls
- Various paint colors
- Permanent markers
- Paintbrush
- Felt (optional)
- Buttons (optional)
- Scissors
- Glue
- Poms
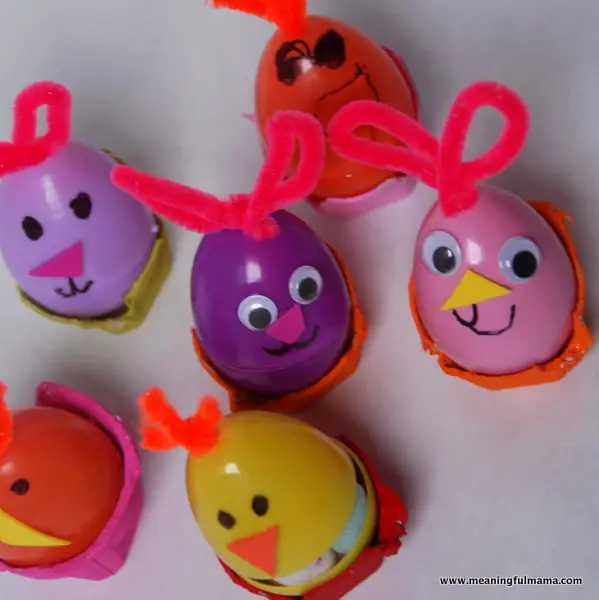
These cute egg bunnies sit in their own little compartment and are great as decorations, play, place holders, or for Easter baskets. Start by cutting up an egg carton into individual cups. Paint those a bright, fun color(s). Widen the hole on the top of the egg with a piping tip or other tool. Twist a pipe cleaner into two loops for ears and stick the end through the hole. Twist into a knot to hold in place. Draw eyes or add googly eyes to the front of the egg.
Cut foam to make a little bunny nose and glue this below the eyes. Put the egg into its own cardboard holder and your preschooler has a cute little friend to play with or store treasures in. These are fun for pretend play, decoration, or for use in Easter baskets to hold toys or candy. Preschoolers will love these bunny eggs found on CraftyMorning.com.
Materials:
- Cardboard egg carton
- Plastic eggs
- Pipe cleaners
- Permanent marker
- Googly eyes (optional)
- Felt or foam
- Scissors
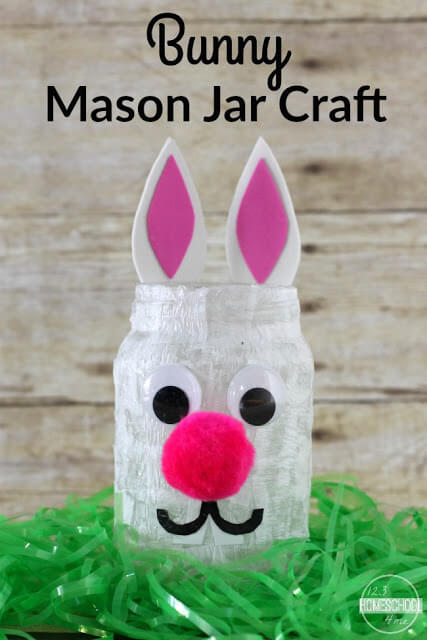
This is a great decoration to celebrate spring or Easter. It’s very preschool-friendly and won’t take too much time. Start by cutting crepe paper or tissue paper into roughly 1×1” squares. This is a great way to practice and develop scissor skills. Next, grab any clean, dry mason jar and cover the outside with glue. Attach the cut-up squares to the glue to cover the entire outer portion of the jar. Add more layers, if desired. When all layers are complete and dry, cover the paper with another layer of glue and allow it to dry.
Now it’s time to make your bunny. Add googly eyes and a pom for a nose, or you can cut these out of paper if you’re short on supplies. Cut a w-shaped mouth out of construction paper and glue beneath the nose. Cut out white teeth and glue those under the nose. Finally, cut ears out of craft foam and glue these to the back of the jar facing the front. Add pink inserts to the ears and you’re done! You can add flowers or treats to the jar and display them anywhere. Visit 123Homeschool4Me.com for more details on this great idea.
Materials:
- Mason jar
- White tissue or crepe paper
- Googly eyes
- Black and white construction paper
- Craft foam
- Glue
- Scissors
- Pom
Conclusion
There you have it. Some of the best bunny craft ideas for preschoolers out there are featured on our list. Choose the one(s) that fit your needs best and let your little one cut, glue, color, and/or decorate to their heart’s desire. You might just get a keepsake you’ll want to keep for years to come. Thanks for reading!
For more preschool activities, check these out:


