Children in preschool adore frogs. This creature has been known to inspire movies, stories, and commercial items. This amphibian is the perfect way to explore Life Science.
Lessons may include life cycle, habitat, food, and animal characteristics. These frog activities are perfect for circle time, storytelling, and Science projects. Children will have a blast making these unique and adorable crafts.
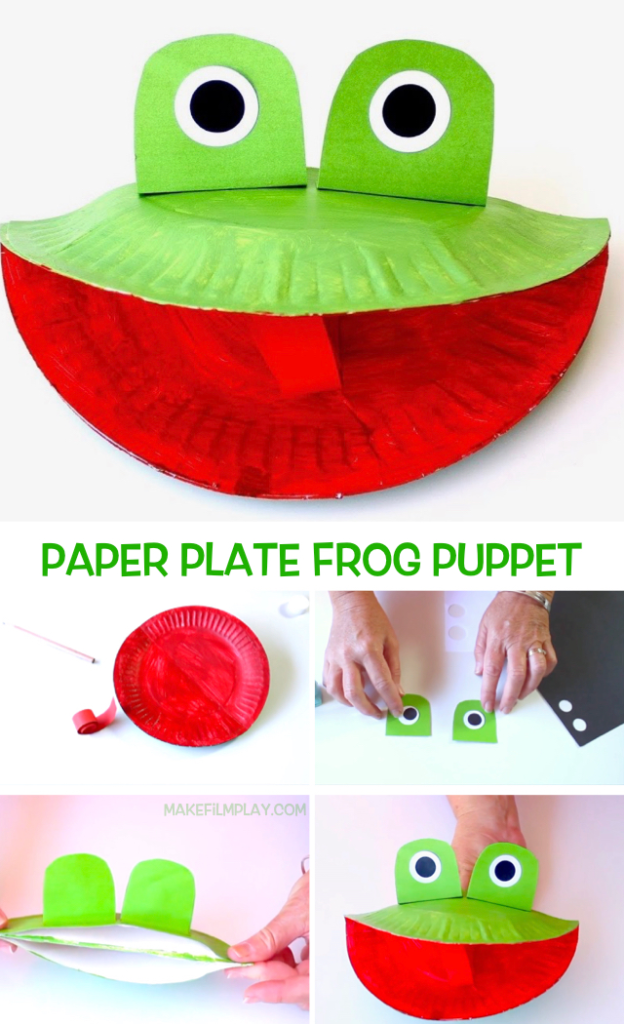
This Paper Plate Frog Puppet is perfect for children learning hand coordination. It helps children learn hand movements through this hand puppet. This craft uses simple materials and is easily made with minimal adult help.
To make this craft, cut one paper plate in half. Using glue, form two pockets by attaching the halves to the other paper plate. Ensure that the edges of the pockets or the openings are not glued together.
Once the glue dries, paint the pocket side green. Let it dry completely. Next, paint the other side red and leave it to dry. Fold this in half.
Cut a long strip for the frog’s tongue using the red construction paper. Curl the strip using a pen. Attach this in the center of the red part.
For the eyes, cut two arch shapes using green construction paper. Cut or punch two circles for the eyeballs with the white paper and two smaller circles for the pupils. Glue the black circles on the white.
Next, glue the white with black circles on the arch. Let this dry. Attach the arch shapes on the head by folding the edges and gluing them on the green part.
Once dry, it is ready for play! Remember that the pockets are for the child’s hands as they play with the puppet.
These openings should be big enough to fit the child’s hand and to control the puppet efficiently. Adjust the size if necessary.
For this craft, you will need the following:
- Two paper plates
- Red and green paints
- Construction papers in white, black, and green
- Hole puncher
- Scissors
- Glue
- Paintbrush
For a detailed process on how to make this craft, head over to MakeFilmPlay.com
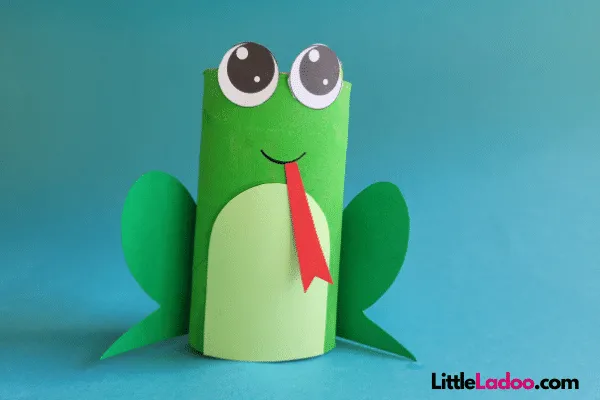
What’s better than a cute frog craft? It’s the frog craft that is simple to make using available materials. Save those toilet paper rolls for tons of fun and creative play.
Start with printing the template and cutting the different parts. Trace the legs on the dark green construction paper. Use the paper with a lighter shade of green for the frog’s tummy. The red paper is for the tongue.
Cut these pieces and set them aside. Next, Use the green paint to cover the tissue paper roll. Generously add color to hide any gray. Add a double coat if necessary. Let this dry completely.
Now, it’s time to assemble the frog! Flatten the sides of the tissue roll by pressing. Glue the legs, tummy, and eyes. Use the black marker to add a mouth. Lastly, glue the tongue.
LittleLadoo.com suggests making a lily pad for the frog to hop on. Toilet Paper Roll Frog craft can be used in so many ways. Teach children to count by making the frog hop.
Create several more and use them for the rhyme “Five Speckled Frog”. Teach colors and animal parts using this craft. The details and a video on how to make this craft are on the website.
For this craft, you will need the following:
- Toilet paper roll
- Frog template
- Construction paper in red and two different shades of green
- Scissors
- Glue
- Black marker
- Green paint
- Paintbrush
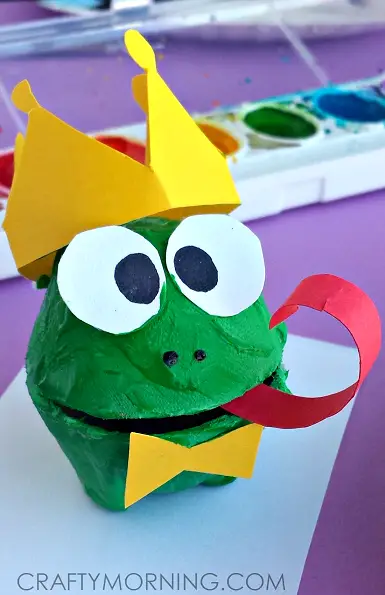
If you are planning to read the story or watch the movie of the Frog Prince, this craft may be the perfect companion for children to appreciate the story even more. Even better is reusing the egg cartons to make a fun project for children to enjoy.
To make this craft, cut two cups from the egg carton. Make sure they lay down flat. Trim the edges very well to make this possible. Paint the outer part of the cups green. Allow the paint to dry.
Using the yellow construction paper, cut the bow tie and the crown. Cut a long strip of red construction paper for the tongue. Curl the end of the paper strip using a pen or ruler.
Cut two circles from the white paper for the eyes. Use black paint to make dots for the eyes. A black marker is also an option for this step. Attach the eyes to one of the egg cups.
Next, glue the tongue inside the egg cup. To complete the prince’s look, add the crown and bow. The frog prince is now ready to meet the princess!
For this craft, you will need the following:
- Egg carton
- White, yellow, and red construction paper
- Black and green paint
- Paintbrush
- Scissors
- Glue
For more details on this craft, check out CrafyMorning.com
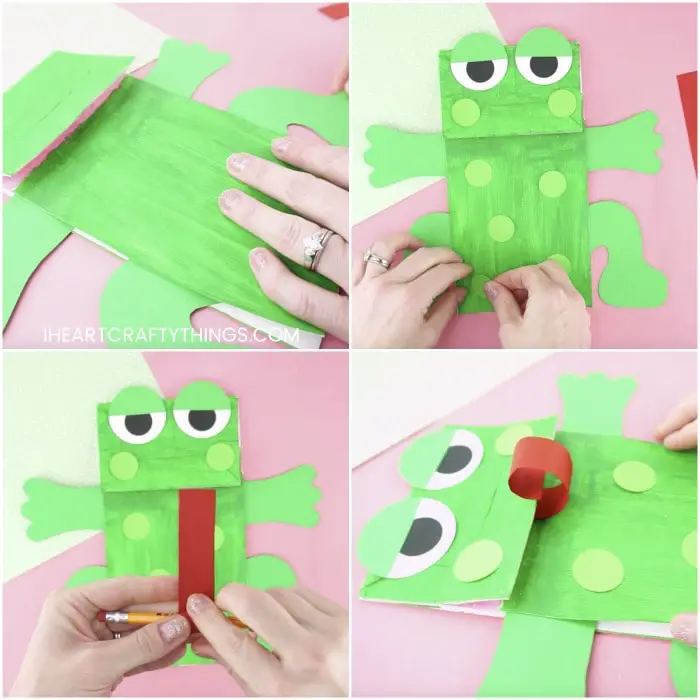
Puppets are one of the teacher’s favorite tools for helping children develop their language skills. It encourages children to express themselves spontaneously, thus improving their conversation skills.
For this puppet, download the template and print it. Use the green cardstock for the first page of the template and white for the second page. Cut the pieces for the first template.
The second template has pieces that come in different colors. Either color them using markers or cut them out and trace them onto a different color of cardstock. The eyeballs are white, pupils are black, spots are green, and the tongue is red.
An option to make perfect circles is to use circle punchers in different sizes. Next, paint the front part of the paper lunch bag green. Paint the area underneath the flap pink. This part will become the frog’s mouth. Let the paint dry.
Assemble the puppet by attaching the arms and legs to the side of the flaps of the paper lunch bag. Add the spots on the body.
To make the eyes, glue the pupils on the white circles and the half green circles on top for the eyelids. Glue them on the top part of the flap. Add the tongue to the pink part of the flap. Curl the tongue using a pencil.
For this craft, prepare the following:
- Frog template
- Brown paper lunch bag
- Green and pink paint
- Paintbrush
- Green, white, black, and red cardstock
- Scissors
- Glue
- Pencil
For more details on this craft, go to IHeartCraftyThings.com
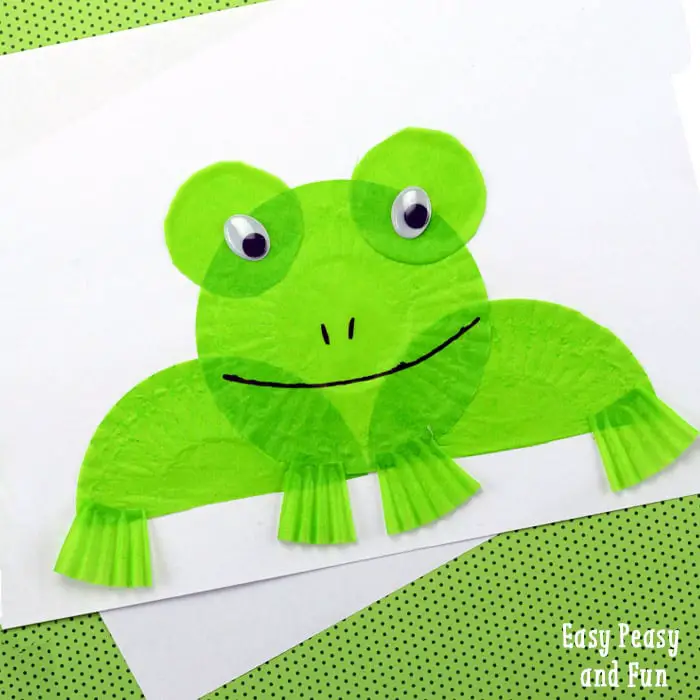
This Cupcake Liner Frog is an excellent craft for teaching the circle shape. Children can count the number of circles in the finished craft. They can compare the sizes of the circles. Another idea is to explore the concept of halves with this craft.
To make this frog craft, cut one cupcake liner in half. Glue these halves next to each other on a piece of white paper. These will be the frog’s legs.
Smoothen one cupcake liner carefully to flatten it. Glue it between the legs. Next, cut circles from the middle part of the other two cupcake liners. These are for the eyes. Do not discard the pleated part since it will be used for the feet.
Glue them on the head, making sure that there is enough space in between. Add the googly eyes.
Next, use the pleated part of the liners for the frog’s webbed feet. Cut the pleated part into about an inch. Make four of these. Glue two for each leg.
Finally, add the finishing touches. Use the black marker to draw tiny lines for the nose and a long curved line for the mouth.
For this craft, prepare the following:
- A piece of white paper
- Four green cupcake liners
- Glue
- Googly eyes
- Black Marker
To find out more about this craft, head to EasyPeasyAndFun.com
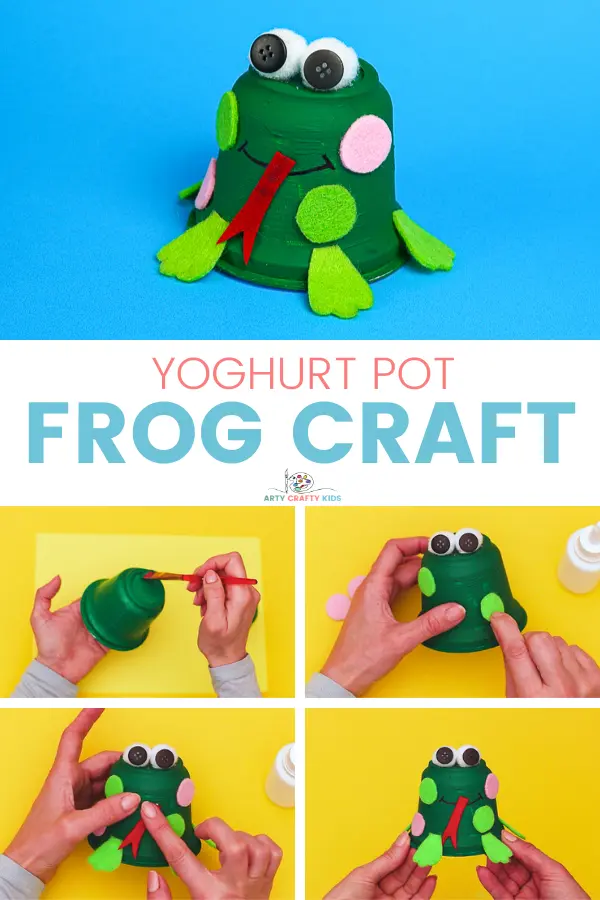
This craft is a great way to recycle food containers. Use other plastic cup containers in the absence of yogurt cups. Construction paper may be an option if children are struggling with cutting felt.
This craft lets children explore colors, shapes, and textures. The frog can also be used for games, to hide items underneath, or as a dice shaker.
Clean and dry the container very well. Make sure no leftover foil is on the rim to prevent cuts. Paint the outer part of the container green. Let it dry.
Use two coats of paint if necessary to ensure no other colors from the container are showing. Once dry, flip the container, so the opening is at the bottom.
Make the eyes by gluing the black buttons on the pompoms. Attach these to the end bottom part of the container. Next, cut circles for the spots using green and pink felt. Stick these on the frog’s body.
Cut four pieces for the frog’s feet using the green felt. Attach two in front of the container and two at the back. Lastly, cut the tongue from the red felt. Use the black marker to draw the frog’s mouth. Attach the tongue using glue.
For this craft, you will need:
- Yogurt container
- Paintbrush
- Green paint
- Black marker
- Black buttons not bigger than the pompoms
- White Pom-Poms
- Green, red, and pink felt or construction paper
- Glue
- Scissors
For more details on this craft, head to ArtyCraftyKids.com
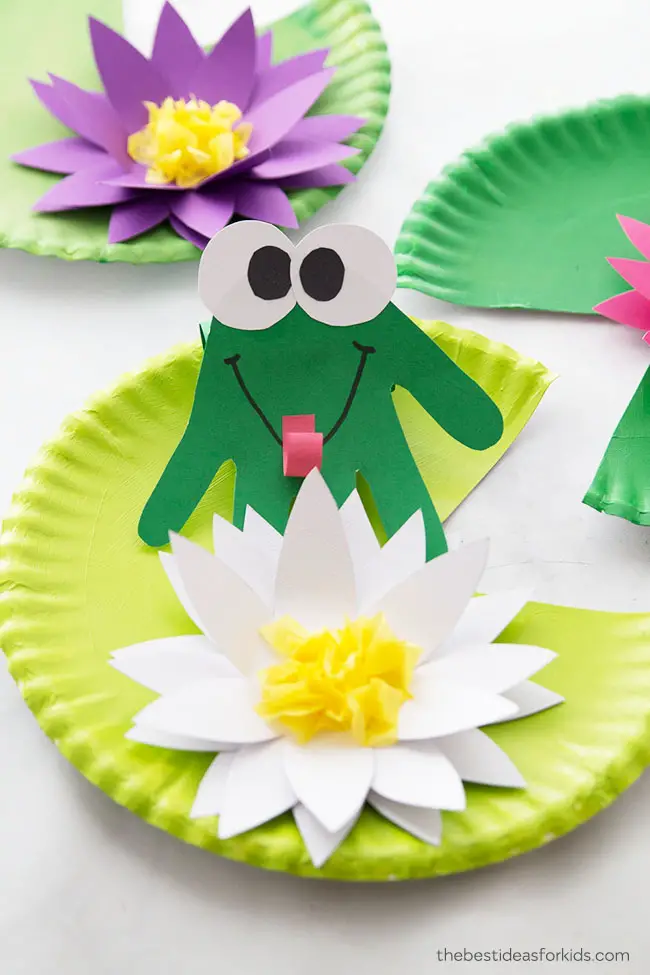
Handprint Frog on a Lily Pad is an elegant-looking craft that can be put on display for everyone to see. The child’s handprint will transform into a frog sitting on a lilypad with a lovely blossom.
To make the lilypad, cut a small triangle off the paper plate. Paint the lilypad green. Use a mixture of shades of green on different lilypads to create an interesting contrast, especially when it is intended for classroom display.
Use the template provided on the site to make flowers. Cut four pieces of flowers using the white cardstock. Use the other colors of cardstock for variety. Use glue to stick all the flower pieces together alternately.
Slightly bend the petals to create dimension. Use the yellow tissue paper to make small squares. Glue these in the center of the flower. Let this dry. Next, glue the flower on the lilypad.
To make the frog, trace and cut out the child’s handprint on green cardstock. Cut two white circles and two smaller black circles for the eyes. Glue the black circles on the white. Next, glue the eyes on the handprint.
Use the black marker to draw a mouth. Cut a strip of red cardstock and curl it before gluing on the handprint frog.
Using the same green color as the frog, cut a strip of cardstock wide enough to make a ring for the frog to rest on so that the frog is standing.
Lastly, stick the frog on the ring before attaching it to the paper plate. Now, it’s ready to display!
For this craft, prepare the following:
- Paper plate
- Colored cardstock in green, black, red, white, purple, and pink
- Black marker
- Yellow Tissue paper
- Green paint
- Paintbrush
For the free templates and to know more about how this craft, check out TheBestIdeasForKids.com
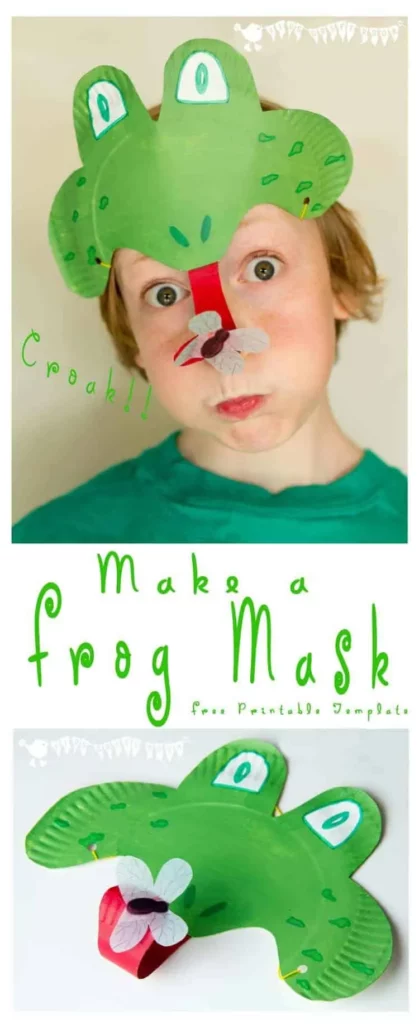
Masks are essential for storytelling and creative play. This mask is designed perfectly for kids who may not like a full-face mask. This craft is a mask in action and can be a useful tool in Science lessons.
Using this will make the discussions on the different food that frogs consume and their manner of eating.
Make the mask by printing the template from the site. Cut it out and trace it onto a paper plate large enough to cover the child’s forehead partially. Cut the paper plate and paint it green. Use red paint for the tongue. Allow the paint to dry.
Add the eyes using the green marker. To make the fly, use the tracing paper to cut a square. Fold in half. Next, cut out a B shape making sure not to cut through the folded part.
Unfold the tracing paper and use the black marker to draw the fly’s body. Use a pencil to curl the tongue. Attach the fly on the tongue. Glue the tongue on the mask.
Punch holes on each side of the mask. Add the rubber band so children can securely wear it on their heads.
For this craft, you will need:
- Frog Template
- Paper plate
- Red, green, and white paints
- Tracing paper
- Black and green markers
- Glue
- Scissors
- Rubber bands
For more information head over to KidsCraftRoom.com
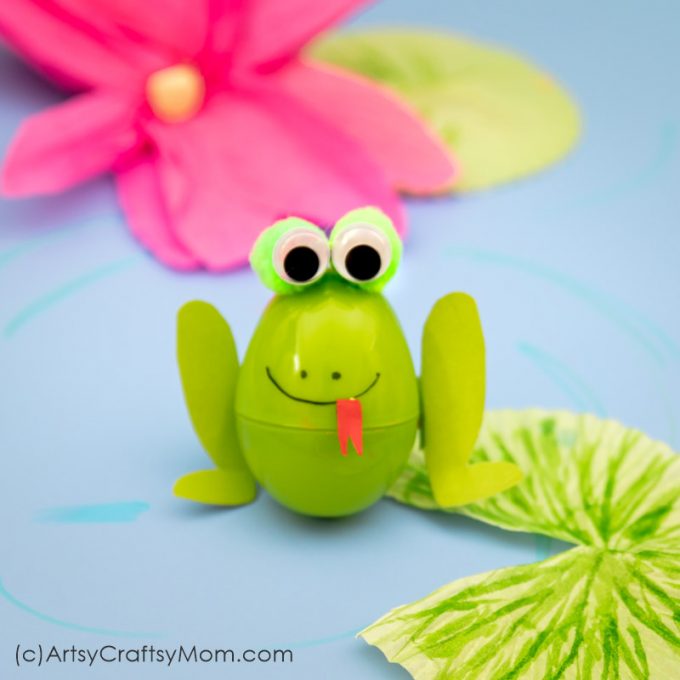
This Plastic Egg Frog is a great way to recycle those plastic eggs from the Easter egg hunt. Use this craft to accompany books and songs about frogs. This craft may come in handy when discussing amphibians and their habitats.
To make this craft, draw the legs on green cardstock. Use the red cardstock for the tongue. Use the pictures on the site for reference. Cut the leg piece in half and attach it to the plastic egg using a clay tack or sticky tape.
Glue the googly eyes on the pompoms and attach them to the plastic egg. Use the black marker to make the mouth and nose. Lastly, stick the red tongue with the clay tack.
Since the plastic eggs are small, young children may need assistance to complete this project. Give children pre-cut pieces such as the legs and tongue. Place stones or anything that would fit inside the egg to weigh it down and keep it stable.
Consider making a lilypad using cardstock and shades of green markers or crayons, as shown in the picture.
For this craft, you will need the following:
- Plastic egg in green
- Scissors
- Glue
- Googly eyes
- Black markers
- Green pompoms
- Red and green cardstock
- Sticky tape or clay tacks
For more information on this craft, go to ArtsyCraftsyMom.com
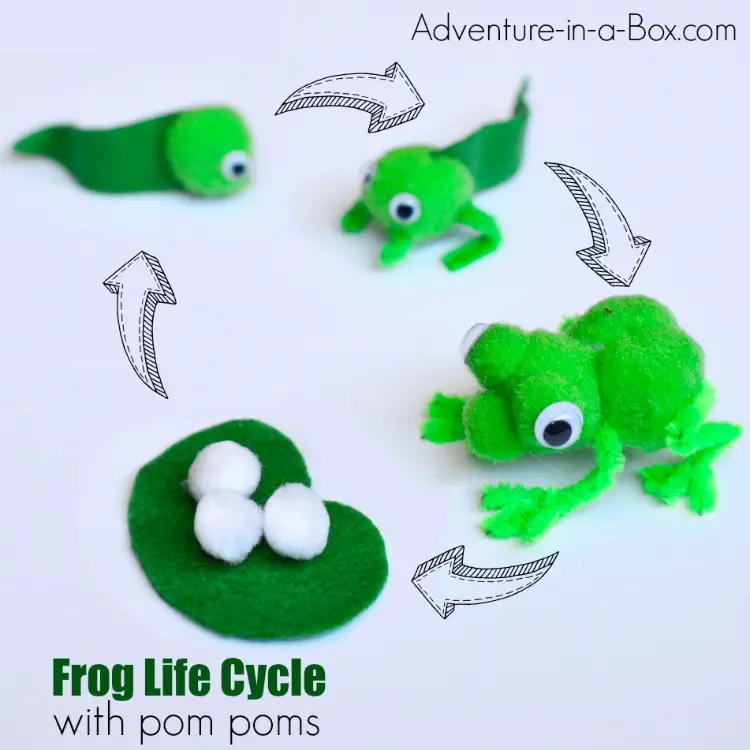
The frog’s life cycle is one of the most popular lessons to teach children about how animals grow from young to adulthood. This craft is a unique and practical example to show children how interesting this topic is.
Remember to take caution as this craft requires a hot glue gun. Pipe cleaners are twisted to form the frog’s legs. Secure the pointed ends with sticky tape to prevent children from getting poked.
To make the frog, hot glue three large green pompoms. Add two small green pompoms for the eyes and one for the mouth. Cut the pipe cleaners for the legs. Twist them and use the hot glue to attach them. Trim the excess length.
Cut shorter pieces and twist on the legs to make the feet. Add the googly eyes. The adult frog is now complete!
Cut a piece of a long triangle from the green felt that resembles a tail for the tadpole. Use the hot glue to attach to a green pompom. Add the googly eyes.
For the tadpole with legs, repeat the process of making a tadpole. Cut pipe cleaners and use the hot glue gun to attach to the pompoms.
Lastly, make the eggs by cutting a small lily pad from the green felt. Attach three white pompoms to it.
Like a string puppet, add a fishing line to the adult frog for easy manipulation. Children will have a blast making the frog hop.
For this craft, you will need the following:
- Green pompoms in assorted sizes
- White pompoms
- Green pipe cleaners
- Green felt
- Googly eyes
- Low heat glue gun
- Scissors
For the video and for more information head to Adventure-In-A-Box.com
Conclusion
Frogs are amazing creatures and are always a hit in preschool. Their life cycle is interesting for children and is worth exploring.
Extend your lessons by considering these activities. They go well with storybooks, songs, videos, and experiments.
These activities will make your lessons more lively and engaging for children. Thank you for reading!
For more preschool animal crafts, check these out:


