The farm is one of the most popular and fun themes to explore in preschool. The farmer and his job, the vehicles and tools, and the animals are interesting for children.
Cows are one of the popular animals for this theme. There are endless books and activities one can use in teaching the farm theme. Here is a list of some cow activities to consider.
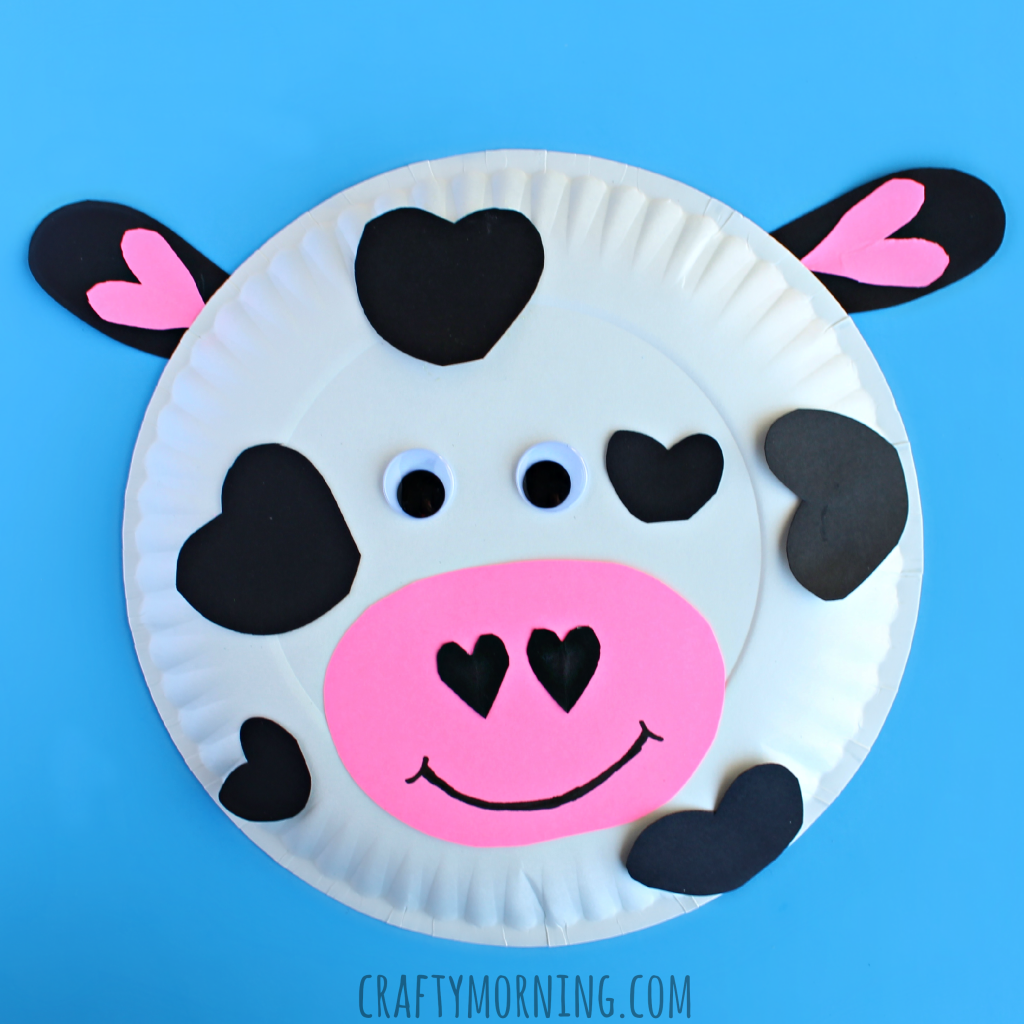
Not only does this paper plate cow look adorable, but it is also easy to put together, even for young children. It also uses different sizes of heart shapes. This craft is a good activity to do after a lesson on shapes-heart.
Bear in mind that hearts can be a bit difficult to cut for young children. Preparing the cut-outs in advance or guiding the child while cutting would be advisable. However, this is a good activity for children to practice cutting curved lines.
To put this together, cut out the two small hearts for the nose and six different sizes of hearts for the spots from the black paper. Cut two black rectangles with rounded edges for the ears.
Cut two small pink hearts to place on the black ears and a big pink oval for the muzzle. Draw a smiling mouth on the muzzle using the black marker. Glue the hearts and the rest of the parts on the paper plate.
For this activity, you will need the following:
- A white paper plate
- Black and pink craft paper
- A pair of googly eyes
- Scissors
- Glue
- Marker (black)
For more information on this activity, check out CraftyMorning.com
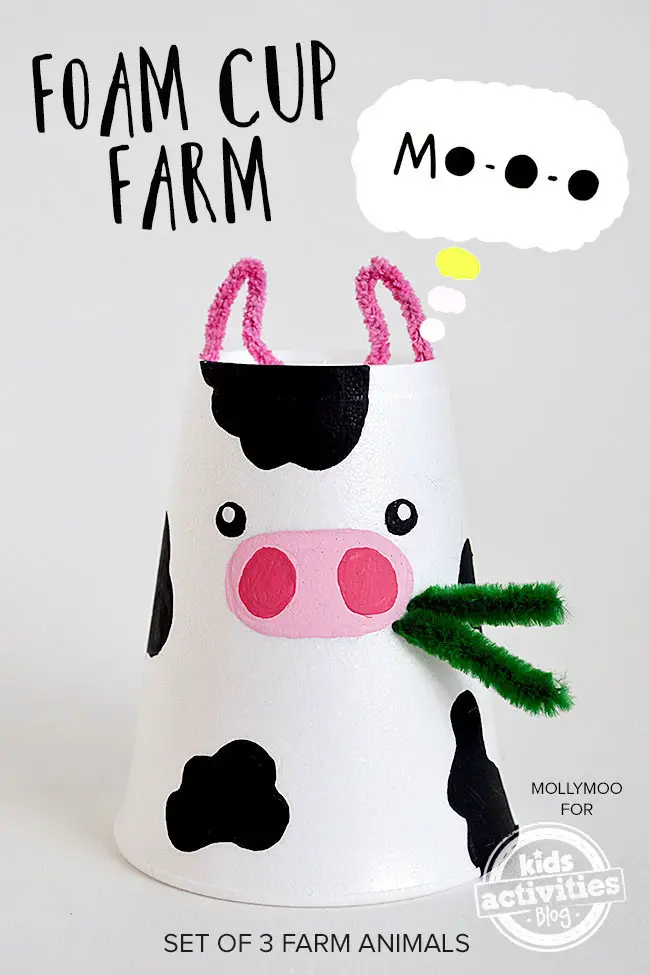
Did you know that coffee cups can be recycled into animal crafts that children will enjoy making? This activity will help improve children’s fine motor skills through drawing and painting.
Please take note that it is easier for young children to draw and paint on a flat surface. So this activity may require some assistance from adults. Use a mat or a large sheet of paper to prevent the mess from paints.
Start with placing the cup bottom-side up on the mat or paper. Children may draw the spots, eyes, and muzzle, or they may paint on the cup directly. Use white paint if the cup is not entirely white.
Use black paint for the spots and eyes, pink for the muzzle, and a mix of red and white for the nose. Let this dry completely. Next, cut the pink pipe cleaner just the right size for the ears. Guide the children as they poke holes and bend them to make the ears.
Insert the green pipe cleaner to resemble the grass cows eat. As a precaution, the pointy ends of the pipe cleaners can be covered with sticky tape to prevent accidents.
You need to prepare the following for this activity:
- Styrofoam cups
- Acrylic paint (white, black, pink, and red)
- Paint brushes
- Pipe cleaners (pink and green)
- Pencil
- Scissors
- Craft Tape
For more details on this activity, check out KidsActivitiesBlog.com
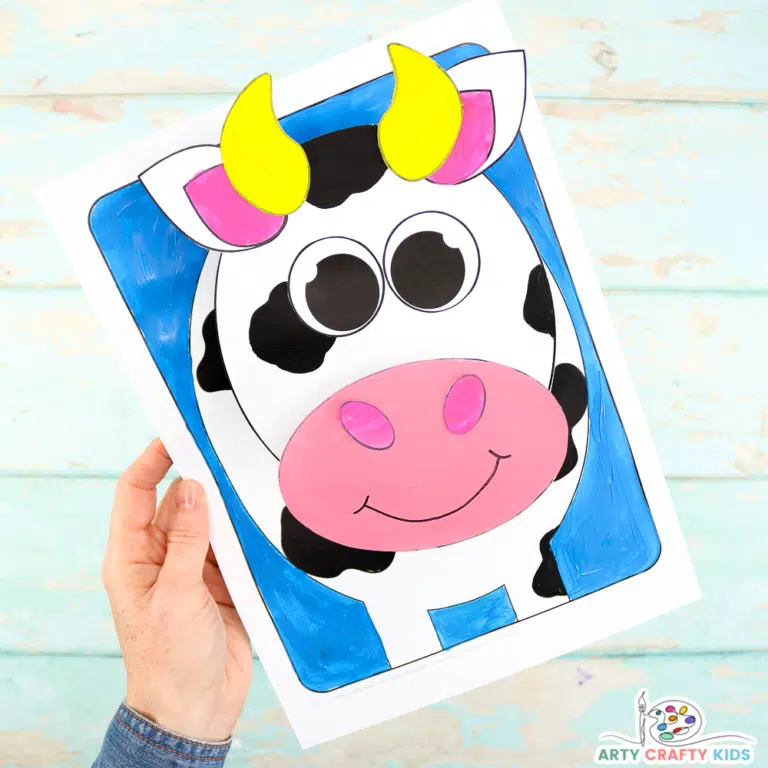
This unique cow craft will help children develop their fine motor skills. They will cut, color, fold paper strips, and paste the pieces together to form this one-of-a-kind 3D cow. The white cardstock is recommended for this craft.
The cow template is big enough to make it easier for children to hold and turn when cutting. It also has a broader area to paint on or color with crayons, which is perfect for preschoolers.
To put together the craft, print the cow template from ArtyCraftyKids.com. Next, paint the parts of the cow such as the muzzle, inner ears, horns, and nose. Let these dry completely.
Color the spots on the head using paint or a black marker. Put together the head of the cow by cutting all the pieces. Paste the eyes, horns, and ears on the head. Paste the nose on the muzzle.
Cut strips of paper, about an inch wide. Paste a strip together to make a ring. Make four of these. Paste two rings on the middle part of the head. Make sure the holes are on the side. Stick the muzzle on top of the rings.
Lastly, paste the two remaining rings on the body. Paste the head on the rings. Now, the 3D cow is complete!
For this activity, you will need to prepare the following:
- Cow template
- Paints or crayons
- Glue
- Scissors
- Black marker
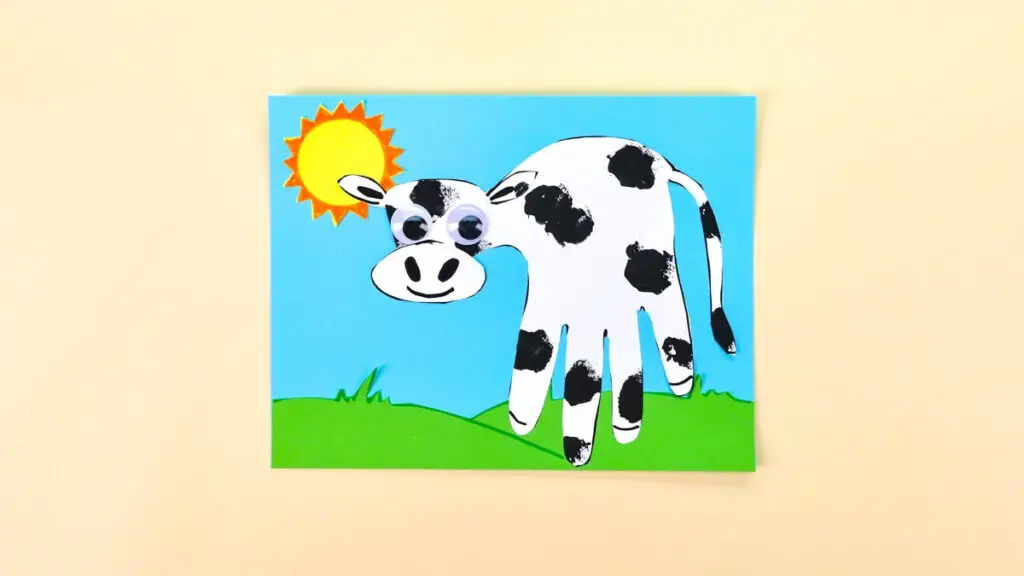
This cow craft is made from hand prints. The handprint will serve as the cow’s body. Using cotton balls is an excellent way to improve the child’s finger grasp, which is necessary for holding pencils.
Trace the child’s hand on a white construction paper. Make sure that the child’s fingers are spaced apart to enable the black marker to trace around them. Draw a tail just above the little finger.
Draw a head and the muzzle with a nose and mouth on the same paper. Next, squeeze some black paint on a plate. Give the child a cotton ball to dip on the paint and dab on the hand print and on the cow’s head.
Once the paint is dry, cut the handprint, head, and muzzle. Use green construction paper to make the grassy hills and yellow paper for the sun. Paste the hills at the bottom of the blue paper and the sun on top.
Complete the scene by placing the handprint in the center. Make sure to add enough glue to each of the fingers. Paste the muzzle on the head. Paste the head on the thumb. The cow grazing on a sunny day is now complete!
To make this cow craft, you will need:
- Construction paper in different colors
- Black paint
- Cotton balls
- Googly eyes
- Markers
- Scissors
- Glue
- A plate for paints
Be sure to check out SuperSimple.com for more information on this activity.
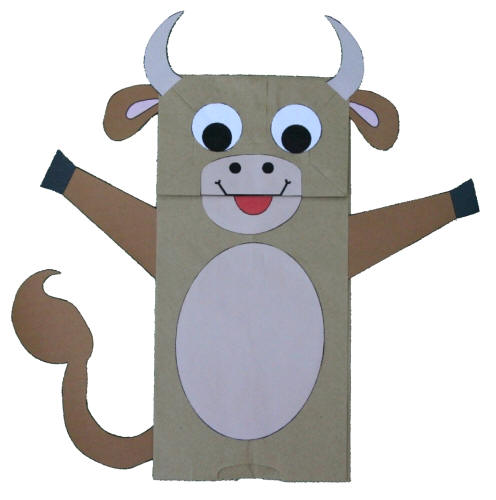
A cow puppet is a fun addition to make learning about farm animals fun and engaging. This paper bag cow craft is easy to make and will surely make children smile. As suggested, this puppet can be used for games, songs, and stories.
Start assembling the puppet. First, cut out the parts from the template. Next, glue the eyes on the flap at the bottom of the bag. Next, glue the ears and horns on the sides of the bottom flap, just above the eyes.
Cut the mouth in half using the line as a guide on the template. Glue the top part of the mouth on the bottom flap of the bag. Glue the bottom part of the mouth under the flap. Make sure that both mouth parts are aligned.
Glue the legs on the folded side of the paper bag. Lastly, attach the tail to the back of the paper bag. Let it dry completely. The puppet is now ready to use!
For this activity, you will need the following:
- A paper lunch bag
- Cow template
- Crayons
- Scissors
- Glue
For the template and step-by-step instructions, check out DTLKKids.com
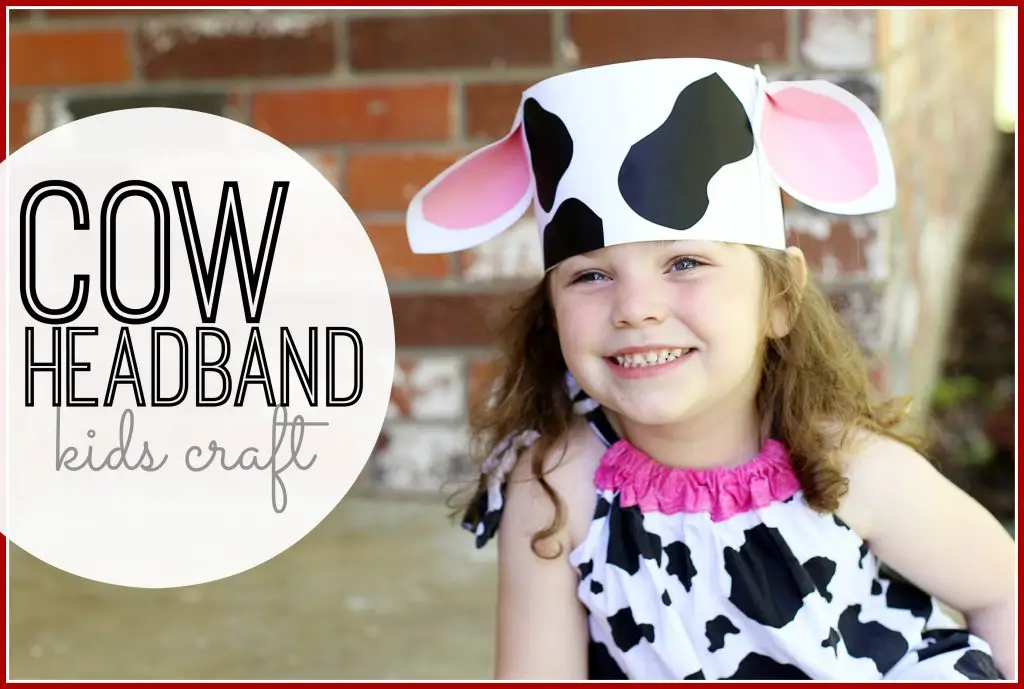
Animal headbands are very useful in pretend play. They can also be used as an addition to costumes in plays. This craft is simple and fun to make.
Begin with folding the cardstock in half. Fold it lengthwise to make thick paper strips for the child’s head. Glue or staple the ends together, creating a long strip.
Next, attach the ends to make a huge ring. This ring will become the headband. Make sure this will fit on the child’s head. Next, have the child cut some cow spots using black construction paper and glue them on the headband.
Cut two pink and two white triangles for the ears. Remember to cut the pink part smaller than the white. Make the sides of the ears rounded. Glue the pink piece on top of the white and let it dry.
Fold the base of the ear and staple. Attach these on the sides of the headband. Make sure to take caution when using staplers. Check for protruding staple wires that may scratch the child’s skin.
For this activity, you will do the following:
- Cardstock or construction paper in white, black, and pink
- Scissors
- Glue
- Stapler
For more information on this activity, please visit KansasLivingMagazine.com
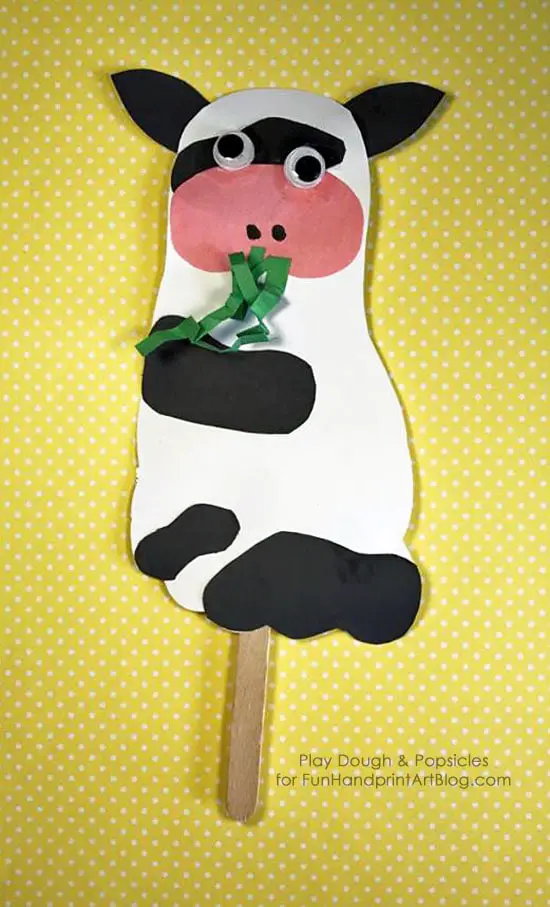
This adorable stick puppet makes use of the child’s footprint. Stick puppets are excellent tools for storytelling. These can also be used as props during the retelling of stories. This craft is simple and fun to make.
First, assist the children in tracing their foot on white cardstock. Guide them as they cut their footprint. Use black construction paper for the ears and cow spots. Use pink for the muzzle and add two black spots by using a marker.
Glue the muzzle and eyes on the heel part of the footprint. Add the ears and cow spots. Cut some green paper strips and lightly crinkle them to make the grass. Glue these on the mouth. Attach the puppet to a popsicle stick.
For this activity, prepare the following:
- Cardstock
- Construction paper in black, green, and pink
- Popsicle sticks
- Glue
- Scissors
- Googly eyes
- Markers
Don’t forget to check FunHandprintArtBlog.com for more details about this activity.
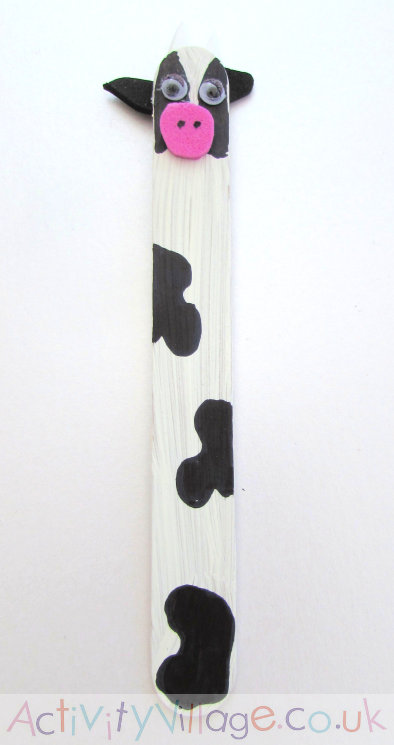
This bookmark craft is not only useful. It is also a great way to encourage children to read books by using this adorable page marker.
To make this craft, give each child a large popsicle stick and a paintbrush. Have them paint the whole craft stick using white paint. Let this dry completely. Next, paint the cow spots using black paint. Let this dry.
Cut two small black ears and a pink muzzle using craft foam. Glue these on the stick. Using a black marker, add two dots on the muzzle for the nose. Cut tiny horns from white craft foam.
Glue these on the head part of the cow. Lastly, glue on the eyes. You may opt to add a tail by cutting a tiny strip of black craft foam. Attach this to the back of the popsicle stick.
This cow bookmark is now ready for budding bookworms!
For this craft, you will need the following:
- Large popsicle sticks or craft sticks
- White and black paints
- Paintbrushes
- Pink, white, and black craft foam
- Black marker
- Googly eyes
- Glue
For more information about this activity, head to ActivityVillage.co.uk
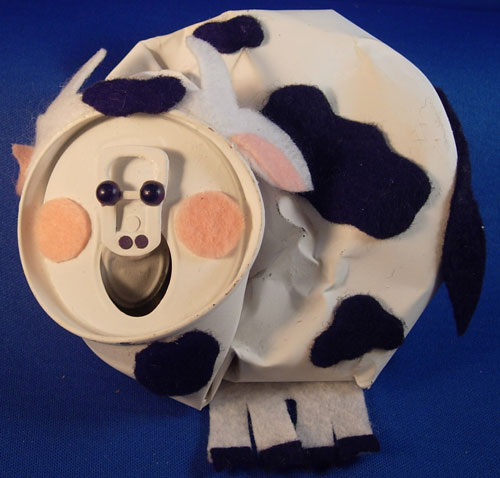
Aside from learning about cows, this activity promotes caring for the environment through recycling. Used soda cans are cleaned and repurposed as a cow craft for children to enjoy. This activity will require an adult to prepare the materials for young children.
First, make sure the cans are clean and dry. Carefully flatten the can’s opening for the cow’s mouth. Next, crush the can gently with your foot. Use a coat of white spray paint to cover the crushed can completely. Let it dry.
Next, have your child use white acrylic paint for the second coat. Let it dry. Use the pattern from the site and trace them on the felt. Use felt pieces to make the cow’s body parts.
On the black felt, cut four hooves and a tail. Cut the legs and ears with the horns using the white felt. Use pink felt for the cheeks and inner ears. After these are cut out, your child is ready to put it all together.
To assemble this craft, glue the spots, tail, and legs to their respective places. Use the picture of the craft as a reference. Glue the cheeks and eyes on the head. Glue the black punched paper for the nose.
To make this craft more charming, add a jingle bell on a ribbon bow. Glue this under the neck part of the cow.
For this activity, prepare the following:
- Aluminum soda cans
- Matte white spray paint
- White acrylic paint
- Scraps of felt in colors white, peach, and black
- A pair of ¼ inch diameter of black bead
- Black punched papers
- Tack glue
For the pattern and to learn more about this activity, head to FaveCrafts.com
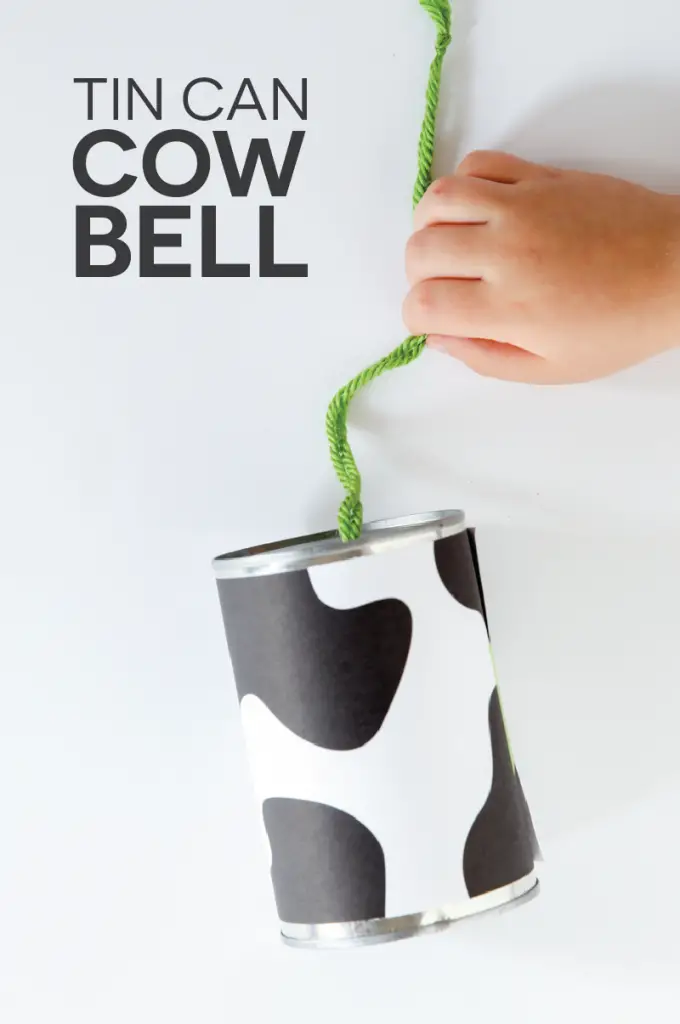
This craft promotes recycling by repurposing tin cans as sound machines. These tin cans are recycled to help prevent ending up in landfills while encouraging creativity in children.
As a precaution, ensure the can is clean, rust-free, and has no sharp edges that may cause harm to the children. Print the cow wrap template in advance. Cut it to fit the size of the can. Glue it around the tin can and let it dry.
Cut the yarn to about three feet in length and fold it in half. Tie the wood beads and secure them with big knots.
Using the hammer and a big nail, make a hole in the bottom of the can. Insert the yarn with the wood beads carefully. To prevent the yarn from sliding, tie the ends very well.
They are now ready to use! These cowbells can be used for pretend play, music-related activities, and games.
Here are the things to prepare for this activity:
- A tin can
- Cow wrap template
- Wood beads or bottle lids
- Yarn
- Hammer and a big nail
Check out CraftingChicks.com for the cow wrap template and more details.
Conclusion
There are many creative ways to use these cow crafts in teaching children the importance of this animal on the farm.
Encourage the children to learn more about the cows by exploring the animal’s sounds, appearance, food, behavior, and value. Use these crafts to go with your favorite farm-themed storybooks. We hope you enjoyed our list. Let us know what you think.
More preschool animal craft ideas you might like:


