The giraffe is one of the most delightful animals to discuss in the zoo theme. Children love talking about what makes this animal unique and beautiful.
The vivid colors, long neck, and long legs are some characteristics children readily identify with the mention of this animal.
Here is a list of wonderful activities that can be used when for lessons on giraffes. Take a look, and we hope you’ll find one that suits your class.
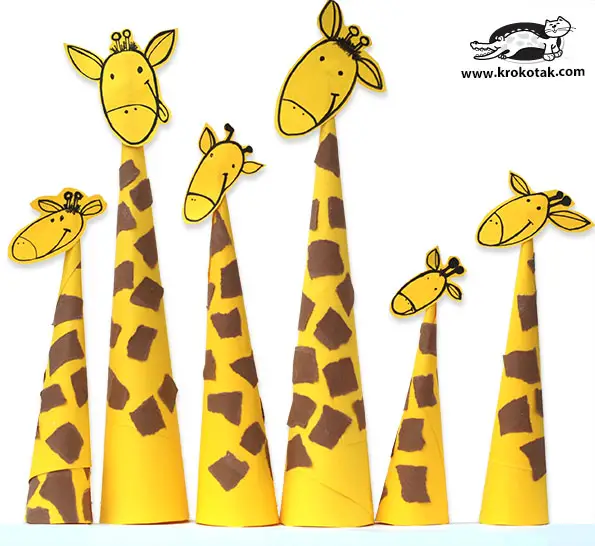
Give the children the option to make one or a set for a lovable family of giraffes. If making a set, encourage them to use their own family as their reference, naming each of the giraffes after a family member.
This craft is an excellent addition to lessons on the family as a unit. The names of the family member and their roles in the family can be the focal point of the lesson. Vary the length of the cones if doing this.
There are two ways to make this craft. The first is to download the template, print, cut, color, and paste.
The second is to make everything from scratch. This option may be more time-consuming, but the result is far more adorable.
Start with rolling the cardstock into a thin and narrow cone. Secure the ends with glue. Trim the edges so the cone will be stable when standing on a flat surface.
Use the remaining piece of yellow cardstock to draw the giraffe’s head. Follow the step-by-step instructions on how to draw the face on the site. Glue on top of the cone.
Tear the brown construction paper into small pieces for the spots. Glue these on the cone. The giraffe is now ready!
For this craft, you will need the following:
- Giraffe template
- Yellow cardstock
- Black marker
- Glue
- Scissors
- Brown construction paper
For more details on this craft, head to Krokotak.com
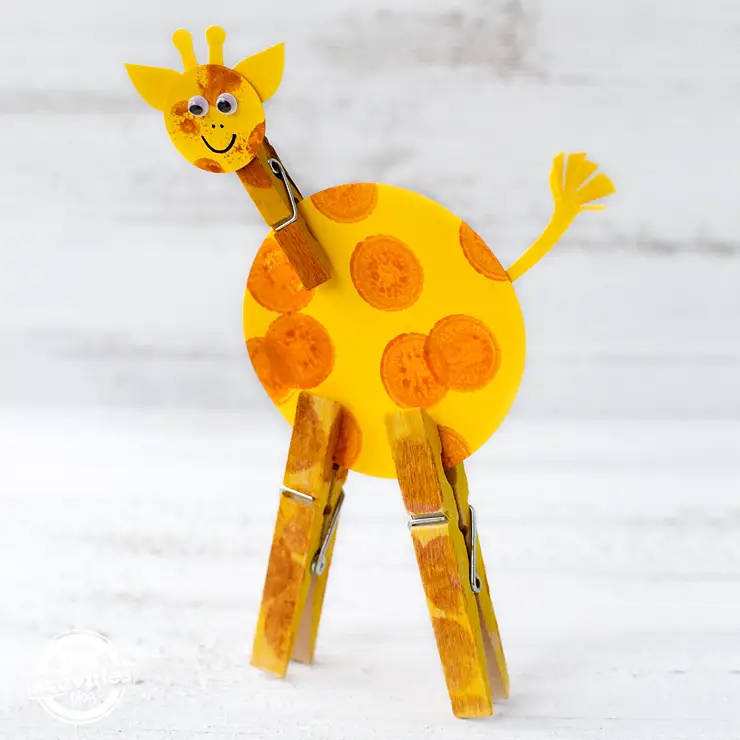
This giraffe craft can double as a place marker or name card at children’s parties. It can be an added activity to learn circles and colors.
Using wooden clothespins will help children improve their three-finger grasp, which is essential when learning to write.
Cut two different sizes of circles from the yellow cardstock. Use the bigger circle for the body and the smaller one for the head.
Add the markings on the giraffe by using the brown bingo markers. If bingo markers are unavailable, use a mixture of brown and yellow paint to dot the body.
Another option is to cut or punch circles from brown and yellow construction paper and glue them on the giraffe’s body. Use the same colors of bingo markers on the clothespin to add color. Let these dry completely.
Use the scraps of yellow cardstock to cut the tail, ears, and horns. Add the googly eyes, ears, and horns on the head. Glue the tail on the big circle.
Glue the head on the small clothespin and clip it on the giraffe’s body. Next, use the large wooden clothespin as the giraffe’s legs. Clip these on the big circle. Position them properly so that the giraffe can stand.
For this activity, you will need:
- Yellow and brown bingo markers
- Yellow cardstock
- Two regular-sized wooden clothespin
- One small-sized wooden clothespin
- Googly eyes
- Scissors
- Glue
- Black marker
For more information on this craft, go to KidsActivitiesBlog.com
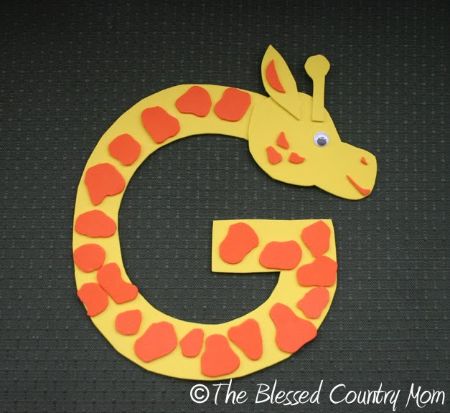
This giraffe activity looks like it is an uppercase G. This alphabet animal craft is an excellent idea for helping children make letter-to-object associations.
This craft is simple to make and is material friendly. It allows the teacher to use craft foam, cardstock, or construction paper, whichever is available.
To make this letter giraffe, use a pen to outline the letter G on craft foam. Cut it out. Use the remaining yellow foam to make the head, horn, and ear. Refer to the photos on the site for these parts.
Next, cut out the spots, mouth, and nose from the orange craft foam. Glue the nose and mouth on the face. Glue the eyes and small spots, too! Let this dry.
Stick the head of the giraffe on the end of the letter G. Lastly, add the orange spots. Allow this craft to dry completely.
For this craft, you will need the following:
- Yellow craft foam, cardstock, or construction paper
- Orange craft foam, cardstock, or construction paper
- Googly eye
- Pen
- Scissors
- Glue
For more details on this craft, check out CoolKidsCraft.com
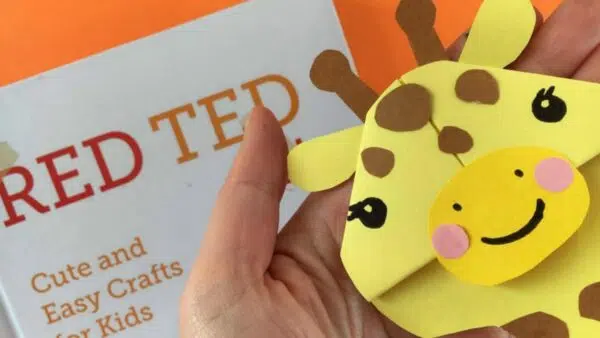
This giraffe craft is not only adorable but also practical. This origami giraffe bookmark uses the paper folding technique to make this one-of-a-kind craft.
Children will enjoy making this bookmark while learning how to fold the paper and adequately improve their fine motor skills.
They may like making more than one giraffe. Other animals are also possible by applying the same folding technique.
Refer to the site for pictures and a video for the step-by-step process on the proper way to fold the paper and turn it into a corner page bookmark. Use the light yellow paper for the giraffe’s head and the dark yellow paper for its snout.
Once the corner bookmark is ready, it’s time to turn it into a giraffe. Add the ears using the excess of the light yellow paper. Use brown paper for the horns and spots.
Use the marker to make the eyes. Googly eyes can also be used for this craft. Next, cut an oval shape from the dark yellow paper. Draw the nose and mouth using the black marker.
Cut or punch two pink circles and add them to the snout. Glue this on the head. Let this dry before using.
This craft may be complex for very young children. If possible, provide a pre-folded corner bookmark and let the children add the rest of the details.
For this craft, you will need the following:
- A5 light and dark yellow papers
- Brown and pink paper
- Black marker
- Scissors
- Glue
For more information, visit RedTedArt.com
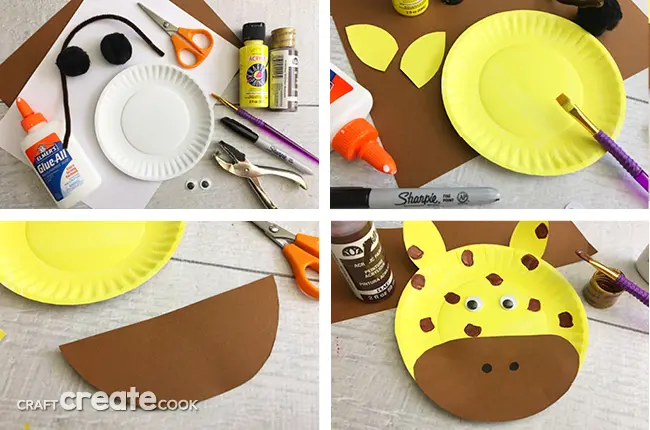
This giraffe is perfect to partner with other paper plate animals. They are great to collect for the zoo theme as a bulletin board display or a hanging wall decor.
Consider making two of these giraffes, using two sizes of paper plates for a mother (cow) and baby (calf) lesson.
This craft is easy to make, and young children would require minimal or no assistance.
Start with cutting the ears using white cardstock. Paint the ears and the paper plate yellow. Set aside for the paint to dry.
Next, glue the ears and googly eyes on the paper plate. Cut an oval from the brown cardstock for the giraffe’s snout. Glue on the paper plate and use the black marker to make the nose.
Paint dots on the paper plate for the spots. Once dry, punch two holes between the ears. Cut the pipe cleaner to make two horns.
Twist the end to make a loop on top. Glue the pompoms on the loops. Secure these in the holes by twisting the ends.
For this craft, you will need:
- Small paper plate
- Brown pipe cleaners
- Black pompoms
- White and brown cardstock
- Yellow and brown paint
- Googly eyes
- Glue
- Paintbrush
- Scissors
- Black marker
- Hole puncher
For more information on this craft, visit CraftCreateCook.com
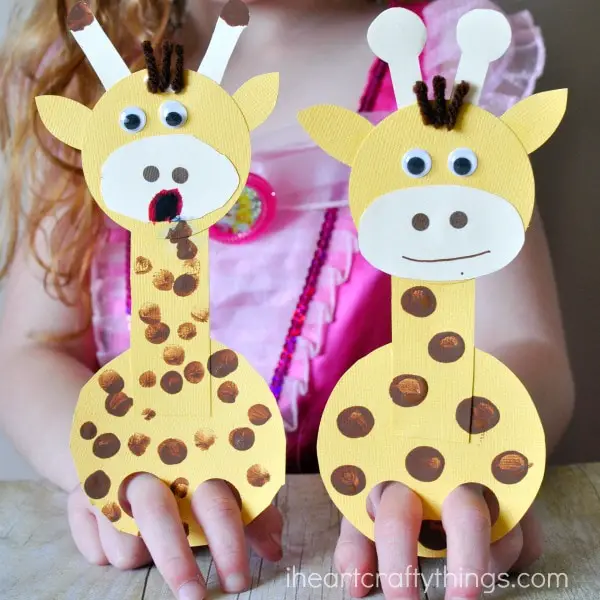
Puppet crafts are always a hit with young children. This finger puppet is no exception. This craft is perfect for circle time, storytelling, and free play. The puppet can be done from scratch or with a template on the site.
Children will strengthen their finger muscles as they play. It is also an excellent tool to help children develop their language skills during play as they give life to these fantastic creatures.
To make this craft, cut circles from the yellow cardstock. One circle should be 3.5 inches while the other is 2.5 inches. Cut ears from the same cardstock.
For the snout and horn, use the cream cardstock. Cut an oval for the snout, and add two small brown circles for the nose. Use a smaller hole puncher for the nose to make perfectly shaped circles. Add the mouth using a marker.
Use the ¾-inch circle punch to make holes on the bigger circle. These holes are where the children will place their fingers when they play.
It’s time to assemble the pieces. Stick the neck on the bigger circle right above the holes. Add the head and its parts. Cut some brown yarn and glue it on the head between the horns. Let this dry.
Next, use brown paint to add spots on the giraffe. Have the children use their fingers to make dots of brown on the body. Allow the paint to dry completely.
For this craft, you will need the following:
- Template (optional )
- Yellow, brown, and cream cardstock
- Circle punch ¾-inch size
- Brown paint
- Googly eyes
- Brown yarn
- Markers
- Scissor
- Glue
For more information on this activity, go to IHeartCraftyThings.com
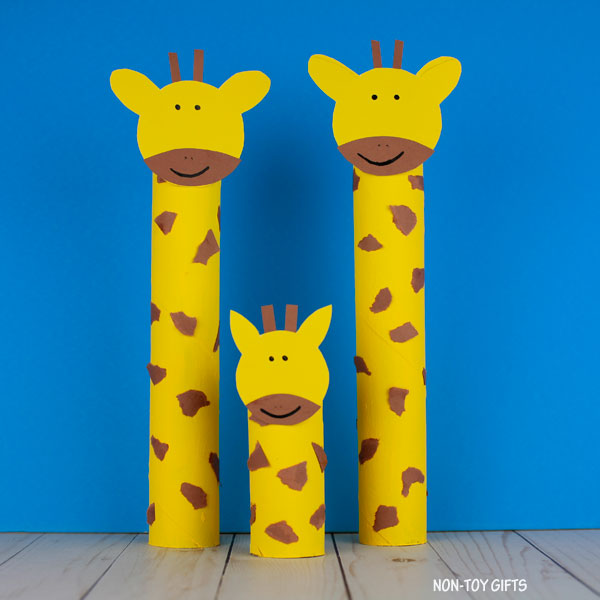
Make three different sizes of giraffes and use them to teach children measurement. Make more for the added challenge. They can arrange the giraffes according to their lengths.
Older children can learn to use a ruler to measure them. To extend this activity, they can also measure each other’s height in class.
This lesson will help them understand that everyone is different and unique, and an individual’s height may have advantages and disadvantages.
Paint the tissue paper and the paper towel rolls yellow. Let these dry. Tear or cut small pieces from the brown cardstock. These will be for the spots. Glue them on the rolls.
Make the heads by drawing circles on yellow cardstock. Draw the ears on top of the circle. Use a round container as a guide to trace a perfect circle. Cut these out.
Next, cut half circles and short strips from the brown cardstock. These are for the giraffe’s snout and nose. Glue them on the head.
Use the black marker to draw the eyes, nose, and mouth. Attach this to the paper rolls.
For this craft, you will need:
- Tissue paper rolls and paper towel rolls
- Yellow paint
- Brown and yellow cardstock
- Black marker
- Glue pencil
- Scissors
- Paintbrush
- Paint container
For more details on this craft, head over to NonToyGifts.com
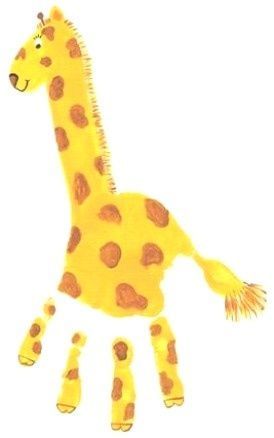
A happy giraffe that looks happily walking is an easy way to teach children to be creative. Extend this activity by making the perfect habitat for using handprints and fingerprints.
Remember to use water-based paints and smocks. This activity can be entertaining but messy.
Assist as the child’s hand needs to be covered with yellow paint. This part can be done by either putting enough paint on the paper plate where the child’s palm can lightly dip or by using a paintbrush on the child’s palm.
If the child is ticklish, do not use the paintbrush method. Tap the excess paint if using the dipping method. Once the child’s hand is covered with paint, assist the child in making an impression on white cardstock.
Ask the child to spread all the fingers apart before pressing on the cardstock. Allow the paint to dry. Use brown paint to add spots on the giraffe. Have the child dip a finger and create the spots on the giraffe.
Extend this by making handprint trees, fingerprint grass, flowers, clouds, and sun. This scene can teach children about the giraffe’s habitat and food.
For this craft, you will need the following:
- A white cardstock
- Paints in different colors
- Black marker
For more information on this craft, go to StylesAtLife.com
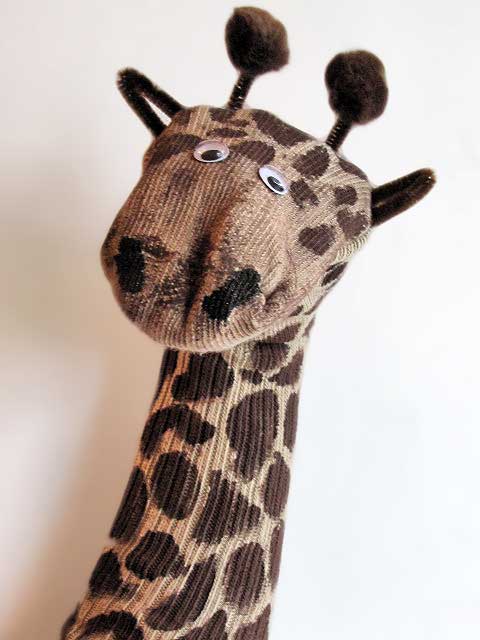
Make circle time fun and engaging using this giraffe sock puppet. Use this during story time to elicit children’s answers and retell stories. Use this puppet in game-based lessons.
Children will enjoy taking turns making the giraffe talk. This activity will help them develop their language skills.
Using tools that resemble the characters from books and movies like this puppet will help children relate more to the character and show empathy with the situation.
Start with cutting the brown pipe cleaner into four pieces. Bend the two, making a V-shape. These will become the giraffe’s ears.
Hot glue the brown pompoms on the remaining unbent pipe cleaners. These will be the giraffe’s horns. Set these aside.
Insert the child’s hand inside the sock. Use the child’s non-dominant hand for the sock. Once the sock is in place, allow the child to paint the spots using brown and black paints. Paint two spots for the nose.
If using one hand to hold the sock and one to paint is difficult for children, modify this step by placing paper towel rolls inside the sock to make it easier to hold and paint.
Once the paint on the sock is dry, attach the eyes, ears, and horns using hot glue.
This craft will use a hot glue gun. Have an adult work on steps that require hot gluing of parts on the sock to prevent accidents.
Provide additional assistance to children who may find this craft challenging to make on their own.
For this activity, you will need the following:
- A sock that is long and tan in color
- Brown pipe cleaner
- Brown pompoms
- Googly eyes
- Brown and black paint
- Paintbrush
- Hot glue gun
- Wire clippers
For more details on this craft, head over to WooJr.com
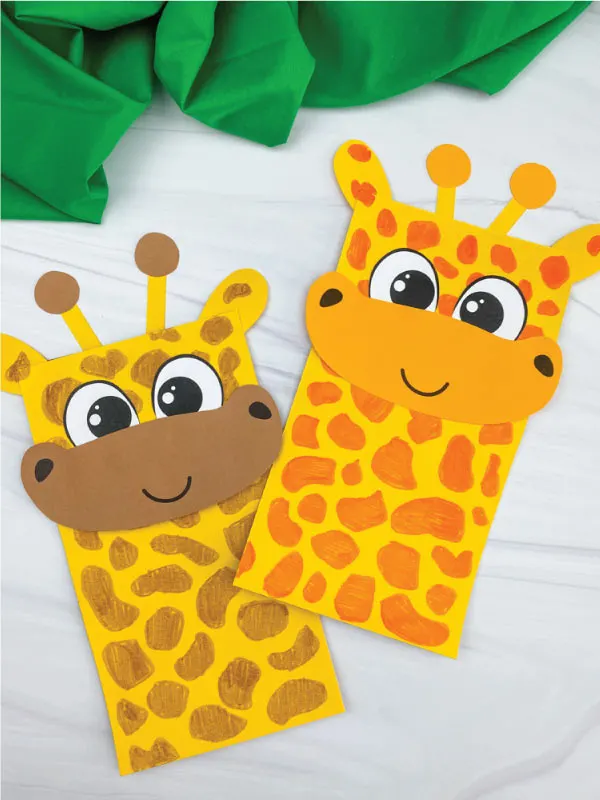
This activity is simple to make using a template. It is colorful and does not even look like a paper bag. Puppets are great for stories and language activities.
This craft requires the paper bag to be covered with spots in the front and back. Coloring the spots will take time to complete, so this craft will undoubtedly keep the children busy.
To get started on this craft, print the template from the site. Cut out the parts and trace them onto the colored cardstock.
Cut the pieces and glue them onto the paper bag. Ensure that the ears are placed in the corner of the bag.
The eyes should be at least half an inch away from the flap of the paper bag. Have the children draw and color the spots over the giraffe’s body. The mouth should be partially hanging from the flap.
Have the children draw and color the spots over the giraffe’s body using markers or crayons.
For this craft, you will need the following:
- Giraffe template
- Brown paper bag
- Colored cardstock
- Scissors
- Markers
- glue
For more details on this craft, go to SimpleEverydayMom.com
Conclusion
Giraffes are unique animals that children enjoy. This list contains resources aimed at children of different ages and abilities. The activities can be modified and adapted to the learner’s needs.
These activities deserve a place in the classrooms or homes. They will indeed offer a considerable amount of enjoyment for young learners. Be sure to check these recommended activities. Thank you for reading!
More zoo and animal theme crafts and activities for preschoolers:


