As the weather gets colder, ducks migrate south for the winter. But that doesn’t mean you can’t still enjoy these feathered friends with some duck crafts! These ten quacktastic crafts are perfect for preschoolers and will help them fine-tune their motor skills while also having a ton of fun. So get your ducks in a row, and let’s get started!
Great Duck Crafts for Preschool
There are so many great duck crafts for preschoolers! Not only are they fun and engaging, but they also help children develop important skills like fine motor control, hand-eye coordination, and creative thinking. Here are just a few of our favorites:
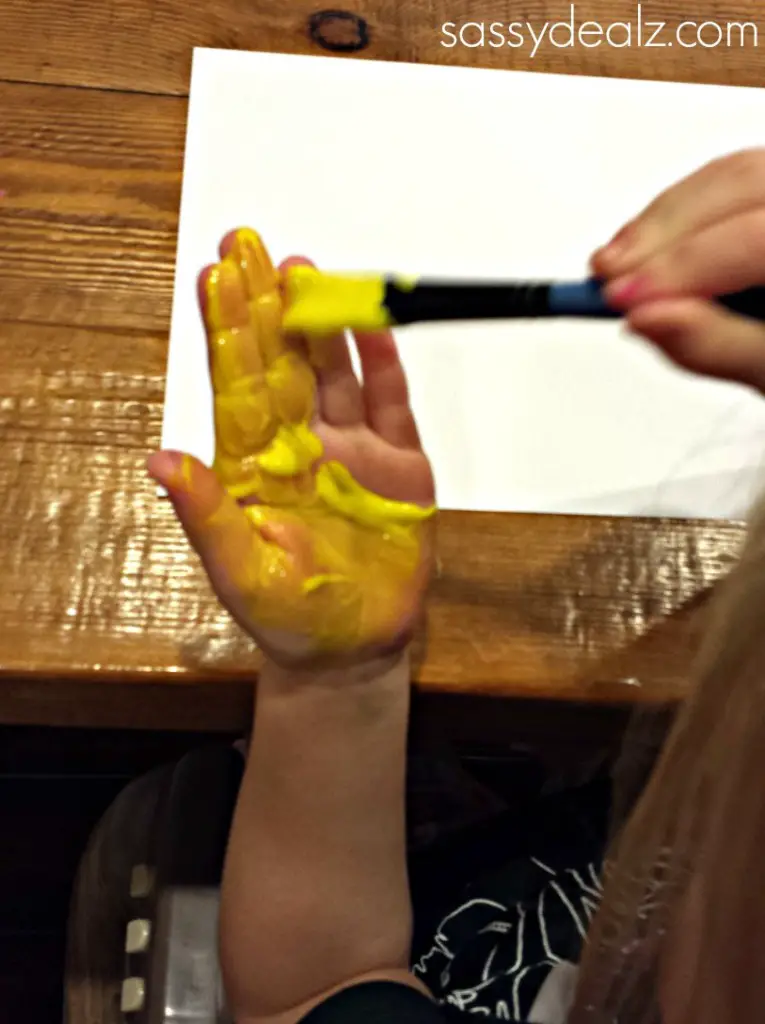
Making a handprint duck is a great way to get your child involved in crafting. It’s also a perfect opportunity to teach them some new skills!
Gather the following supplies: yellow paint, white construction paper, a small orange paintbrush, and a black marker.
Assist your child in painting their hand entirely with the yellow paint. Then have them press down hard on the center of the white piece of construction paper sideways with their fingers pinched together except the thumb to create a duck-like shape. Let dry completely.
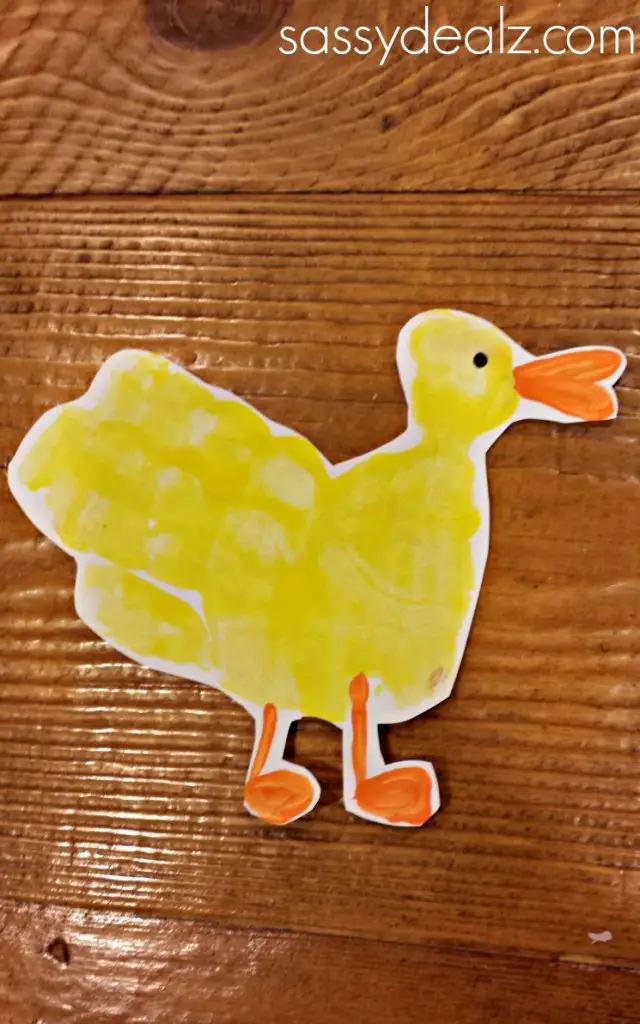
To finish the duck, have them use a small paintbrush to add an orange beak and legs. Then, draw a simple rounded oval eye below the beak with a black marker.
That’s it! Your child has now made their very own handprint duck!
Find it interesting? Visit Crafty Morning for more details!
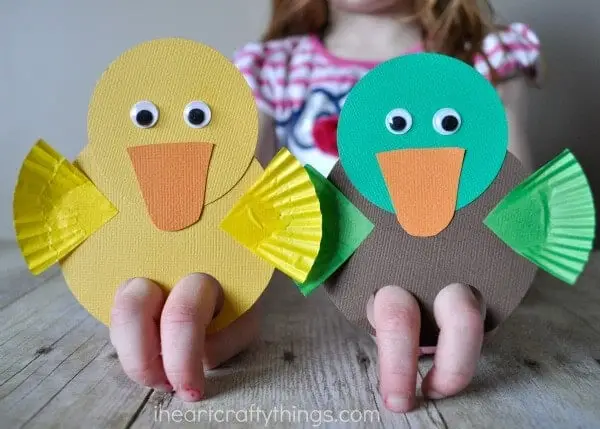
Looking for a fun and easy craft to do with your preschooler? Look no further than these adorable duck finger puppets!
To make these puppets, you’ll need just a few supplies: orange, yellow, green, and brown cardstock paper, a bigger circle hole punch, green and yellow mini cupcake liners, googly eyes, scissors, and glue.
Instructions:
- For your duck finger puppets, cut out two circles. One should be about three and a quarter inches for the body and two and a half inches for the head. At the bottom of the larger circle, punch two holes each three-quarter inch – these will be where you insert your fingers.
- Glue the smaller circle to the top of the larger one, leaving the finger holes exposed at the bottom. Cut out a beak from orange cardstock or construction paper and glue it onto your duck’s face. After that, attach googly eyes to your duck in any pattern you choose.
- For the wings, take a yellow or green small cupcake liner and cut it in half. Then, cut one of those halves in half to make two triangle duck wings. Glue one triangle cupcake liner wing on each side of the duck puppet.
Now, simply place two fingers inside the puppet holes, and you have an adorable duck finger puppet! These are perfect for a springtime craft or for a farm-themed unit in preschool or kindergarten. Your child will love playing with these puppets – and you’ll love how easy they are to make!
Have fun crafting with your little ones! If you want to try this craft, see further details at IHeartCraftyThings.
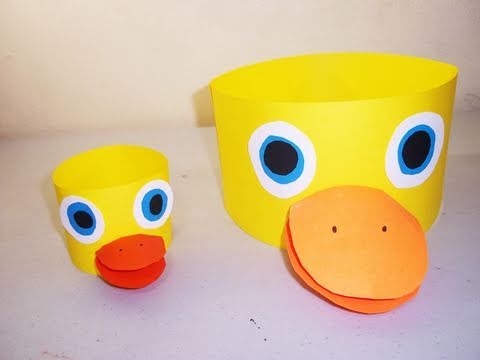
Are you looking for a fun and easy craft with your preschooler? If so, you’ll love this Duck Hat craft! It’s perfect for rainy day activity and a great way to teach your child some new skills.
You’ll need yellow, orange, blue, black, and white cardstock, a black marker, scissors, and glue for this duck hat project. Let the youngsters work on their own and have fun by cutting all of the supplies ahead of time!
To make the Duck Hat:
- Begin by gluing the end of a rectangular piece of yellow cardstock to the two edges. Make sure it fits the kid’s head.
- Then, using the orange cardstock, cut out a duck bill design and glue it to the front of the hat.
- Next, obtain cut 2 circles of black cardstock and glue them on top of two larger circles of blue cardstock, then paste them onto an even bigger circle of white cardstock to become the eyes of the duck.
- Finally, draw a tiny pair of oval shapes above its beak as part of its nose.
Your child will love wearing their new Duck Hat around the house! And you’ll be able to rest easy knowing that they’ve learned some valuable skills along the way. Thanks for crafting with us!
If you’re looking for a fun and easy craft to do with your preschool, look at this at Cool Kids Crafts!
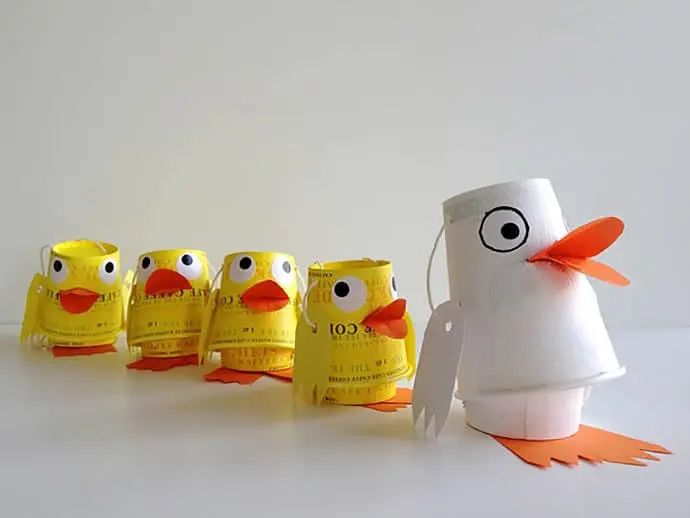
It’s so easy and fun, the whole family can make their own Recycled Paper Cup Duck Family. All you need are a few supplies and some basic skills. Here’s what you’ll need:
- Medium paper cups
- Two small paper cups per duckling
- Paper: orange, yellow, and white
- Acrylic paint (yellow and white)
- Yarn or baking twine
- Medium sticker white and small black
- Black marker
- Two brushes
- Scissors
- Reamer
- Two bottle caps
- Hole punch
With these supplies, you’ll be able to make your very own Recycled Paper Cup Duck Family. So let’s get started! Children may need quite a bit of help with this activity.
Making the ducklings is easy. Just follow these steps:
- Using white acrylic paint, brush the outside of one cup for the mother duck, while the second cup only needs 3/4 of it painted. For the duckling, you can use yellow paint for one cup, and the second cover half with yellow paint. Then let them all dry.
- For the beak, cut a 3 1/2x 1 1/2in (8.5x4cm) piece. Once you have done that, fold it in half and then cut a half circle at both ends. For the orange feet and white wings, cut 2 1/2 x 1 1/2 in (3.5×6.5cm) for two pieces for each. Do another half circle to one side, followed by three triangle cuts on the other. After all of this is complete, punch a hole in each section.
- For the first cup, make two holes along the edge. Punch one hole on each side, 1/3 of the way from the rim. For the second cup, cut a piece out of it (1/3). Again, punch two holes along this newly made edge too.
- Measure out an arm’s length of yarn. Thread the two feeds into the middle. Start at the bottom and work your way up, threading one end into each hole. With one end, go down to the next cup. Inside and outside, then over the top. Repeat with the second pair of holes.
- To make the mother duck, close and open two cups, then knot them together. Cut a long beak in the middle of one cup, making it taller than wide. Place the beak inside the other cup to form your duck’s bill, then add sticker eyes and draw pupils with a marker.
- For the baby duckling, cut off half of one cup, then follow instructions for forming the mother duck, except use this smaller piece for cutting out a smaller beak and feet.
You’ve now made your own Recycled Paper Cup Duck Family. We hope you enjoy them.
If you have any questions, feel free to visit the website at HandmadeCharlotte.
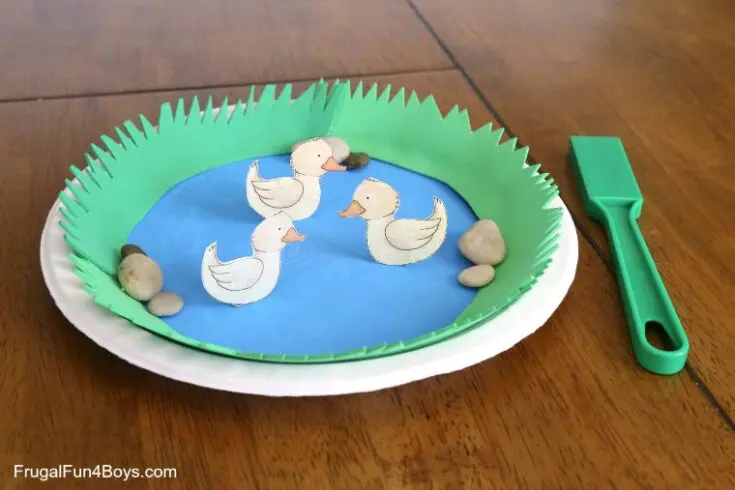
It’s always fun to craft with kids, and this Paper Plate Magnetic Duck Pond is a great project for preschoolers. They’ll learn a few new skills while at it – painting, gluing, and cutting. Plus, it’s a great way to teach them about ducks and ponds!
To make your own Paper Plate Magnetic Duck Pond, you’ll need:
- Paper Plate
- Blue paint
- Green craft foam or construction paper
- Glue
- Paper clips
- Scissors
- Small stones
- Duck template
- Magnetic Wand
Step One: Paint your plate blue. You’ll want kids to paint the bottom of the plate and a little bit on the sides. It doesn’t have to be neat, but if they go up too far on the sides, the blue will show on the ducks’ feathers later.
Step Two: Once the paint is dry, it’s time to glue on some lily pads. Cut out shapes from your green craft foam or construction paper, and glue them onto the plate.
Step Three: Now it’s time to add the ducks! Print out the duck template, and cut out the duck shapes. Glue a small paperclip to the back of each duck, and then place them on the pond.
Step Four: Finally, add some small stones around the ducks (this is optional). Then, use your magnetic wand to make the ducks swim around the pond!
That’s it – your Paper Plate Magnetic Duck Pond is now complete! We hope you and your little ones enjoy playing with it. Be creative and have fun with it.
If you want to take this craft one step further, try visiting FrugalFun4Boys.
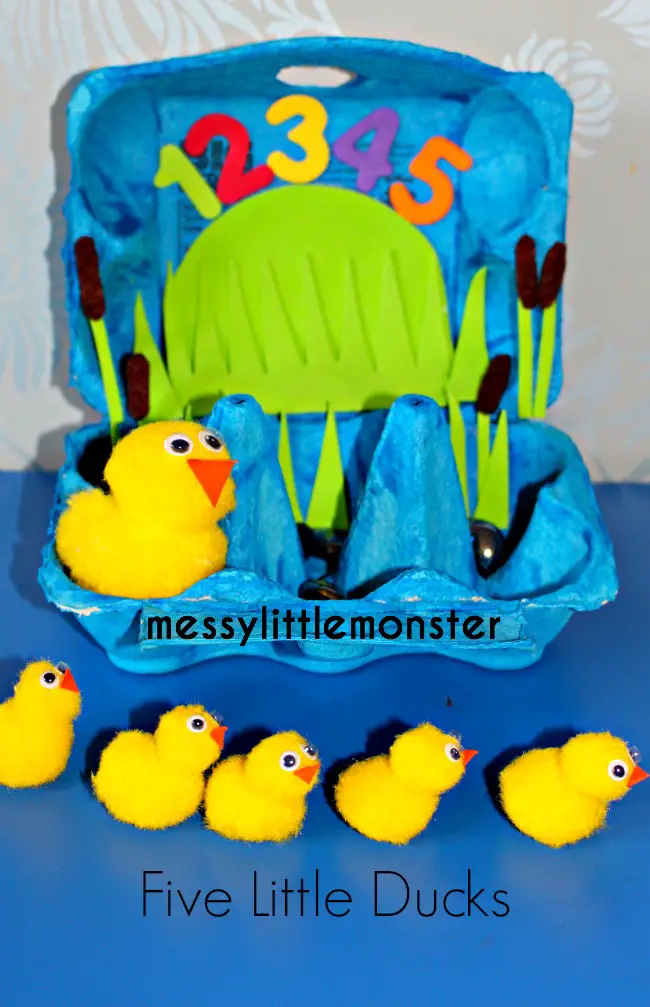
Making this Five Little Ducks Egg Carton is fun to teach your preschooler some important skills! They’ll learn to count, identify colors, and practice fine motor skills. Plus, it’s a great activity for rainy days or long car rides.
Here’s what you’ll need:
- Egg carton
- Green foam
- Blue paint
- Glue
- Foam numbers
- Brown felt
Directions:
Start by painting an egg carton blue. Then, place the egg box lid on a hill shape cut from green foam. Following that, use green foam triangles and strips to add reeds to the top and bottom of the egg box. Finally, utilize brown felt ovals to complete the reeds
To make the pom pom ducks, you will need: A bag of mixed-size yellow pom poms, googly eyes, an orange card, and glue
Directions:
Take two yellow pom poms, one larger than the other. Stick the smaller pom pom on top of the larger one. Then, stick on two eyes and a beak. Make the beak by folding a tiny square of an orange card in half diagonally.
These pom pom ducks are so much fun to make and require only a few supplies you likely already have at home. Plus, they’re perfect for little ones to play with. So get crafting and enjoy some quality time with your kiddos!
Your preschooler will have much fun playing with their own Five Little Ducks Egg Carton. And you’ll be proud of all the skills they learned while making it!
Do you want your preschooler to learn while making this project? Check out Messy Little Monster!
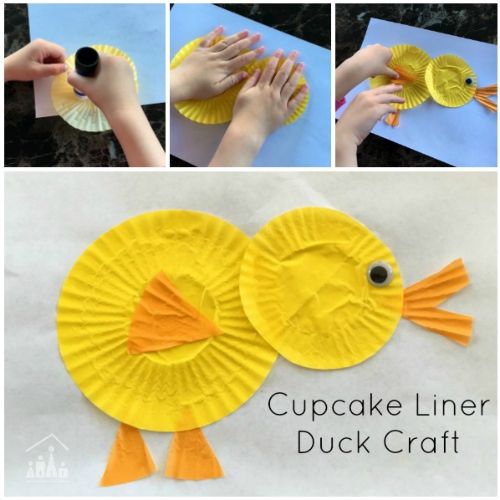
Do you want to make an adorable duck craft with your preschooler? All you need are:
- Cupcake liners
- Glue
- Googly eyes
- Scissors
- White construction paper
To start, you’ll need two yellow cupcake liners. One will be used for the body and the other should be cut out smaller to be used for the head. Paste both cupcake liners onto the white construction paper.
Next, using the orange cupcake liner, create a beak, feet, and triangle wing in the middle of the duck body. Then glue on the googly eyes.
Your Cupcake Liner Duck is now complete! This craft is perfect for a rainy day or anytime you want to have some crafting fun with your preschooler. The options are endless! Let your creativity run wild!
Do you want to make this cupcake liner animal? Try looking at this craft at CraftyKidsAtHome.
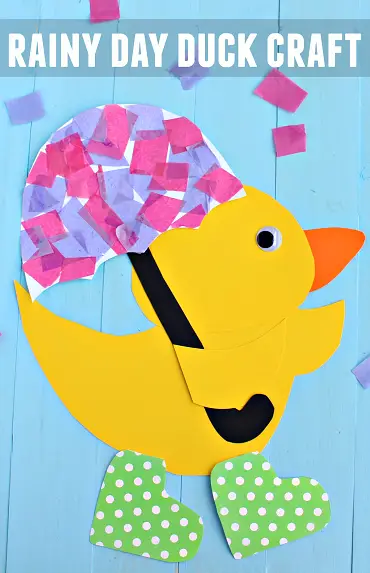
When it’s raining outside and your little ones are stuck indoors, why not try this fun Rainy Day Duck Craft? Not only is it a great way to spend some quality time together, but they’ll also get to learn some new skills. Here’s what you’ll need:
- Yellow, black, orange, white, and any polka-dot paper
- Tissue paper
- Googly eye
- Scissors
- Three-page printable template
- Glue
Take a look at the following instructions to construct your own “rainy day duck with umbrella craft” out of paper and tissue: Remove the duck’s head, wing, shoes, umbrella, body, and beak with scissors. Have your children cut the tissue into tiny squares before affixing them to the white umbrella top. When you’re finished, your duck will be able to play in the rain!
We hope you have fun with this craft, and we’d love to see how yours turn out.
Feel free to check the details instructions at Crafty Morning.
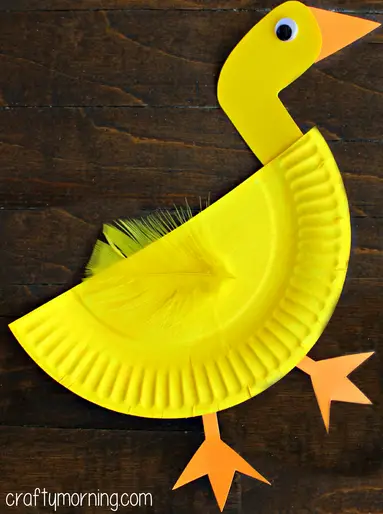
Making a paper plate duck is a great way to teach your child how to use scissors, paint, and glue. These are all important skills for preschoolers to learn! With just a little bit of help, your child will be able to make their very own duck!
You only need:
- A paper plate
- Some yellow paint
- Orange and yellow paper
- Glue
- Scissors
- A yellow feather
- A googly eye
- A paintbrush
Here’s how to make your duck:
To start, cut a paper plate in half and paint it yellow. Once the paint dries, cut out two orange duck feet and a beak. Add a yellow head too! glue or tape all the pieces together, then put a feather in the center of the plate to look like a wing. To finish off your duck, add one googly eye.
Your child will love decorating their very own paper plate duck. And you’ll love seeing the smile on their face when they’re done!
We can’t wait to see what you create! Don’t forget to see this at Crafty Morning.
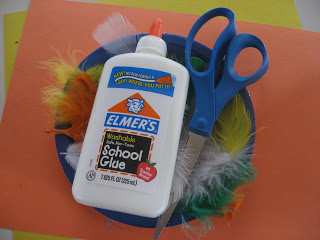
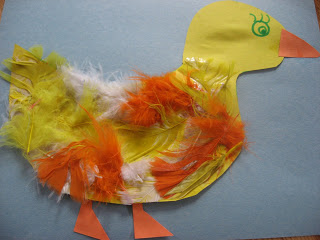
Making a feathery duck craft is a fun way to spend an afternoon with your preschooler. It’s also a great way to teach them some important skills, like how to follow directions and use scissors. Here’s what you’ll need:
- Three different pieces of paper (yellow, orange, and white)
- Black marker
- Glue
- Feathers
Create a duck outline on one of the pieces of paper. Don’t worry if it isn’t perfect; you’ll be covering most of it with feathers anyhow. Meanwhile, cut out the feet and beak from the Duck figure. Cut out and mount the Duck figure on the second piece of paper after drying the glue.
Now it’s time to get creative! Decorate your duck with glue and feathers until it is completely covered. You can use any color combination you like, or even mix and match for a fun effect. Once the glue is dry, add the beak and feet. Your feathery duck craft is now complete!
Looking for more detailed instructions? Check out No Time For Flash Cards!
Conclusion
These ten duck crafts are perfect for any preschooler! With easy-to-follow instructions, your little one will be quacktastic in no time. From handprint ducks to cupcake liner ducks, there is a craft for everyone. So gather up those supplies and get ready to have some fun!
Related preschool crafts and activities:


