One of the most common shapes children are familiar with is the circle. This shape can be found everywhere, in the house, outdoors, and even in the sky. Let children explore this shape as they associate this with different objects.
With these ten circle crafts, they will also learn to form them in different sizes and understand how circles are part of everyone’s life.
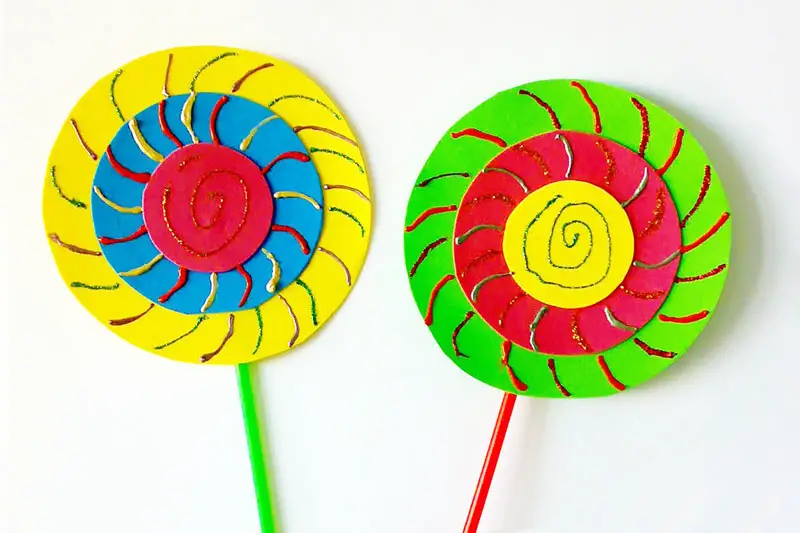
The swirls in these circle crafts resemble sweet treats. With the use of different sizes of circles, this craft can be made even by young children.
They can learn the circle shape and different colors and improve their fine motor skills through cutting and pasting, sizes and patterns. Their hand-eye coordination skills will also improve as they use the puffy paint and glitter glue to make the swirls.
Make the circles by cutting out three different circle sizes from three different construction paper colors. Use the compass to make the varying size of circles. If unavailable, find round objects to trace on paper.
Glue the circles in order, with the smallest on top. Next, use sticky tape to attach the drinking straw to the back. This will serve as the handle. Use puffy paint, glitter glue, or even colored markers to decorate.
Make swirls of different colors on the lollipops. Use other lines and designs to make them unique. These lollipops can be used for matching activities and to teach comparison.
For this activity, you will need:
- Construction paper
- Drinking straws
- Glue
- Sticky tape
- Scissors
- Compass or round objects
- Markers
- glitter glue
- Puffy paint
For more information, go to FirstPalette.com.
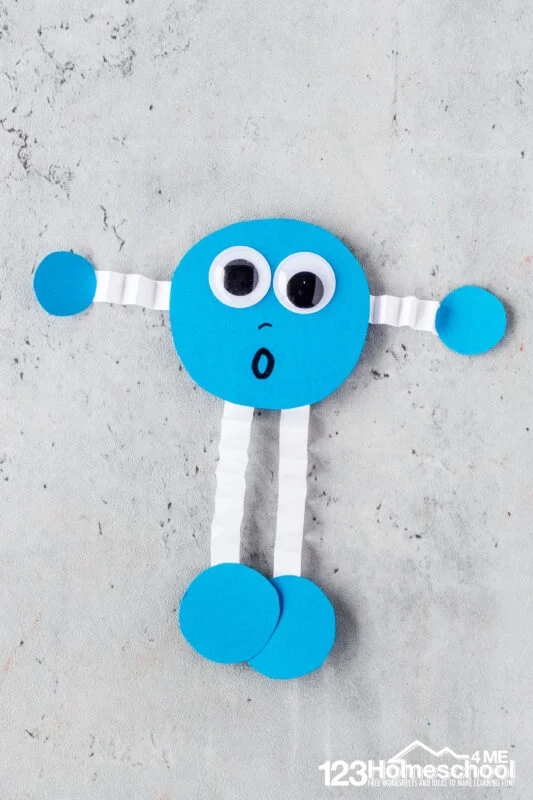
A shape monster that can double as a puppet is perfect for centers and pretend play areas. Make these in different sizes to teach size comparison and in different colors to teach color recognition skills.
The tasks required to make this craft will help children improve their fine motor skills. Cutting the different sizes of circles is challenging for children. Use precut pieces for those with limited cutting skills.
Use the preferred color of construction paper to make the monster craft. Cut out a large circle, about four inches in diameter, two medium-sized circles, about two inches in diameter, and two small circles, about an inch in diameter.
Cut out four strips of white paper and fold them into accordion style for the legs and arms. Assemble the monster by attaching the arms and legs to the large circle. Glue the medium-sized circle to make the feet and the small ones for the hands.
Let the glue dry. Next, glue the googly eyes on the monster’s head and use the black marker to add facial details, such as the nose and mouth.
For this activity, you will need:
- Construction paper
- Scissors
- Glue
- Marker
- Googly eyes
For more information, go to 123Homeschool4Me.com.
3. C is for Caterpillar Craft Made with Circles
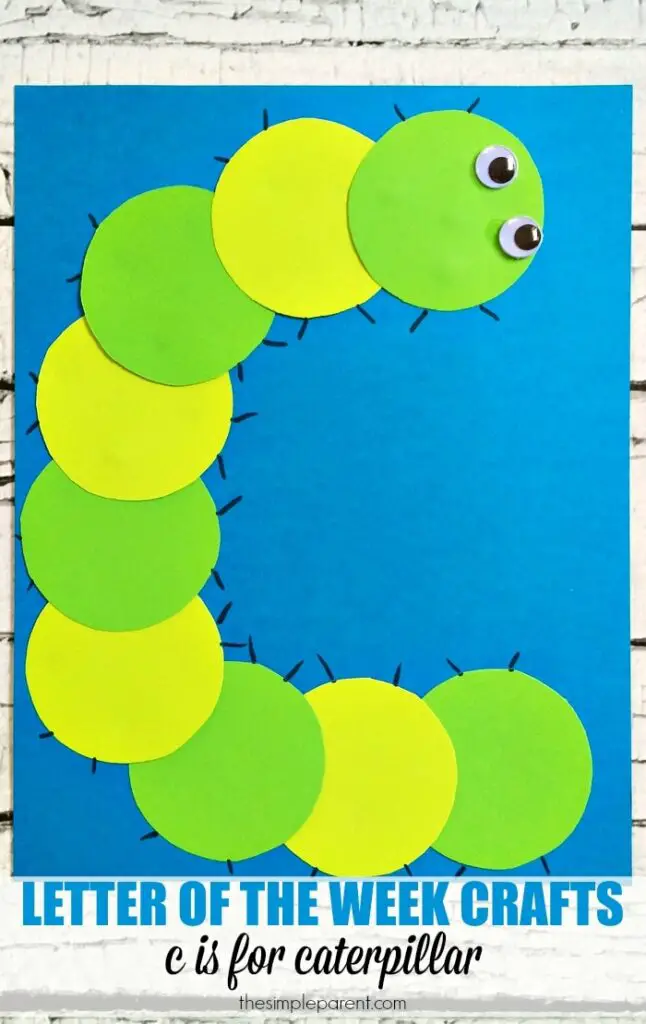
This adorable circle craft can be used to teach different preschool concepts. Use this caterpillar craft to teach the letter C. Use different colors of paper to teach color recognition skills.
Teach the life cycle of a butterfly with this craft. Cutting circles is a great way to help children improve their fine motor skills. Make the caterpillars in two sizes for children to learn the big and small concepts.
Make them in three or more sizes to teach seriation-big, bigger, and biggest. Children can mimic the caterpillar’s movement to help improve their gross motor skills.
Write a large letter C on construction paper using a marker. Cut out nine circles from green and yellow paper by tracing a round object, such as glass on paper. Glue the circles on the letter C. Ensure that the circles are in alternating colors.
Once the glue dries, stick the googly eyes and use the black marker to add legs. Show children pictures of real caterpillars and let them add details and designs to make their crafts unique.
For this activity, you will need:
- Construction paper
- Scissors
- Glue
- Googly eyes
- Marker
For more information, go to TheSimpleParent.com.
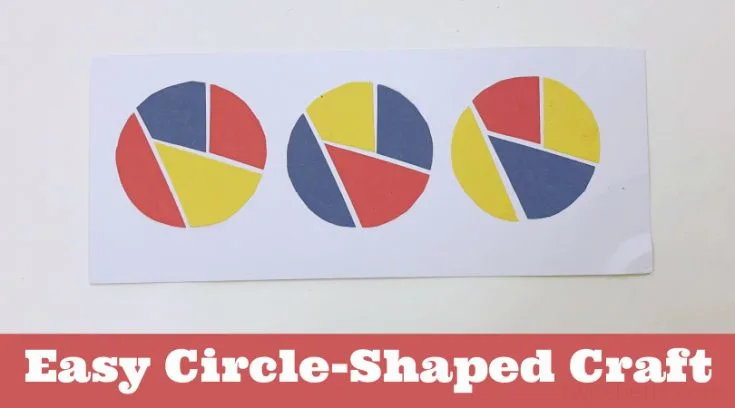
This craft shows children that a circle can be cut into pieces and still form a circle when put together. This is a wonderful idea to introduce children to insets and puzzles. This activity teaches visual-perceptual skills.
It is also a craft to teach children the colors blue, red, and yellow as the primary colors. If possible, use a color wheel to explain this concept better. Cutting the paper into circles and pieces will help improve their fine motor skills.
Start with tracing a round object on the construction paper. Use a glass or a round container for this step. Next, layer the papers together and cut out the circle. This will eliminate the extra steps of cutting the circles individually.
While holding all three circles together, cut them into four parts. On white construction paper, glue the pieces together to form a circle. Ensure that each color is present in the circle. Refer to the pictures on the site for this step.
For this activity, you will need:
- Construction paper
- Scissors
- Glue
- Round object for tracing
- Pencil
For more information, go to Twitchetts.com.
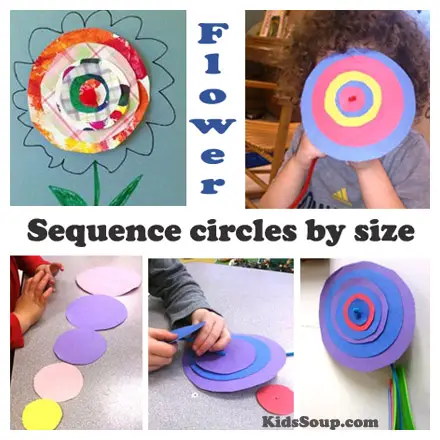
Seriation is the ability to organize objects according to size. This flower craft is a perfect example of seriation that will help improve children’s cognitive skills.
This craft aims for children to arrange the circle cutouts in order while improving their fine motor skills through cutting. Their visual motor skills will also improve as they insert the circles into the pipe cleaner.
Download and print out the circle template. The template has six circles of different sizes. Cut these out and trace them on different colors of construction paper. Next, cut out and arrange them according to size.
Poke a hole in the middle of each circle and use the pipe cleaner to thread them. Ensure that the biggest circle is placed at the back part and the smallest in front. Twist the end of the pipe cleaner in front to hold the circles in place.
Bend the pipe cleaner at the back to make the stem. The site suggests gluing the circle craft onto paper to make a 3D flower. Use markers to add details, such as leaves.
For this activity, you will need:
- Circle template
- Construction paper
- Scissors
- Pipe cleaner
- Markers
For more information, go to KidsSoup.com.
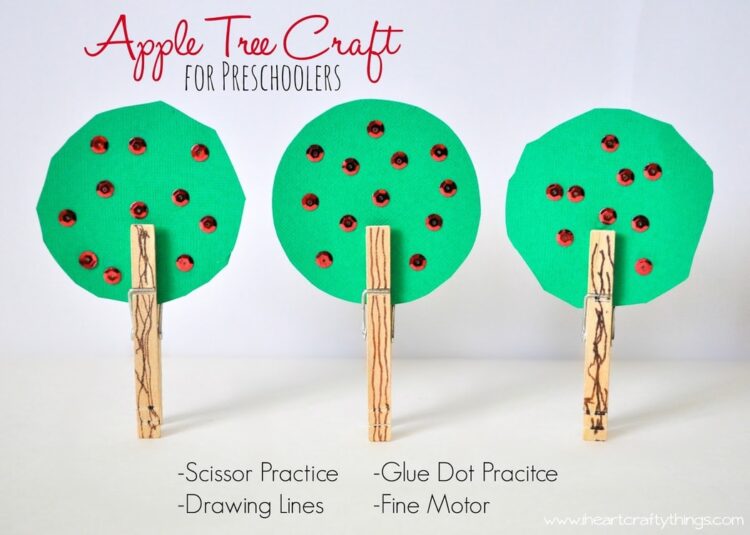
This apple tree craft is a wonderful way to practice cutting circles for young learners. Cutting circles involves slowly turning the paper and using the scissors skillfully.
With a science lesson, teach children the life cycle of apples. You can use the book “Secrets of the Apple Tree” by Carron Brown as a companion to the task.
This craft is also perfect for math centers to teach counting. Glue varying numbers of red sequins for children to count.
Another idea is to use it as a Math mat. Leave the sequins unglued. Present a number card, and the child will put the correct number of sequins on the tree.
To make the tree, take the cup or any round object and trace it onto the green cardstock. Cut this out. Use glue to attach the sequins to the circle tree. Allow the glue to dry.
Use the markers to add designs and texture to the clothespin. This will become the trunk of the apple tree. If possible, show children pictures of apple trees to know what the trunk looks like.
For this activity, you will need:
- Wooden clothespin
- Markers
- Glue
- Red sequins
- Cardstock
- Pencil
- Cup
- Scissors
For more information, go to IHeartCraftyThings.com.
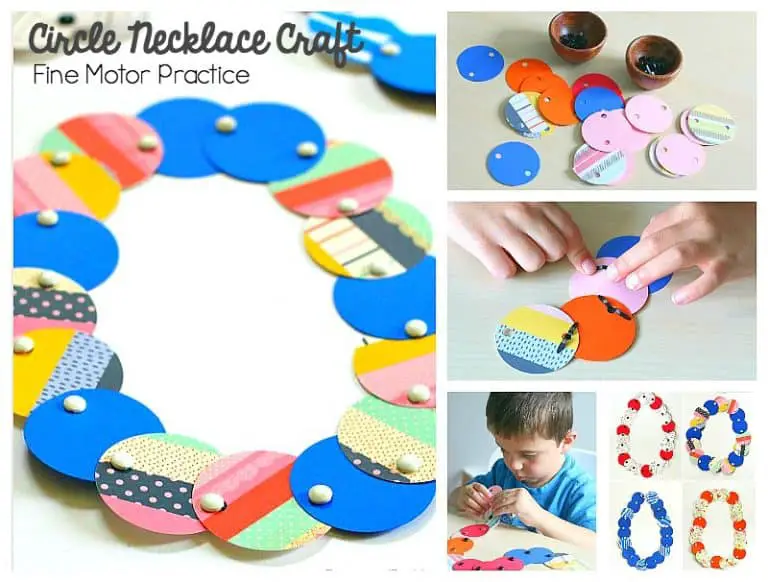
Turn circles into wearables with this paper necklace. Children will have fun punching the paper into circles while improving their fine motor skills. This is a great craft for mother’s day for children to give as a gift.
Using punchers to make circles and holes will strengthen the children’s hands. Inserting the brass fasteners in the holes will help improve their visual-motor skills.
Use different colors and designs of paper to teach children color recognition and patterns.
Start by choosing the paper that will be used for the necklace. Assist children in positioning the paper in the puncher to maximize the number of circles that can be made. Make several of these depending on the length of the wearer.
Next, use the single-hole puncher to make holes at each end of the circle. Position the two circles so that the holes are aligned. Attach them using a brass fastener.
Repeat the process until the desired length is achieved.
For this activity, you will need:
- Cardstock
- Circle puncher
- Single hole puncher
- Brass fasteners
For more information, go to BuggyAndBuddy.com.
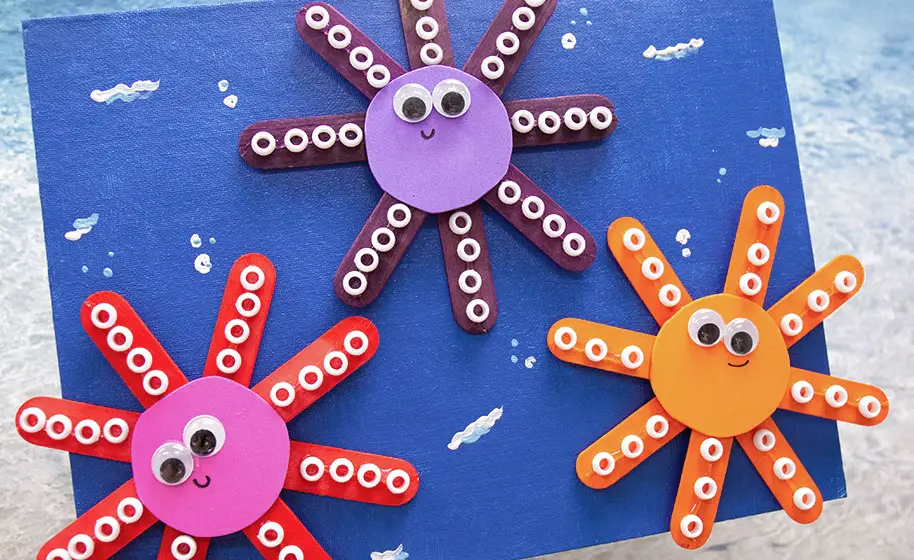
This octopus craft is full of circles that children will have fun making. Set in a blue backdrop, these round-shaped creatures are a great craft to use for ocean-themed lessons.
Teach marine life with this craft. Children can also learn about the octopus, its unique characteristics, habitat, food, and behavior. Use videos and pictures for this lesson.
Children will improve their fine motor skills by cutting the circles and assembling the craft. Make the octopuses in different colors to teach color recognition. Create other expressions by drawing different mouths and eyebrows to teach emotions.
Take a cup or round object and trace it on the craft foam. Cut out the circle and attach the googly eyes. Use the black marker to add facial details.
Next, make the arms by gluing two craft sticks in the middle to form a cross. Next, glue the other two to create an X on the cross. This should look like an asterisk. Once the glue dries, attach the head to the craft stick.
Add the tentacles by gluing the white pony beads on each arm. Let the glue dry before using.
For this activity, you will need:
- Colored craft sticks
- Pony beads
- Googly eyes
- Craft foam
- Canvas
- Paint
- Paintbrush
- Cup
- Marker
For more information, go to CraftProjectIdeas.com.
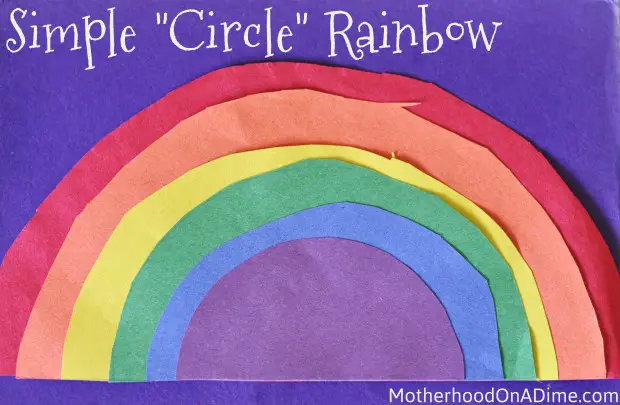
A colorful rainbow craft made from circles is a wonderful way to teach children colors and cutting skills. This craft can also be used with a science lesson to explain rainbows.
Children will be able to learn the order of colors in a rainbow. They will also learn to compare the sizes of the circles. The site suggests attaching a magnet to the back of the rainbow to make it a decoration or a fridge magnet.
The colors for this craft are red, orange, yellow, green, blue, and purple. Use the compass or round objects of different sizes to trace the circles on the construction paper. The size of the circles should follow the order of colors.
Red should be the biggest, and purple should be the smallest. Cut out the circles. Next, glue all of these to form a colorful concentric circle. Fold it in half, or use a pencil to draw a line in the middle.
Cut through the fold or line. The rainbow is now ready to use.
For this activity, you will need:
- Construction paper
- Compass
- Scissors
- Glue
- Magnet
- Pencil
For more information, go to MotherhoodOnADime.com.
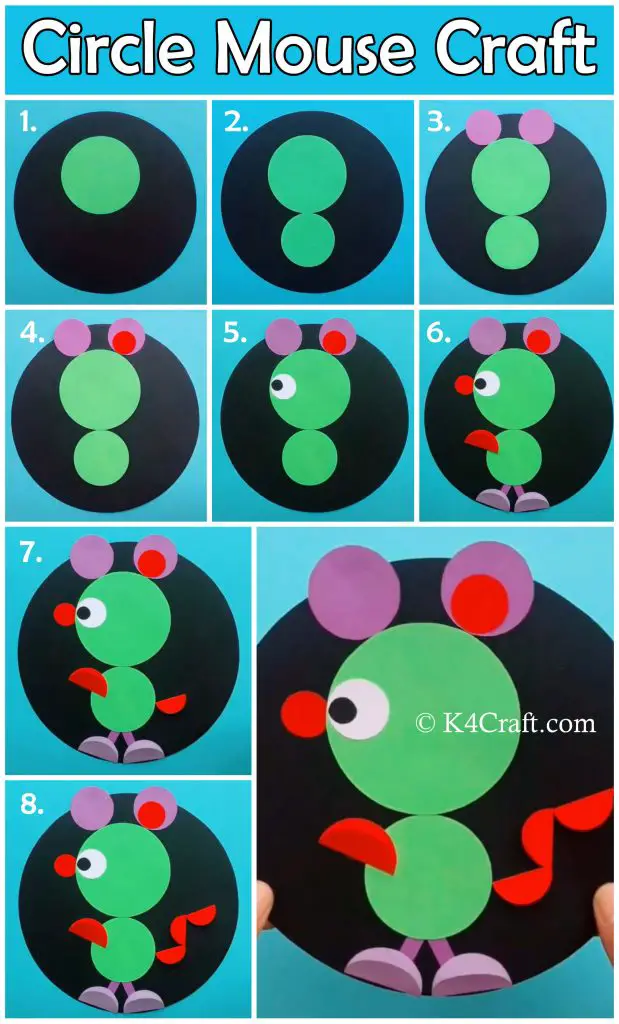
Turn circles into an adorable creature with this mouse craft. Teach children that an image can be formed by using different colors and sizes of circles. Let them imagine and be creative by using the circles to create other images, such as a bear or a pig.
This mouse craft can teach color recognition skills and comparing sizes. Turn it into a mouse paper doll or a stick puppet by attaching a craft stick to the back. This is a great tool to improve oral language skills during pretend play.
Start by making a big circle from black paper using a compass or round object. This will become the background of the craft. Make the head and body by cutting out a circle from green. The head should be bigger than the body.
Cut out two purple circles for the ears, two red circles for the nose and inner ear, one white circle for the eye, and a small black circle for the pupil. Assemble this to form the mouse’s body by gluing them on the black background.
Cut out two strips of purple paper and attach them to the mouse to make the legs. Make the feet by cutting two purple half circles. Glue them on the legs.
Cut out four half circles from red paper and arrange three to form the tail. Use the last one as the mouse’s hand. Refer to the pictures on the site for step-by-step instructions.
For this activity, you will need:
- Colored paper
- Glue
- Scissors
- Compass
For more information, go to K4Craft.com.
Conclusion
Children can easily identify circles. Teach its properties by showing how it is formed and its attributes. They will learn that a circle is unique since it has no corners, unlike the other shapes.
With these crafts, young learners will understand that circles can come in different sizes and colors. Consider using these for your next shape lesson.
Thank you for reading!
People Also Ask
The circle is one of the shapes that children can easily recognize. This is a round, flat shape that has no corners.
Children can identify this shape with the round objects they are surrounded with. Introduce children to circles in different ways through centers, tabletop activities, and sensory bins.
Incorporating craft activities in lessons will help children learn more about shapes. Letting them draw and cut out this shape will help them understand how it is formed without any corners.
Let children find different objects around them with the same shape. Use games, puzzles, and books to teach children the circle shape. When frequently exposed to this shape, children will easily remember its form and name.


