There’s something so special about sheep! They’re gentle, fluffy, and just plain adorable. And these easy sheep preschool crafts are the perfect way to bring a little bit of that magic into your home or classroom. Whether you’re looking for a simple project for your child to do on their own or a more complex craft together, you’re sure to find something here that’s just right.
Great Sheep Preschool Crafts
Looking for some fun and easy sheep crafts to do with the kids? Look no further! We’ve got everything from cotton ball sheep to paper plate sheep and everything in between. These crafts are perfect for preschoolers and young elementary school students. So gather up your supplies and get ready to create some cute sheep crafts!
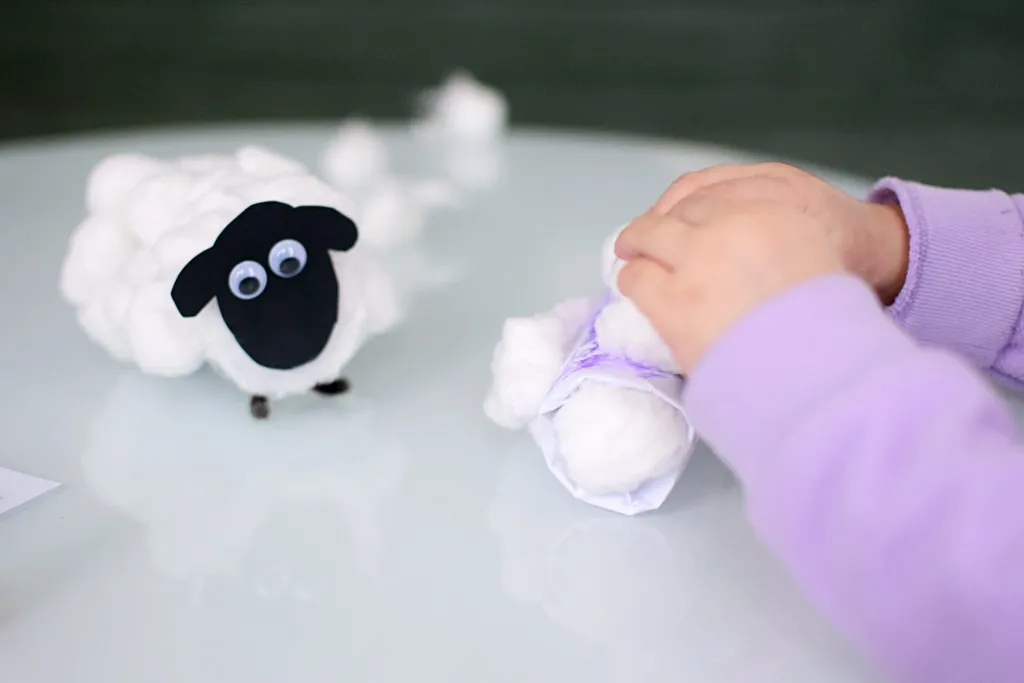
Today we’ll be learning how to make Cotton Ball Sheep. This is a great project for kids because it helps them develop fine motor skills, learn symmetry, and use their imaginations.
You’ll need:
- White paper
- Black and silver marker
- Construction paper
- Scissors
- Glue sticks
- Googly eyes
- Cotton balls
To make your sheep:
Draw a sheep’s body and its feet on white paper. Glue cotton balls onto the sheep’s body. On the black construction paper, cut out an oval for the head and two smaller ovals for the ears. Decorate the head with a smile using a silver marker, and glue on googly eyes. Paste the head onto the sheep’s body.
Your Cotton Ball Sheep is now complete! We hope you had fun making it. Until next time, happy crafting!
Did you like the 2D Cotton Ball Sheep? You may check out the 3D version at Entertain Your Toddler.
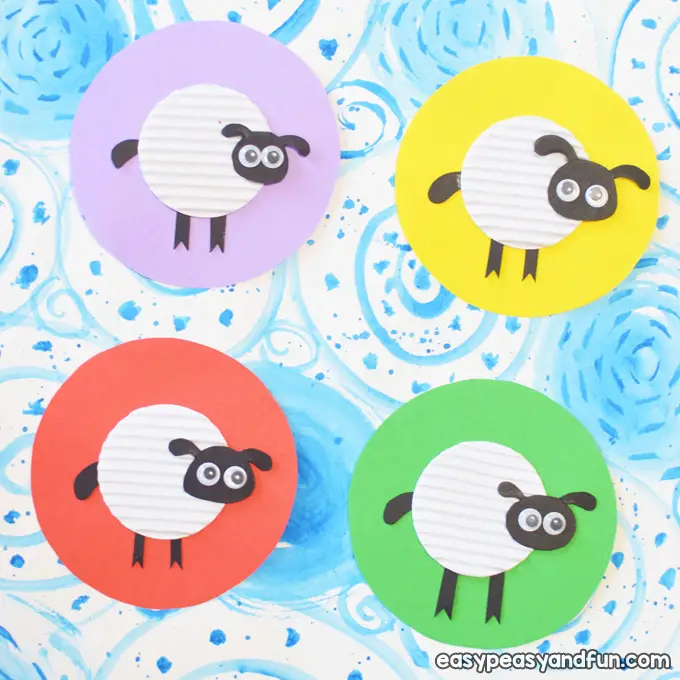
Children will love this easy paper sheep craft! It’s a great way to learn new skills, like tracing and cutting circles. Plus, it’s a lot of fun to make!
You’ll need:
- Colored paper
- Glue
- Googly eyes
- A circle punch
- White ribbed paper
- Black cardstock
- Scissors
- A small circular object
First, trace and cut a circle out of colored paper to make a background for the sheep. Next, punch one white ribbed circle using the circle puncher. Then, draw and cut out the sheep’s head, leg, and tail. Glue the legs and tail onto the back of the white ribbed circle.
Glue the white ribbed circle onto the center of the colored paper. For the head, add two googly eyes using glue. Then, attach the head to one side of the white ribbed paper.
There you have it! Your very own paper sheep!
What other animals can you make using this same method? Try a bunny, cat, or even a dinosaur! The possibilities are endless. So have fun and get creative!
This easy paper sheep craft is available at Easy Peasy and Fun.

Today we are going to learn how to make a Popsicle Stick Sheep. This is a great craft for kids to practice their fine motor skills. They will also learn to follow instructions and create something cute and fluffy!
Supplies needed:
- Large popsicle sticks (four per sheep)
- Small popsicle sticks (four per sheep)
- Small clothespins (two per sheep)
- Glue gun
- Paint (White and Black)
- Paper plate
- Foam and a small paintbrush
- Cardstock paper (White and Black)
- Scissors
- Black Sharpie
- Tiny wiggle eyes
Directions:
Create the base of your sheep puppet by gluing four popsicle sticks in a row next to each other, and then glue two mini popsicle sticks across them perpendicularly. Set it aside to dry completely before repeating this process for however many sheep puppets you want to make today. Once the base is dry enough, squirt some white and black paint onto the paper plate.
Paint your newly created popsicle stick white with the foam paint brush. Paint the black craft paint on your TWO small clothespins as well. Set aside all of the painted components. Grab all of your cardstock sheets and craft scissors. Cut out a big head from the black cardstock and some hair on top of the head, using white paper.
Take your painted popsicle stick shape and flip it, so the rectangle is on its larger side. Glue your paper headpieces to the painted popsicle stick figure after you’ve completed it. To finish the Popsicle Stick Sheep project, pin the 2 painted clothing pins to the painted popsicle stick form to make the legs. Add any other decorations you like (a small bow or a little sprinkle of glitter, for example!). Then allow it to dry fully before handling.
We hope you had as much fun making these sheep as we did! We can’t wait to see what you create!
If you enjoyed this post, check out Gluedtomycraftsblog.com for the complete idea.
This is a fun and easy craft that only requires a few supplies. Plus, it’s perfect for little ones just learning to use scissors and glue. All you need is:
- Sheep PomPom Craft Free Printable
- White cardstock
- Scissors
- A hot glue gun
- A 2 inch pom pom
- One small pompom for the tail
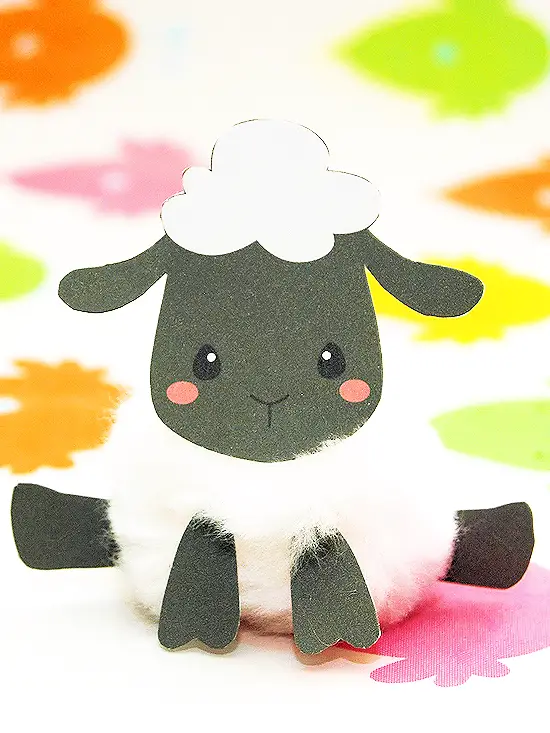
Start by cutting out all of the pieces from the printable for the sheep. Attach two small dots to both sides of the top of each foot and tuck them into the pompom, giving it a sense that they’re emerging from its bottom. After that, glue on the head, pushing it into the pompom so that it stands up a bit but not so much as to hide too much of it.
Gluing the front legs in place on the pompom’s surface will complete your cute, sitting sheep with extended back legs and a vertical position for the fronts. To finish, add some hot glue to attach the smaller pompom to act as this fluffy animal’s tail.
Now you have a fun and easy Sheep PomPom Craft that is perfect for little ones to make!
Be sure to check out Our Kid Things for the free printables and the full details of this craft.
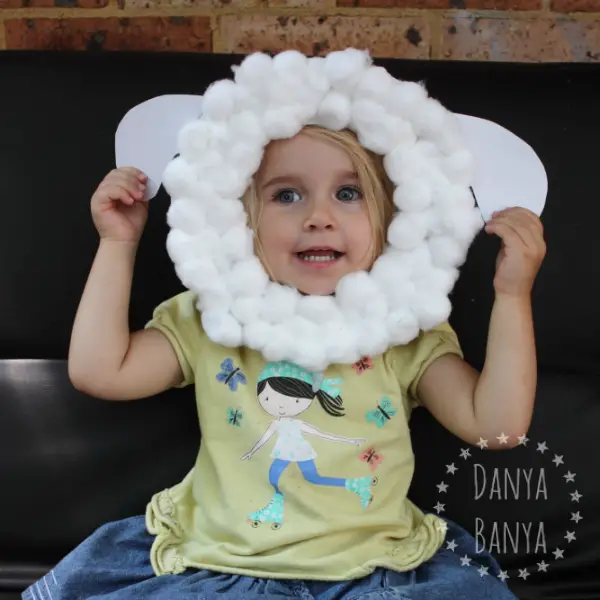
Making a sheep mask is a great way to introduce your child to crafting. It’s a simple project that only requires a few supplies, and it’s a perfect opportunity to teach your little one some new skills. Here are the things you and your child will need to learn to make this fun and festive mask:
Supplies:
- Large paper plates
- Cardboard
- Cotton balls
- Paste
How to make it:
- Cut an inner circle from one paper plate large enough for a human-face.
- Paste cotton balls to cover the whole plate.
- Cut big ears from the other paper plate and paste them as the sheep’s ears at the back of the first plate.
- Use cardboard to provide a backing for the mask.
That’s it! You and your child have created a festive and fun sheep mask that is perfect for any occasion.
If you enjoyed this crafting project, be sure to check out Danya Banya for this easy and fun blog post.
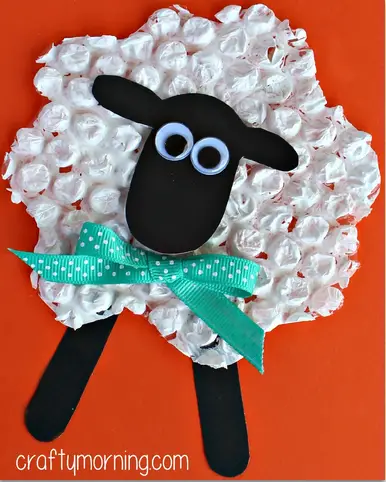
Making a Bubble Wrap Sheep is a great way to teach your child some important skills, like painting and gluing. Plus, it’s a lot of fun! Here’s what you’ll need:
- White paint
- Bubble wrap
- Black paper
- Glue
- Two googly eyes
- Scissors
Here’s how to make your Bubble Wrap Sheep:
- First, cut a circle or flower shape out of the black paper. This will be the sheep’s head.
- Next, paint the bubble wrap with white paint.
- Once that dries, glue on the head and legs.
- Stick on the googly eyes, and your Bubble Wrap Sheep is complete!
Your child will love playing with their new Bubble Wrap Sheep, and you’ll love seeing them learn important skills. Give it a try today!
What other animals can your child make out of bubble wrap? Try a Bubble Wrap Lion or a Bubble Wrap Giraffe! Let your child’s imagination run wild. Making Bubble Wrap Animals is a great way to spend an afternoon. So gather your supplies and get started! Your child will love it.
Do you have a Bubble Wrap Sheep of your own? If none yet, visit Crafty Morning for more details about this craft!
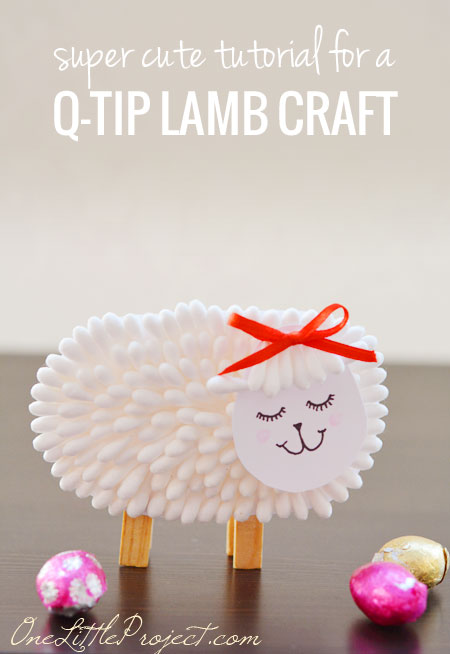
Making a Q-tip lamb is a fun and easy project you can do with your preschooler. All you need are:
- Q-tips
- A magic marker
- White glue
- A pink pencil or crayon
- White paper (heavier white card stock would be best if you have some)
- Scissors
- Two clothes pins
To make the lamb, first cut an oval shape for the body and head of the sheep. Next, cut off the tips of the Q-tips and glue them at one end of the lamb’s body. Then, place the Q-tip ends over the top of the line of glue. Start with the outer edges and overlap the second layer of Q-tips on top of the first layer. Keep adding lines of glue and Q-tips as you work your way across the lamb’s body.
It’s time to add the head after completing the body with Q-tips. Add three q-tip ends to the narrow part of the egg shape, using a small amount of glue. Keep your selections of Q-tips consistent in length so that they appear tidy and organized.
It’s time to give your lamb some features. Use a fine-tip magic marker to draw the closed eyes with eyelashes, little nose, and mouth.
To finish, use a faded light pink pencil crayon to paint the lamb’s cheeks with a touch of blush. Then, using a scrap piece of skinny ribbon, make a tiny bow and adhere it to the top of the lamb’s head. Finally, wait for everything to dry before gluing the head to the body. After that, attach two clothes pins to the back of the lamb.
Your Q-tip lamb is now complete! You can display him proudly on a shelf or mantle or use him as part of your child’s Easter basket this year.
You’ll have as much fun doing this project. You may take a closer look at Onelittleproject.com.
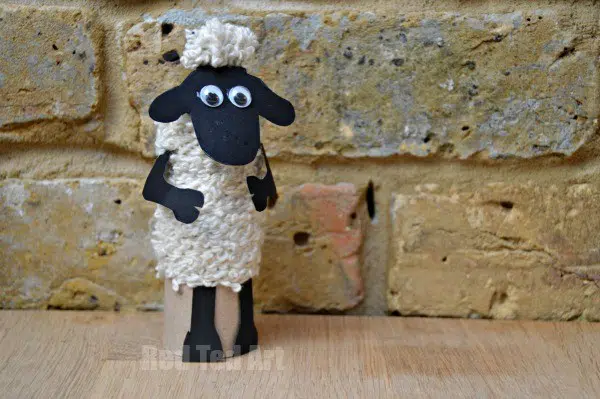
Introducing the cutest sheep craft for kids – TP Roll Sheep! These little guys are easy to make and require only a few supplies. Plus, they’re perfect for exploring different textures and practicing fine motor skills.
You’ll :
- Two toilet paper rolls
- One kitchen towel roll
- A bit of paint,
- Branches
- Masking tape or glue
- Cotton wool
- Googly eyes for each sheep
To create a TP Roll Sheep: Take one of your toilet paper rolls and cut four slits. Then stuff them together with glue or tape. The white sheep was tacked, the black sheep glued. We then painted them white or black after they were dry. Inserted cute, very short slits into the other end alternating with the slits made for the front, squeezed, and then inserted them into the second TP roll.
It’s time to add details to your sheep! Add a lot of glue to your toilet paper roll body and let your child stick away. Once all the cotton wool is on, press firmly down, look for any gaps, and let your child fill them. The example used regular white craft glue, which worked fine.
Now add some googly eyes – we used two wiggly eyes per sheep. And that’s it – your TP Roll Sheep is done! So cute and so easy to make. The perfect addition to any farm animal-themed craft project or playtime.
You may visit Kids Crafts and enjoy this craft!
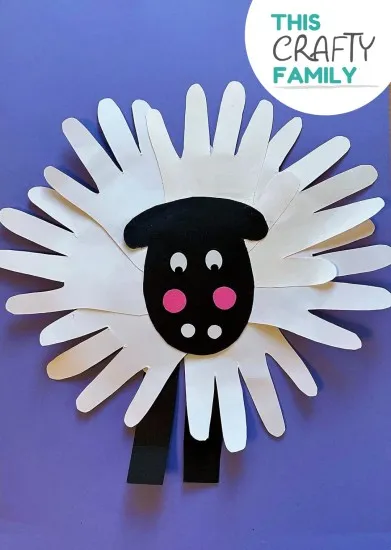
Are you looking for a fun and easy craft with your preschoolers? This Handprint Sheep Craft is perfect! Not only is it super cute, but it’s also a great way to learn some new skills.
Your little ones will learn to draw around a template, cut out shapes, and glue them together. Plus, they’ll love getting their hands messy!
Here’s what you’ll need:
- White and black card/paper
- Black marker
- Pink paper
- Glue
- Scissors
To make the sheep, draw around your template handprint on your white paper to produce six or seven additional handprints. Then glue the palms of the handprints together in a circle wreath shape to create the sheep’s fluffy body.
Then make a sheep’s head acorn out of cardboard and attach it to the center of your sheep. Then make two lengthy rectangular hind legs, which you may glue on the back of your sheep using hot glue.
If you want to add some finishing touches, make your sheep two eyes with eye stickers, but if you don’t have them, use a black marker to draw on the details. Next, cut out two small white circles for nostrils and two pink circles to create the rosy cheeks. Glue all your face pieces into place, and your adorable handprint sheep is ready!
We hope you have fun making this Handprint Sheep Craft with your preschoolers! If you try it, share a photo with us on Facebook or Instagram. We love seeing your creations!
Looking for more easy and more fun crafts to do with your preschoolers? Check out Crafts for kids.
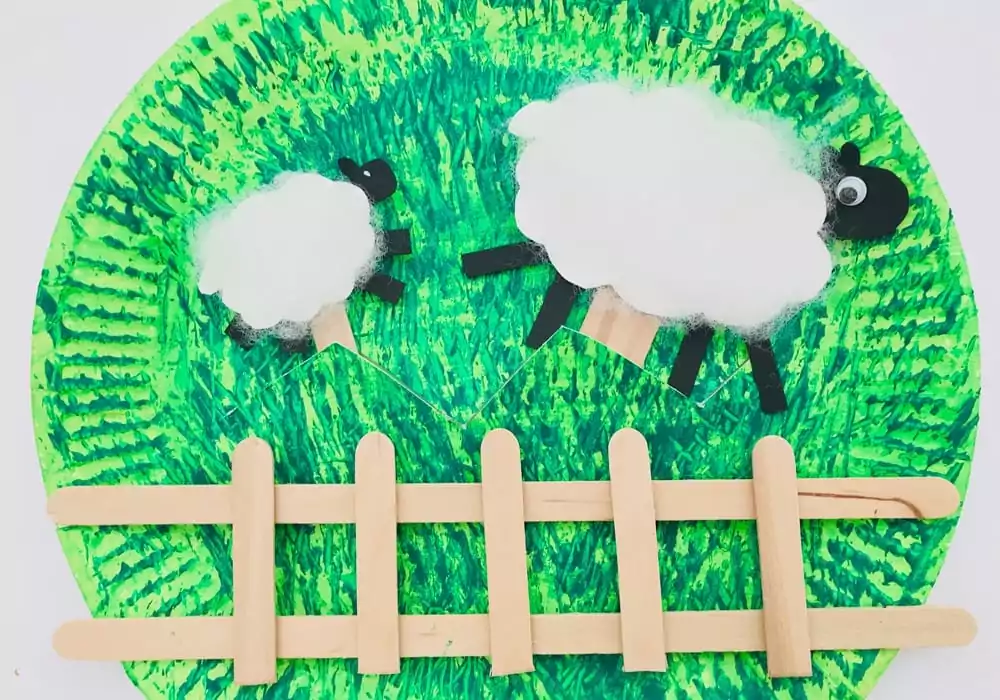
This is a fun and easy craft for preschoolers that teaches them about sheep and how to count. It’s also a great way to recycle paper plates!
To make this Paper Plate Sheep Jumping the Fence, you will need:
- One paper plate
- A paintbrush
- Paint (light and dark green)
- A fork
- Scissors
- White and black card
- Googly eyes
- A glue gun or Tacky glue
- Cotton wool
- Wooden popsicle sticks
- First, paint the paper plate light green. Once that is dry, use the fork to add some texture using dark green paint. This will be the grass.
- Cut a cloud shape from the white card for your sheep’s body. Take the black card and cut out four thin strips for its legs and an oval shape for its head. Glue all the card shapes in place to put together your sheep.
- Glue a googly eye onto its head. Spread some cotton wool balls with your fingers and glue them to make your sheep nice and fluffy.
- Stick your sheep to the top since you’ll have your wooden popsicle stick below. Repeat the process to make a smaller sheep.
Now you have a whole flock of jumping sheep! You may also make a long strip by combining two popsicle sticks. Repeat the procedure to create two extremely long wooden poles. Cut several of your popsicle sticks in half. Glue them along the length of the wooden poles to create a fence-like appearance. Your fence is now complete!
This is a fun and easy craft for preschoolers that teaches them about sheep and how to count. It’s also a great way to recycle paper plates! So have fun and enjoy making your Paper Plate Sheep Jumping the Fence!
Start your own sheep craft now and drop by Fun Kids Crafts.
Conclusion
These adorable and easy sheep preschool crafts are perfect for a farm theme or a lesson on counting. Your students will love making these simple sheep crafts, and you’ll love how easy they are to put together. Thanks for reading, and have fun crafting with your students!
More crafts and activities you might like:


