Construction paper crafts are a simple and affordable way to engage children in creative play while also developing their fine motor skills, color recognition, and creativity.
For today’s list, we’ve rounded up a collection of fun and easy construction paper crafts that will surely entertain and engage your little ones. What are we waiting for? Let’s get into it!
Great Construction Paper Crafts for Preschoolers

This rainbow craft is a fantastic way to help your preschoolers develop their color recognition skills in a very enjoyable way! They’ll surely have fun as they develop their fine motor skills and showcase their creative side. It only needs a few common supplies and is very easy to make!
First, cut out a 1-inch strip from a 12×9 inch paper, and the rest into 1×9-inch strips — red, orange, yellow, green, blue, and purple. Trim them so they get progressively shorter. The shortest is purple at 4 inches, and the longest is red at 9 inches. Then, staple the strips together at one end and align their other ends to form an arch.
To finish it off, add some fluffy clouds by fluffing up a cotton ball and stretching it to look like a cloud. Staple the cloud to each end of the rainbow. Voila — your rainbow craft is complete and ready to brighten up any room!
Materials Needed:
- Construction Paper (rainbow colors)
- Scissors
- Stapler
- Cotton Balls
Super adorable, right? To learn more about this cute craft, you can go and check out onelittleproject.com.

Looking for a fun activity to build your child’s hand muscle strength? Weaving activities, like this one, are perfect for that very purpose! On top of hand strength, they’ll also be able to develop tons of other important skills such as hand-eye coordination, concentration, fine motor skills, and a whole lot more.
To make it, simply fold your base paper in half vertically, then draw a line about an inch from the top and cut evenly spaced lines down the paper, being careful not to cut all the way through. Your base paper should now look like an accordion. Next, fold your weaving paper in half vertically, then draw lines from top to bottom, and cut into strips all the way through.
Unfold both papers and begin weaving the strips over and under through the base paper. Alternate the pattern and work your way to the top. Finally, cut or fold over and tape the ends. That’s it, your very own woven paper masterpiece!
Materials Needed:
- 2 Letter Size Paper (preferably in different colors)
- Scissors
- Pencil
- Ruler
You can visit madewithhappy.com if you’re interested to know more about this amazing activity.
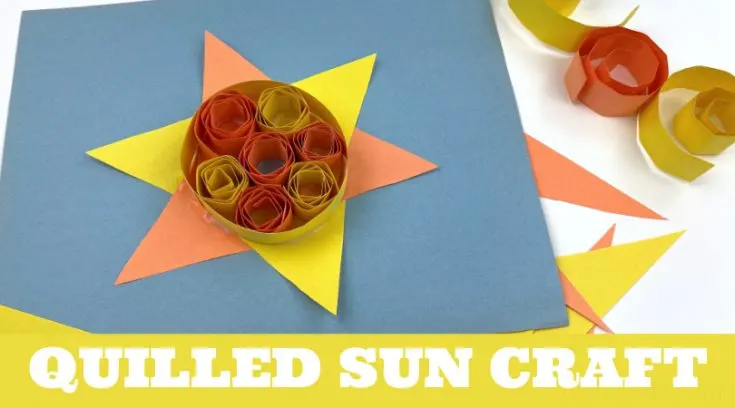
Here’s another cool and fun craft that can help develop your preschooler’s creativity and fine motor skills. It can also serve as cutting practice for them, too. You’ll surely be able to build their hand strength and showcase their creativity through this easy-peasy craft!
To start, simply cut your orange and yellow paper into 1-inch strips. Then, cut some triangles from the remaining paper. Glue the ends of one paper strip together to create a circle and place it on blue paper. Use a pencil to mark the inside of the circle, and place the triangles over the pencil marks to cover them. Now, create a ring of glue around the circle, then place the circle strip in the glue ring.
Start quilling by rolling your paper strip around a craft stick until the whole strip is wrapped around. Pinch the edges flat and dunk it in white glue, then place it within the circle section of your sun. Keep alternating between orange and yellow paper strips until you’re happy with your sun craft!
Materials Needed:
- Construction Paper (yellow, orange, and blue)
- White Glue
- Paper Cutter
- Scissors
- Pencil
- Craft Sticks
- Pallet
Discover more about this fun craft and a whole lot more at twitchetts.com.
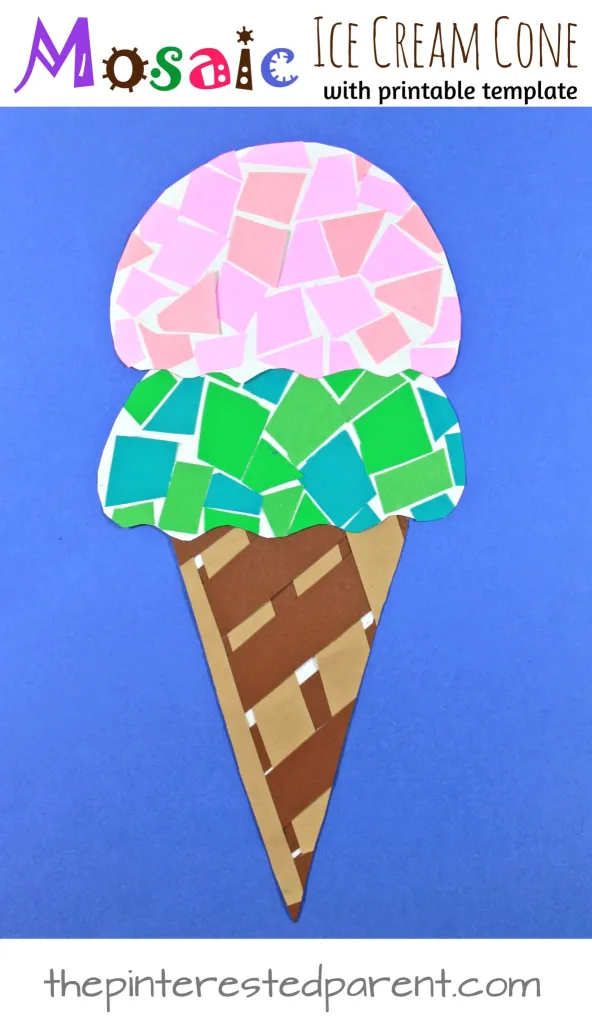
Get your little ones creative with this fun and easy ice cream craft! It’s a perfect activity if you are looking to develop your child’s concentration and fine motor skills. They’ll also be able to do some cutting practice and squeeze out their creative juices! It’s quick and simple to make, too.
First off, print the ice cream cone printable and cut out its pieces. Then, cut small pieces of construction paper to use as your mosaic tiles. You can choose to use a solid color or mix and match different colors. Use a glue stick to glue your paper pieces onto your cone, trimming the excess paper off afterward.
Next, assemble and glue your cone and scoops onto a separate piece of paper. Finish it off by adding paper sprinkles, cherry, or any decoration you like.
Materials Needed:
- Ice Cream Cone Printable
- Construction Paper
- Glue Stick
- Scissors
What are you waiting for? Visit thepinterestedparent.com and have fun making this awesome craft with your kids!
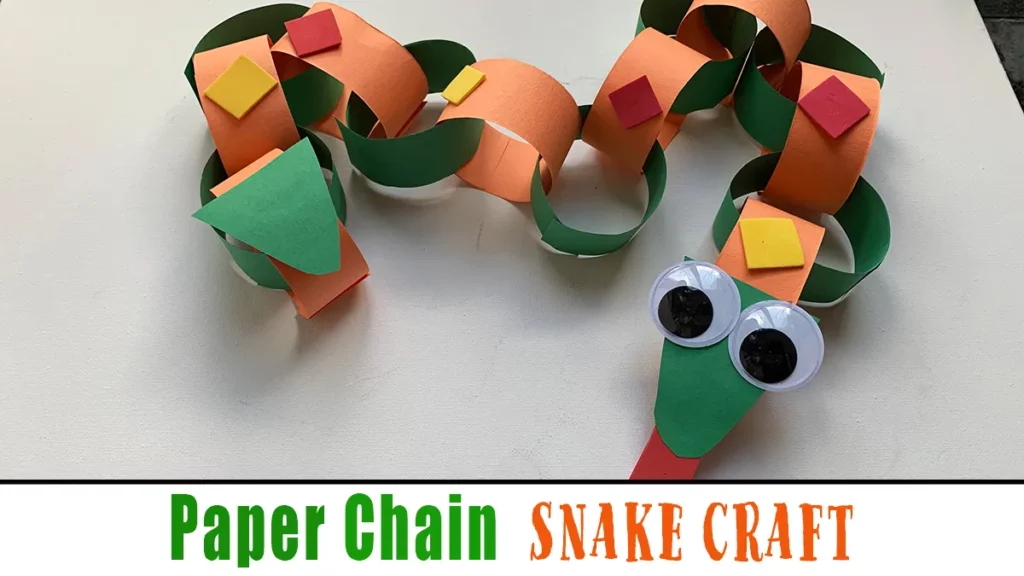
Looking for a fun craft that you can use to complement your animal-related studies? This paper chain snake craft will surely pique your preschoolers’ interests. It’s a simple yet entertaining craft that can help you introduce reptiles to the kids while cultivating their creativity and fine motor skills. Your kids can also work on it with very little guidance — as easy as 1, 2, 3!
Start by grabbing two different colored construction papers, then fold and cut them into 8 strips each. Make circles by gluing the strips together and alternate between the colors as you go. Next, add googly eyes, a tongue, and shape cutouts to decorate your snake. Finally, glue a large triangle to one end and a smaller triangle to the other to serve as the tail. Voila, your snake craft is ready to slither away!
Materials Needed:
- Construction paper (orange, red, and green)
- Googly Eyes
- Scissors
- Glue
- Foam Shapes (optional)
For more information about this fun craft, you can go check out happytoddlerplaytime.com.
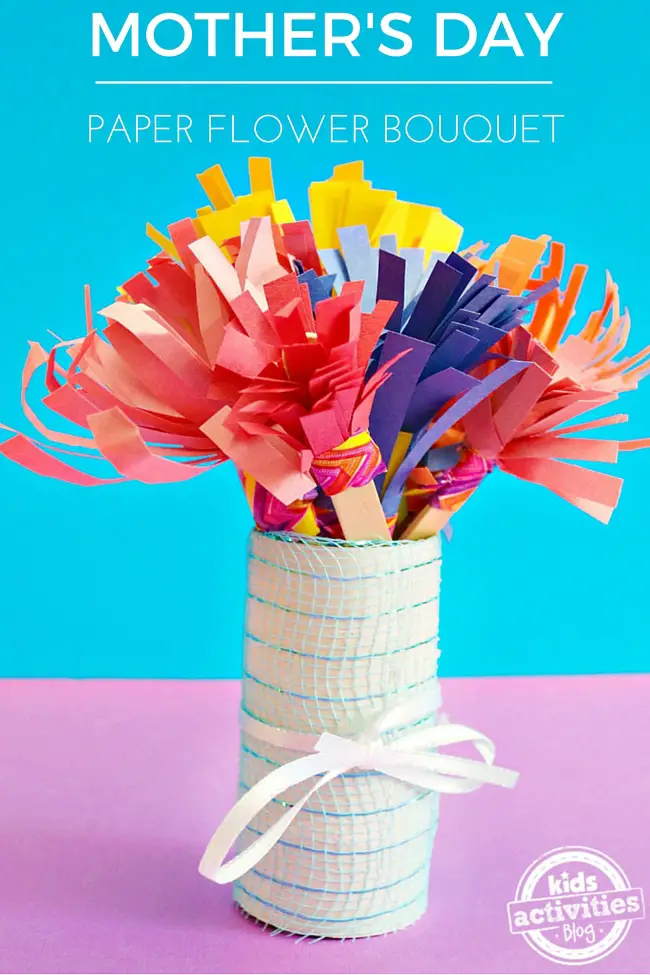
Here is another adorable craft that’s perfect to make with the kids during Valentines Day or Mother’s Day. It can help you hone your little artists’ creativity, concentration, and fine motor skills. On top of that, you can also insert a bit of color recognition practice as you work on it, since you’ll be using different colors of paper.
To make it, simply cut 3-inch wide strips of paper. Then, make some slits in each strip, kind of like when you’re making grass for a paper craft. Add a line of glue and a popsicle stick to one end, and roll it up inside the paper. Make sure to reinforce the base with some duct tape.
Next, use your fingers to shape the paper into a flower shape. Then, glue some ribbon around your toilet paper roll, and pop your flowers inside. Voila, you’ve got yourself a beautiful bouquet of handcrafted flowers!
Materials Needed:
- Different colored construction paper
- Popsicle sticks
- Glue
- Toilet paper rolls or craft rolls
- Ribbon
- Scissors or preschool training scissors
- Duct Tape
Don’t hesitate to visit kidsactivitiesblog.com for more details about this lovely activity.
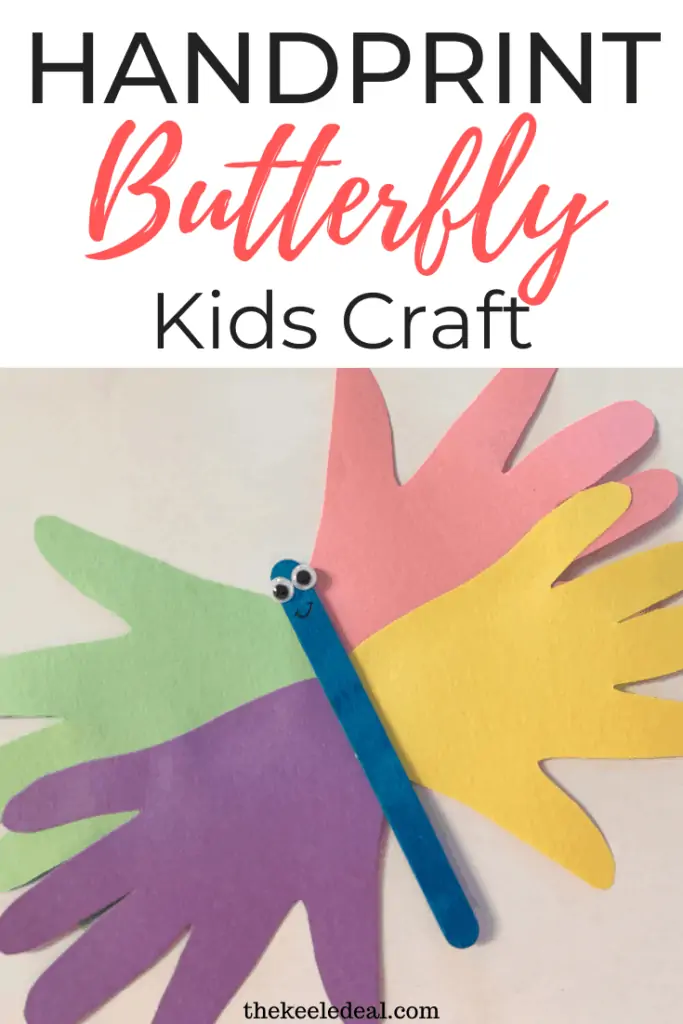
This charming little craft will surely make your children smile as they make them. It’s a perfect spring activity you can use to introduce the letter B, practice color recognition, or simply just a fun circle time art activity. The best part is it’s easy to make and only needs a few common supplies!
You can start by tracing and cutting out 4 handprints in different colors. Glue two handprints together, then repeat with the other two. Then, glue both sets of handprints in the middle to make butterfly wings.
Next, glue two googly eyes and draw a smile on a popsicle stick. Attach the popsicle stick to the butterfly wings using school glue. Wait for the glue to dry and you’re done! Your butterfly is now ready to fly and play!
Materials Needed:
- Construction Paper
- Glue (stick and school glue)
- Googly Eyes
- Scissors
- Pen
- Popsicle stick (preferably colored)
Can’t wait to make it with your little ones? Then go and check out thekeeledeal.com to learn more.
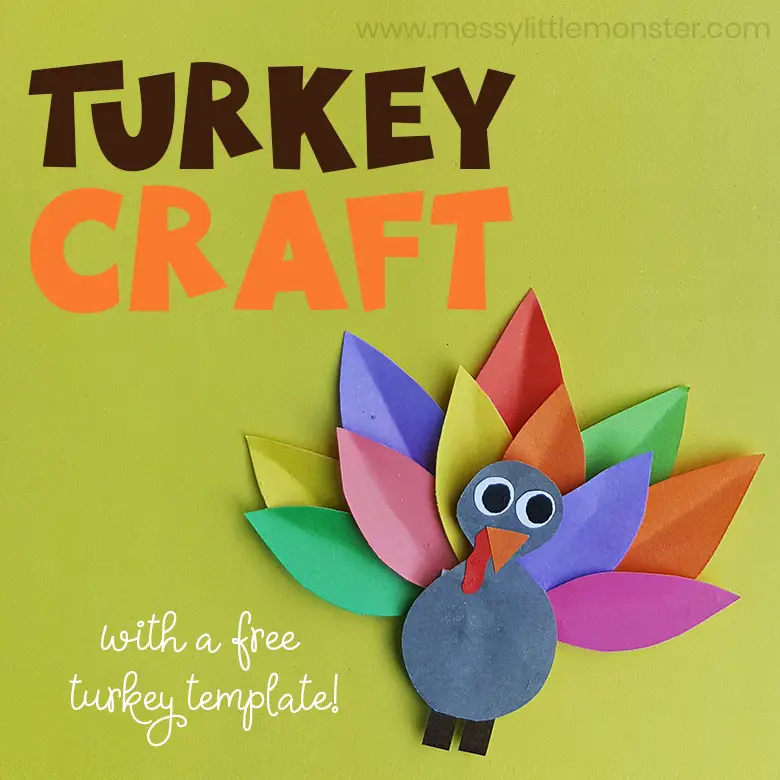
This cool and fun turkey craft is indeed the perfect activity to keep your kids busy and entertained on Thanksgiving. Aside from developing their creativity and fine motor skills, you can also use this activity to teach them about gratitude. That makes it even more fitting as a Thanksgiving activity, right?
First, gather the supplies and print out the turkey template. Then, cut out the shapes and glue them together to create your turkey’s body. Now it’s time for feathers! Fold and glue colorful leaf shapes together to create a 3D feather display.
Finally, glue your turkey body to some cardstock and attach your feathers for a final touch. Add turkey legs and a craft stick for a puppet, or ask the kids to write things they’re thankful for on the feathers! And that’s it, your very own fun and a festive paper turkey craft.
Materials Needed:
- Turkey Template
- Colored craft papers
- Cardstock paper
- Pencil
- Black sharpie
- Craft glue
- Scissors
Add this craft to your Thanksgiving to-do list! Visit messylittlemonster.com to learn more.
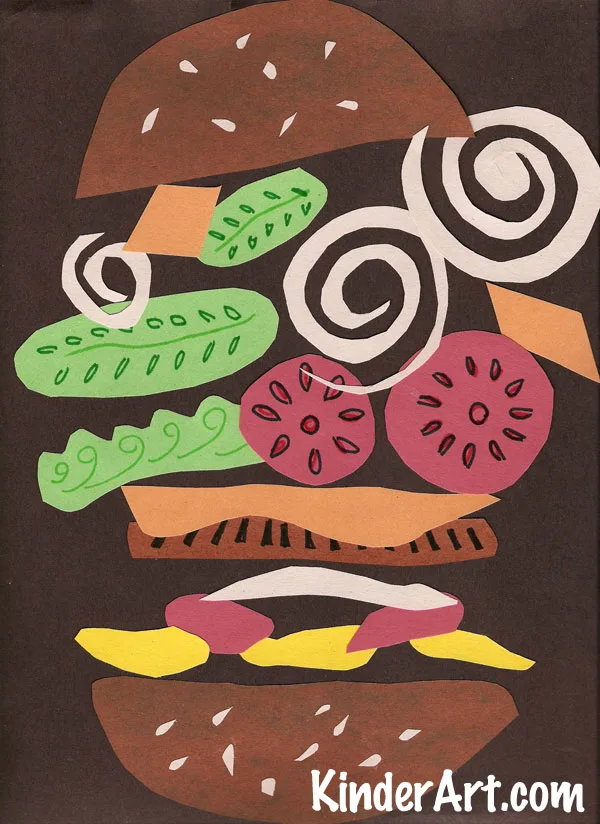
Ready for some snacks for the brain? If your kids love eating burgers, then they’ll definitely enjoy making this craft! This fun activity is perfect for some shape recognition practice, too. It can be a super fun circle time activity where your little ones can develop their fine motor skills, bring out their creative side, and most importantly, have lots of fun!
To make it, simply grab some construction paper of different colors and cut out shapes for the bun, tomato, pickles, and other toppings. While you’re at it, you can practice identifying shapes as they cut each part out.
Next, assemble the burger on black construction paper. Start with the bottom bun and add your ketchup, mustard, and mayo. Then add your patty, cheese, lettuce, tomato, and the rest of the ingredients. Finally, use some crayons or markers to add some grill marks or texture. Sounds like a feast of fun, doesn’t it?
Materials Needed:
- 9×12 Black Construction Paper
- Crayons or Markers
- Construction Paper (various colors)
- Scissors
- Glue
To learn more about this fun-filled activity, you can go ahead and visit kinderart.com.

Here is a simple ant craft that’s perfect for spring and summer! It can help your kids develop their hand-eye coordination and fine motor skills. They’ll also be able to bring out the little artists in them! You can use it as a circle time activity, as it’s quick and easy to make, too.
First off, grab your green construction paper and cut it into a wavy line to create grass. Then, cut some black construction paper into strips. Make spirals for the ant’s head and thorax by wrapping them around a pen or pencil. For the abdomen, glue two black strips together, curl them around a pen or pencil and attach them to the ant.
Finally, glue the grass onto blue cardstock, add the ant’s body parts on top, and draw on some antennae and legs. Finish it off by adding some fluffy clouds to the sky. Easy-peasy, right?
Materials Needed:
- Blue Cardstock
- Green, Black, and White Construction Paper
- Wiggle Eyes
- Black Marker Pen
- White Posca Paint Pen
- Herb Scissors
- Scissors
- Glue
Excited to try it with your preschoolers? Learn more about it at kidscraftroom.com.
Conclusion
There you have it, ten fun construction paper craft ideas to make with your young artists!
Whether you use it as a complement to your lessons, or simply as a fun circle time activity, your children will surely be so excited and happy to work on them. Happy crafting!


