Although clouds resemble wads of cotton that look soft and fluffy, these are water droplets that have condensed. This fact is essential for young children to know. It will help dispel myths and misconceptions that may confuse children.
Check out these ten dazzling cloud crafts that will help explain the Science behind the appearance of these water vapors through fun and engaging lessons.
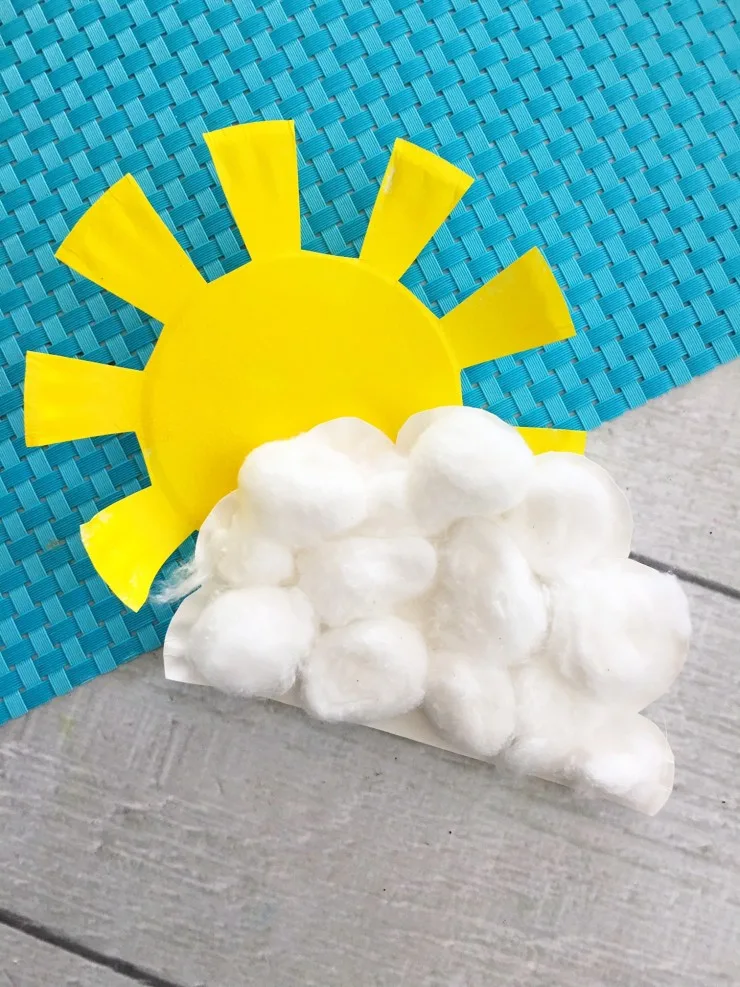
Clouds can appear even when the sun is out. They come in different shapes and sizes. Some even have recognizable shapes like animals or objects. Let children explore these shapes by letting them observe the sky and find a familiar one.
Doing this will help develop children’s imagination. Use this craft to retell the story “The Cloud Book” by Tomie de Paola. This story explains the different names and changes in clouds’ shapes.
Retelling stories will help develop comprehension and oral language skills in young children.
Working with this craft will help improve the children’s fine motor skills through painting, cutting, and pasting.
Make the sun by cutting off pieces from the ribbed edges of a small paper plate to make the rays. Refer to the pictures on the site for this step. Paint the sun yellow and let it dry.
Next, cut a quarter off the second paper plate and trim its edges with a scallop pattern. Doing this step will make the cloud more recognizable. Attach the cotton balls using glue. Continue adding until the whole cloud is covered with cotton.
Glue the cloud on the sun and let this dry before using.
For this activity, you will need:
- Small paper plates
- Paint
- Cotton balls
- Scissors
- Foam paint brush
- Glue
For more information on this activity, go to FrugalMomEh.com.
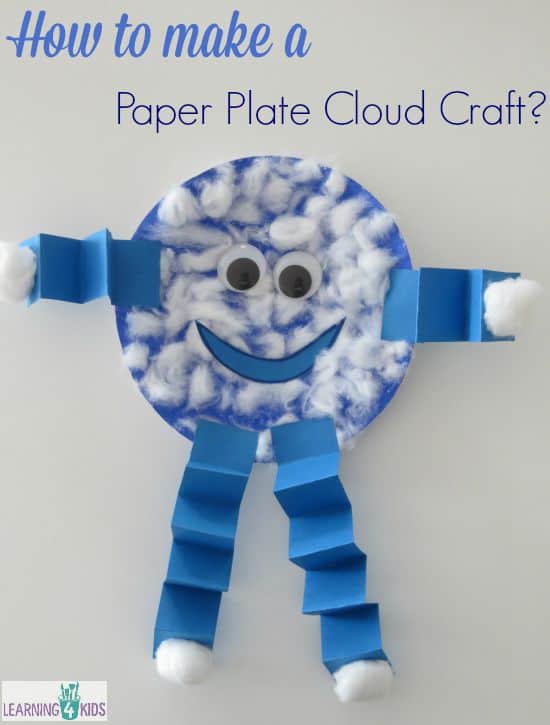
Inspired by the book “Little Cloud” by Eric Carle, this cloud craft is the perfect project for young children. It is simple and easy to make. This craft is a beautiful tool to retell the story. It can also be used as a puppet in pretend play areas.
Children will learn about colors, shapes, and textures with this craft. As children assemble the pieces to make their version of Little Cloud, their fine motor skills will develop through the cutting and pasting tasks.
Start with painting the paper plate blue. The site suggests adding the cotton while the paint is still wet, but glue can also adhere the cotton to the plate. Unfold the cotton to stretch it out and stick them on the paper plate.
Cut strips of blue construction paper and fold them accordion style for the arms and legs. Make sure that the arms are shorter in length than the legs. Using the marker, outline and cut out a smile from the remaining blue paper.
Attach the arms and legs to the paper plate using a hot glue gun. Next, add the eyes and smile. Finally, add a cotton ball to each arm and leg.
For this activity, you will need:
- Paper plate
- Paintbrushes
- Construction paper
- Cotton balls
- Hot glue gun
- Googly eyes
- Marker
For more information on this activity, go to LearningForKids.net.
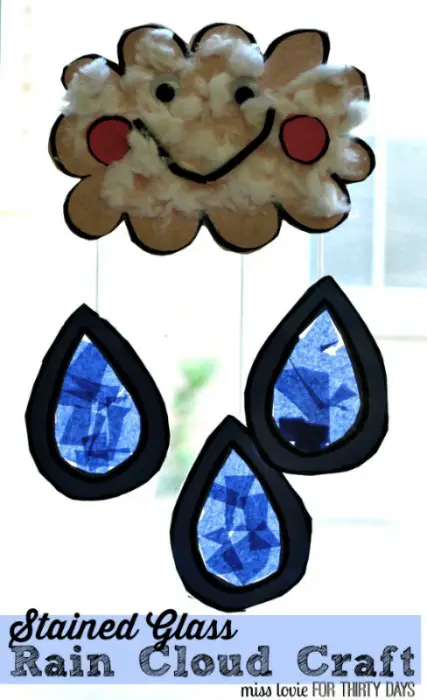
Clouds are indicators of weather. Make this rain cloud craft that is perfect for the spring season. This cloud mobile with a stained glass effect on the raindrops can be used as decor to teach why clouds can sometimes bring in rain.
Make several of these with varying numbers of raindrops for children to count. Turn the mouth upside down or bend and turn it into a zigzag to teach emotions. This craft will provide a wonderful sensory experience for children.
Download and print the site’s free cheeks, raindrops, and cloud templates. Cut these out. Trace the cloud template on gray construction paper and the cheeks on pink paper. Cut these out. Stretch the cotton and stick them on the cloud using glue.
Glue the cheeks and googly eyes. Bend the pipe cleaner to form a U shape for the mouth. Stick this on the cloud as well. Trace the raindrops on blue paper and cut these out, including the middle part. Stick these on a contact paper.
Let children stick cut-up pieces of blue crepe paper on the contact paper. Attach the yarn using sticky tape on all the raindrops. Attach these to the cloud. Finally, place the raincloud craft on the window where the light shines.
For this activity, you will need the following:
- Printed cloud, raindrop, and cheeks templates
- Scissors
- Glue
- Cotton balls
- Construction paper
- Pipe cleaner
- Googly eyes
- Contact paper
- Crepe paper
- Yarn
- Sticky tape
For more information on this activity, go to ThirtyHandmadeDays.com.
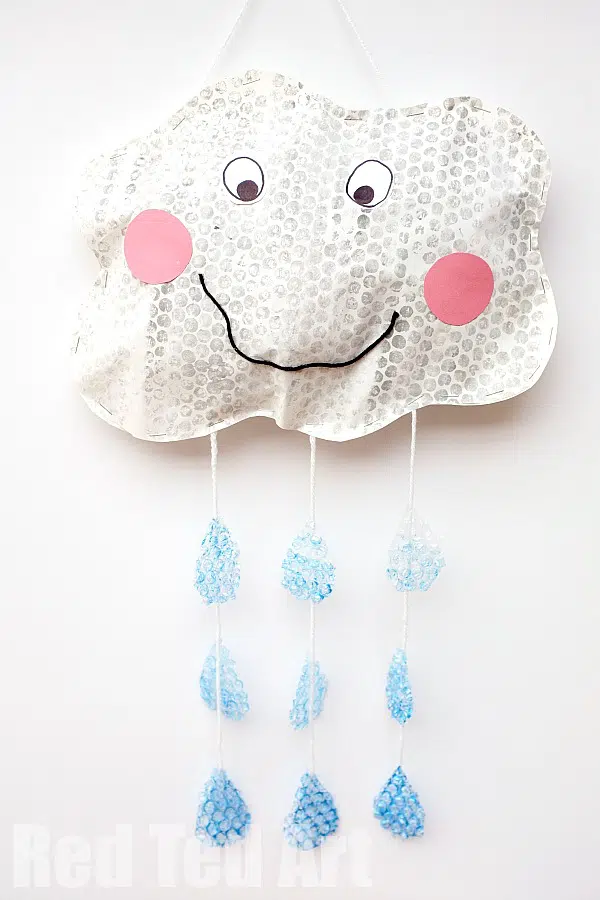
Recycling is a beautiful practice to impart to young children. This action will teach children to value the environment by lessening waste. One good way to practice recycling is by using them for crafts, such as this rain cloud.
Children will learn the printing art technique to make a textured pattern. They will also improve their fine motor skills and coordination as they cut the different materials and stuff the cloud. This will also provide a sensory experience for children.
Start with painting the old bubble wrap gray. The site suggests mixing white and some black if gray paint is unavailable. Use the paintbrush to apply this on the bubble wrap. Gently press this on the white paper. Repeat the process on another paper.
Cut out the papers into a cloud shape and glue the two white circles with black pupils for the eyes, two pink circles for the cheeks, and a black yarn for the mouth.
Next, staple the edges but leave some openings. Insert old plastic bags inside the cloud. This should look plump, like a pillow. Close the opening with the stapler.
Paint the remaining bubble wrap blue and cut it out to the shape of raindrops. Attach three of these on a white string. Make three sets and staple them at the edge of the cloud.
For this activity, you will need:
- Old bubble wrap
- Paint
- Paintbrush
- White paper
- White string
- Black yarn
- Markers
- Stapler
- Old plastic bags
- Glue
- Scissors
For more information on this activity, go to RedTedArt.com.
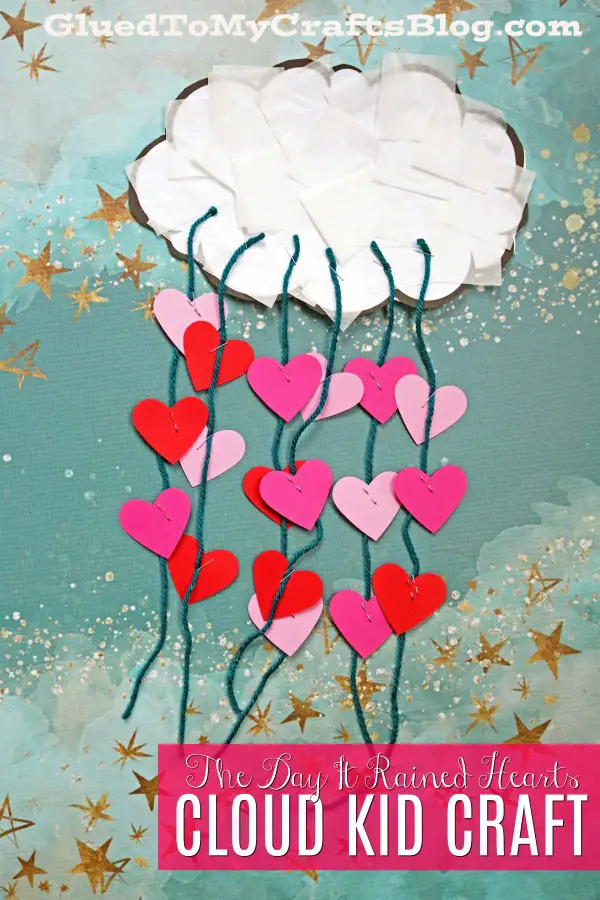
This cloud craft is perfect for weather-themed lessons and special occasions like Valentine’s and Mother’s Day. Use this craft to teach different skills.
Make several of these and vary the number of the hearts for children to practice counting. Use different colors of hearts to teach color recognition skills. Write number symbols on each heart and let the children arrange them in order.
Use the hearts for children to learn about the letters. Write the uppercase letters on the dangling hearts and provide another set of hearts with lowercase letters for the children to match.
The hearts can also contain the letters of the children’s names to help them recognize and spell their names.
Download the free cloud template from the site. Print this on white cardstock and cut it out. Spread a good amount of glue on the cloud and stick small squares of white tissue paper to cover it entirely.
While waiting for the glue to dry, punch out hearts from red cardstock and cut a few inches of string. Attach the hearts on the string using a stapler. Attach the string of hearts on the cloud.
For this activity, you will need:
- Printed cloud template
- Tissue paper
- Cardstock
- Glue
- Scissors
- Heart-shaped puncher
- Stapler
- Yarn
For more information on this activity, go to GluedToMyCraftsBlog.com.
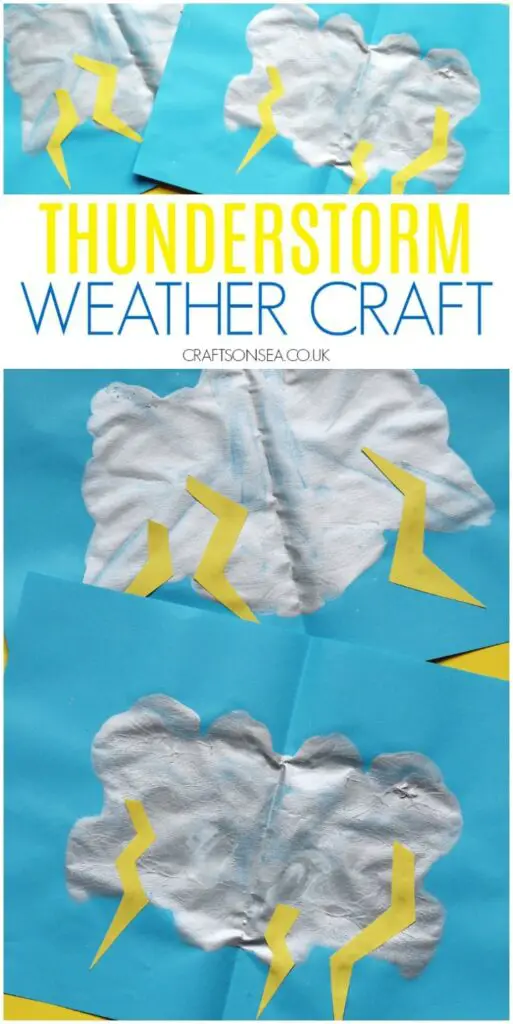
Thunder clouds bring rain and thunder at the same time. Use scientific facts to explain this to children. Understanding the reasons will help them be less fearful of lighting.
This art craft can be made easily by young children. Folding the paper and cutting out the thunder will help improve the children’s fine motor skills. Teach children the concept of symmetry with this craft.
Explain that a mirror image is created when the paper is folded. Make several of these with varying bolts of lightning for children to improve their counting skills.
Ask children the form or shape their clouds have taken on once the paper is spread out to develop children’s imagination.
Start by folding the light blue construction paper crosswise. Open the paper and squirt some paint on one of the sides, close to the fold. This will ensure that the result of this step is a single cloud. Refer to the pictures on the site for this step.
Fold the paper and spread the paint by running your hands on the folded paper. Next, open the paper and let the paint dry. Cut out the lightning from yellow paper. Glue this on the cloud once the paint dries.
For this activity, you will need:
- Scissors
- Glue
- Construction paper
- Gray or silver paint
For more information on this activity, go to CraftsOnSea.co.uk.
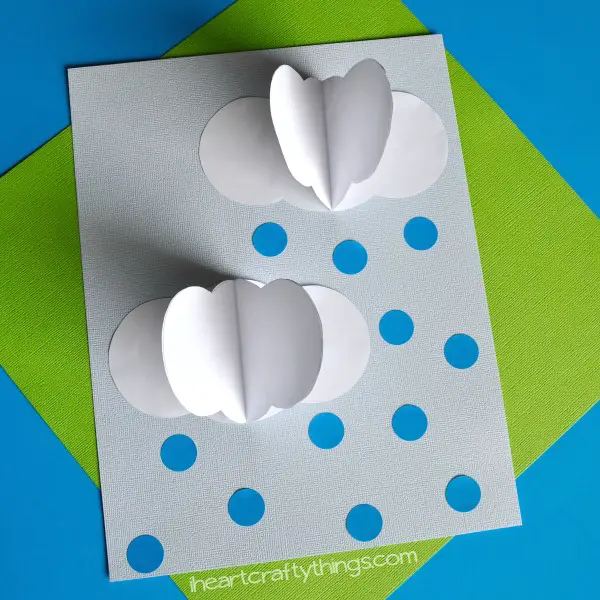
This 3D raincloud craft is a beautiful idea to use as a card for any memorable holiday. It can be used in weather charts during circle time or as a fun decoration.
This craft requires children to practice cutting curved lines. Encourage children to work independently when assembling the cloud.
For younger children, model out the step-by-step instructions. Children will learn to pay attention and follow instructions. Fine motor control and coordination will be enhanced when they combine the cloud pieces.
For older children, use verbal instructions. This will help develop their listening skills and attention to detail.
Download and print out the free cloud template from the site. The template comes in two pages. Each page has three clouds. Print both pages to make two 3D clouds.
Cut these out and fold them in half. Glue together the pieces by laying two clouds beside each other with folds in the center. Glue the sides that are standing. Repeat the process with the third piece.
Stick the clouds on light blue paper and add the dot stickers to complete.
For this activity, you will need:
- Printed raincloud template
- Blue dot stickers
- Construction paper
- Scissors
- Glue
For more information on this activity, go to IHeartCraftyThings.com.
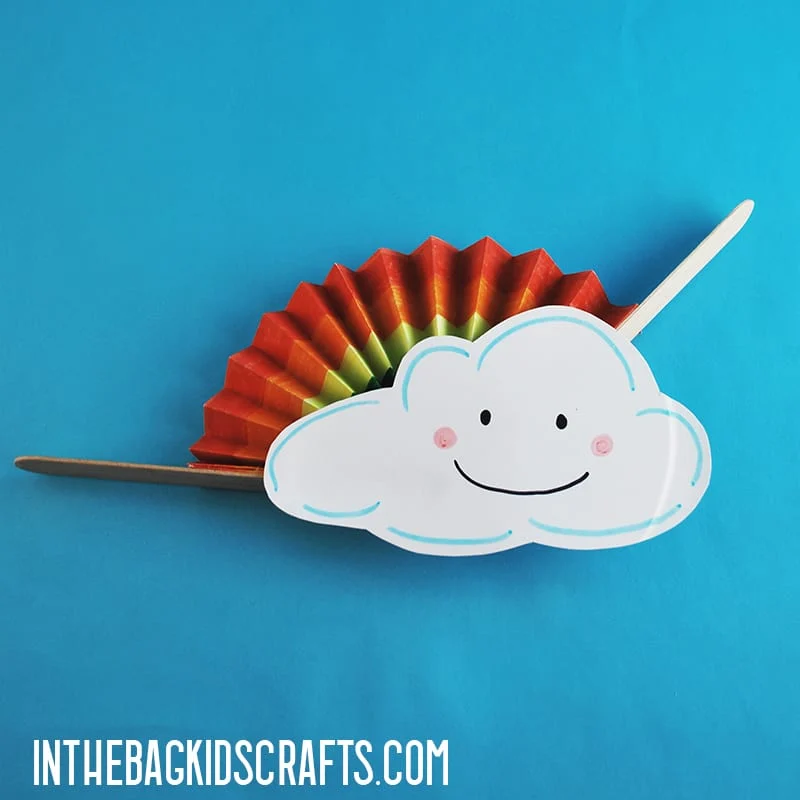
This cloud is hiding a surprise-a colorful rainbow fan. The fan can be opened and closed. It can be used to teach mindfulness through positive meditation. Children will improve their fine motor skills by cutting and folding the paper.
This craft can be used to teach the colors of the rainbow. Opening and closing the fan will help strengthen their finger muscles and improve coordination.
Teach children to say something positive to themselves or others whenever the fan is opened. Doing this will help children become mindful of their strengths and those of others.
Start by downloading the cloud template from the site. Cut this out and trace it on a paper plate. Cut out the cloud and use the marker to add details.
Next, fold a white construction paper lengthwise and cut it in half. Divide the paper into six parts and color each rainbow using markers. Once dry, fold the paper in accordion style, leaving two flaps at the end.
Attach each of the flaps on craft sticks to make a fan. Refer to the pictures on the site for this step. Once the glue dries, stick the cloud on the fan. Let this dry before using.
For this activity, you will need:
- Printed cloud template
- Paper plate
- Scissors
- Marker
- Construction paper
- Craft sticks
- Glue
- Sticky tape
For more information on this activity, go to InTheBagKidsCrafts.com.
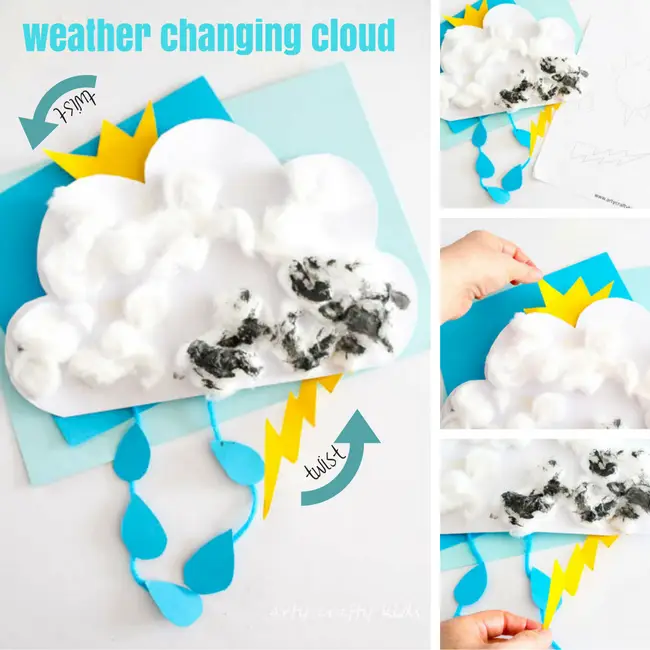
This cloud craft is a beautiful tool for monitoring the weather during circle time. Use this to teach the different types of weather that can be observed. Let children do a weather report using this craft to enhance their oral language skills.
Cutting the pieces and assembling the craft will provide opportunities for children to enhance their fine motor skills. Increase children’s vocabulary by introducing weather words they might not be familiar with.
Download and print the free weather template. It includes a sun, a raindrop, and a bolt of lightning. Cut these out and trace them onto cardstock. Use yellow for the sun and lightning while blue for the raindrop. Cut out and set these aside.
Next, outline and cut out a large cloud on white cardstock. Use the leftover cardstock to make a small pocket at the back of the cloud. Attach this with glue. Next, punch holes in the cloud and attach the sun and lightning using brass fasteners.
Attach the raindrop to a blue yarn and stick this on the cloud. Conceal the brass fasteners by gluing thinned-out cotton balls on the cloud. Use the gray paint to add color to the bottom part of the cloud where the raindrop and lightning are.
For this activity, you will need:
- Printed weather template
- Cardstock
- Paint
- Cotton balls
- Blue yarn
- Brass fastener
- Hole puncher
For more information on this activity, go to ArtyCraftyKids.com.
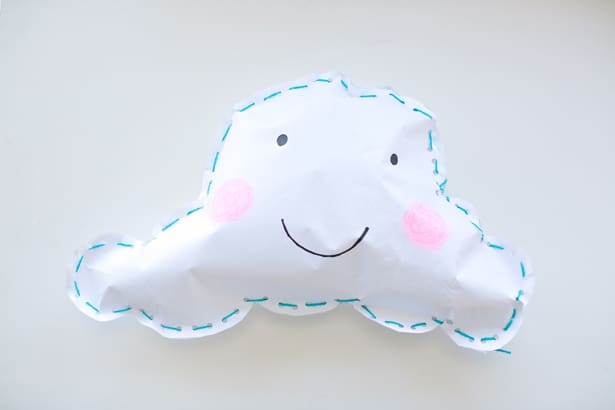
This huggable paper cloud will make children want to learn more about the weather. Use this in pretend play area as a talking character to help build the children’s oral language skills.
It can also be placed in calming areas to help children relax when they need a brain break. This paper cloud is a lovely introduction to sewing. Children will develop hand-eye coordination skills and patience as they sew the pieces together.
Decide how large the cloud will be. Take a piece of butcher paper and fold it in half. Outline the shape of the cloud and cut it out. This will result in two symmetrical clouds. Use the hole puncher to punch out holes on the edges.
Make the distance between the holes bigger for younger children and smaller for older kids. Next, use the marker to draw the facial details. Use the yarn to thread into the holes, leaving a small opening to insert the filling.
Use cue words like “in and out” to guide children on where to put the yarn next. Add the polyfill and continue sewing until all holes are filled with the yarn. Secure the ends by tying them several times.
For this activity, you will need:
- White butcher paper
- Hole puncher
- Yarn
- Black marker
- Polyfill
- Scissors
For more information on this activity, go to HelloWonderful.co.
Conclusion
There are many different types of clouds that children can observe and learn. Use these crafts to expose children to the world of weather. Their knowledge of the world will increase as they know more about the scientific facts about clouds.
These crafts can be modified and tailored to the needs and abilities of the class. Use books related to the topic (such as weather books) and experiments to help children understand the concept better.
Thank you for reading!


