Learning should be fun and exciting for young children. Teach children the letter M through crafts and fantastic activities that keep them engaged and motivated.
Integrating crafts with letter learning will be beneficial as they will improve the other skills necessary to thrive in preschool.
Here are ten crafts that children will be highly interested in.
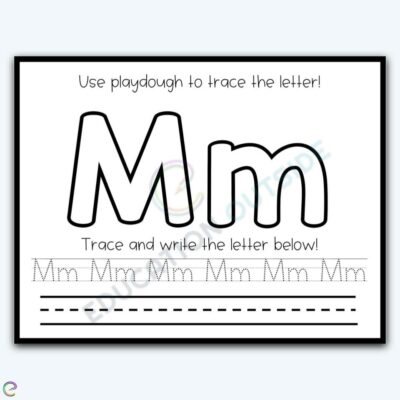
Teach the upper and lowercase letter M through clay play. Children will be aware of the different lines that comprise the letter M. learning how the letter is formed is important in remembering its appearance.
As children knead and form the playdough and trace and write the letters, they will improve their hand-muscle strength, hand-eye coordination, and fine motor skills.
Download the printable from the site. For this to last longer, laminate the sheets if possible. Provide an ample amount of playdough for each child to work on. Let them roll, knead, and flatten the clay to form the right size and shape that will fit in the mat.
Have children use a marker or pencil to trace the letters with dotted lines once they have formed their clay letters. Next, let children practice their writing skills as they copy and form the letter Mm on the line.
If children are unsure how to start writing the letter M, have them trace the clay with their fingers, focusing on each line before using a pencil to write on the line.
For this activity, you will need:
- Printed Letter M playdough mat
- Markers
- Pencils
- Playdough
For more information on this activity, go to EducationOutside.org.
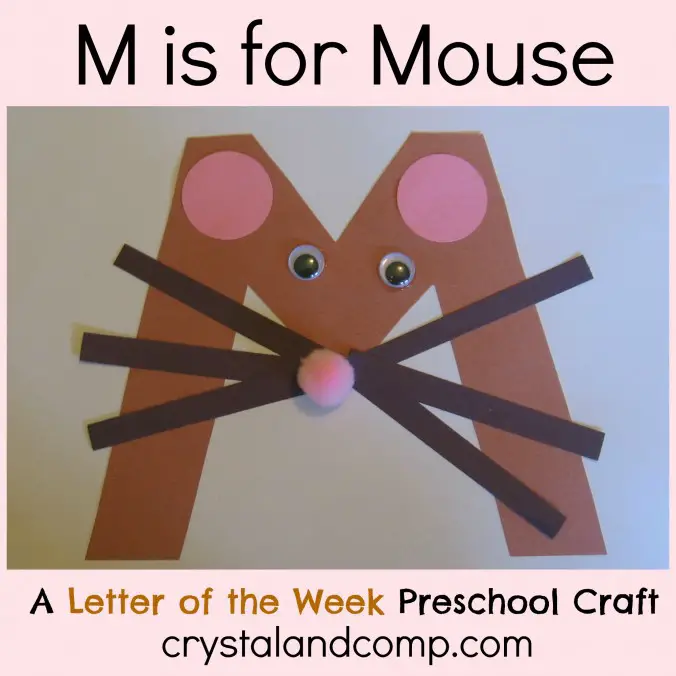
Help children with the letter M’s form by turning the letter into a mouse. This adorable mouse craft will help children create a visual image that will let them remember its form, sound, and object that begins with the same letter.
Start with outlining and cutting out the letter M on brown construction paper. Next, cut out two pink circles for the ears and six black strips. Once all the pieces are ready, assemble the letter M mouse.
Glue the brown M on white paper. Place each pink circle on the top of the letter M. This part is the mouse’s ears. Refer to the picture on the site for this step. Stick the googly eyes below the ears.
Glue the six black strips on the pointy part of the letter M. Ensure that they are glued together at an angle to form the whiskers. Finally, stick the pink pompom on top of the whiskers.
The site suggests using nursery rhymes, such as “The Muffin Man” and “ Little Miss Muffet,” and the book “If You Give a Mouse a Cookie” by Laura Numeroff, to go with this craft.
For this activity, you will need:
- Construction paper
- Googly eyes
- Scissors
- Glue
- Pompom
For more information on this activity, go to CrystalAndComp.com.
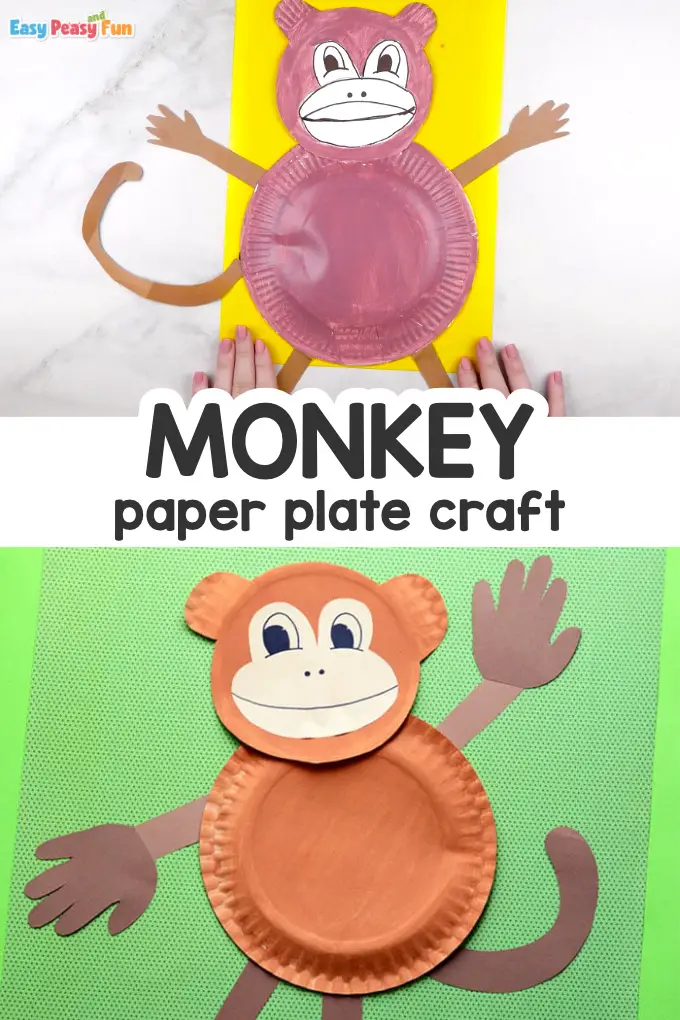
This friendly-looking monkey is a perfect craft to teach the letter M. Children can associate the letter M with the word monkey. This activity provides the opportunity to practice their tracing and cutting skills.
Start with painting the back part of both paper plates brown. Once dry, trim off the ribbed part on one of the paper plates, leaving two small parts for the ears. Refer to the pictures on the site for this step.
Next, trace and cut out the children’s handprints. Two sets of handprints should be prepared for the monkey’s hands and feet. Next, cut out four strips of brown paper for the arms and legs. Make the tail by cutting out a curved strip of brown paper.
Use beige construction paper to cut out the monkey’s face. Use the black marker to add facial details, such as the eyes, nose, and mouth.
Assemble the monkey by gluing the paper plates on the green paper. Stick the arms, legs, and tail under the body to keep the edges hidden. Glue the handprints at the end of the paper strips. Finally, glue the face on the head.
For this activity, you will need:
- Paper plates
- Construction papers
- Glue
- Scissors
- Pencil
- Black marker
For more information on this activity, go to EasyPeasyAndFun.com.
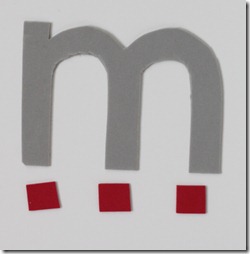
This lowercase letter m-turned magnet is a perfect craft for children to help them visualize its form and to learn the object’s beginning letter and sound.
The site suggests using this craft as a companion for the book “Magnets: Pulling Together, Pushing Apart” by Natalie Rosinsky. It discusses scientific facts about what magnets are and how they work.
Children will be able to practice their cutting skills as they cut the curves of the letter with precision.
If possible, show children what a magnet looks like, so they will understand how it works and what it looks like. This way, they will understand the use of the two colors-gray and red-on this craft.
Outline and cut out the lowercase m on a gray craft foam sheet. Next, cut to size three red squares from the craft foam, stick them on the bottom part of the letter m and let this dry.
Use the foam craft for children to trace the letter with their fingers and on paper.
For this activity, you will need:
- Gray and red craft foam
- Scissors
- Glue
- Pen
For more information on this activity, go to TotallyTots.blogspot.com.
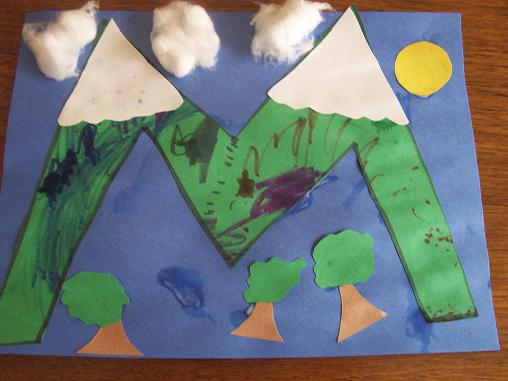
Make this realistic scene of the mountain complete with snow peaks and a forest filled with trees to teach children letter recognition. Use this craft to go with the book “Over on a Mountain” by Marianne Berkes.
Have children find the similarities between the craft and the pictures in the book. Discuss what can be found in the mountains. Use pictures and videos for this part if possible.
The children will improve their fine motor skills as they cut and paste the pieces of paper to complete the craft.
Outline and cut out the letter M on green construction paper. Cut out two triangles from white paper and trim the flat part wavy for the snow peaks. Ensure that they fit exactly on the angular part of the letter outline.
Cut out trees from green and brown paper. Make the sun by cutting out a yellow circle.
Stick the letter M on blue paper. Let children add designs to the letter by using colored markers. Next, glue the snow caps on the letter and the trees on the bottom part.
Glue the yellow sun in place. Loosen several cotton balls and attach them above the letter M to make the clouds.
For this activity, you will need:
- Construction papers
- Markers
- Scissors
- Glue
- Cotton balls
For more information on this activity, go to OurCraftsNThings.com.
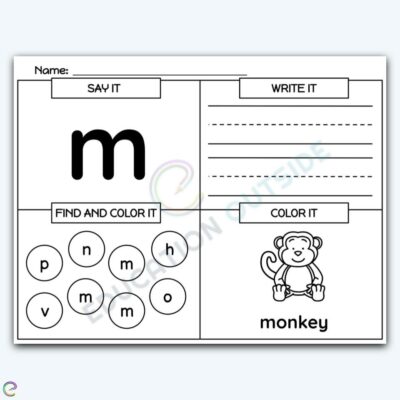
This four-in-one activity sheet is a no-prep and a time saver for educators. Children will learn to recognize the lowercase letter m form, identify, write, and associate it with an object as they complete the tasks.
Download and print the activity sheet and provide the children with a pencil or markers for this activity. Have children say the letter m’s name.
Next, they can run their finger over the letter repeatedly. They can also use a pencil to go over it so they will become familiar with how the letter is written. Next, have them write as many lowercase letter m on the line as possible.
Ask the children to find the letter m on a group of circles with letters. They can use the markers to color the correct letter or a bingo marker to mark the letter m.
Finally, have the children look at the picture on the bottom right part of the activity mat. Ask children if they can identify the picture and its beginning sound. Provide prompts if necessary. Let them color the picture of the monkey to complete the task.
For this activity, you will need:
- Printed letter m activity mat
- Markers
- Crayons
- Pencil
For more information on this activity, go to EducationOutside.org.
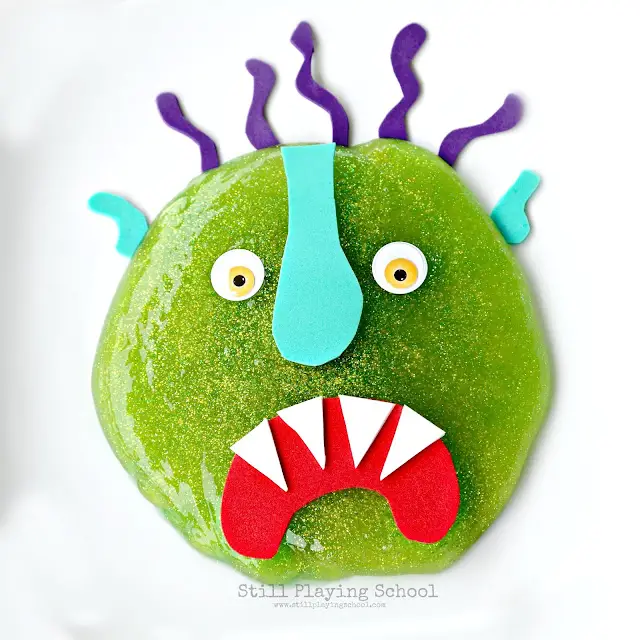
This craft is created to go with the book “Go Away Big Green Monster” by Ed Emberley. This classic book provides a sensory experience for children through its unique die-cut style pages that slowly reveal what the monster looks like.
This monster slime also provides a sensory experience while adding the parts of the monster as the story is told. Children will have fun and excitement as they look forward to completing the monster.
Use a ready-made slime for this activity, or make one green in color. Next, trace out the monster’s facial parts using the book’s die-cut patterns as a stencil. Trace them on the corresponding color of craft foam.
Refer to the pictures in the book for the accurate parts and colors. Note that the nose is bluish-green, the mouth is red, and the teeth are white. The monster’s hair is purple. Cut out the pieces and use them to retell the story.
Next, flatten and shape the slime on a flat surface. Build the monster one part at a time as the story progress. Place the parts on the slime and take them out according to the story.
For this activity, you will need:
- Green glitter slime
- Craft foams in different colors
- Yellow googly eyes
- Scissors
- Go Away Big Green Monster book
For more information on this activity, go to StillPlayingSchool.com.
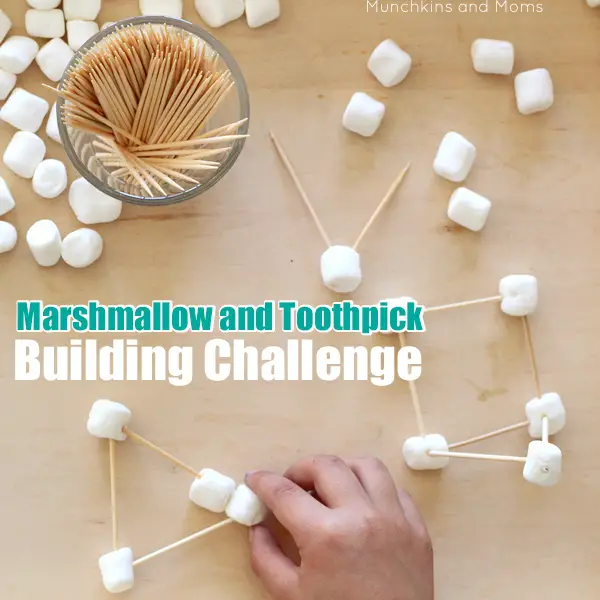
Challenge children to build different structures, shapes, and even the letter M with this STEM activity. Using marshmallows as connectors, children will learn to think critically and improve their fine motor skills while being creative.
As they make the structures, point out that the word marshmallows start with the letter M. challenge them to make the letter M using the toothpicks and the marshmallows.
Provide children with a big bowl of mini marshmallows and many toothpicks. Demonstrate how a marshmallow can be a connector by inserting the toothpicks gently. Next, have children try this out.
Once they are comfortable with the idea, challenge them to make simple shapes such as triangles, rectangles, and squares. Dare older children to create 3D shapes with the same materials.
Extend the activity by providing rules and criteria, such as building the tallest tower that will stand, making the biggest shape possible with limited materials, or the fastest one to make a given shape wins.
For this activity, you will need:
- Marshmallows
- Toothpick
For more information on this activity, go to PlayTeachRepeat.com.
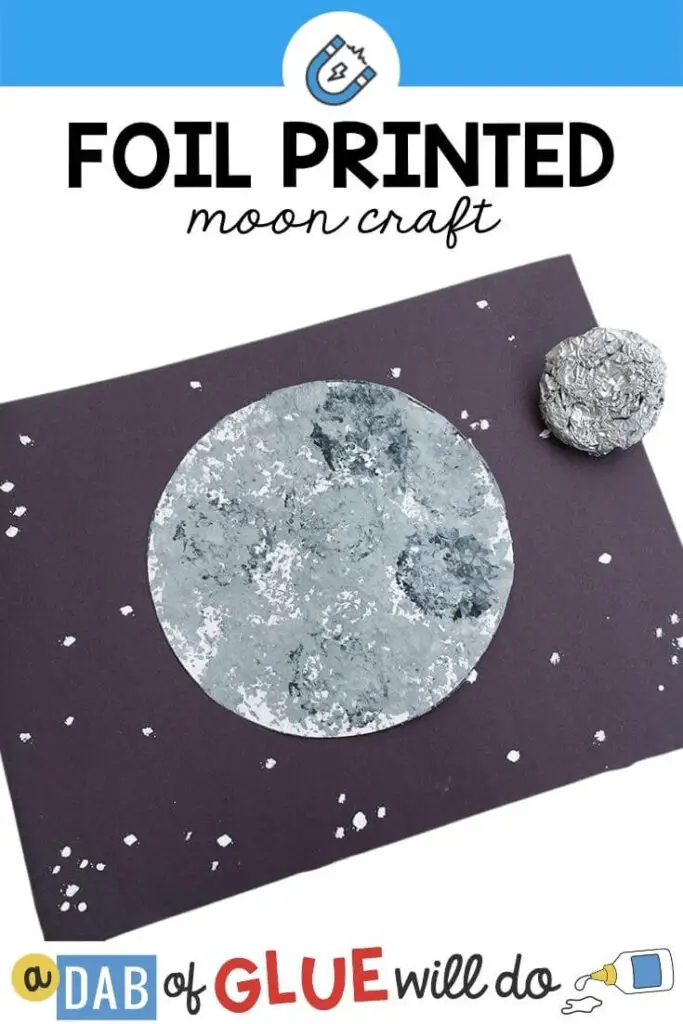
As children become aware that the word moon begins with the letter M, they will also learn more about astronomy with this simple craft that even young children can make.
Engage children with a lesson on space science as they make their version of the moon. Use this craft to go with the book “Moon! Earth’s Best Friend” by Stacy McAnulty.
The book discusses scientific facts, including the moon’s activity, phases, eclipse, and distance from earth. Working with craft and literature will help children gain valuable knowledge while debunking myths about the moon.
Take a white construction paper and find a circle big enough to trace on the paper. Next, form a stamping material by compressing a good amount of foil into a small cup. See the pictures on the site for this step.
Dip the foil stamp on the gray paint and gently press on the white circle until it is covered with color. Let this dry and cut out. Glue the gray circle on black paper.
Make tiny stars by dipping a small paintbrush in white paint and dabbing it on the black paper. Make sure the white dots are scattered, resembling the stars at nighttime.
For this activity, you will need:
- Foil
- Cup
- Construction paper
- Marker
- Paint
- Paintbrush
- Scissors
- Glue
For more information on this activity, go to ADabOfGlueWillDo.com.
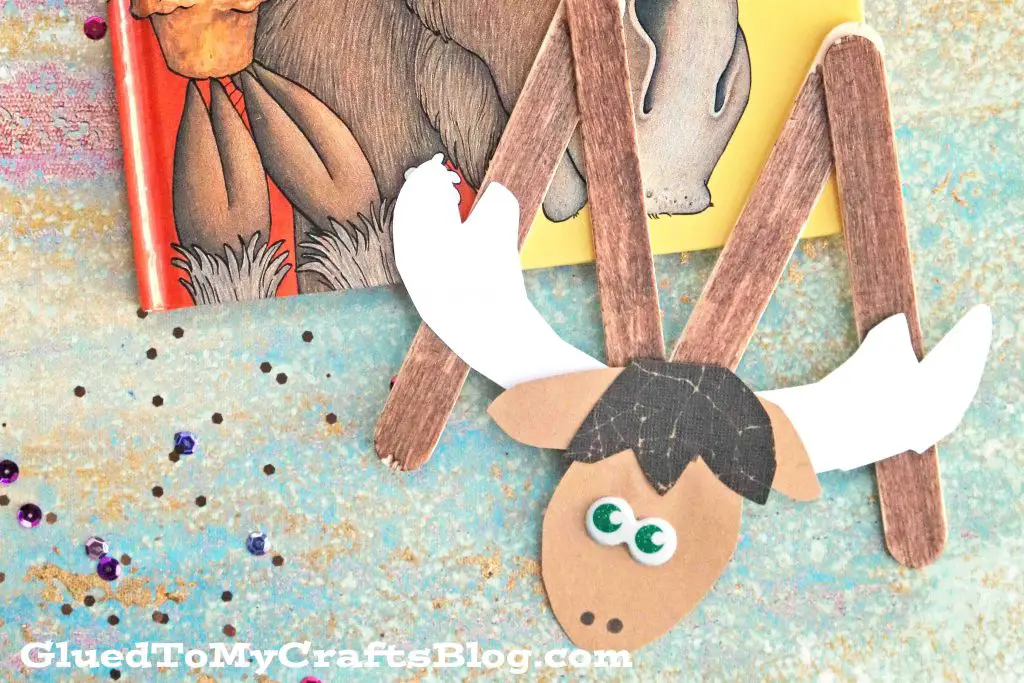
This moose craft is inspired by the book “If You a Moose a Muffin” by Laura Numeroff. It is a hilarious story about a series of disastrous events that started with a boy giving a moose a muffin.
Children will hone their fine motor skills as they cut, paint, and paste the pieces to make the moose while learning about the letter M.
Extend this activity as they improve their oral language skills and creativity by making a short story that supports learning the letter M sounds. Provide a sentence structure for them to follow.
For example, Marty the Moose (give an M name to the moose), who lives in Mount Majestic (give an M name to the mountain), loves to eat muffins.
Glue three craft sticks together to form the letter M. Paint this brown and let it dry. Outline the head on brown paper, the hair on black, and the antlers on white cardstock. No templates are provided, so check the pictures on the site for this step.
Cut out these pieces and glue them together to form the head. Once dry, attach to the pointy middle part of the letter M.
For this activity, you will need:
- Large craft sticks
- Paint
- Paintbrush
- Scissors
- Glue
- Cardstock
- Googly eyes
- Embellishments
For more information on this activity, go to GluedToMyCraftsBlog.com.
Conclusion
These letter M crafts are fun and have learning opportunities for children to explore. Let young ones experience the different methods of learning the letter through fun and engaging activities such as creative projects and stories.
Children will be motivated to learn when lessons are presented enjoyably. They will retain these concepts better if they are entertained while learning.
Thank you for reading.
Related activities and resources:


