The crab is one of the animals explored when teaching the ocean theme. This orange-shelled creature is so popular that it inspired books, songs, and even animated shows.
Most stories showcase the crab’s emotions and ability to use its pincers to help, attack, or defend itself. Let’s look at ten activities highlighting how amazing these sea creatures are.
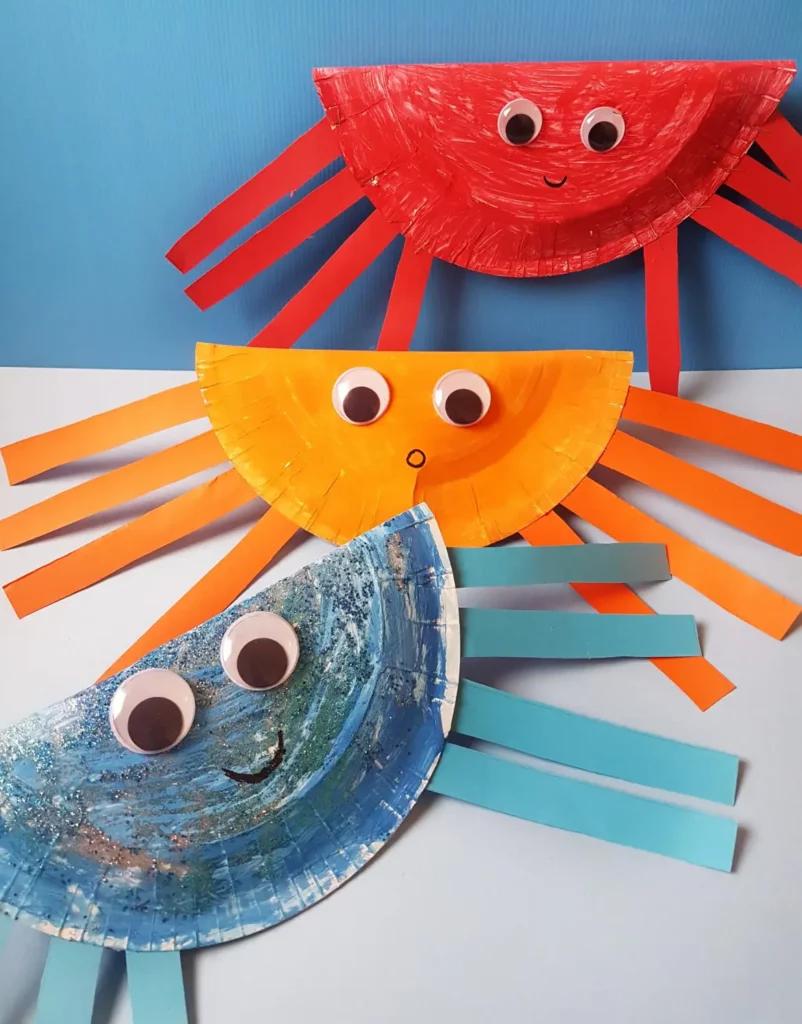
Easily tailored for young children, children can do this craft from start to finish. They are initially inspired by the book “A House for Hermit Crab” by Eric Carle, but other simpler stories can be used.
Create different colors of crabs to have a group. Let children know that a group of these animals is called a cast of crabs. Use these to teach colors and improve children’s cutting and pasting skills.
Start with painting the paper plate the preferred color. Once dry, fold it in half. Cut eight strips from the construction paper and insert each one between the edges of the folded paper plate.
Place the four strips on the left side and the other four on the right. The site recommends using a stapler for this step, which has sharp and pointy wires, so assist the children when necessary. Sticky tape or double-sided tape can be the safer option.
Finally, stick the eyes and use the black marker to draw the mouth.
For this craft, you will need:
- Paper plates
- Googly eyes
- Construction paper
- Scissors
- Glue
- Stapler
- Paint
- Black marker
To find out more about this craft, head over to ArtCraftandFun.com.
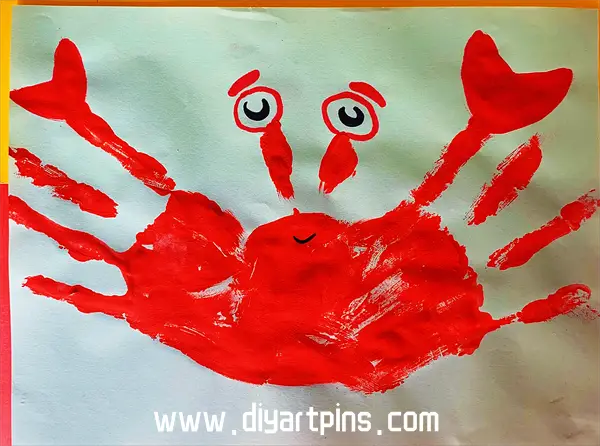
A lot of children find handprint crafts fascinating. They cannot seem to believe their handprints can turn into something else. This crustacean on paper is no exception. It is easy to make and will provide an excellent time for children.
Dip the children’s hands in paint or use a paintbrush to cover their palms with color. One hand may be enough to make the two prints.
Position the hands so that the handprints look like open wings, with the thumb facing north and the rest of the fingers towards the edge of the paper. Use the markers to draw the eyes.
Use the same red paint to make the crab’s pincers by pressing the child’s fingers on the thumbprint in a V shape.
Refer to the site for step-by-step pictures of the process of making this craft. There are different ways to make this crab unique. Check out DIYArtPrints.com for more details on how to make all these variations.
For this craft, you will need:
- White paper or cardstock
- Red paint
- Red and black markers
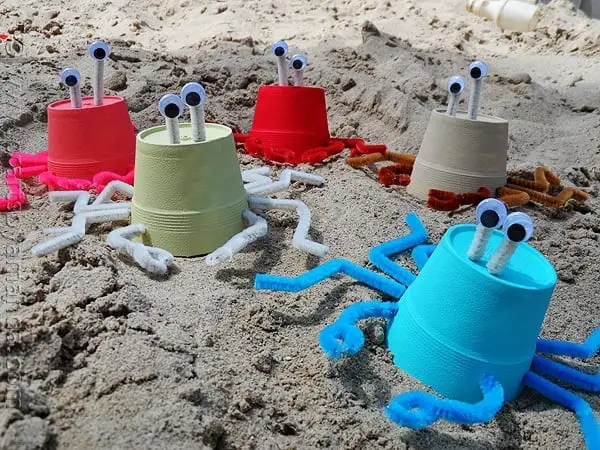
If heading to the beach or thinking about a perfect toy for the sandbox, this Styrofoam cup crab is a must-try. These can be used to hide items inside the cups and have children guess where they are.
Make several crabs and use different colors to help children practice identifying them. Use the pipe cleaner legs to teach counting. If using recycled Styrofoam, ensure it is thoroughly cleaned and dried for the paint to adhere well.
Start with painting the cups using acrylic paints in chosen colors. Use a double coat if necessary.
Cut the pipe cleaners and follow the instructions on CraftsByAmanda.com to properly bend and twist them to make the legs and pincers. Attach the googly eyes on two beige pipe cleaners.
Use a toothpick to poke holes in the cups. Insert the wires one at a time. To make them sturdy for sand play, use craft glue. Ensure that the craft is dry and stable before using.
For this craft, you will need:
- Styrofoam cups
- Pipe cleaners
- Googly eyes
- Paint
- Scissors
- Craft glue
- Paintbrush
- Toothpick
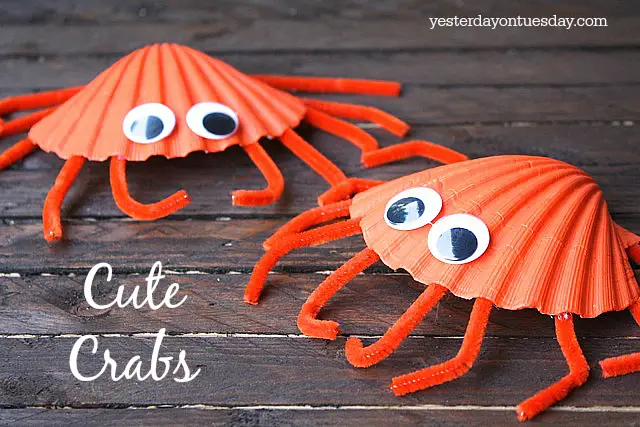
This craft is an excellent way to use up those shells that have been collected years ago and are now gathering up dust. Use different types of clamshells for a unique-looking cast of crabs.
Clean the shells very well and ensure they are dry before painting. Check to make sure that there is no funky or fishy smell to the shells. If there is, repeat the cleaning process and disinfect properly.
Once the shells are ready, have the child paint them orange and let them dry thoroughly. Cut the pipe cleaners about 2.5 inches for each leg.
Attach them by flipping over the shell. Use craft glue to secure the legs. Let this dry. Lastly, attach the googly eyes.
Using different types of shells will help children learn to group them based on textures, shapes, sizes, and patterns. Identifying and grouping these features is an important skill to master. These may also be used as counters for a counting activity.
Attach a small piece of paper with numbers, letters, shapes, and other drawings to use as a memory game.
For this craft, you will need:
- Craft shells
- Orange pipe cleaners
- Orange acrylic paint
- Scissors
- Craft glue
- Googly eyes
For more information about this craft, go to YesterdayOnTuesday.com.
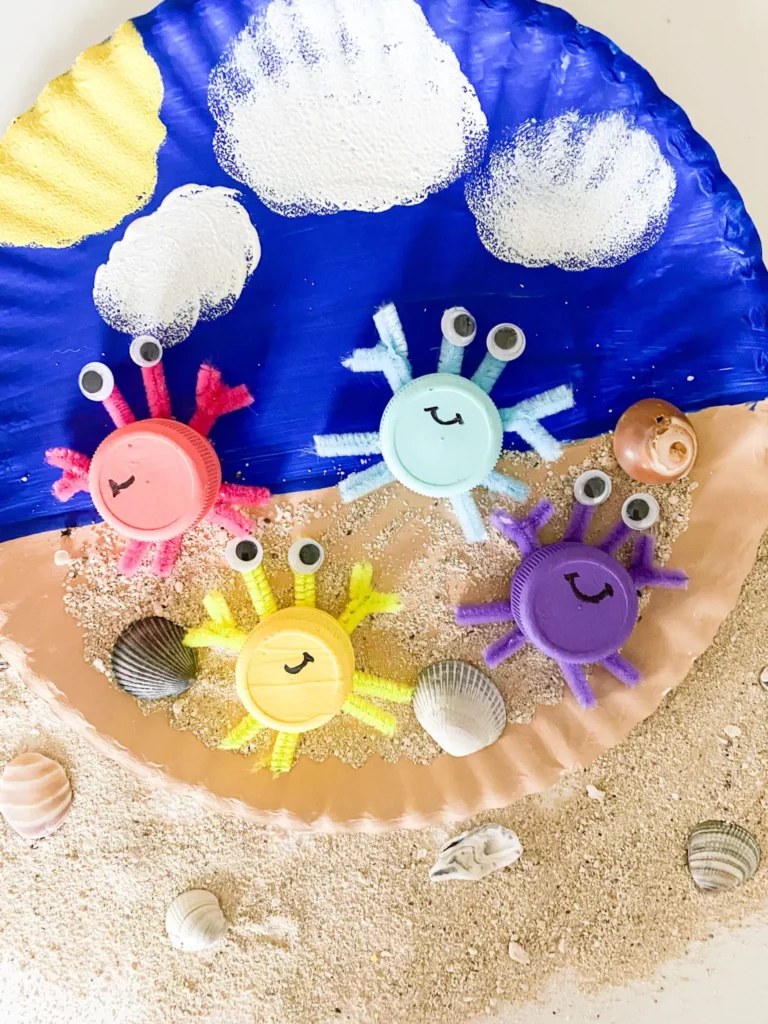
Consider uncapping all plastic bottles before taking the trash out. These will make a colorful cast of crabs that will provide endless excitement for children.
Make sure to use clean and dry bottle caps. Paint them in colors that match the pipe cleaners. Let the paint dry.
Cut the pipe cleaners to about an inch for each leg. Cut half an inch of the pipe cleaner for the pincers and twist it onto the leg. Attach the legs to their corresponding bottle cap using a hot glue gun.
Attach the eyes to 2 pipe cleaners. Use the black marker to draw the mouth. Before using them for play, check that all the pieces are securely in place.
Remember that a crab has ten legs. Small bottle caps will limit the number of legs that can be placed. Use bigger plastic bottle caps to have enough space for the ten legs.
Let the child paint the paper plate to recreate the exact scene in the picture. Use beige to cover half and blue for the top part.
Once dry, add white clouds and yellow sun. Allow the paint to dry before adding the sand and shells for good sensory play.
These bottle cap crabs can also be used for sensory tubs or tables in centers to go with the different shells.
For this craft, you will need:
- Plastic bottle caps
- Acrylic paint in different colors
- paintbrush
- Pipe cleaners
- Googly eyes
- Scissors
- Hot glue gun
- Black marker
- Paper plate
- Sand
- Shells
To find out more about this craft, head over to ABCDELearning.com.
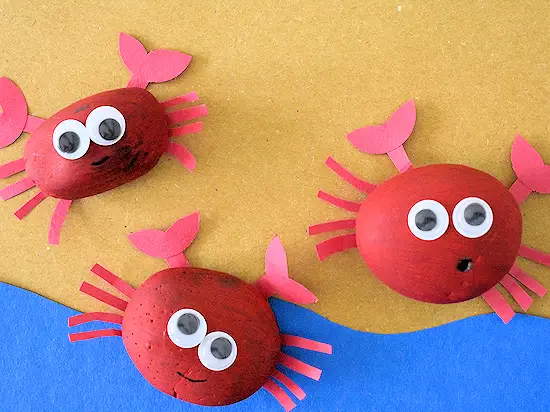
These adorable crabs can double as paperweights and are perfect gifts to make for Mother’s Day or Father’s Day. Draw different mouths to convey other emotions.
This craft is a great companion for the book “Crabby Crab” by Liza Charlesworth, which explores different scenarios that make the character happy or crabby.
Use clean and smooth rocks for this activity. Paint them red and let them dry. Use different sizes of rocks for an exciting cast of crabs.
Use the red cardstock to cut out an oval shape slightly smaller than the rock. This part should fit and remain unnoticeable under the rock.
Cut strips of red cardstock to make the legs. Cut out a circle or use a puncher with the remaining cardstock. Cut a V in the middle of the circle to make the pincers. Glue the paper pieces together.
Once dry, attach the paper part underneath the rock. Add the eyes on the rock and use the black marker to draw the mouth.
Refer to the pictures on OurKidThings.com for detailed instructions on making these rock crabs.
For this craft, you will need:
- Rocks
- Red paint
- Paintbrush
- Red cardstock
- Googly eyes
- Black marker
- Craft glue
- Scissors
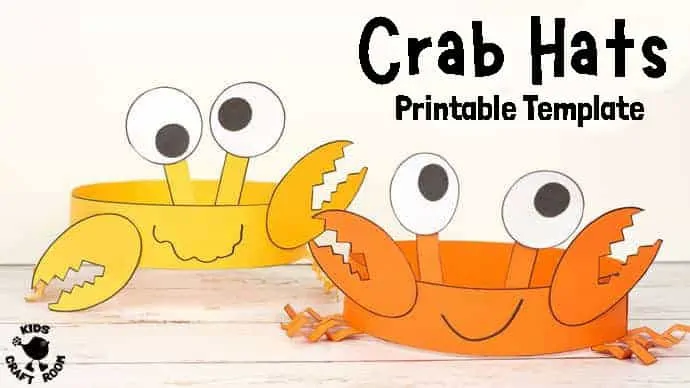
These crabs are the perfect headdress for storytelling and stage plays. This craft is ideal for children who are working on their cutting skills.
The site provides a template that can be downloaded in color and black and white. To save on printer ink, choose black and white, then cut and trace on colored cardstock.
Cut out the pieces and assemble them using glue. Fold the legs in a zigzag manner to add dimension to the legs. Use the black marker to draw the mouth. Let the child choose the final look of the crab.
Experiment with the different looks of the crabs by varying the position of the pupils and drawing a squiggly line for the mouth to make a silly look.
Use a straight line for a serious-looking crab and a downward U for a sad crab. Doing this will help children learn different emotions.
Measure the head of the child to ensure that it will fit perfectly. The site recommends using a stapler to attach both ends of the hat. Use double-sided tape as an option for a safer crab headgear.
For this craft, you will need:
- Crab template
- Colored cardstock
- Scissors
- Glue
- Black marker
- Stapler
To find out more about this craft, head over to KidsCraftRoom.com.
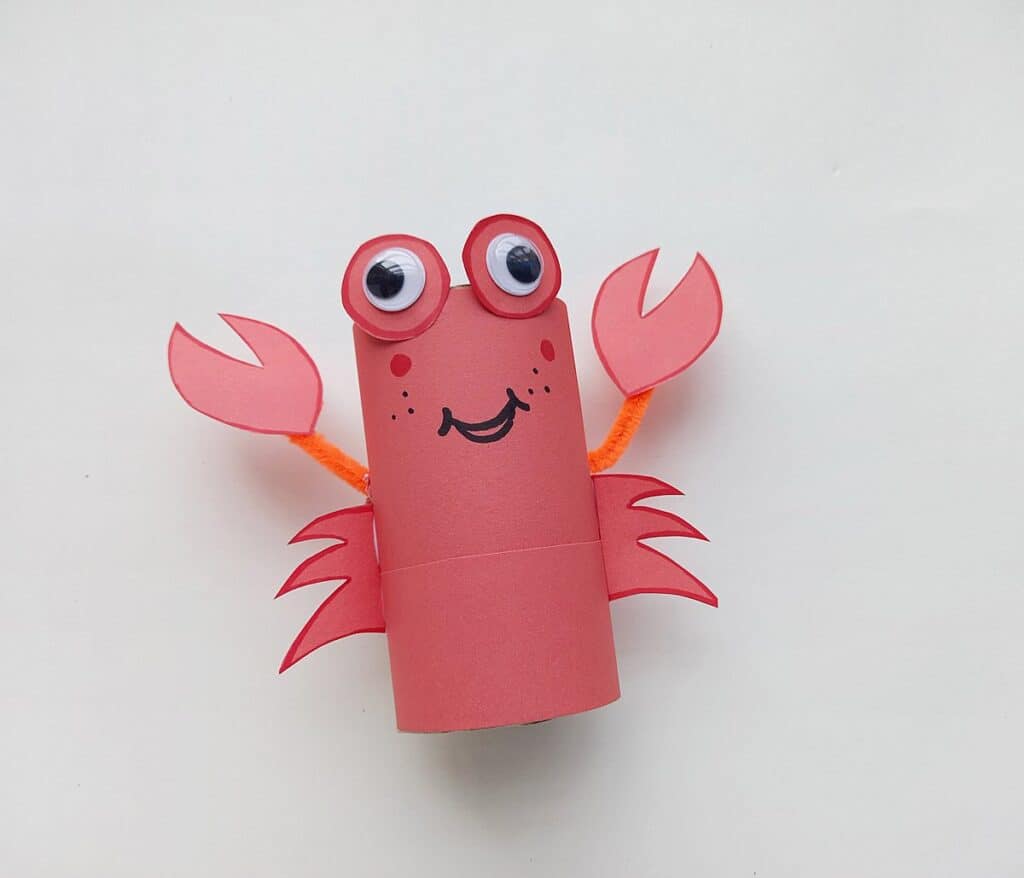
Use this craft as a companion to the book “Clumsy Crab” by Ruth Galloway. Recreate the story by making a stage play using toilet paper crafts.
The giant pincers on this craft are enough to make the story lively and entertaining to young listeners. Make different toilet roll animals to complete the group of friends in the story.
Download the free crab template from BigFamilyBlessings.com. Next, cut out the pieces and trace them onto the red or orange cardstock. Cut the parts and assemble the crab.
First, use a big rectangle of paper to cover the toilet roll. Use glue to secure the ends. Attach the googly eyes on the circles. Add the legs and the eyes on the toilet roll.
Next, cut the pipe cleaner in half and attach the pincers. Use a sharp object to poke the sides of the toilet roll. Insert the pincers. Use a black marker to draw the mouth of the crab. Now it’s ready!
For this craft, you will need:
- Crab template
- Toilet paper roll
- Red or orange cardstock
- Black marker
- Orange pipe cleaner
- Googly eyes
- Red marker
- Glue
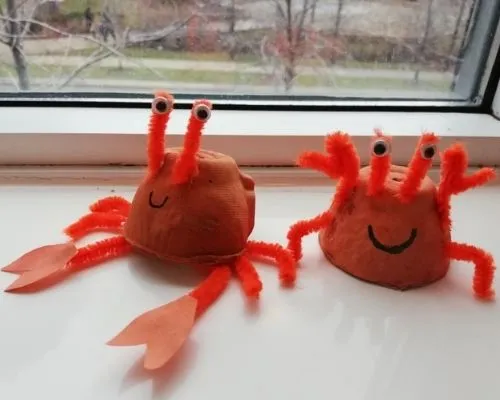
Make a lot of these egg carton crafts to teach children about the migration of the red crabs on Christmas Island. Because these are small, they are the right size to make it look like a swarm of red-legged creatures.
Use videos and pictures to explain that these crabs are unique and that the massive number of crabs going to the island late in the year is natural. Let the children know that female crabs hatch their eggs on the island.
Start with cutting the egg carton into individual cups. Paint each cup orange and wait for it to dry. Cut one pipe cleaner into two and attach the googly eyes. Poke holes and insert the eyes on the top part of the cup.
Next, cut another pipe cleaner into four. Stick these on the cups after poking holes. To make the crab realistic, add ten legs instead of just four.
Cut out a V shape using the orange cardstock for the pincers. Attach them to the pipe cleaners and position them just below the eyes.
For this craft, you will need:
- Egg carton
- Orange paint
- Orange pipe cleaners
- Googly eyes
- Black marker
- Orange cardstock
To find out more about this craft, head over to SweetAndSourToddlers.com.

Create this beach scene using available materials. This picture-perfect moment can be framed and displayed for everyone to see and admire.
This craft is effortless. Young children will require minimal assistance from adults. To start, decide how many crabs will be in the picture.
For two crabs, cut the blue construction paper into an 8-inch square. Add one or two more crabs for the full-sized construction paper.
Use the brown paper bag to make the sand part in the picture. Cut a decent size that will cover a third of the paper. Glue this on the bottom part.
Cut the cupcake liner in half and glue them on the sand part. Position the liners so that the straight edge rests on the sand. Add mouth and legs using a red marker. Draw two long legs for the portion with pincers.
Fold another cupcake liner and cut a V shape. These will be the pincers. Attach them to the front legs. Glue the eyes on top of the curved part of the liner. Use the white crayon to draw wavy lines for the water.
Add sequins on the sand part as an option. Use this activity to explain the habitat and behavior of crabs.
For this craft, you will need:
- Red mini cupcake liners
- Blue cardstock
- Brown paper bag
- Googly eyes
- Red marker
- White crayon
- Scissors
- Glue
For more details about this craft, go to IHeartCraftyThings.com.
Conclusion
The crab activities on this list are simple and easy to make. They can be used for a variety of purposes-as props, to tell stories, to count, to learn numbers and letters, to learn about emotions, and many more.
Find a craft that will serve its purpose in your class. Use it to make your lessons more fun and exciting for children while informing them that these animals are unique.
We hope you liked our list. Thank you for reading!
Other animal crafts you might find interesting:


