Children love doors that are inviting and colorful. These decorations provide a glimpse of fun and enjoyment. The different colors and themes are not just a feast for the eyes.
They are also meant to pique the children’s interest by giving them a chance to explore and feed their senses through the different tactile materials, which provide unique texture that stimulates curiosity and creativity.
Look at this list that provides door decoration ideas for every season and theme.
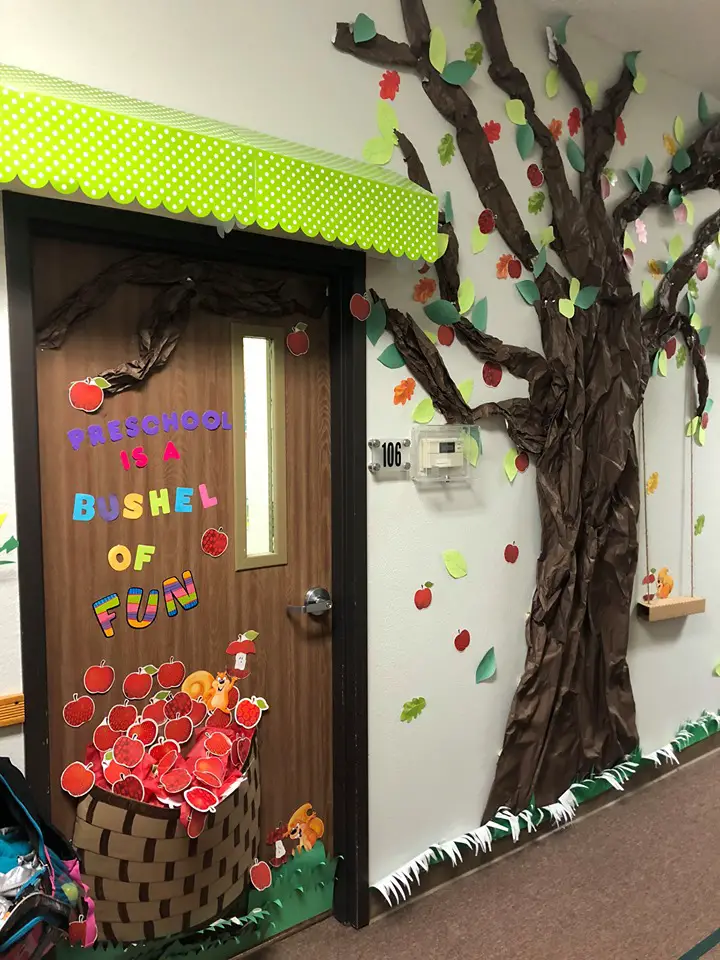
The tall crinkly tree, falling leaves, and a container overflowing with apples are the stars of this door. The leaves in different shades of yellow, green, red, and orange seem to foretell that fantastic moments are about to unfold behind the door.
This decoration is an excellent way to practice color recognition and counting skills. They can also find matching leaves based on color or design.
To make the impressive tree, start by marking the section on the wall where the tree will be placed. Lightly crimp or crumple the dark brown paper and attach it with masking tape.
Cover all the areas for the tree, making sure the crinkles are aligned, and the papers are overlapping. Extend the tree by making the branches stick out, reaching the door’s top part.
Next, cut out different shapes of leaves from colored cardstock. Use the fall colors for these. Score each leaf to make the veins stand out. Use a black marker to outline. Attach these to the tree.
Make the bushel by cutting the light brown kraft paper into a big square. Use dark brown to make a woven pattern on it. Attach this to the door, ensuring a pocket is created for the apples.
Cut out apples from red cardstock. Stick them in the bushel in a manner that looks like it is overflowing.
Make the green grass from paper. Carefully line the bottom edges of the door and wall. Use pens to curl some of the grass blades.
Lastly, cut out letters from colored cardstock that spells “Preschool is a Bushel of Fun.” Use different colors of paper, but make sure the font is simple to read for children.
For this activity, you will need:
- Colored kraft paper roll in dark brown, light brown, and green
- Colored cardstock
- Masking tape
- Scissors
- Black marker
For more information on this activity, head over to TeachersMag.com.
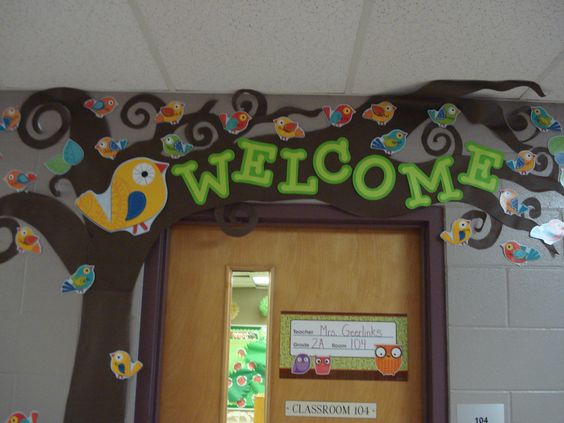
The giant mama bird with a bunch of baby birds perched on a curlicue tree screams a loud welcome to everyone who wishes to enter. It evokes a sense of calm while encouraging children to take risks and travel in a wonderland.
The tree and its curly branches overhang the door and extend to the ceiling. This oversized tree is a conversation starter for children on growth. It is also good to practice their numbers as they count the birds.
Find an outline of a curlicue tree to copy. Use the design to resize and cut into pieces. Add as many curls as possible to make the tree look massive and thick. Assemble the tree by the door using masking tape.
Use colored cardstock to create the mama bird and the baby birds. Ready-made bulletin board decorations can also be used. Attach them to the branches, ensuring they are evenly distributed throughout the tree.
Next, print the word welcome using a large-size font that is simple for children to read easily. Use uppercase for all letters and choose a catchy color that stands out.
Stick the letters on the longest branch just above the door.
For this activity, you will need:
- Dark brown kraft paper
- Colored cardstock
- Scissors
- Masking tape
For more information on this activity, head over to ChildCareRenovation.com.
See Also: Bird Activities for Preschool
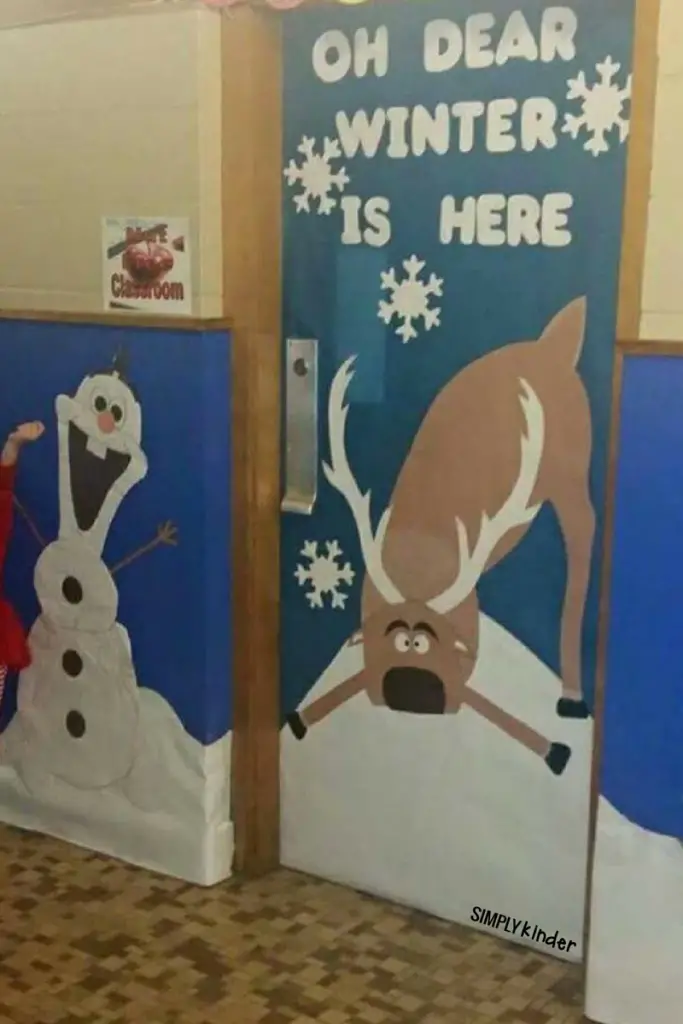
Who can forget Olaf, the loveable snowman from the movie “Frozen”? No one! That’s for sure! And this winter decor proves that he and his lines are immortalized in the minds of the little ones and the not-so-little.
Let’s not overlook the pun for the adorable reindeer, Sven. He and Olaf seem to show their goofy side in this decor, which is quite endearing for the fans of this movie.
This decor is a great conversation piece for children to discuss the different things they can find and do during winter. Talk about what makes this season unique. Include clothing, food, and activities.
Add many snowflakes in various sizes and designs for them to count and match. Add snowflakes on the white background for children to find a “Hidden Object.”
Cover the door with blue kraft paper and masking tape. Add a mound of snow using white paper. Cut the paper in a curved pattern resembling a snow pile on the ground.
Outline the reindeer in brown paper while Olaf in white. Cut these out. Position them properly and attach them to the blue background.
Use the black kraft paper to cut out details such as the nose and hooves of Sven and Olaf’s buttons, mouth, and hair. Attach these parts to complete the character.
Add cut-out snowflakes in random places. Lastly, use the white paper to cut out the letters for the line “OH DEAR WINTER IS HERE” to go with Sven. Use orange paper for Olaf’s iconic line, “I LOVE WARM HUGS.”
For this activity, you will need:
- Kraft paper in different colors
- Masking tape
- Scissors
For more information on this activity, head over to SimplyKinder.com.
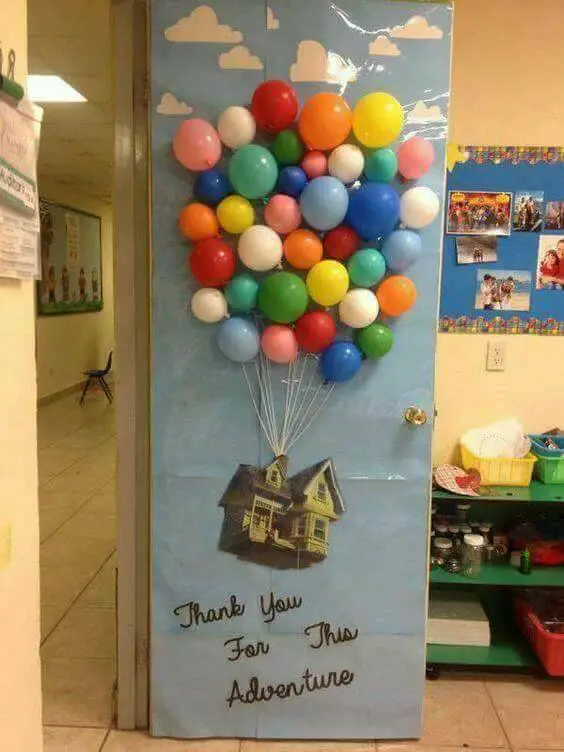
This 3D version of balloons is reminiscent of the movie “Up” scene and is a delight for every Russel. It will undoubtedly take a lot of effort to get children to go inside and not linger by the door.
Start with creating the background for the sky. Cover the door with light blue kraft paper. Cut out clouds from white cardstock. Stick them on top of the door.
Next, blow up the balloons. Use the regular round-shaped balloons but in different colors. Vary the amount of air in each to create mismatched sizes. Once all are filled, set them aside.
Stick the picture of the house on the bottom of the door. Position it well so the balloons occupy one-third of the door’s space. Add the cut-out of letters that form the line “Thank You For This Adventure.”
Cover the whole door with a thick transparent plastic cover. This step will enable the masking tape to adhere better to the surface. This step will hold the balloons well in place.
Cut ten strings no less than twelve inches. Tie them together on one side and attach them to the house picture. Use sticky tape to arrange them and make it look like they hold together a massive bunch of balloons.
Start sticking the balloons one at a time, making an arrangement of various sizes and colors. The result should look like a huge bouquet. Secure them well with more tape if necessary.
Use this decor to play a guessing game. Without counting, have the children guess the number of balloons. Add or take away a few balloons daily so that the total number changes daily.
For this activity, you will need:
- Light blue kraft paper
- White cardstock
- Printed picture of a house
- Party balloons
- Balloon air pump
- White string
- Scissors
- Masking tape
For more information on this activity, head over to KidsArtNCraft.com.
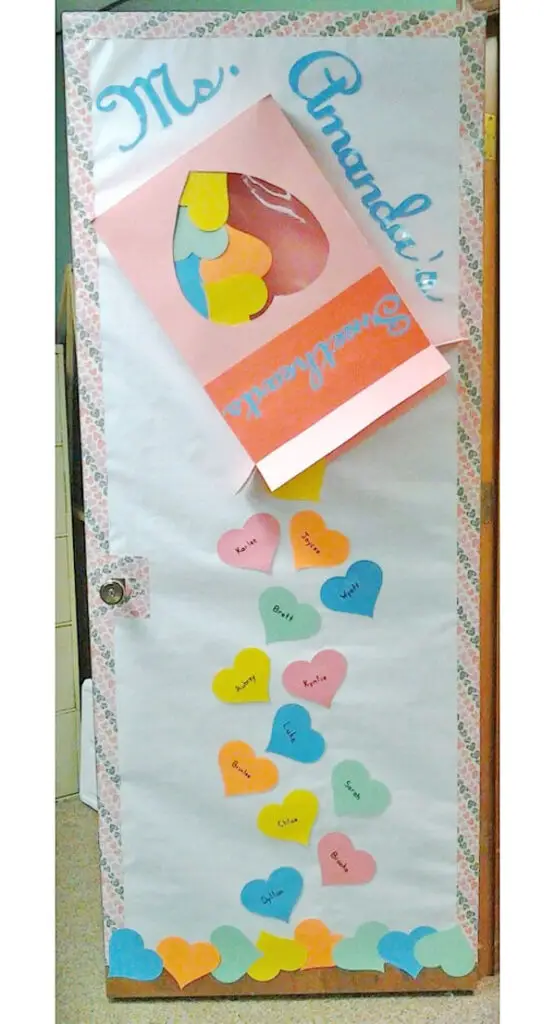
The quintessential symbol for Valentine’s Day, one can find hearts in every classroom decor. What sets this decor apart is the candy-inspired theme.
When in a pinch for time and resources, this decor is a great option.
Cover the door with white kraft paper. Using the pink cardstock, create a box that resembles the Sweetheart Candy.
Cut out a heart shape in the middle and use the transparent plastic film to the heart-shaped hole. This step will create a window in the box.
Print out the word “Sweethearts” using orange paper. Choose a cursive font to give it an authentic look. Attach this to the door in an upside-down position, looking like a box is spilling the heart-shaped candies.
Next, cut out heart shapes of different colors. Stick some of them inside the box where they can be seen through the plastic covering.
Write the children’s names on the rest of the hearts and stick them on the door.
Use the box to hide a mystery word related to the day’s topic. Have the children take turns guessing it. Provide clues if necessary.
For this activity, you will need:
- White kraft paper
- Colored papers
- Black marker
- Masking tape
- Scissors
- Pink cardstock
- Transparent plastic film
For more information on this activity, head over to OneCreativeMommy.com.
See Also: Preschool Heart Crafts
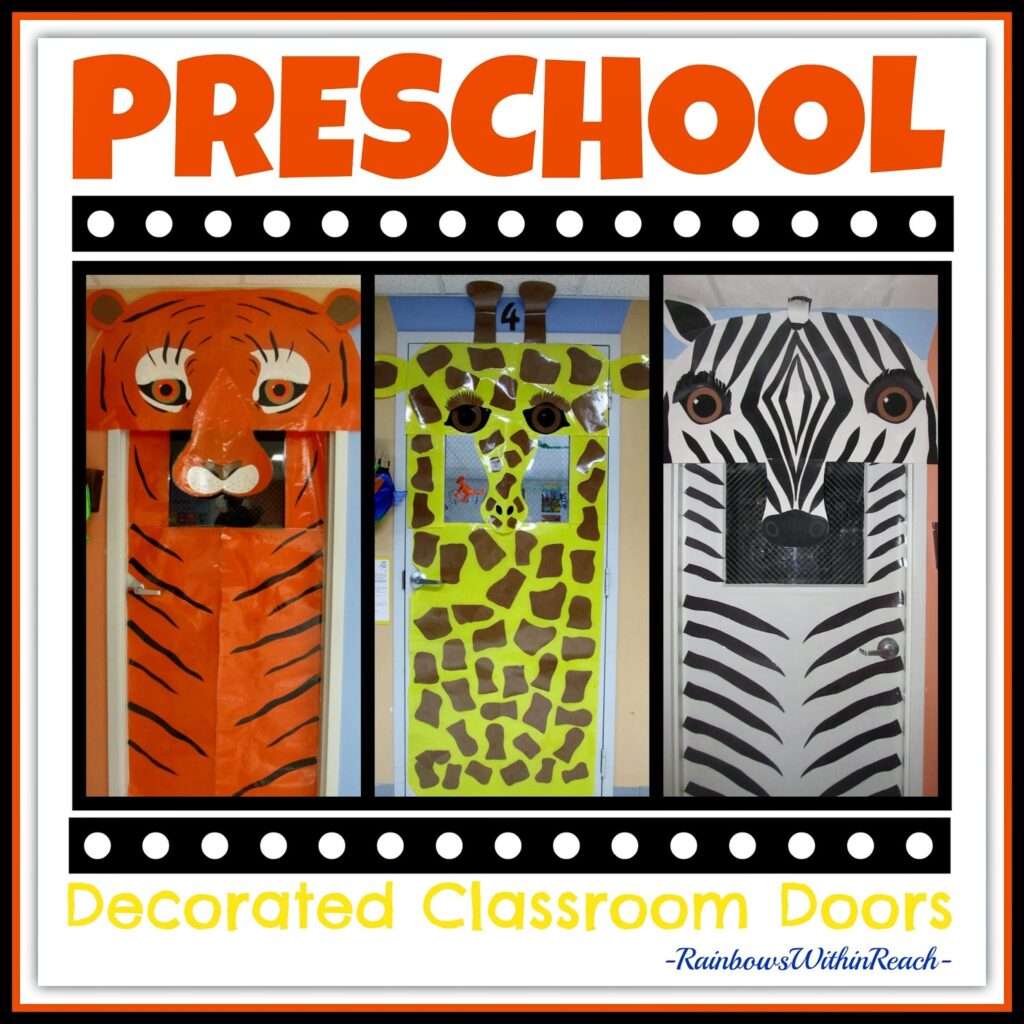
These zoo-themed doors create an air of mystery that kids would love to explore.
These creative decors foster language learning by getting children to pay attention to the details and use language to describe what they see, including the similarities and differences.
Cover the door with kraft paper corresponding to the chosen jungle animal. Use orange for tiger, yellow for giraffe, and white for zebra. Use masking tape to secure these on the door very well.
Add the details such as black stripes for the tiger and zebra. Use black cardstock to make them. Cut out the rest of the details for the tiger and zebra, such as their noses and ears.
Use brown cardstock to make the markings on the giraffe. Use the same color for the horns and inner ear. Be sure not to obstruct the view of the door has a built-in window.
Use these doors to engage children in a discussion about jungle animals. Talk about their characteristics and unique qualities. Use storybooks to support the discussion.
For this activity, you will need:
- Orange, yellow, or white kraft paper
- Black and brown cardstock
- Scissors
- Masking tape
For more information on this activity, head over to RainbowsWithinReach.blogspot.com.
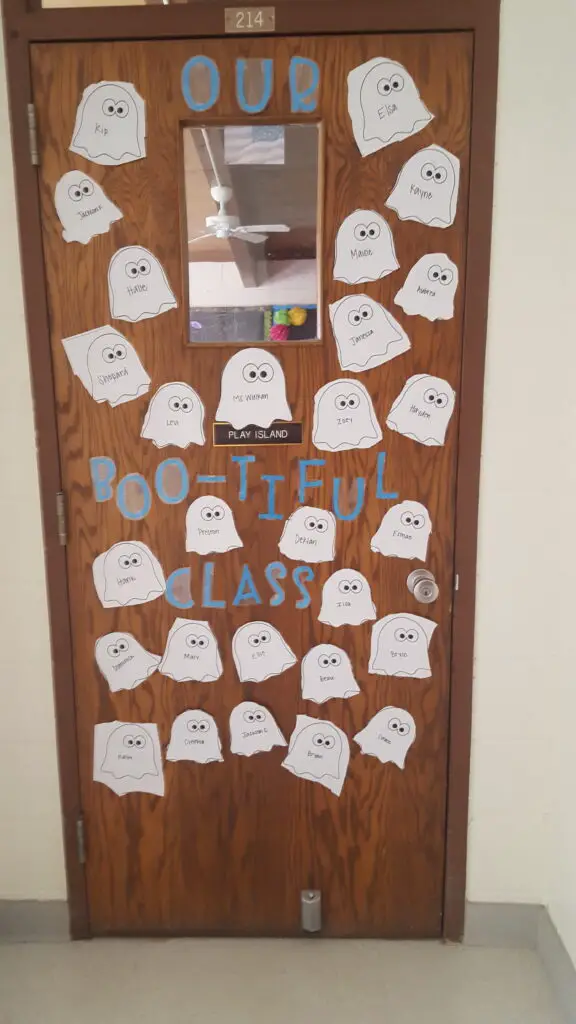
Halloween is a time for scary and spooky characters. However, when in a rush and there is no time to decorate, one can opt for simplicity.
Here’s a quick and simple door decor for Halloween. Print out ghost illustrations on white paper. Write the children’s names on each and stick them on the door.
Print or cut out letters to the perfect pun that says “OUR BOO-TIFUL CLASS .”Stick these words on the door between the cluster of ghosts.
A fun way to make this door engaging is to print other ghosts. Choose ghost illustrations that are unlike the ones on the door, such as a cross-eyed ghost, a ghost making a face, a ghost wearing a witch’s hat, etc.
Place it somewhere on the door for the children to find. This practice is an excellent way to improve children’s scanning ability.
Replace the odd ghost every day. Use the characteristic of the odd ghost of the day to review and recall the traits of the previous ghosts.
Keep the odd ghosts previously used. If they could not remember what yesterday’s ghost looked like, bring it out as a prompt.
This activity is also great in helping children improve their memory.
For this activity, you will need:
- Printed ghost illustrations
- Black marker
- Letter cut-outs from colored cardstock
- Scissors
- Masking tape
For more information on this activity, head over to FarminTeacher.com.
See Also: Ghost Crafts for Preschool
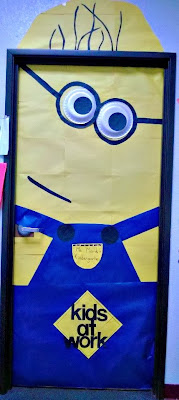
It is safe to say that almost everyone loves these yellow creatures in blue jumpsuits. This minion is adorable and easy to make as a door decor. This door will be a crowd pleaser.
Use the yellow kraft paper to cover the door. Extend this beyond the door to complete the minion’s whole head. Attach two styrofoam bowls to make the eyes.
Cut out circles from black cardstock and stick them on the bowls. Use the black marker to draw the eyeglasses, hair, and mouth.
Next, use the blue kraft paper to make the jumpsuit. Stick this on half of the door, ensuring the handle is uncovered.
Cut a diamond shape and write the words “kids at work” from the yellow kraft paper. Cut a half circle for the pocket. Stick them on the jumpsuit.
Make this decor functional by attaching a cereal box or a Ziploc bag behind the diamond shape. Every day, have a strip of paper with a word of encouragement. Read this aloud in class. Explain what this means to the children.
Place the paper inside the box on the door. Let the children know that they may get one when they feel down.
An option is to make several copies of the word of encouragement for the day. Children may choose to get one and bring it home. Let them have a collection of these words, and let them choose their favorite.
For this activity, you will need:
- Yellow and blue kraft paper
- Black cardstock
- Black marker
- Styrofoam bowls
- Scissors
- Masking tape
For more information on this activity, head over to CraftyMorning.com.
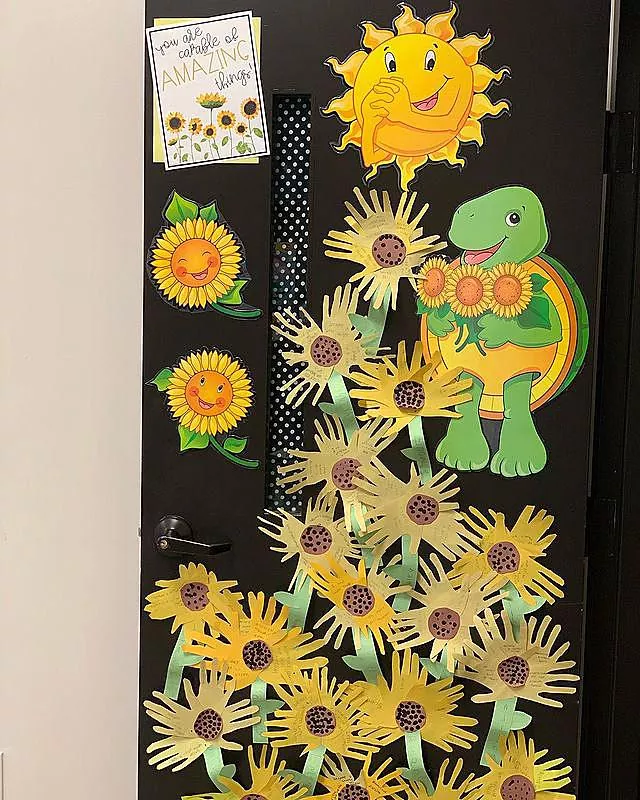
It is always good to involve children in designing the classroom. For example, this door is decorated with a bunch of sunflowers using children’s handprints.
Imagine how proud these children must be. Not only will the door be inviting and lovely to look at, but it also serves to showcase their masterpieces.
Use black kraft paper to cover the door. The yellow flowers will look stunning against the dark background.
Have children trace two sets of their hands on yellow paper. Cut and set aside. Cut circles from brown construction paper. This part will become the center of the sunflower. Use the black marker to add dots.
Assemble the sunflower by gluing them together. Place one handprint on top of the other, arranging them to form a circle. Use the yellow paint to add a darker shade of yellow to the handprints.
Stick the brown middle part of the flower. Cut out strips and leaf shapes from green construction paper. Glue the sunflower on the strip and add the leaf.
Next, arrange the sunflowers on the door to form a tall bouquet. Use the masking tape to hold them together. Add a picture of the sun and other related illustrations that go with them.
Print a sign that says, “You are Capable of Amazing Things!”
Use this fabulous decor to count bigger numbers. Let the children count as many fingers as they can or count the number of dots on the center of the sunflowers.
Use this to help children learn to skip counting. Start with counting by 5s since each hand has five fingers. Have children practice skip counting by modeling the process for children.
For this activity, you will need:
- Black kraft paper
- Yellow, brown, and green construction paper
- Yellow paint
- paintbrush
- Glue
- Scissors
- Black markers
- Masking tape
For more information on this activity, head over to TeachersParadise.com.
See Also: Sunflower Crafts for Preschool
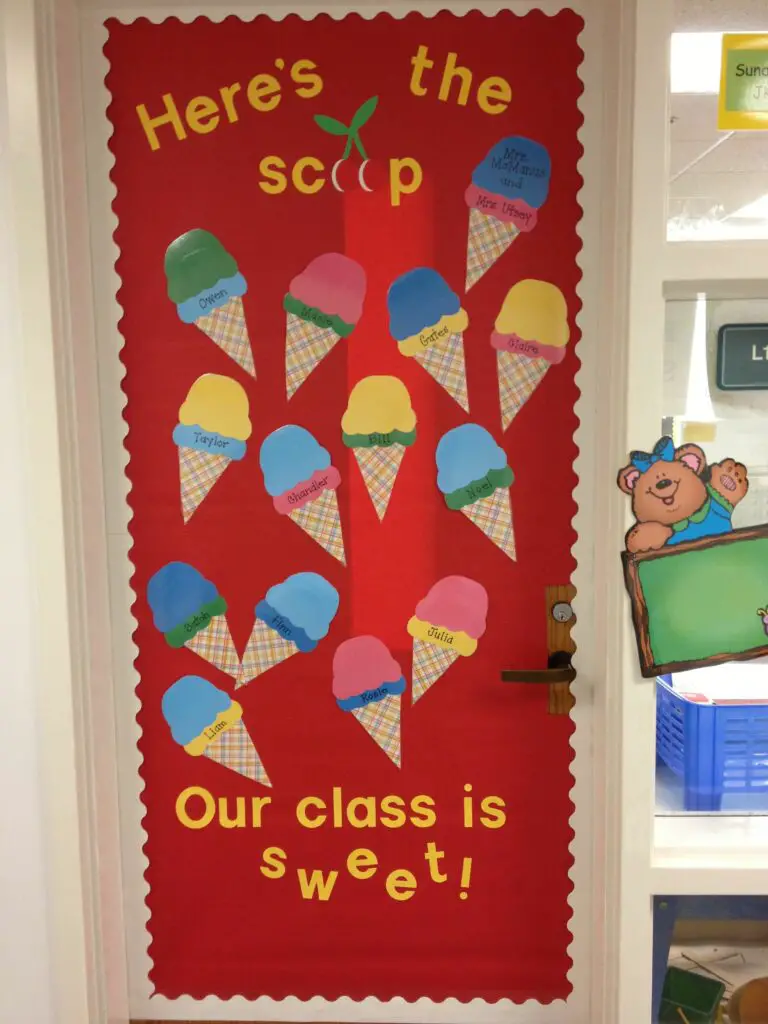
Sun, sand, and the beach are good concepts that signal summer is coming. But don’t overlook the tasty treats to beat the heat!
This ice cream summer decor is drool-worthy simple yet colorful. Children may help in putting the decors together. They can help cut and assemble the ice cream or even write their names on each one.
Cut ice cream scoop shape from construction paper. Use different colors for this. Glue two scoops together and set them aside.
Cut a triangle for the ice cream cone from the paper with the checkered print. Use a gift wrapper or scrapbook paper; if unavailable, use the printer to make one.
Attach the two scoops of ice cream to the cone with the child’s name. Use masking tape for these to adhere. Arrange them on the door. Cut out letters to make the words “Here’s the scoop” and “Our class is sweet!”
Replace the two letter O on the word scoop with a cut out of cherries using red and green construction paper.
Use this decor to jumpstart a Science lesson. Using the line, “Our class is sweet,” talk about the different flavors of food and the sense of taste. Start with sweet edibles such as fruits, candies, honey, etc.
Tape a picture of food with the ice cream to give children an idea of the discussion. The next day, choose a different flavor and repeat the process.
For this activity, you will need:
- Red kraft paper
- Construction papers in different colors
- Paper with checkered print
- Scissors
- Glue
For more information on this activity, head over to MagzHouse.com
See Also: Ice Cream Crafts for Preschool
Conclusion
Each one of these doors is a gateway to learning. Use these door decorations to arouse children’s curiosity by providing simple activities. These will extend the purpose of the decors more than aesthetics.
Make door decors meaningful by allowing children to participate in the process. Allow them to help in the planning and preparation. The final output will give each one a sense of pride in their accomplishments. And because they have put effort into making their classroom door attractive, they will be more excited to learn and cautious about keeping the decorations intact.
Be sure to try these decorations. Thank you for reading!
You might also want to check out: Preschool Birthday Board Ideas


