It’s raining, it’s pouring, but that doesn’t mean you can’t have some fun! As the weather warms up and spring rain showers become more frequent, why not celebrate the season with some fun umbrella crafts? These ten umbrella crafts are perfect for preschoolers, whether it’s a rainy day or any day. They’re also great for learning about colors, shapes, and counting.
Great Preschool Umbrella Crafts
With so many different options to choose from, there’s sure to be an umbrella craft that’s perfect for your preschooler. From shaving cream umbrellas to paper plate umbrellas, there’s something for everyone. And what could be more fun than making an edible umbrella craft or a pom pom umbrella?
So grab your supplies and let’s get started! These preschool umbrella crafts are sure to be a hit with your little ones.
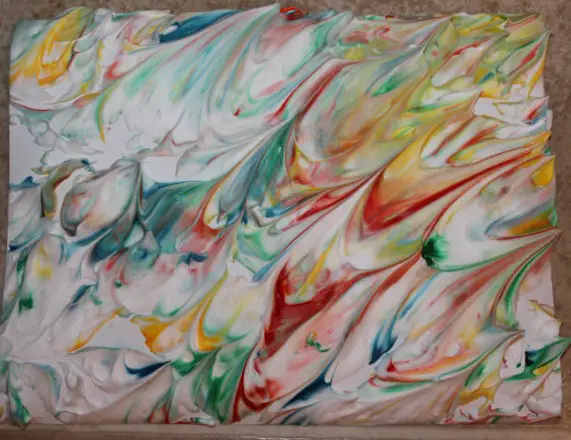
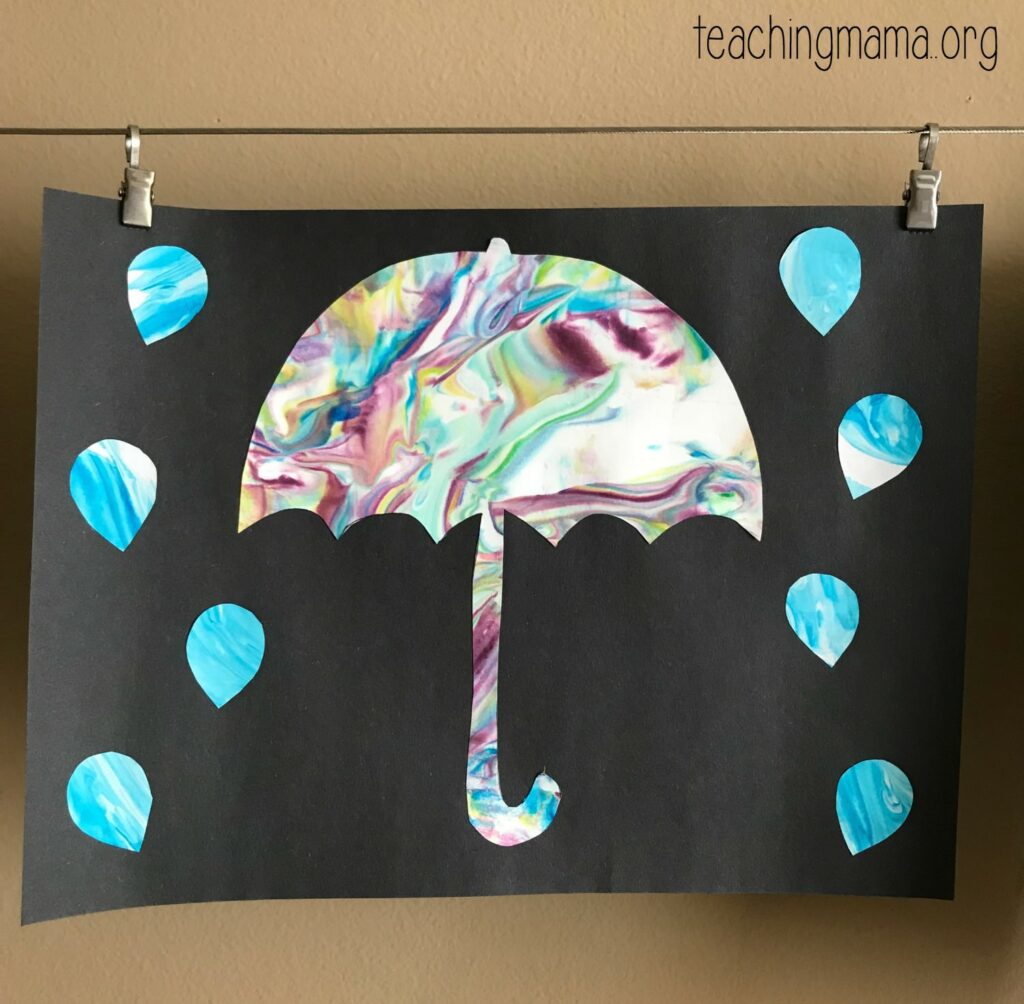
If you’re looking for a fun and easy rainy day craft for your preschooler, look no further than this innovative shaving cream umbrella craft! All you need is some shaving cream, food coloring, a baking sheet, knife, card stock paper, scissors, glue, and black paper. Plus, we’ve included a handy umbrella template to make things even easier.
To begin, spray shaving cream over a baking sheet. Next, pour food coloring around the perimeter of the sheet. Swirl colors together using a butter knife. Once you’re happy with the result, place a piece of card stock paper on top of the design and press down until coated; after about 30 seconds to 1 minute has passed, slowly peel off the paper from the shaving cream- side up! Repeat this step as necessary.
After about 30 minutes, the paper will be dry, then use the printed umbrella template, cut it out, and trace it onto the shaving cream paper. It’s ready to make into an umbrella! Finally, glue the shaving cream umbrella cutout onto a solid color piece of paper. You can add a background or raindrops too, if desired.
Do you like this new craft idea? Visit Teachingmama.org for more information.

With just a few simple supplies, you can make a fun and festive paper plate umbrella to keep the rain away! All you need is a large paper plate, scissors, sticky tape or stapler, pipe cleaners, string, and blue card cut into the shape of raindrops.
We painted over the dots with a paintbrush to decorate the paper plate, but you might want to add other things, such as stickers or glue on some pompoms, sticker dots, or decorative washi tape. Use paint or other crafting supplies of your choice to decorate the paper plate. Allow the paper plate to dry after it has been decorated. Cut the paper plate in half using scissors. Using scissors, cut through one of the halves without going all of the way through it.
As shown in the photo, leave approximately 1cm of the paper plate uncut. To create a cross or ‘x’ shape, slide the other half of the paper plate through the cut. Hold the plates together with sticky tape so they don’t move or come apart. In order to make a ‘J’ shape, bend the pipe cleaner and use sticky tape to attach it to {the center/middle} of one paper plate. Stick string on top of the umbrella and blue cardboard raindrops then tie raindrops around the paper place the umbrella evenly distributed.
Your paper plate umbrella is now complete and ready to use!
Amazed with this colorful art? Check out Learning 4 Kids.
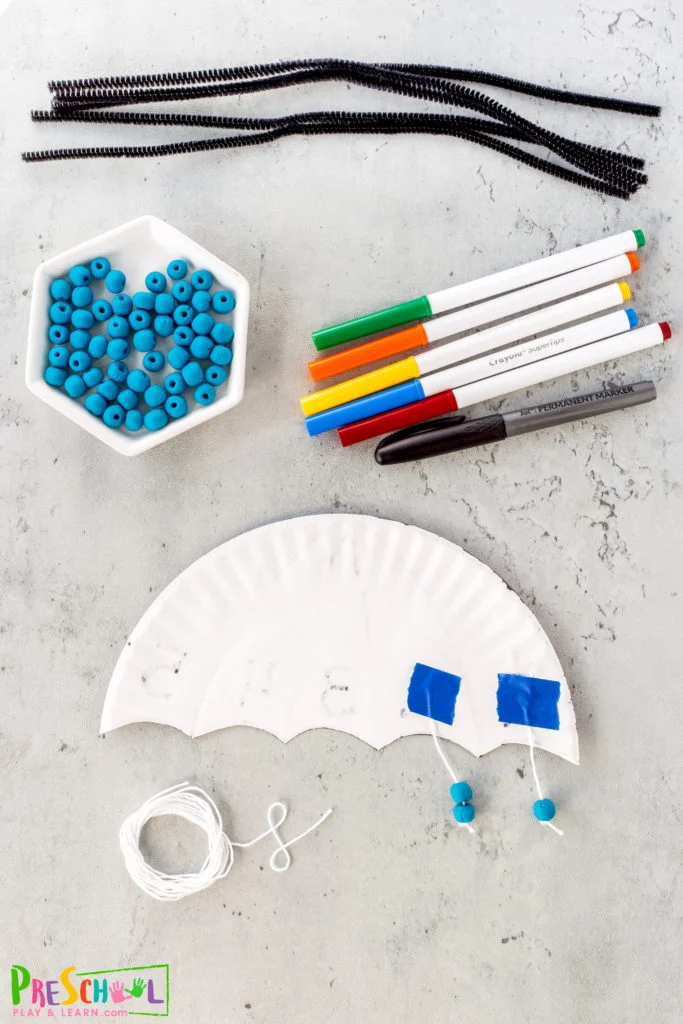
These crafts are perfect for little ones who are scared of the rain, or just want to have some fun on a rainy day. They’ll learn how to make an umbrella, and count raindrops. So gather up your supplies and let’s get started!
What You’ll Need:
- White paper plate
- Pipe cleaner
- Markers in various colors
- String
- Tape
- Scissors
- Beads (we used blue so they look like raindrops)
Instructions:
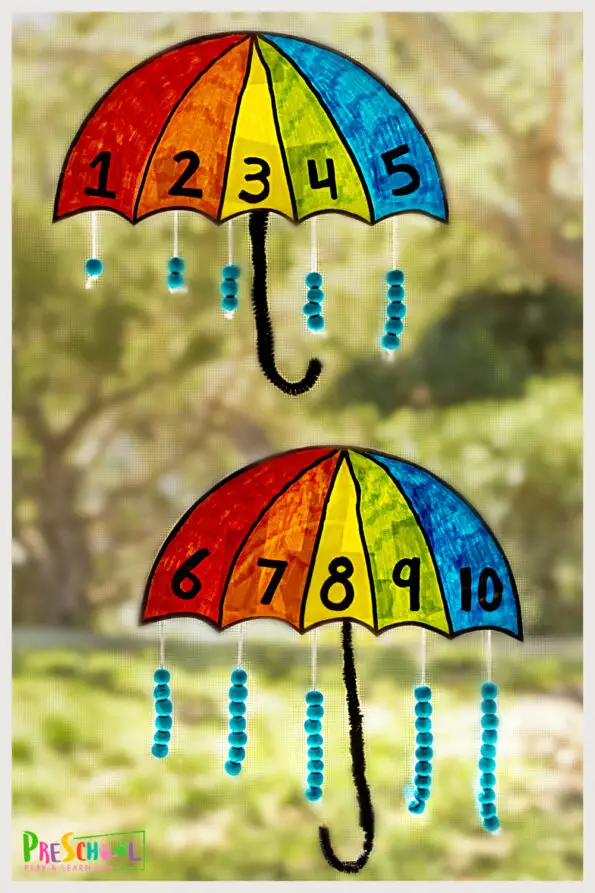
Make a pattern in the center of the paper plate. To make it more interesting, make six small scallops along the flat edge with your scissors. From each point, connect to the top middle using a line. We traced around the entire plate edges to add some flair. Then number each section 1-5 on one half of the umbrella and 6-10 on the other half. Color each section of the umbrella in any way you like: crayons, markers, or colored pencils may be used. You are free to use whatever colors you desire.
Now it’s time for the math craft. Take your tape and attach a 4″ string to the bottom of each numbered section at the back of your umbrella. Looking at the front again, count out and add the correct number of raindrops, or beads, that should fall on each section underneath its corresponding number. So under the red section with #1, we added one bead onto its string and tied a knot so the bead couldn’t fall off. Then we did likewise for all remaining sections until both parts had been completed. Kids can now count the beads for each section to practice number identification and counting.
Attach a pipe cleaner to the back of the project with tape and curve the end into an umbrella handle. Hang your lovely spring suncatcher craft in a window, on your fridge, or use it as a spring motif for your classroom bulletin board or door to create a beautiful spring suncatcher craft.
If you enjoyed this rainy day umbrella counting craft, be sure to check out Preschoolplayandlearn.com.
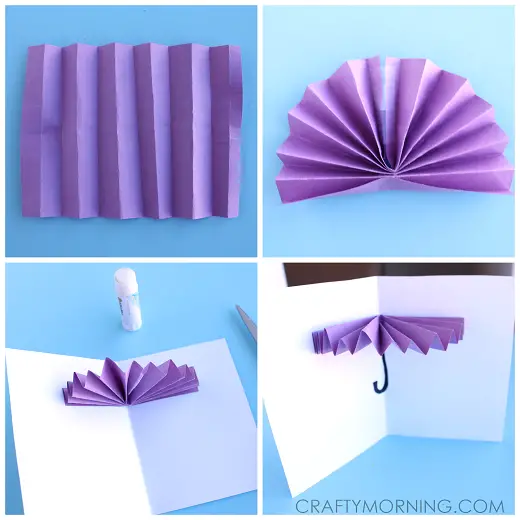
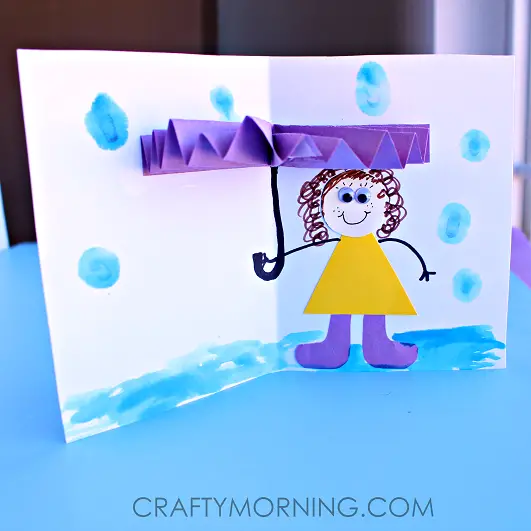
What a fun and easy way to beat the rainy day blues! With just a few supplies, you can make these amazing umbrella cards in no time. Your little ones will love helping out with this project, and they’ll be so proud of their finished product. Plus, it’s a great opportunity to teach them about colors and shapes. So gather up your supplies and let’s get started!
First, you’ll need to gather your materials. You’ll need purple, yellow, and tan paper, scissors, glue or tape, googly eyes, markers, watercolors, and a black marker. Once you have everything you need, it’s time to get started!
Begin by cutting a colored paper rectangle. Fold it in half and back again until you reach the end. Pinch it together and fold it in half once more. Glue the middle sections together and glue the flat edge of the umbrella to a folded paper card. Use a black marker to draw an umbrella handle. Cut out a triangle for the little girl’s dress, a round face, and rain boots using scissors.
Use markers to add a smile, arms, freckles, and eyelashes! Get out some blue watercolors and tell the kids to put more water than the color on their brushes to make puddles and raindrops. They could also use blue markers to draw raindrop shapes. Let the cards dry and then display them for all to see! These Umbrella Cards are sure to brighten up anyone’s day.
Thanks for crafting with us! You may see the full details at Crafty Morning.
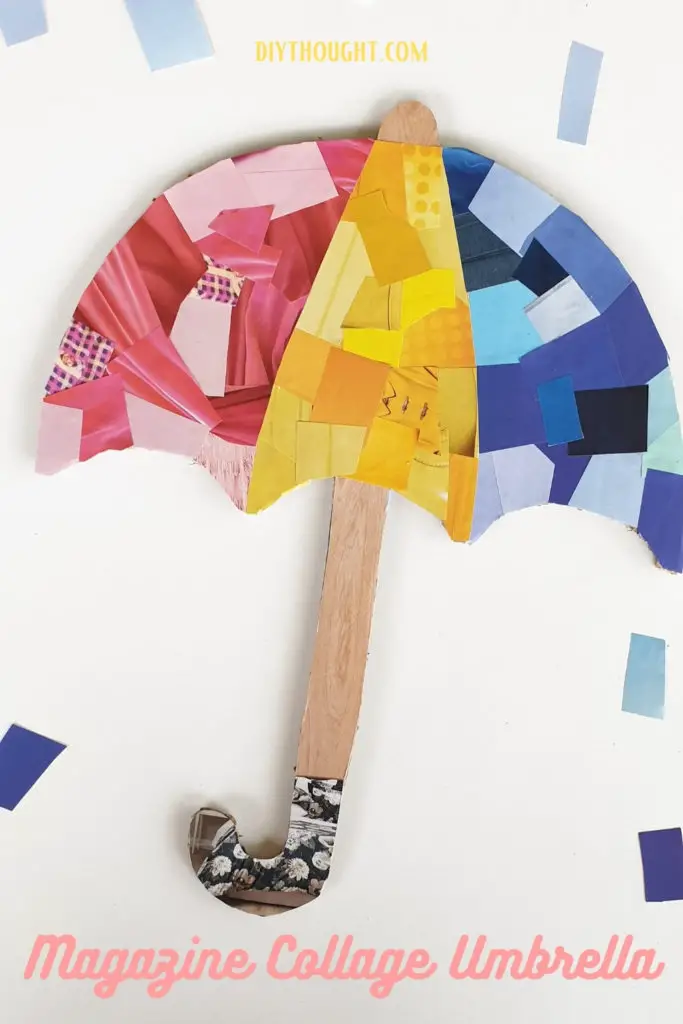
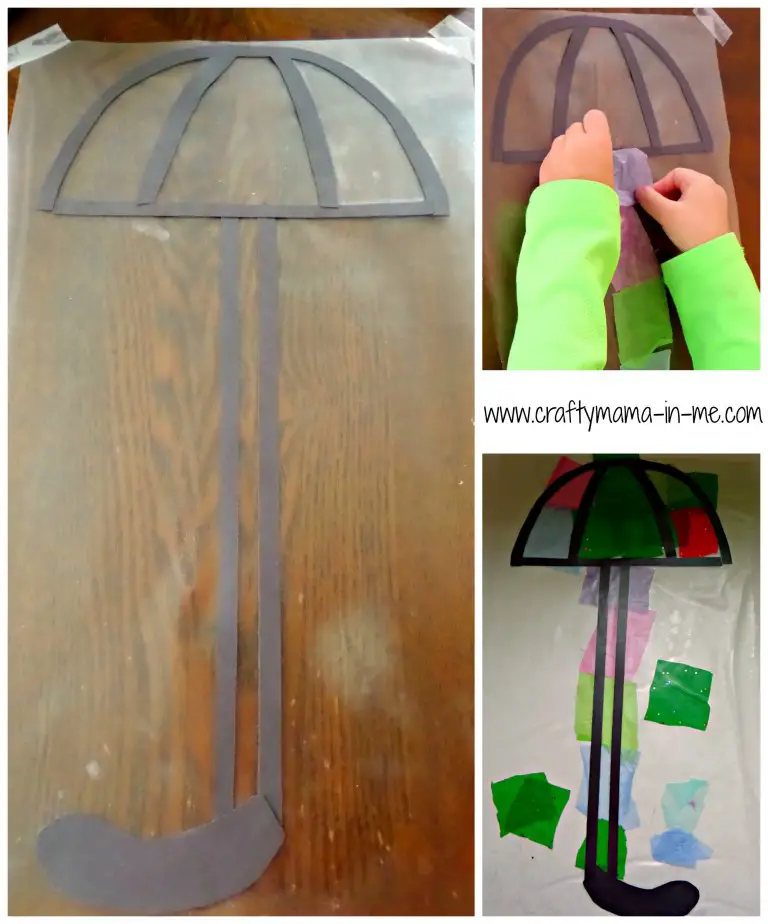
If you are wanting a fun and easy-to-follow rainy day craft for your preschooler, look no further than this DIY Magazine Collage Umbrella!
All you need is a cardboard box, some magazines, scissors, and a glue stick. You can also use a craft knife to make things easier. Just print out the umbrella template (or draw your own) and let your child have fun creating their own unique design. This is a great way to recycle those old magazines and turn them into something new!
Begin with collecting all of your materials. The umbrella top and handle will span two pieces of paper. Attach the cut-out umbrella parts together to a flat side of the cardboard box, then draw around them with a pen. Using a craft knife, carefully trim away the umbrella shape (kids may do this). Once you’re satisfied with its form, carefully snip off any excess material using scissors.
Consider the colors you want to use for your umbrella. It is usually worth a quick look through the magazine to make sure there are enough of these hues available. Because of grass, trees, sky, and water, blue and green are generally simple colors to come by. Cut out tiny pieces of the three hues that you’ve chosen in the magazine. Keep each color separate in separate piles. As well as a color for the handle and top of your umbrella, you’ll need one more for the bottom of your canopy.
Next, trace around the handle and pole as well as the top umbrella tip in your desired color or pattern. Cut out this shape and then apply glue to these sections. Finally, attach the cutout magazine piece by gluing it in place.
Decide which color will go where and begin filling in the section with the color you’ve chosen. Then, apply glue to the cutout magazine pieces and glue them in place one color at a time until all sections are complete. Finally, trim around the outer edge of the umbrella so that all overhanging magazine collage pieces are removed.
So next time it rains, don’t let the weather ruin your day, break out the crafts and make some memories instead.
What are some of your favorite rainy day activities? If you like this craft, visit DIY Thought.
On a rainy day, bring the outdoors inside with this fun and easy suncatcher craft! Using a few materials, your child can create their own vibrant umbrella to hang in the window.
To make an Umbrella Suncatcher, you will need:
- Two pieces of contact paper, cut to the size you want your finished umbrella
- Black construction paper, cut into strips
- Tissue paper, cut into squares
- Tape and scissors
Instruction:
- The first step is to cover your work surface with contact paper, tape the contact paper to each corner, then remove the backing.
- After that, have your youngster make an umbrella outline out of the black construction paper strips.
- Then they may fill in the space within the umbrella shape with tissue paper squares.
- End by covering and sealing the end of the umbrella formation with another piece of contact paper.
- To release any trapped air, massage the top gently.
- Finally, trim any extra paper from around the edge of the umbrella and tape it to a window as a decoration.
Your child will love watching the raindrops run down their Umbrella Bright Suncatcher! And when the sun comes out, they’ll be delighted to see the colorful tissue paper glowing in the light. This simple craft is a great way to brighten up any rainy day. Try it with your child today!
You can check it out here at Craftymama-in-me.com.
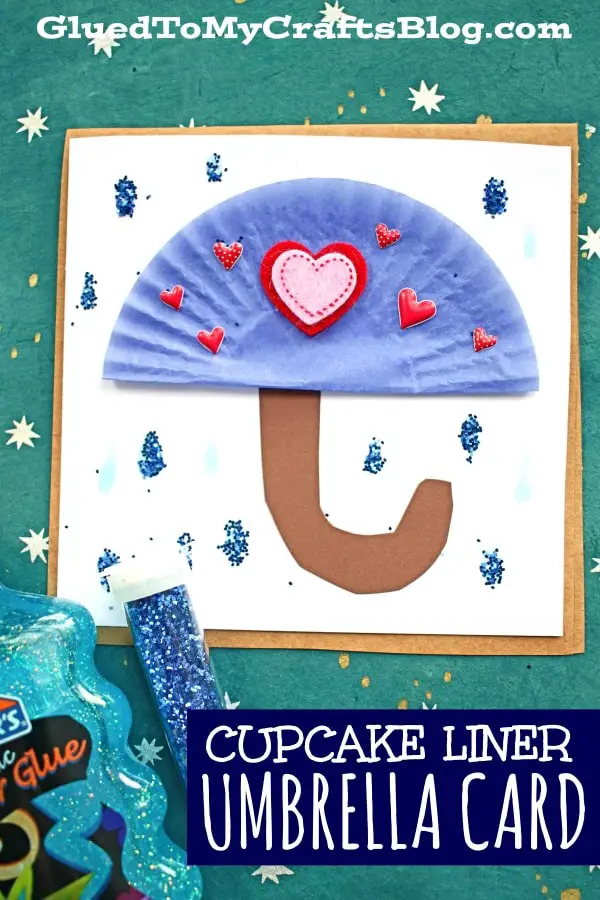
To make the card “umbrellas,” you will need large cupcake liners, white cardstock, brown colored cardstock, and cardstock cards. I went with a square-shaped card. You will also need a glue stick or tape runner, basic craft scissors, blue glitter glue, and blue loose craft glitter. Optional – heart/stars stickers, rhinestones, etc.
To make the cupcake liner umbrella cards:
First, take one large cupcake liner and flatten it. Next, fold the liner in half and glue it together to make an umbrella shape. After that, find a small white square piece of cardstock smaller than your card front, then glue the cupcake liner piece towards the top of that white square. Finally, grab some brown cardboard and scissors to complete this step.
Cut out an umbrella “handle” for your card. Glue your handle paper piece under the cupcake liner shape on the card to complete the cupcake liner umbrella card. Make “rain” over the front of the card with loose craft glitter and blue glitter glue. A few dabs of glue and a sprinkle of glitter will suffice! Then add any other decorations you like. I added heart stickers to mine, but feel free to experiment! Allow everything to dry fully before handing it off!
There you have it – another creative umbrella crafts for preschool that are sure to make anyone smile on a dreary day! Enjoy and have fun crafting with your kiddos!
If you liked this art, then you will love our other easy and fun rainy day crafts for kids! Be sure to check this out at Gluedtomycraftsblog.com.
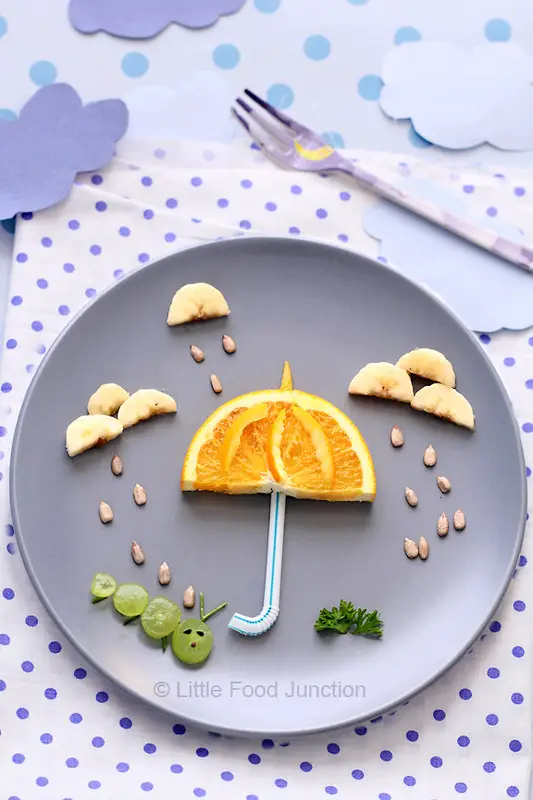
It’s snack time! Get ready for a creative and fun nature-edible umbrella craft! It’s a great way to teach your little ones about the weather, and have some fun too!
What You’ll Need:
- A bendable straw
- An orange
- Grapes
- A banana
- Parsley
- Toasted sunflower seeds
Instructions:
- Cut the orange in half, and use one half as the umbrella.
- Stick the bendy straw upside down into the center of the orange to serve as the handle.
- Use the banana as a cloud, and add some seeds to make raindrops.
- Place grapes around the edge of the umbrella, and add a parsley leaf to make a plant.
- Finally, add some toasted sunflower seeds to the top of the umbrella for extra decoration.
Your edible umbrella craft is now complete! Enjoy your rainy day creation with your little ones.
Did you like this food art? Visit Little Food Junction.
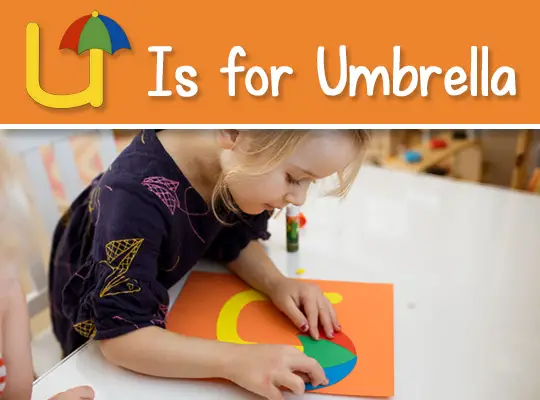
Rainy days are the perfect time to break out this fun and easy umbrella craft for preschoolers! It’s packed with indoor activities that are perfect for days when you can’t go outside and play. From arts and crafts to sensory activities, there’s something for everyone! With just a few supplies, you can help your little ones make their very own Rainy Day Umbrella Crafts.
Here’s What You’ll Need:
- Two sheets of printer paper
- Card stock (we used yellow, red, green, blue, and orange)
- U Is for Umbrella Craft templates
- Glue stick
- Pencil and scissor
Instructions for Assembling Your Lowercase U Craft:
- Print out the U Is for Umbrella Craft templates.
- Trace the letter U and the umbrella pieces onto card stock after cutting out the templates.
- Cut out the letter U and the umbrella pieces.
- Glue a full sheet of card stock (you can use any color you like) with the letter U on it.
- Attach the letter U to a whole piece of card stock with glue.
- Attach the middle umbrella panel to the top of the letter U.
- Glue the right and left umbrella pieces to the sides of the centerpiece.
- Attach the spike on top of the umbrella.
- Fix the umbrella spike to the top of the umbrella.
That’s it! We hope you and your little ones had fun making this craft together. Be sure to check back for more fun and easy crafts for kids!
If you’re looking for more information about this rainy day art craft, be sure to check out Allaboutlearningpress.com.
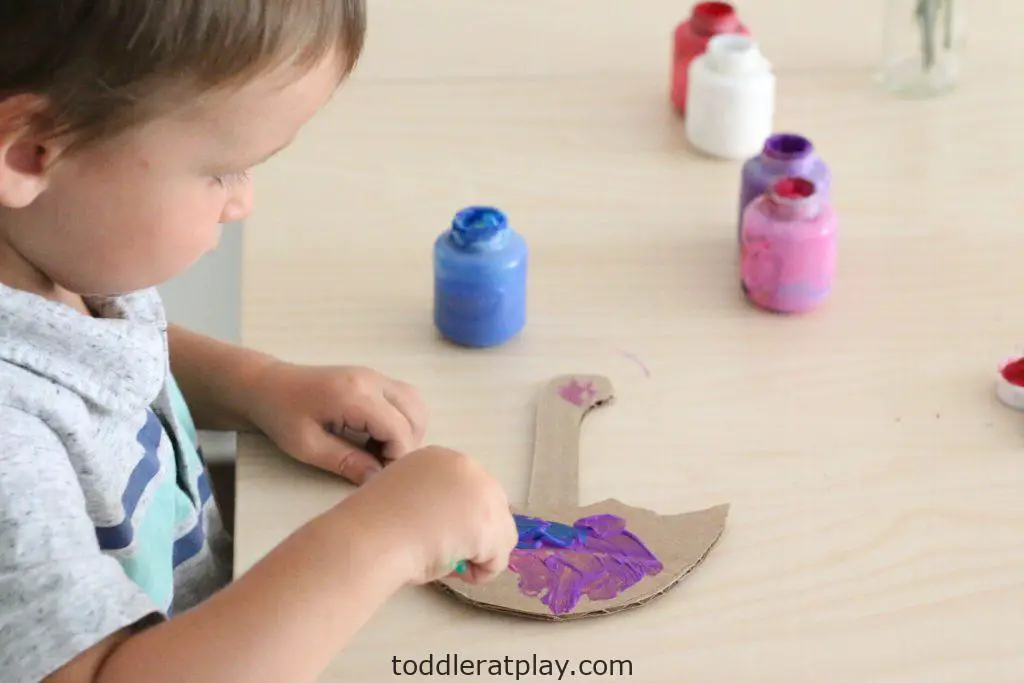
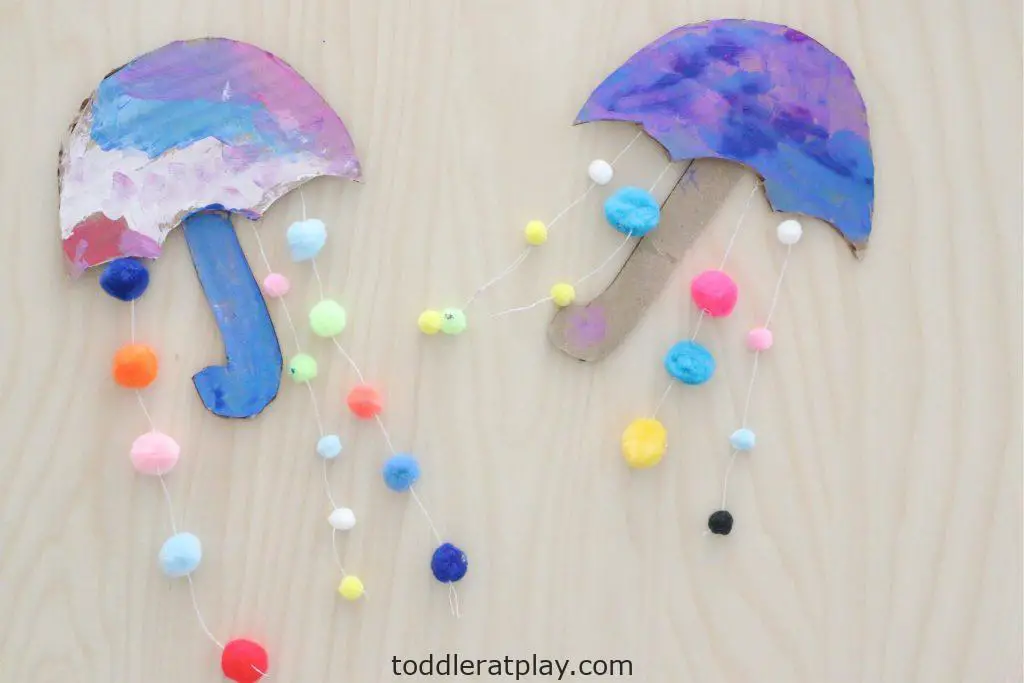
What a fun and easy rainy day craft for kids! With just a few supplies, you can make this adorable pom-pom umbrella. It’s the perfect way to brighten up a rainy day. Plus, your preschoolers will love learning how to sew with this project.
Here’s what you’ll need:
- Cardboard
- Thread
- Sewing needle
- Pom-poms (small)
- Craft scissors
- Washable kids paint
- Paintbrush
- Hot glue gun + glue sticks
First, cut out the cardboard into an umbrella shape. Next, allow the kids to paint the umbrella in any color they want and let it dry. While the umbrella is drying, make the rain. Cut long pieces of thread and loop them through the needle. Weave the needle through the pom-poms and spread them out (this step is for adults). We made about four to five pom-poms per thread and three to four pieces of thread. Hot glue the ready pieces of thread with pom-poms onto the umbrella.
There you have it! A fun and easy rainy day craft that your preschoolers will love. So next time it’s raining outside, bust out this craft and enjoy some quality time with your little ones.
Still, need more details on how to make a pom pom umbrella? Check out Toddler at Play.
Conclusion
Rainy days don’t have to be boring! With a little creativity, you can turn a rainy day into a fun learning opportunity for your preschooler. These rainy day umbrella crafts for preschool are the perfect way to brighten up a gloomy day. From homemade umbrellas to raindrops and everything in between, your preschooler will love these crafts. So, grab your umbrella, and let’s get started!
Related preschool resources, crafts, and activities.


