Stars are mesmerizing to look at. They twinkle at night time to give children incredible skyscapes. They accompany the moon and provide added light. These tiny lights form into clusters with identifiable patterns that are fascinating for stargazers.
Explore how excellent these stars are with these ten superb crafts that children will adore.
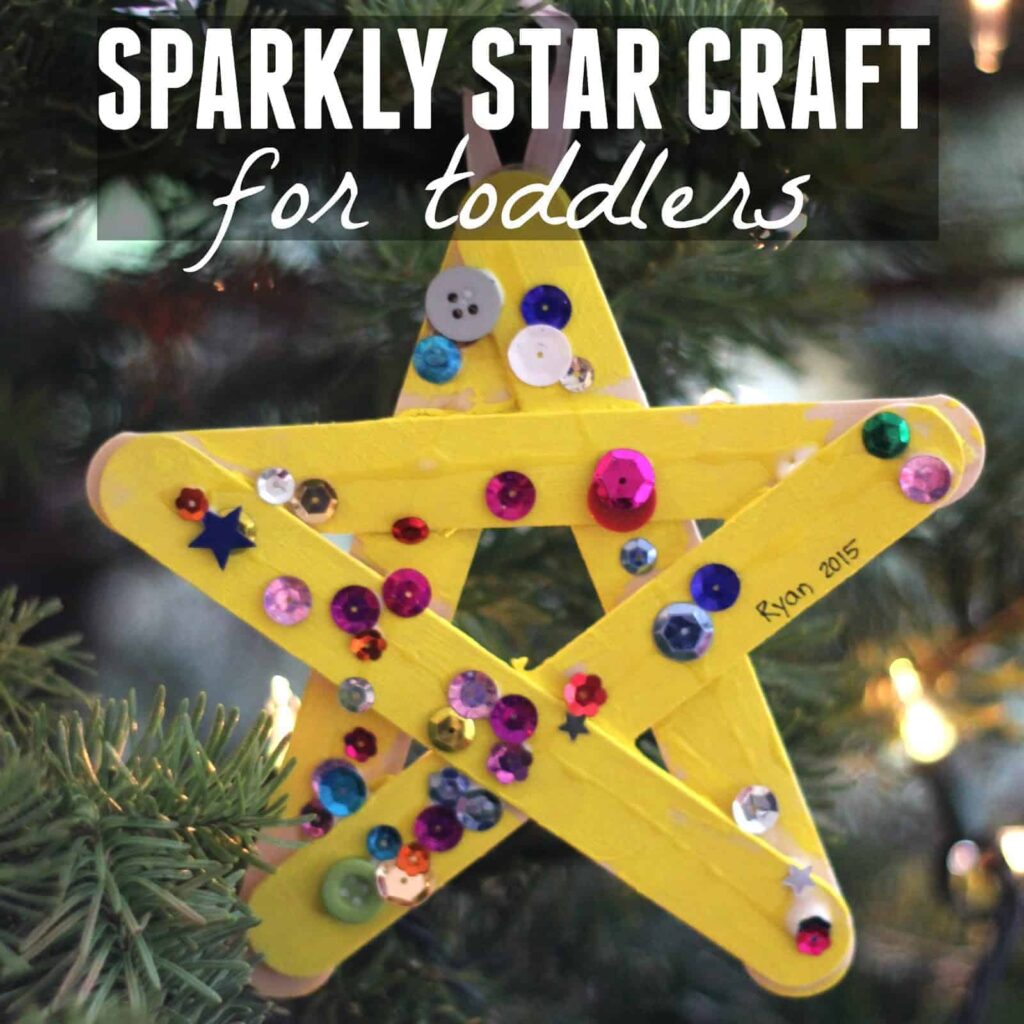
Perfect for Christmas time, this sparkly star craft can be used as a tree ornament or just a simple decoration for the festive season. Children will improve their fine motor skills as they put together this craft. It is a great craft to learn about the star shape.
Prepare the star using the hot glue gun to attach five craft sticks. Next, have the children paint their stars yellow.
Let this dry. Squeeze some glue on the stars and have the children place colorful sequins and other embellishments on them. Let the glue dry, and use the hot glue gun to attach a ribbon for hanging.
Extend this activity by pointing out that stars have points. Let them count these and compare them with other basic shapes. Play a scavenger hunt to find different objects with the same shape. Use this star craft to trace and cut out their stars on paper.
For this activity, you will need:
- Hot glue gun
- Craft sticks
- Sequins
- Glue
- Paint
- Paintbrush
- Scissors
- Ribbons
For more information on this activity, go to ToddlerApproved.com.
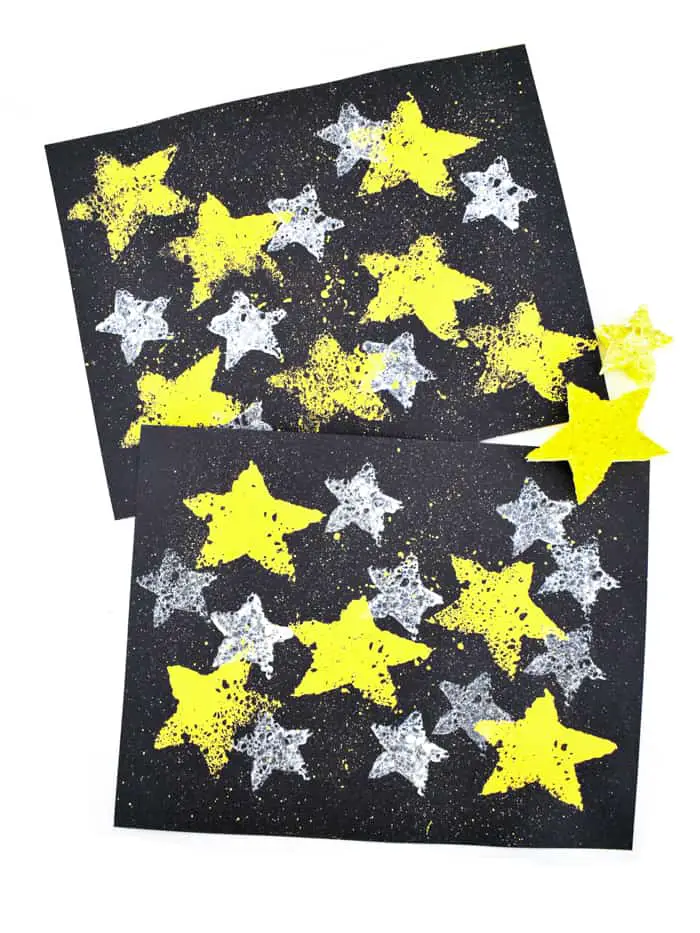
This craft is an excellent introduction to the stamping and splattering techniques in Art. It is simple and easy to make but provides an interesting texture that adds depth for children to appreciate.
This art activity provides a great sensory experience and will help enhance children’s fine motor skills. Let children count the number of stars they have on their finished craft. They can also compare their sizes.
Use the marker to draw two stars of different sizes on the sponge. Cut these out. Have the child lightly dip the big star in yellow paint and stamp it on the black cardstock. Add several of these to the paper.
Next, have them use the small star dipped in white paint and stamp between the big stars. Finally, use the paintbrush for splattering. Dip it in yellow paint and lightly tap using a second paintbrush.
This technique will create specks of colors throughout the paper for an interesting effect.
For this activity, you will need:
- Cardstock
- Sponge
- Paint
- Paintbrushes
- Scissors
- Markers
For more information on this activity, go to MadeWithHappy.com.
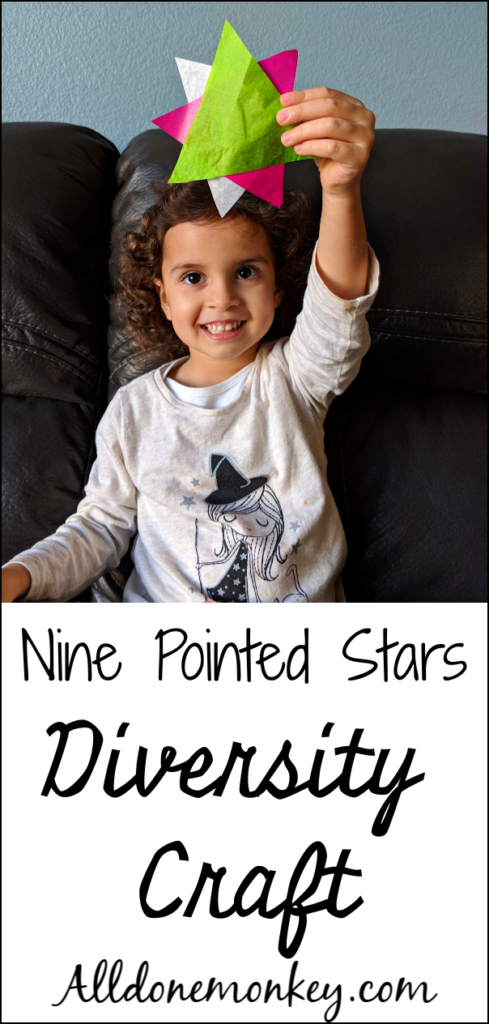
The variety of colors in this star sends the message of unity amid diversity. This craft will help improve children’s fine motor skills and coordination through tracing, cutting, and pasting.
It is also a great activity to help with color recognition skills and compare the variation of the star shapes. Children can also explore combining 2D shapes to create a new one. In this case, the three triangles can make a nine-pointed star.
Download and print the star template from the site. Cut this out and trace one point to the next on the cereal box to create a triangle. Cut out the triangle and use this to trace onto three different colors of tissue paper.
Cut out the tissue paper and carefully stack them together following the template to create the nine-pointed star. Place one color on top of another and use double-sided tape to adhere to the triangles.
For this activity, you will need:
- Printed star template
- Tissue paper
- Scissors
- Cereal box
- Double-sided tape
For more information on this activity, go to AllDoneMonkey.com.
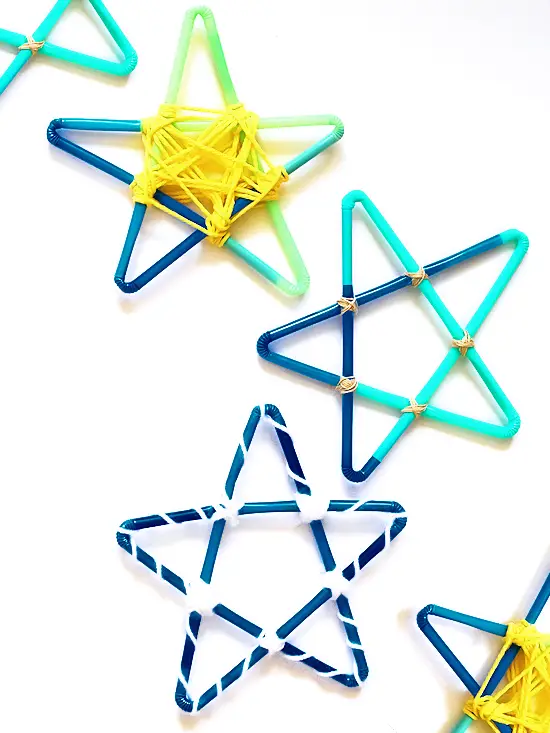
Turn bendy straws into adorable-looking star crafts that can be used as ornaments or tied to a long string to make a star bunting. These are perfect decorations for holidays and parties.
These straws will help develop children’s eye-hand coordination and fine motor control skills. Use this craft to learn more about the star shape. Add the child’s picture in the middle of the star for a personalized ornament.
Show kids how to carefully insert one straw into another by slightly folding the ends to make it easier to slide it in. Have them bend the bendy part of the straw and repeat this several times until all five straws are inserted, forming a star.
Take the twine and tie the middle part of the star. The site suggests tying in different ways to secure the star. Tie where the points meet by crisscrossing the twine around it. Loop a string in the middle of the star to form variations.
For this activity, you will need:
- Plastic bendy straws
- Twine
- Scissors
For more information on this activity, go to OurKidThings.com.
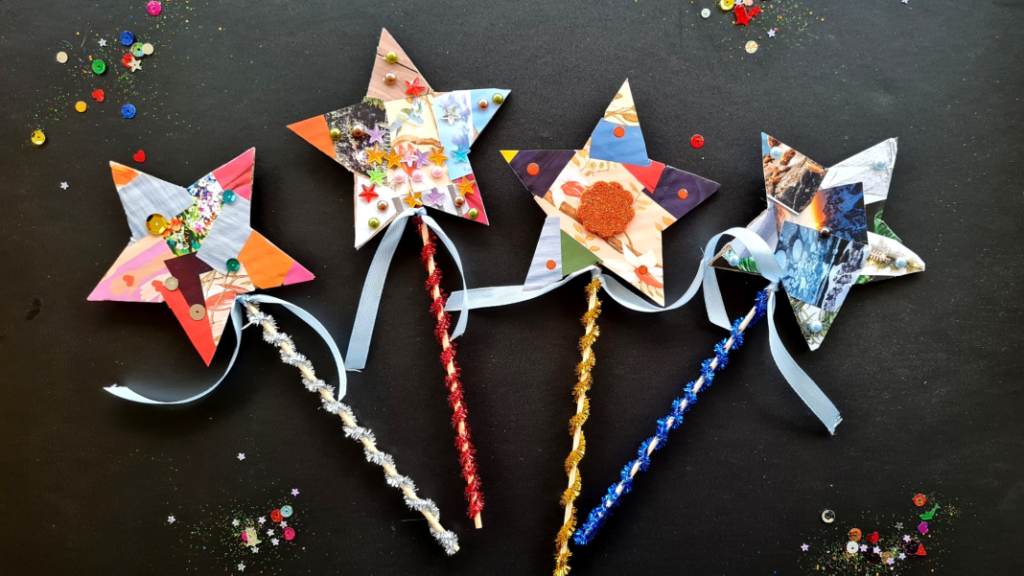
These star wands are perfect for granting wishes. These can be used in pretend play areas, as props for stage plays, or as a tool for retelling stories. Using the wand this way will help improve children’s oral language skills.
Tracing, cutting, and pasting will help improve children’s fine motor skills.
Download, print, and choose which star to use from the template on the site. Outline the template on an old cardboard box and cut it out. Next, have the children look for colorful pages they like in an old magazine and cut these out.
Glue this on the star, layering until the cardboard is fully covered. Do this step on both sides. Add embellishments.
Next, wrap a pipe cleaner on a bamboo skewer. Use the hot glue gun to keep it adhered. Stick this to the back of the star. Tie a ribbon on the wand just below the star to finish.
For this activity, you will need:
- Cardboard
- Magazine
- Scissors
- Hot glue gun
- Bamboo skewer
- Pipe cleaner
- Ribbon
- Pen
- Embellishments
For more information on this activity, go to DIYThought.com.
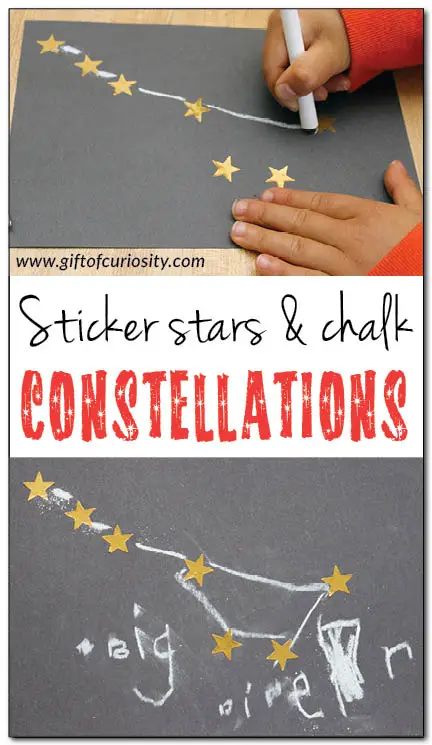
Replicate the familiar constellations with this activity using stickers and chalk. This activity is perfect for a space unit study or after star gazing. With a science lesson, discuss how stars form recognizable patterns.
Use pictures and videos to show the connection between the constellation and what they were named after. Working on this craft will help improve children’s fine motor skills.
Start this activity by letting children choose the constellation they want to make. Have them position the gold star stickers on black cardstock. Ensure that these are evenly spaced.
Next, have them use white chalk to draw lines connecting the stars. Doing this will show the pattern or shape of the constellation. Children can also write the name of the constellation on the cardstock.
Extend this activity by having the children and their parents do star gazing in their homes. Ask children which of the constellations they were able to see.
For this activity, you will need:
- Gold star stickers
- Cardstock
- White chalk
For more information on this activity, go to GiftOfCuriosity.com.
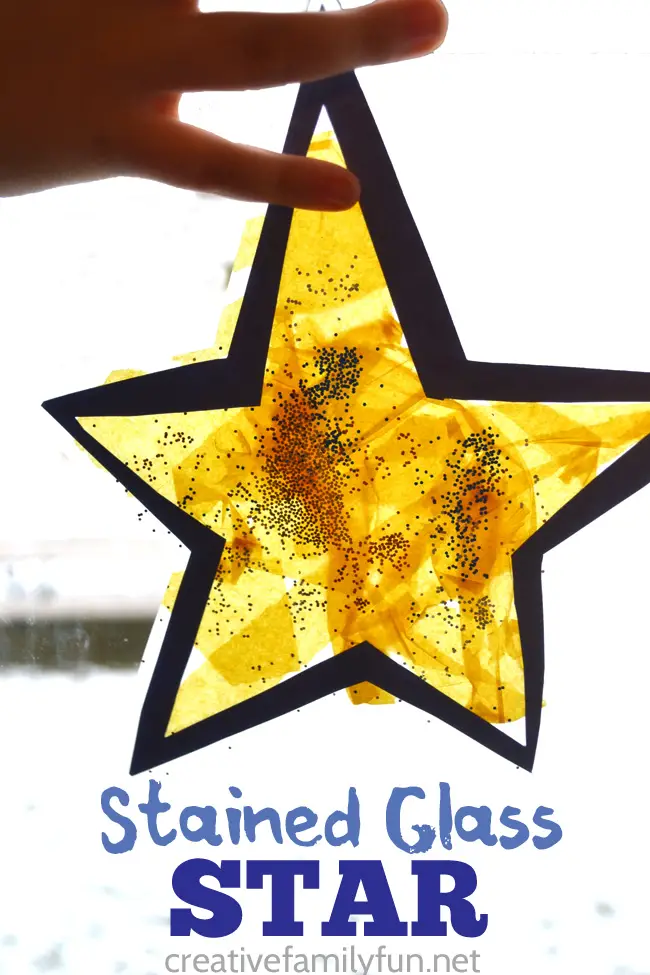
The bright golden glow makes this stained glass a unique suncatcher. Make several of these in different sizes to teach children about size comparison and seriation. Stick these on the window by arranging them according to size.
Use different colors of tissue paper or a combination of colors to teach color recognition and color mixing.
Draw and have kids cut out star outlines from construction paper. The site suggests folding the paper in half to make two symmetrical stars. Peel off the backing from the contact paper and stick to the outline.
Use sticky tape to secure the ends of the contact paper and prevent it from sliding off the table. Have the children sprinkle some glitter and cut out the tissue paper into a smaller sizes. Stick the tissue paper one at a time until the star is filled with color.
Carefully add a second sheet of contact paper on top to laminate. Smooth this well. Place this in a well-lit window.
For this activity, you will need:
- Contact paper
- Construction paper
- Yellow tissue paper
- Bottles of glitter
- Sticky tape
For more information on this activity, go to CreativeFamilyFun.net.
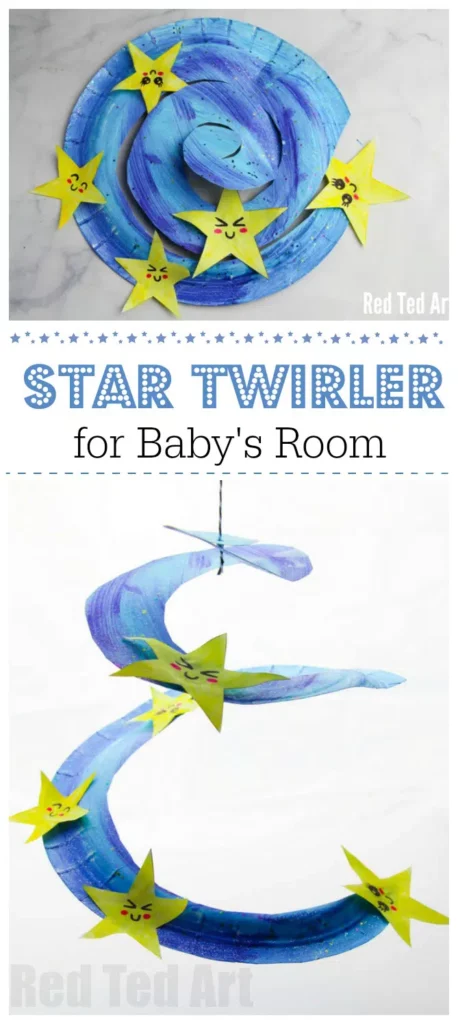
Stars lined up in a spiral are a charming decoration in any room. This craft is perfect for children to practice their cutting skills. Cutting in spirals requires focus and a particular technique.
Children will learn to move their hands as they see the curved lines on the plate.
Add a different number of stars for children to practice their counting skills. Each star has a face. Modify their facial expressions to teach children about emotions.
Paint the paper plate in blue, purple, and black swirls to create a galaxy appearance. Once dry, cut it in a spiral. For younger children, draw a line as a guide for cutting.
Next, download, print, and cut out the star templates on yellow paper. Draw different faces on them or use embellishments. Stick the stars on the spiral.
Next, poke a hole in the topmost part of the spiral and add the string. Tie a knot at the end and hang.
For this activity, you will need:
- Printed star templates
- Paper plate
- String
- Scissors
- Paint
- Glue
- Paintbrush
- Marker
- Yellow paper
For more information on this activity, go to RedTedArt.com.
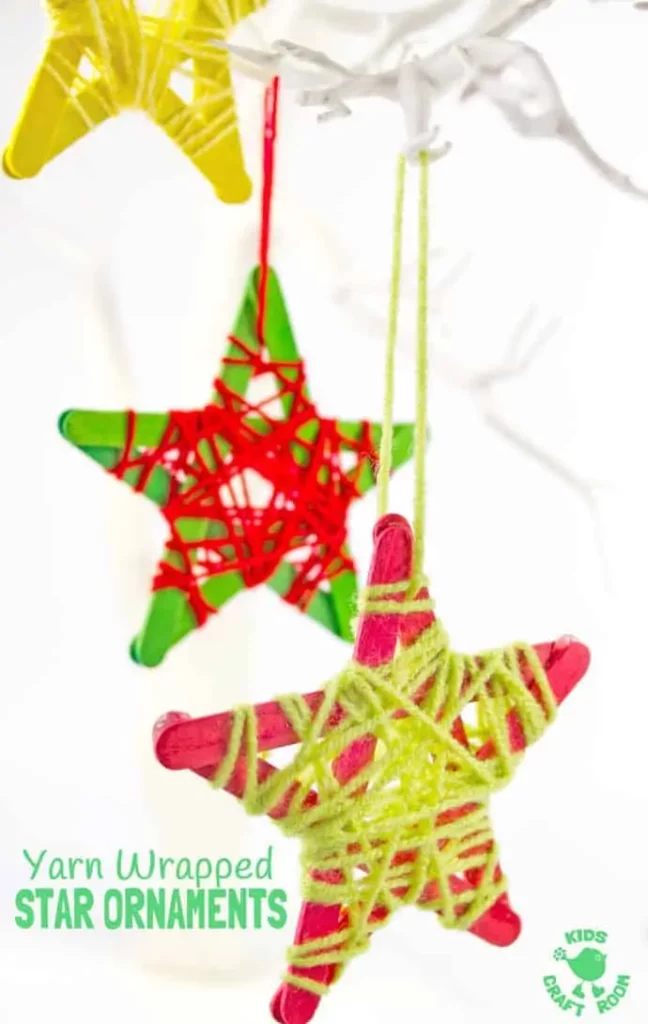
Make these simple star ornaments for children’s last-minute crafts. This uses readily available materials and requires limited to no assistance from adults. Make these in different colors to help children with color recognition skills.
Make this a two-toned star by wrapping a complementary color of yarn. Use these to teach children patterns. Looping the yarn on the star will help improve children’s hand-eye coordination skills.
Prepare the craft stick stars in advance by using hot glue to attach five colored craft sticks together. The site suggests using a template to create uniform-shaped stars. Refer to the picture on the site for this particular technique.
Next, tie a long piece of yarn in the middle part of the star. Have the children wrap the yarn around the star until fully covered.
If the string is too short, add another by tying the ends together and continue wrapping. Loop the ends for hanging.
For this activity, you will need:
- Colored craft sticks
- Hot glue gun
- Paper
- Pen
- Yarn
- Scissors
For more information on this activity, go to KidsCraftRoom.com.
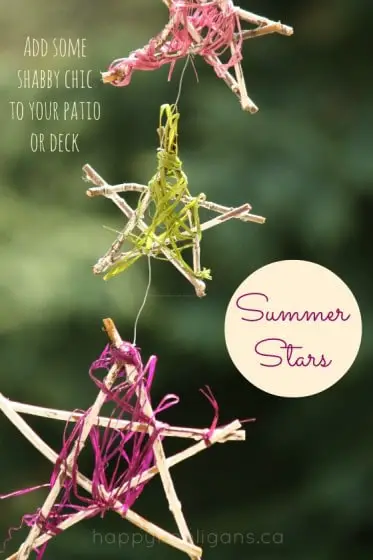
This rustic-inspired craft is a beautiful activity after a nature walk or exploring the outdoors. Collecting twigs and sticks provides a great sensory experience for children.
Have children choose twigs that are intact and have no rotting parts. Inspecting each twig they have picked will help improve their eye for detail and will help increase focus. Putting together this craft will help strengthen their fine motor skills.
The site suggests using hot glue to prepare the stars in advance. Choose sticks with the same diameter and trim them off to make these identical in length. Position five sticks together and stick them with the hot glue gun.
Once ready, let the children paint all sides of their stars and let them dry. Tie a piece of raffia in the middle of the star and have the children wrap it around. Make three of these in different sizes and string them together for the perfect hanging ornament.
For this activity, you will need:
- Sticks
- Raffia
- Twine
- Paint
- Hot glue gun
For more information on this activity, go to HappyHooligans.ca.
Conclusion
These star crafts are a fantastic addition to a collection of projects to help children improve their skills and create unique products. These activities are simple that children will enjoy making, even if some require minimal preparations.
Thank you for reading. Come back and check out our other craft articles soon.


