Sharks are unique fishes often portrayed as ferocious characters with insatiable appetites in stories and shows. However, sharks are beneficial to our environment. They are apex predators that keep the balance in our ecosystem.
Let children explore these amazing animals through these ten crafts that are fun to make and educational.
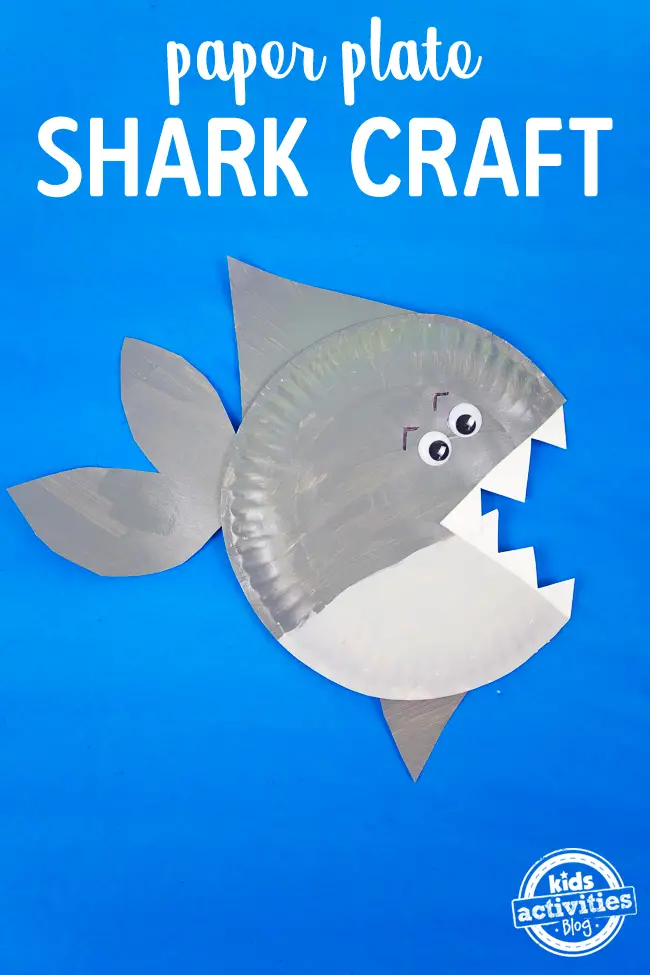
Make this shark craft to go with the nursery rhyme “Five Little Sharks.” Children will improve their memory and comprehension as they use the craft with the song. The cutting, painting, and pasting tasks will help improve their fine motor skills.
To make this shark craft, paint two paper plates gray and let them dry. The site suggests painting half of the shark’s body in a lighter color to make the belly more visible.
Next, cut out a triangle for the shark’s mouth from one of the plates. Cut out the fins and tail from the second gray paper plate. Attach these pieces to the shark’s body.
There are no templates provided for these parts. Refer to the pictures from the site for this step.
Next, cut out small triangles from the unpainted paper plate to make the teeth and attach these to the shark’s mouth. Finally, add the googly eyes to complete the craft.
For this activity, you will need:
- Three paper plates
- Googly eyes
- Glue
- Scissors
- Paint
- Paintbrush
For more information on this activity, go to KidsActivitiesBlog.com.
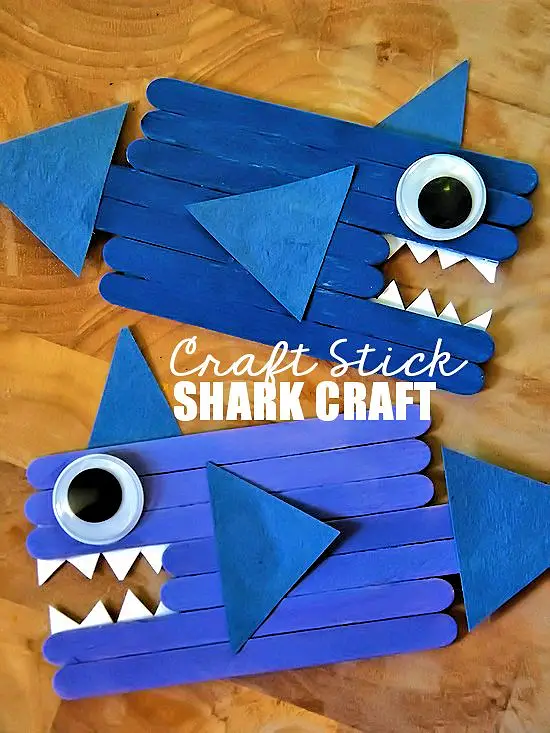
Turning these craft sticks into geometric sharks is perfect for teaching children shape recognition. As recommended by the site, make these sharks in different colors to help children with color recognition skills.
Cutting and assembling the craft will help improve children’s fine motor skills.
To make the shark, line up seven craft sticks together. Push the fourth and fifth sticks backward to create an opening for the mouth. Refer to the pictures on the site for this step.
Next, cut to size a square of paper and glue this on the craft sticks. Doing this will keep the sticks’ position intact. Flip the craft sticks and paint the flat side with the chosen color.
While the paint dries, take construction paper the same color as the shark and cut out three triangles for the fins. Cut out small white triangles for the teeth. Attach the teeth on the wrong side of the craft. Attach the fins and the googly eyes to complete.
For this activity, you will need:
- Craft sticks
- Googly eyes
- Paint
- Paintbrush
- Construction paper
- Scissors
- Glue
For more information on this activity, go to OurKidThings.com.
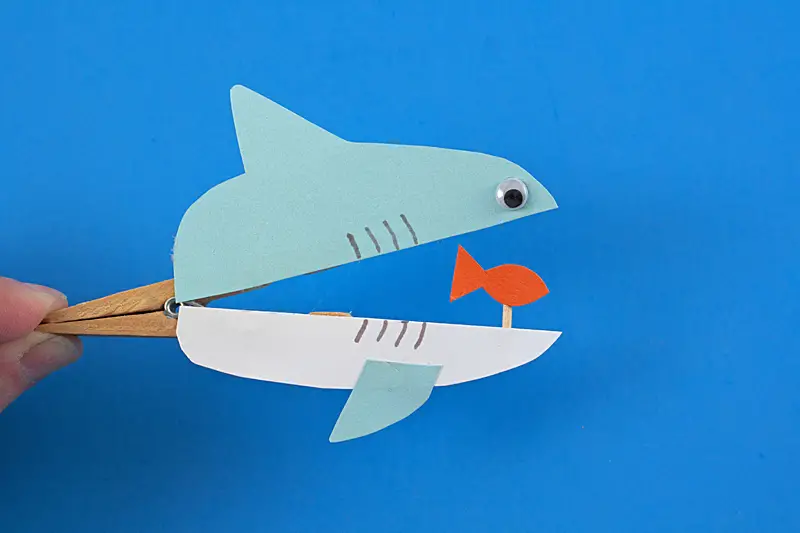
Perfect for the nursery song “Slippery Fish,” this clothespin shark will make a great prop to help children visualize the song. Children will improve their listening skills and pay attention to details.
Using the clothespin will help strengthen their three-finger grasp. Cutting and adding details on the shark will help enhance their fine motor skills.
To make the shark, download and print the free shark template from the site. Cut and trace this on the corresponding color of cardstock. The upper part of the shark and the separate fin should be light blue, while the bottom should be white.
Cut out the pieces and set them aside. Take orange cardstock and cut out a small fish. Attach this on a one-inch length toothpick. Stick this on the bottom part of the shark. Stick the separate fin as well.
Next, use the hot glue gun to attach the shark pieces to the wooden clothespin. (For safety, an adult should handle this step.) Stick the googly eyes on and use the gray marker to draw gills on the shark.
For this activity, you will need:
- Printed shark pattern
- Wooden clothespin
- Cardstock
- Toothpick
- Googly eyes
- Scissors
- Hot glue gun
- Marker
For more information on this activity, go to KixCereal.com.
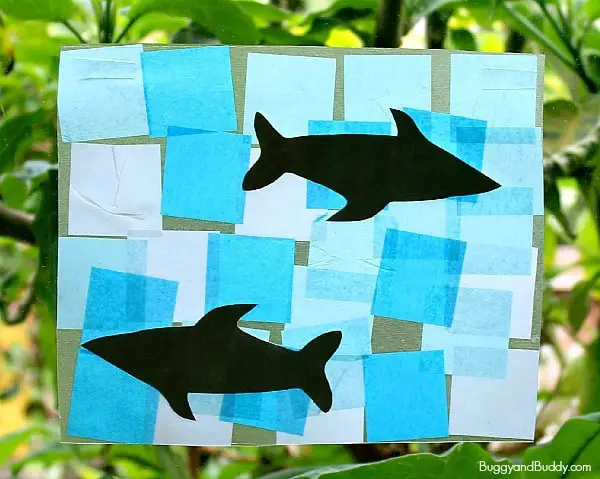
This shark suncatcher is perfect for an ocean unit and a fantastic activity to learn more about colors and shapes. Using different blue shades of tissue paper will help children understand the concept of color variation.
Squares are the main shape used in this activity. Vary this to help children identify other basic shapes. Cutting the template and the paper will help improve their fine motor skills.
Make the suncatcher by cutting the tissue paper into small squares. The free shark template can be downloaded and printed from the site. Cut these out and trace them on gray construction paper. Cut out the gray sharks.
Peel off the backing from the contact paper and have the children stick the blue squares. Have them position the sharks.
Next, remove the backing from a second contact paper and place this over the sharks. Smooth it carefully to keep everything even and to ensure all the pieces are adhered to on the contact paper.
For this activity, you will need:
- Printed shark template
- Contact paper
- Tissue paper
- Construction paper
- Scissors
For more information on this activity, go to BuggyAndBuddy.com.
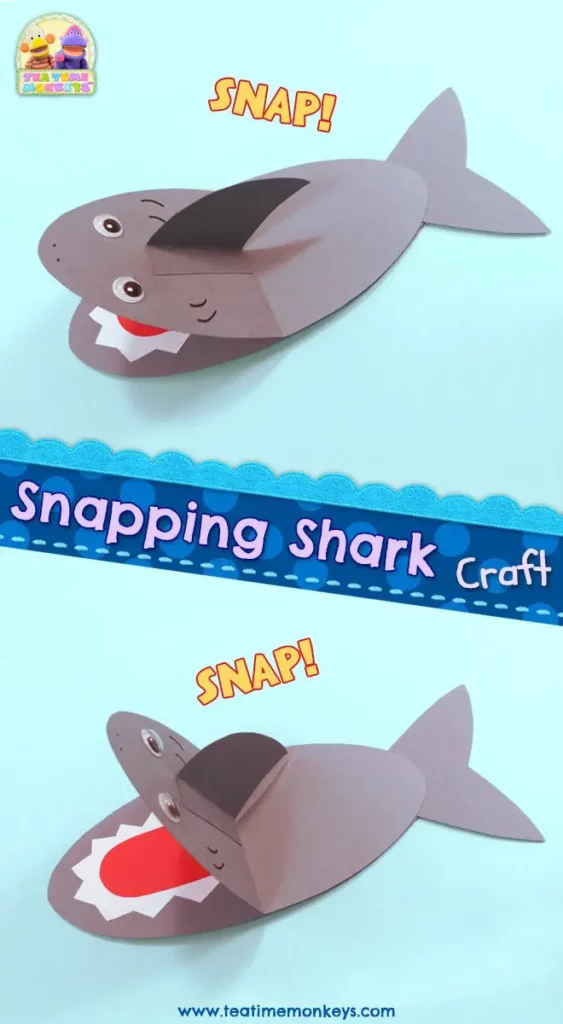
This shark craft is a wonderful prop for the nursery song “Five Little Fish Swimming in the Sea.” Children will improve their listening skills and coordination as they make the shark snap on cue.
Download and print the free shark template from the site. Cut out and trace the body, tail, and fin on gray cardstock. Trace the teeth on white and the tongue on red cardstock. Cut out the pieces and assemble them.
Attach the tail to the oval-shaped body using glue. Next, fold the second oval shape in half. Glue one of the flaps on the body to make the mouth.
Cut off triangles from the edge white oval to make the teeth. The site suggests the use of zigzag scissors for this step.
Glue this inside the mouth. Stick the red tongue over the white teeth. On the top flap, attach the remaining fin and googly eyes. Use the marker to add the gills.
For this activity, you will need:
- Printed shark template
- Cardstock
- Googly eyes
- Glue
- Scissors
For more information on this activity, go to TeaTimeMonkeys.com.
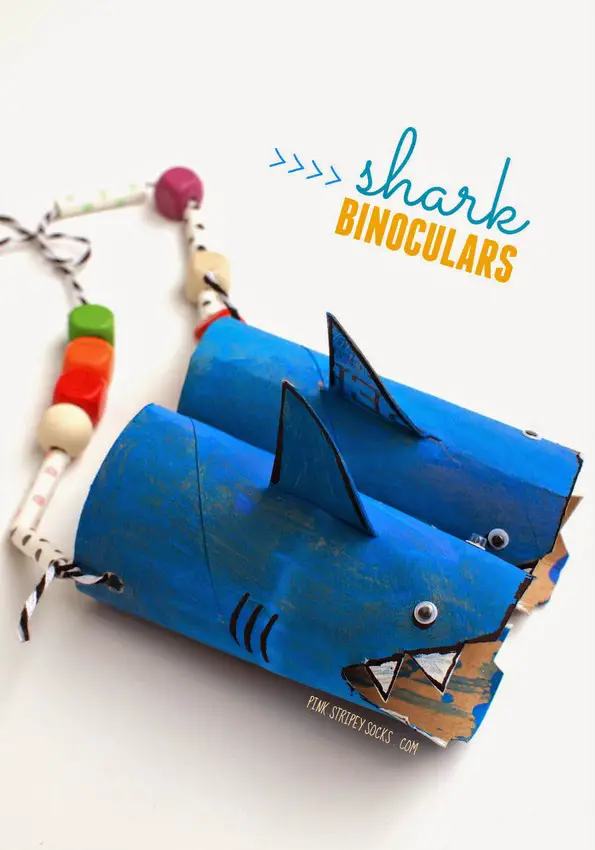
Use these shark-inspired binoculars for the ocean unit. Let children play an I Spy game looking for different sea animals. This is perfect for centers and sensory play areas. As they put together this craft, their fine motor skills will improve.
To make the binoculars, cut out two fins from the cereal box. Cut a slit on the base of the fins.
Cut a triangle off the toilet paper rolls to make the mouth. The site suggests leaving small triangles for the teeth. If children find this step difficult, cut the triangle teeth separately and glue them on the mouth.
Next, cut a slit in the sharks’ bodies and insert the fins. Fold the tabs inside or secure them with glue. Paint the binoculars blue and leave them to dry.
Use a marker to add details and attach them using a hot glue gun. Punch holes on the opposite end and tie a string with beads so children can hang this on their necks.
For this activity, you will need:
- Toilet paper rolls
- Cereal box
- Paint
- Paintbrush
- Scissors
- Glue
- Sticky tape
- Craft knife
- Marker
- Hole puncher
- Hot glue gun
- String
- Googly eyes
- Beads
For more information on this activity, go to PinkStripeySocks.com.
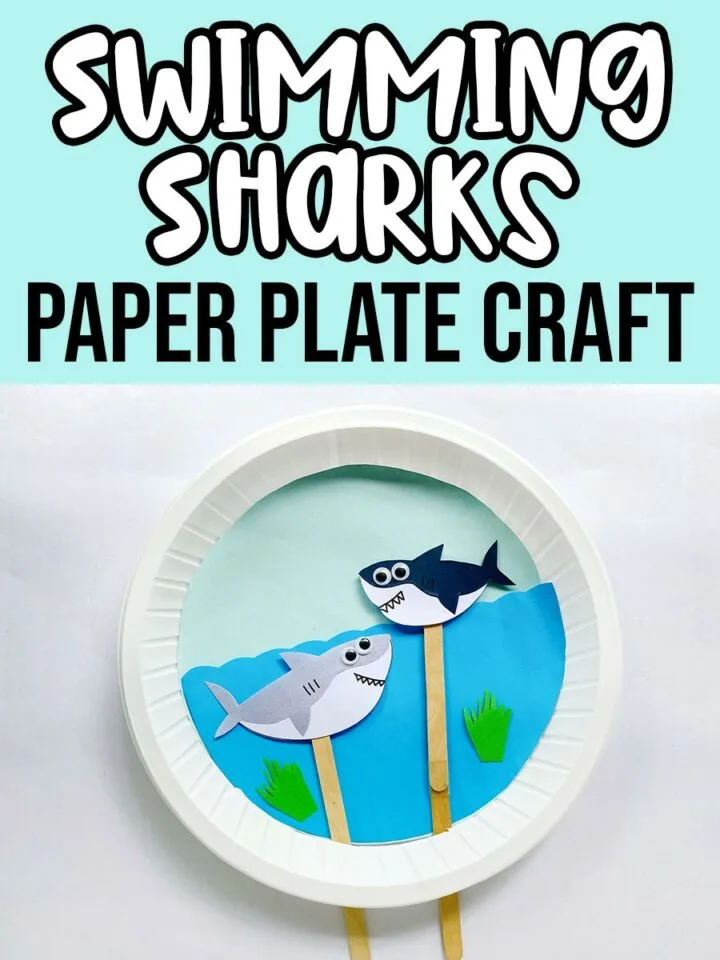
Teach children the concepts of underwater and overwater with this craft. Have children manipulate the stick puppets as they listen to instructions.
This will help children improve their listening skills, follow directions, and pay attention to details.
Download and print the free shark template from the site. Cut these out and trace them onto colored cardstock. Use the combination of gray and white for the first shark and dark blue and white for the second.
Cut these out and assemble them. Attach the top part to the belly using glue. Next, add the gills and teeth using a black marker. Glue the googly eyes on the sharks. Stick these on craft sticks. Make these longer by using sticky tape to attach the two sticks.
Make a slit on the paper plate right after the ribbed part so the stick puppets can be inserted. Cut out two half circles from two different shades of blue. Stick the lighter blue on top.
Cut scallops on the dark blue paper to resemble waves. Attach this to the bottom part of the paper plate. Add cut-out details such as seaweed if preferred. Insert the stick puppets.
For this activity, you will need:
- Printed shark template
- Paper plate
- Cardstock
- Googly eyes
- Craft sticks
- Glue
- Scissors
- Marker
- Pencil
For more information on this activity, go to DarcyAndBrian.com.
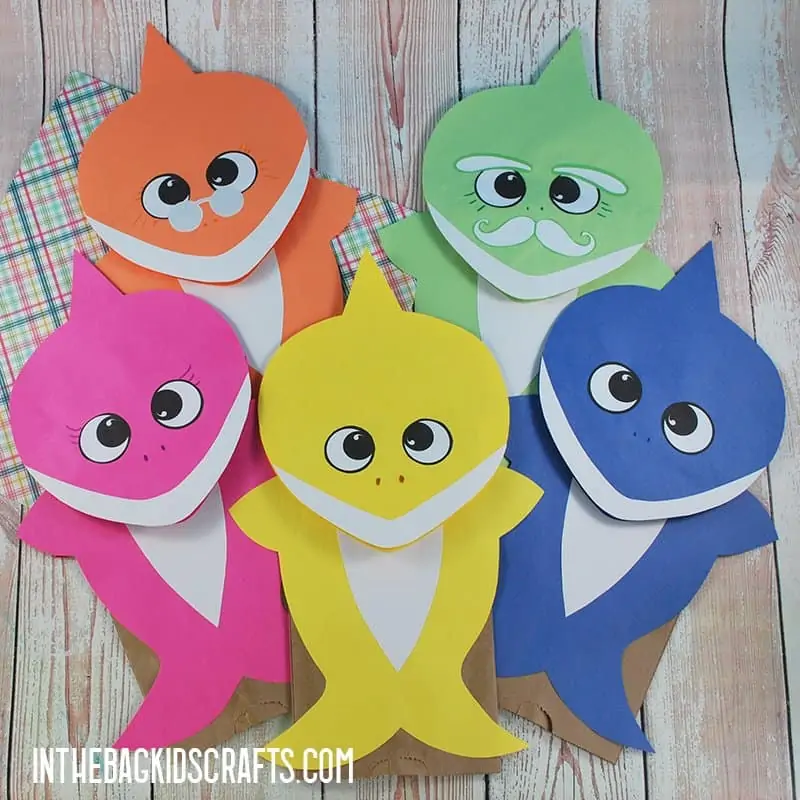
These paper bag puppets are the characters from the song “Baby Shark.” Use these as props for the song. This is also perfect for the family theme. Children can learn the basic unit of the family and their roles.
These puppets are also perfect for helping with color recognition and improving children’s fine motor skills as they assemble and use the puppets.
These free shark templates are available on the site. Download, print, and cut them out. Trace the body and head on colored paper while the teeth and belly are on white. Use red paper for the mouth. Cut these out and assemble them.
Sticky the belly on the body and glue it on the front part of the paper bag. Next, glue the head on the flap of the paper bag. Attach the teeth to the red mouth. Add the eyes. Let this dry before using.
Note that the grandma and grandpa sharks have added details. Ensure that the spectacles and mustache are added.
For this activity, you will need:
- Printed shark templates
- Small brown paper bag
- Scissors
- Glue
- Construction paper
For more information on this activity, go to InTheBagKidsCrafts.com.
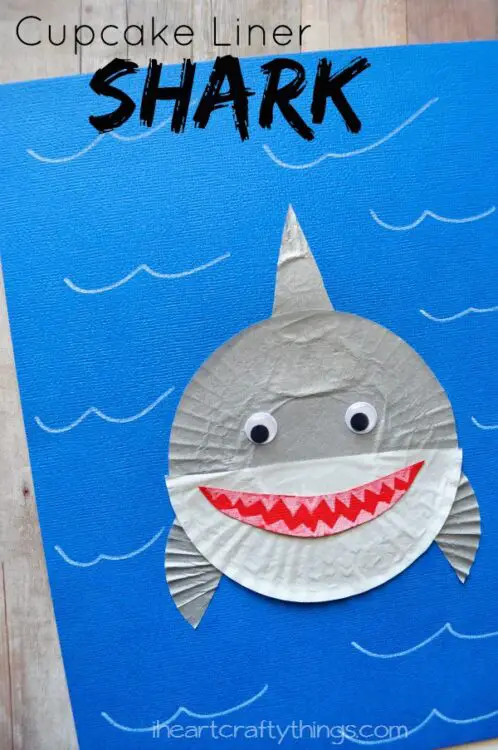
This craft can be used to teach children the body parts of a shark. Through a science lesson, discuss the shark’s unique features, habitat, food, and behavior. Children will improve their fine motor skills as they assemble this craft.
To make this cupcake liner shark, flatten the regular-sized gray cupcake liner and glue it in the middle of the blue cardstock, leaving the edges unglued. This will make the body.
Cut apart the gray mini cupcake liner to make two pectoral fins and a dorsal fin. Refer to the pictures on the site for this step. Glue the fins on the body.
Next, cut a white cupcake liner in half and glue it on the bottom part of the body. Cut out a crescent shape from red cardstock for the shark’s mouth. Glue this on the white cupcake liner. Once the glue dries, use white chalk to draw and shade the teeth.
Finally, use the chalk to draw waves on the blue cardstock.
For this activity, you will need:
- Cupcake liner
- Cardstock
- Scissors
- Glue
- Googly eyes
- Cardstock
For more information on this activity, go to IHeartCraftyThings.com.
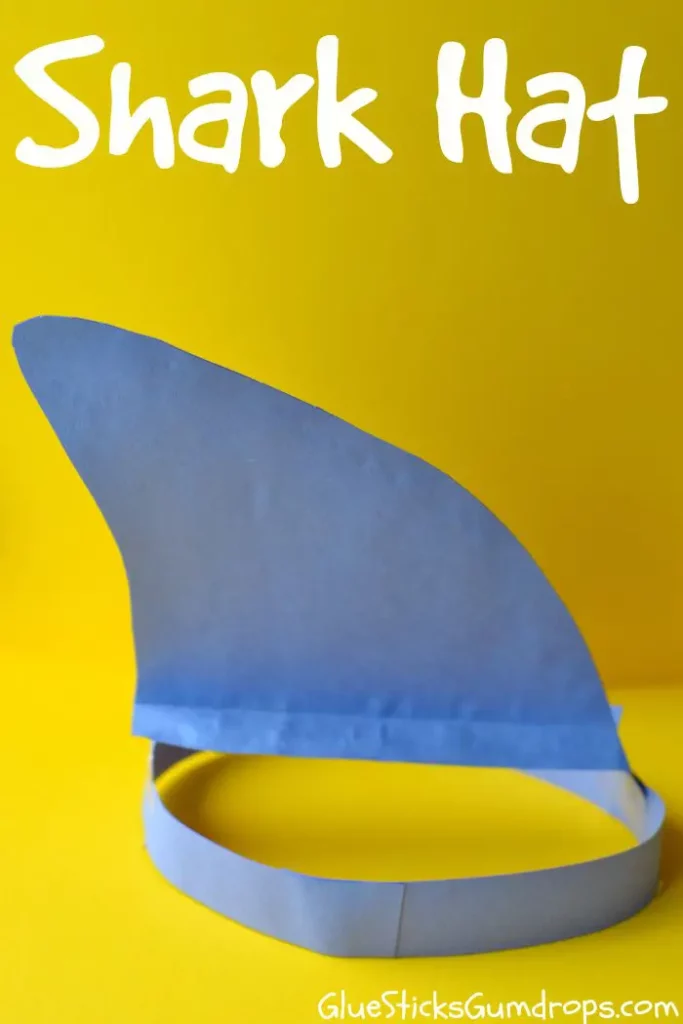
A shark hat can be used as props for stage play and pretend play areas. Teach children positional and directional words using this hat. This will help children improve their listening skills and follow directions.
For example, tell the children the shark swims to the right or hides behind the chair. Use numbers and make the hats in different colors to make the game more challenging. Say, two blue sharks are under the table, or one white shark is asleep.
Make the hat by measuring the children’s heads. Cut two strips of cardstock and attach them with glue. Once dry, use it to measure the children’s heads. Attach both ends to make a ring. Take another strip of cardstock and attach it across the ring.
Next, cut out the fin from the same color of cardstock. Make two of these and glue them together, leaving half an inch on the base unglued. Once the glue dries, flatten the unglued part to make flaps. Attach the fin on the middle strip of the hat.
For this activity, you will need:
- Cardstock
- Scissors
- Glue
For more information on this activity, go to GlueSticksGumDrops.com.
Conclusion
Sharks are fascinating animals that children will love to learn about. Use these crafts for children to explore how amazing these animals are. Discuss the value that they bring to our environment.
This is also an excellent opportunity to dispel myths and misconceptions about these animals.
Thank you for reading. Come back and check out our other craft articles soon.


