There are many silly beliefs about the moon. Some think it is a bowl of milk or is made of cheese, while some believe a rabbit lives there.
Explore the facts about Earth’s satellite with these bright moon crafts that will help explain the moon’s characteristics and demystify myths and beliefs to young children.
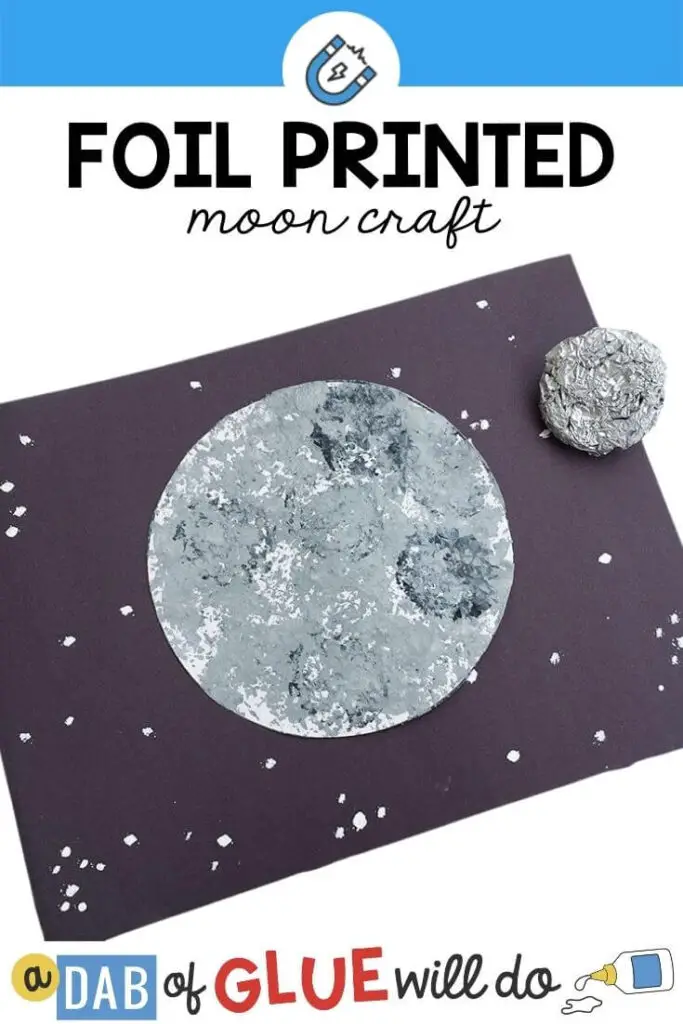
This moon craft makes a realistic version of the real thing that can also double as children’s artwork. It is a perfect activity for the space unit study or space-themed parties. Children will learn the art of stamping through an unusual material.
This activity will help strengthen children’s fine motor skills. They will also learn the technique of layering colors to create depth in their artwork.
Take a large sheet of aluminum foil. Press this into a measuring cup to create a stamp.
Next, trace and cut out a round object on white construction paper. Squeeze some gray and white paint side-by-side on a plate. Let the children dip the foil stamp in the paint and press it on the white circle.
Repeat this step until it is fully covered with color. Next, glue the moon on black construction paper. Use a small paintbrush to create tiny dots on the black background.
For this activity, you will need:
- Aluminum foil
- Small measuring cup
- Round object for tracing
- Marker
- Construction paper
- Paint
- Paintrbursh
- Plate
- Scissors
- Glue
For more information on this activity, go to ADabOfGlueWillDo.com.
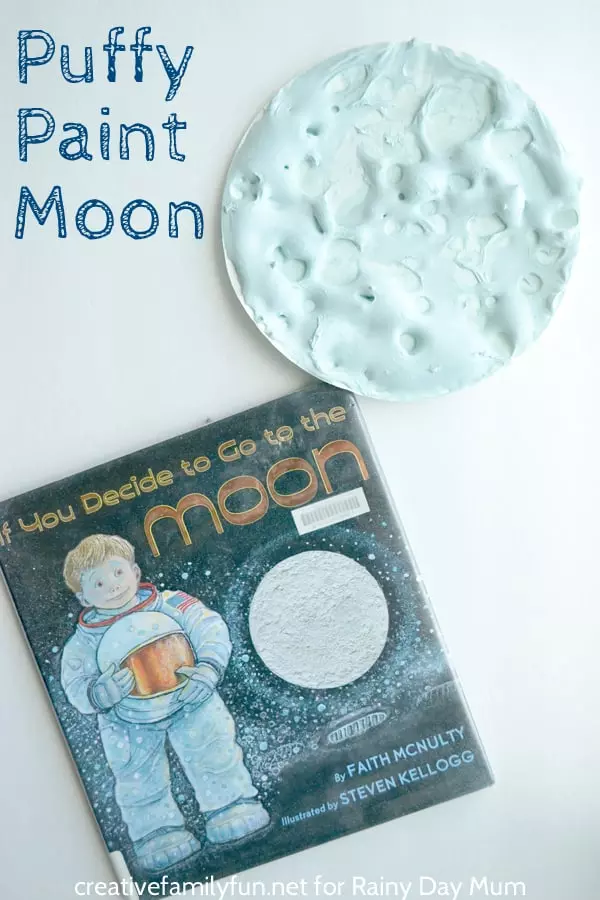
Inspired by the book When You Decide to Go to the Moon by Faith McNulty, this craft provides a beautiful sensory experience using sensory paint made from shaving cream.
This art technique gives the final output an interesting texture. The finished moon is excellent for sensory tables and bins. It will also help improve children’s fine motor skills.
Mix two parts of shaving cream with one part of glue in a bowl using a cut-and-fold technique to keep it thick. Add black paint and black liquid watercolor to make it a bluish-gray mixture.
Let the children scoop a thick mixture onto a paper plate. Have them spread the paint to cover the plate completely using a paint sponge. The color will be unevenly distributed at this stage to create a delightful finish.
Next, let them drop the marbles at different heights to create the craters. Let this dry for several hours.
For this activity, you will need:
- Shaving cream
- Glue
- Black paint
- Liquid watercolor
- Paint sponge
- Paper plate
- Marbles
- Bowl
For more information on this activity, go to RainyDayMum.co.uk.
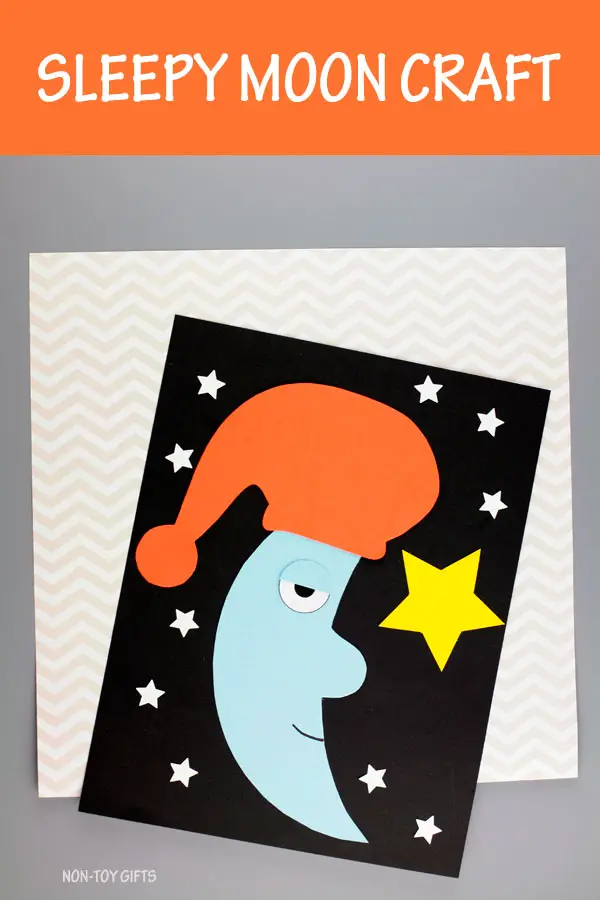
Perfect for bedtime theme and space unit, this sleepy moon craft will help improve children’s fine motor skills. It is a simple and easy-to-make craft that requires children to cut and paste.
Use this craft with bedtime-themed storybooks to help turn nighttime routines fun and engaging.
Download and print the moon template from the site. Let the children cut and trace these on colored cardstock. Have them trace the moon and eyelid on light blue paper, the hat on yellow, and the hat with any preferred color.
They can cut the pieces and glue these on black cardstock. Have them glue the moon in the center of the paper. They can add the hat and eye and glue the eyelid. Let them use a black marker to draw a mouth and glue the star in front of the moon.
Have the children place the star stickers around the sleepy moon to complete the craft.
For this activity, you will need:
- Printed moon template
- Cardstock
- Marker
- Scissors
- Glue
- Star stickers
For more information on this activity, go to NonToyGifts.com.

This moon craft’s crinkly feature will give children a fantastic sensory experience. The site suggests using this craft with the book Goodnight Moon by Margaret Wise Brown.
Children will learn to retell the story and improve their oral language and comprehension. As they work on this craft, their fine motor skills will improve. Explain the source of the moon’s glow and movement with a Science activity.
Take extra caution when children work with the foil. Let them use gloves to prevent unnecessary cuts.
Start by cutting a large circle from the aluminum foil. Have the children crumple it and carefully unfold it without breaking or tearing some parts. Have the children smooth the foil by running their hands on it. Let them glue it on black construction paper.
Next, add the star stickers around the moon. The site suggests adding a cutout of the sun to explain why the moon glows.
For this activity, you will need:
- Construction paper
- Aluminum foil
- Star stickers
- Scissors
- Glue
For more information on this activity, go to MommysBundle.com.
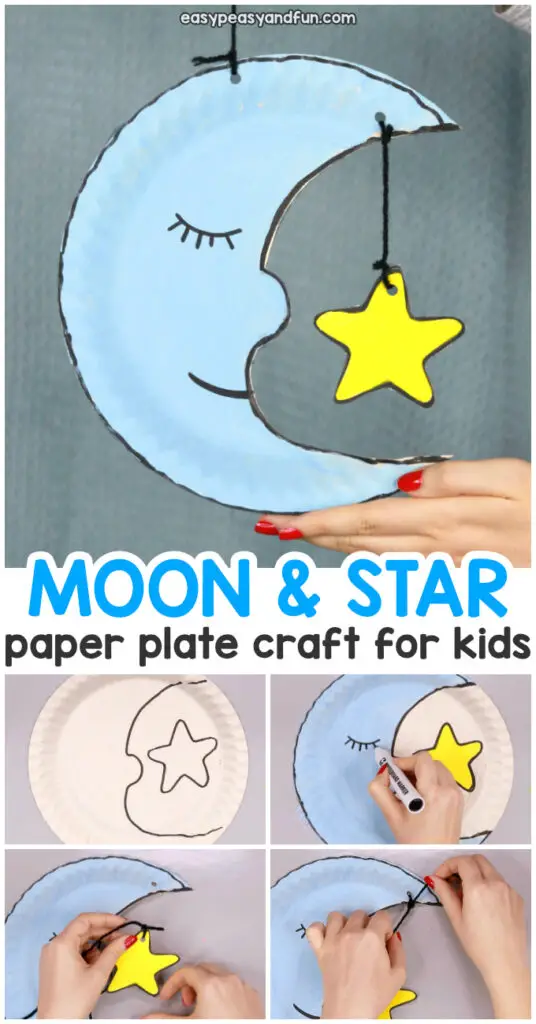
This mobile will strengthen children’s hand muscles and improve their fine motor skills as they assemble the craft. This can be used as a decoration for bedtime-themed lessons.
Outline the moon and star on a paper plate, as shown in the pictures on the site. Next, use the black marker to darken the outlines. Let the children paint the moon in light blue and the star yellow. The site suggests adding a hat on the moon if desired.
Once the paint dries, let the children add facial details, such as closed eyes, eyelashes, and mouth. Let the children cut out the moon and star. Punch a hole in the star and on the top part of the moon.
Have the children tie a piece of yarn on the star and let them knot the end to secure and attach this to the moon. Punch another hole on the moon and attach another yarn for hanging.
For this activity, you will need:
- Paper plate
- Marker
- Paint
- Paintbrush
- Scissors
- Hole puncher
- Yarn
For more information on this activity, go to EasyPeasyAndFun.com.
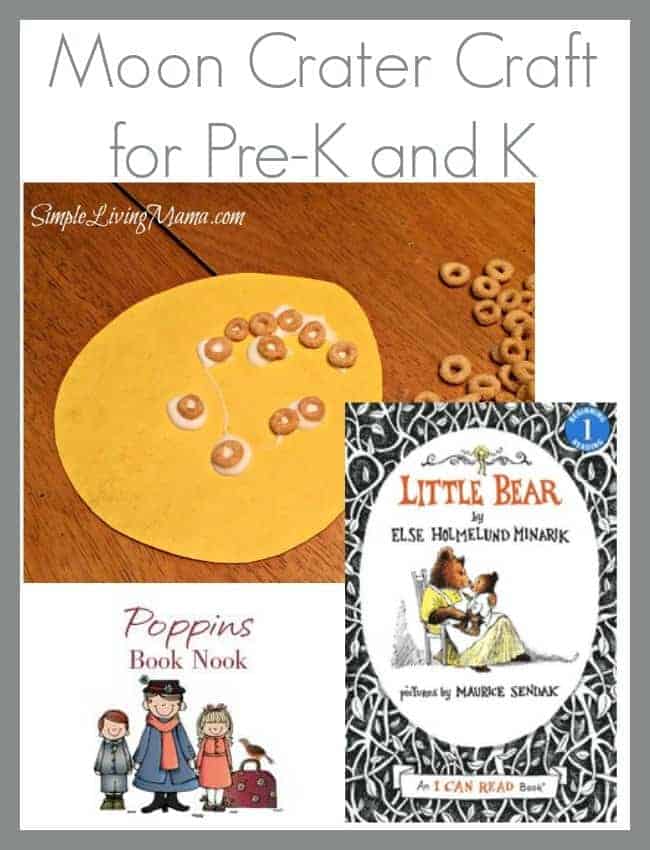
The moon is not smooth. It is filled with craters of different sizes and depths. Explain this idea to young children with a Science lesson and this craft for them to fully understand it. Use videos and pictures for this step.
They will improve their three-finger grasp when they pick up and glue the Cheerios on the paper. This sensory activity provides excellent stimulation for the children’s senses. They can smell, touch, taste, and examine the Cheerios.
Let them count the craters and compare these to each other’s moons. Let them use comparing words, such as more than or fewer than.
Use colored Cheerios to teach color recognition skills and patterns.
Let the children trace and cut out a large circle from the yellow construction paper. Have them glue the Cheerios on the paper one at a time. Explain that each of these Cheerios represents the craters on the moon. Let the glue dry.
For this activity, you will need:
- Yellow construction paper
- Cheerios
- Glue
- Scissors
For more information on this activity, go to SimpleLivingMama.com.
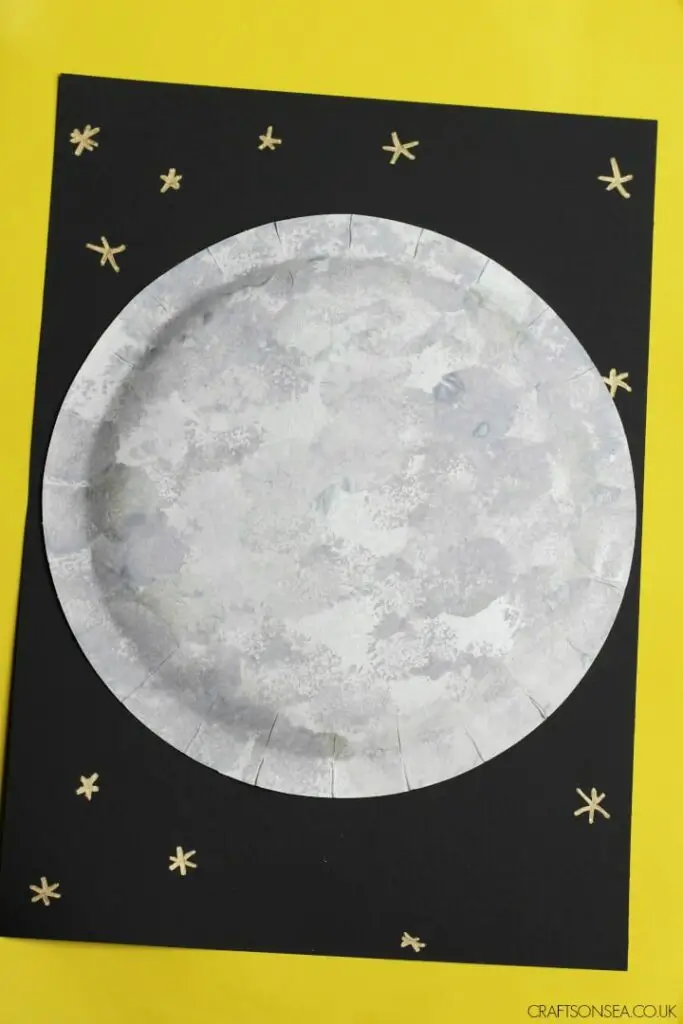
Using pompoms as an alternative to a paintbrush will create layers of colors that result in a fascinating texture. Let the children explore the stamping art technique using pompoms.
This craft will help improve their fine motor skills and strengthen their three-finger grasp. Use this craft with a science lesson to discuss the moon’s phases. Show pictures and videos for this step.
Squeeze some white and gray paint on a palette. Let the children flip the paper plate. Have them dip the pompoms in the paint and stamp it on the paper plate. Let them dip the pompoms alternately on both colors to create a layer of colors.
Attach the pompoms on clothespins as an option for a mess-free activity. This step will add depth to the finished craft.
Let the paint dry, and have the children glue this on black cardstock. Let them add star stickers around the moon or use metallic markers to draw stars.
For this activity, you will need:
- Paint
- Pompoms
- Paper plate
- Palette
- Cardstock
- Metallic markers
For more information on this activity, go to CraftsOnSea.uk.
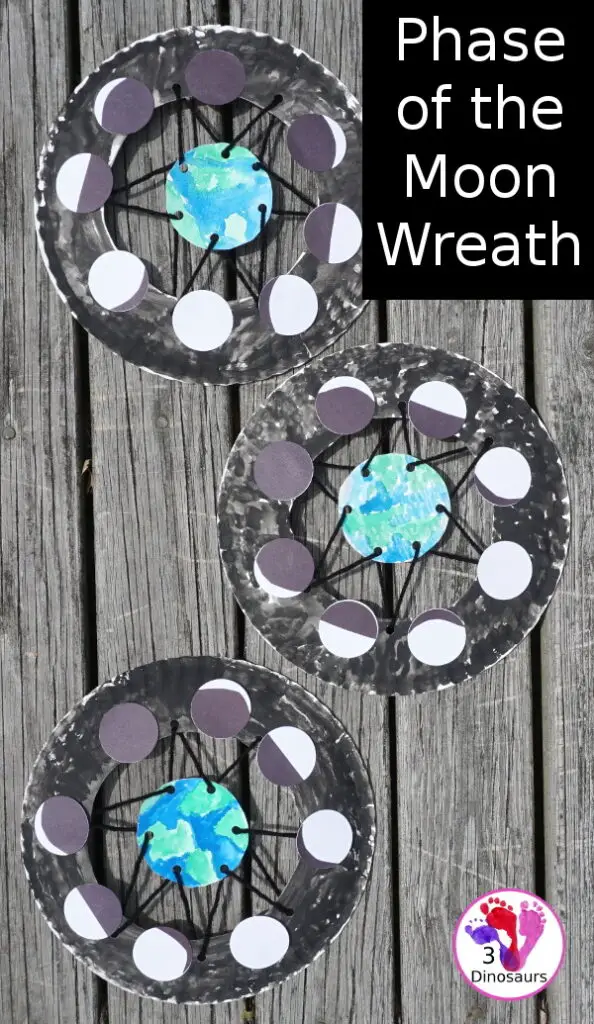
This craft will help explain the natural phenomenon of the moon phases. Use this craft with a science lesson to help children understand the phases in detail. The threading part of the activity will help improve their visual-motor skills.
This is a great visual aid for space-themed lessons and an excellent addition to Science centers.
Have the children cut out the center part of the paper plate and paint it black. Next, have them cut out a circle for the Earth and smaller circles for the moon’s phases using white and black cardstock.
Next, have them paint the Earth blue and green. Let them cut parts of the black circles and glue on the white circles to create the phases.
Next, have the children use the hole puncher to make holes around the paper plate and the Earth. Use the yarn to thread them together. Refer to the pictures on the site for this step. Glue the moon in the correct order around the Earth to complete.
For this activity, you will need:
- Paper plate
- Watercolors
- Construction paper
- Cardstock
- Glue
- Yarn
- Hole puncher
- Scissors
For more information on this activity, go to 3Dinosaurs.com.
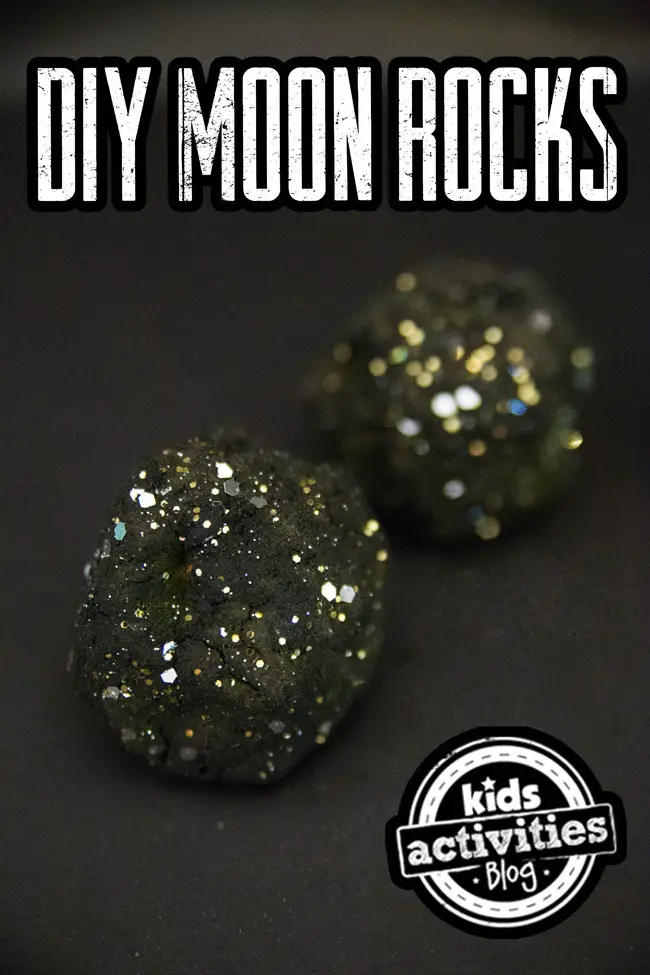
Create these shimmery moon rocks using readily available materials. These are perfect for Science centers and space-themed sensory bins or tables.
Molding and shaping these rocks will provide a great sensory experience for children. It will also strengthen their hand muscles and improve their hand coordination.
Have the children make the rocks in different sizes for comparison.
In a plastic bin, let the children mix four cups of baking soda, silver glitter, and a quarter cup of water until thoroughly combined using a spatula. Let them add a few drops of black food coloring and mix well.
Next, let the children form the mixture into rocks by pressing them together and rolling them between their hands. Ask them to create craters by pressing their fingers on their moon rocks.
Let the rocks dry overnight. If the rocks become too brittle, the site suggests adding water to keep them from falling apart.
For this activity, you will need:
- Baking soda
- Silver glitter
- Water
- Black food coloring
- Plastic bin
For more information on this activity, go to TheCraftingChicks.com.
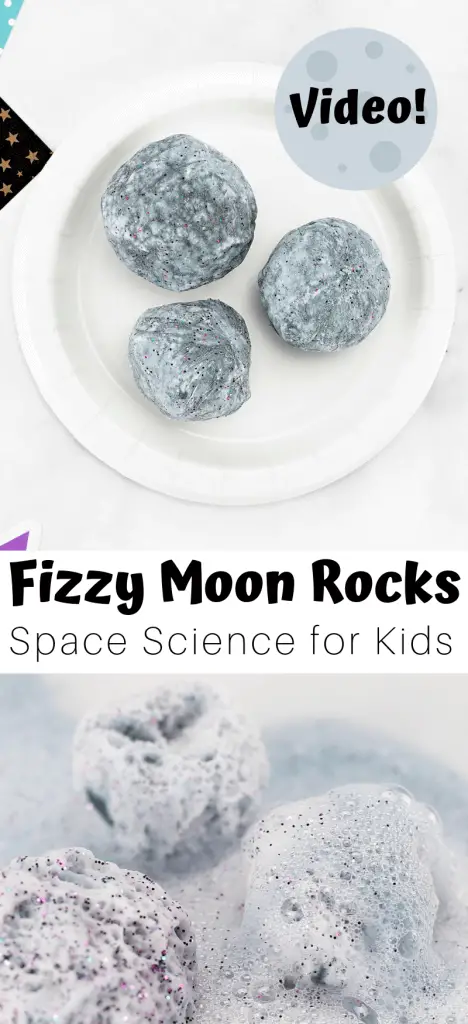
Do this awesome fizzing experiment with children using faux moon rocks. Forming the rocks provides a great sensory experience for children.
These are great for centers and can be used as a STEM challenge. Task children to find out how long it will take for a moon rock to become wholly dissolved based on its size.
Explain with a history lesson how astronauts collect samples of dirt and stones from the moon for scientists on Earth to study.
Have the children mix baking soda and glitter with a bit of water until they can be packed together like snow. Let them add a little water at a time.
Next, have them add some blue, blue, and purple food coloring and mix well. Let them form the rocks and freeze for half an hour or longer. Place the rocks on a tray and have the children use pipettes to drop vinegar on the rocks.
For this activity, you will need:
- Baking soda
- Vinegar
- Water
- Food coloring
- Glitter
- Pipette
- Tray
For more information on this activity, go to LittleBinsForLittleHands.com.

This craft is inspired by a line in the famous book Guess How Much I Love You by Anita Jeram. “I love you to the moon and back” has become a classic quote to express one’s love.
This is a wonderful craft for space unit and a STEM activity, challenging children to make their pictures get to the moon by creating a simple machine called a pulley.
Have the children trace a circle on cardboard and paint it using white and gray colors to resemble the moon.
Next, take a photo of each child with their arms raised upward, as if flying. Print this on the A4 card and cut it out. Attach a small piece of drinking straw to the back with masking tape.
Next, insert a string through the straw and attach it to the back of the moon. Attach two small straws, each one at the end of the string. Refer to the pictures online for this step.
Stick a strip of magnetic tape to the back of the moon and place it on the refrigerator. The children can now pull the cords to make them fly to the moon.
For this activity, you will need:
- Printed banner template
- A4 card
- Printer
- Scissors
- Drinking straw
- String
- Bamboo skewer
- Masking tape
- Cardboard
- Plate
- Pencil
- Paint
- Sponge
- Magnetic tape
For more information on this activity, go to RedTedArt.com.
Conclusion
Stimulate children’s interest in space science with these crafts to help them understand more about this celestial body. These crafts can be tailored to fit every children’s abilities and skills.
These are a perfect addition to science lessons that broaden children’s ideas about the moon. Thank you for reading. Come back and check out our other craft articles soon.
People Also Ask
The large object we see in the sky at night is called the moon. It circles the Earth and affects the tides in our seas. It is filled with craters and is smaller than the sun.
It may look like something else when viewed from Earth but it is not made of cheese or a bowl of milk.
Teaching preschoolers about the moon can be fun and interesting. Use videos to show how the first astronauts reached the moon through a space shuttle. Explain the need to wear a special suit while exploring the area. Use books, pictures, videos, and hands-on activities to help them visualize the moon.
Show pictures to help them understand that it is filled with dirt and rocks. Show pieces of evidence that it has no gravity and breathable air. Use pictures, books, and videos to explain the moon’s phases.


