With sixty books written and illustrated for children, Dr. Seuss is a favorite among young learners. Millions of copies of his books have been sold and translated into many different languages.
His books have become a classic in children’s literature. The crafty narration and whimsical illustrations cemented Dr. Seuss as one of the most beloved authors of all time.
Here are ten crafts to go with his books.
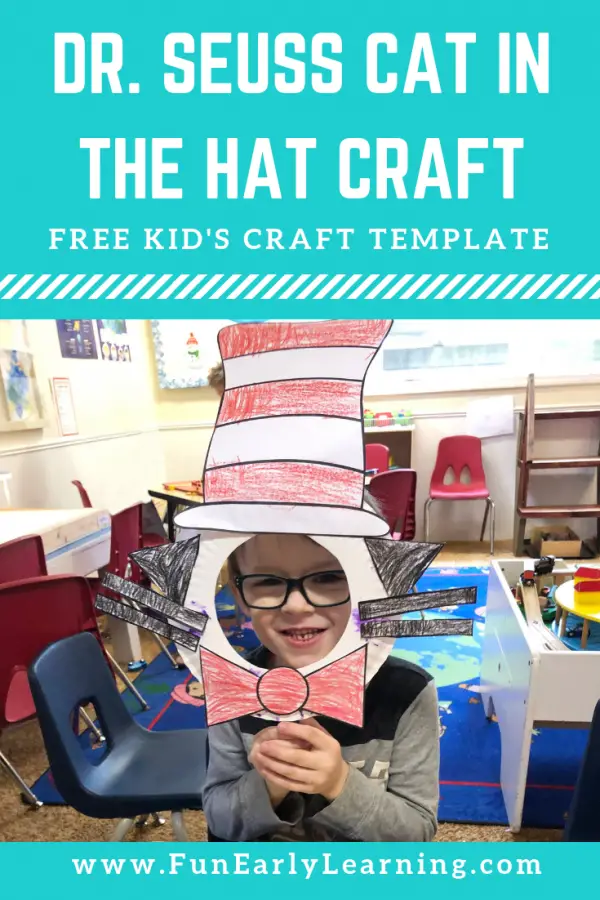
Turn every kid’s dream of becoming the “Cat” with this hat craft a reality. Use this to retell the story of “The Cat in the Hat” as a prop during pretend play and as a part of a costume. Children will improve their fine motor skills as they cut, color, and paste the pieces of this craft.
Download and print the free Cat in the Hat template from the site. Color the pieces and cut these out. Cut out the circle in the center of the paper plate.
Stick the hat on top of the paper plate. Add the ears below the hat and the whiskers on the side. Glue the bow on the bottom part of the paper plate. Finally, glue the craft stick on the paper plate on the back where the bow is.
Extend this activity by showing different emotions as they put on the mask. Use situations in real contexts to elicit the correct response. Say to the children, “What would the cat in the hat feel if his toy gets broken?”
Let children show expressions that are appropriate to the situation. This activity will also teach children empathy as they become aware of what others feel in different situations.
For this activity, you will need:
- Printed hat template
- Crayons
- Scissors
- Craft stick
- Glue
- Construction paper
For more information on this activity, go to FunEarlyLearning.com.
See more: Cat in the Hat Activities for Preschool
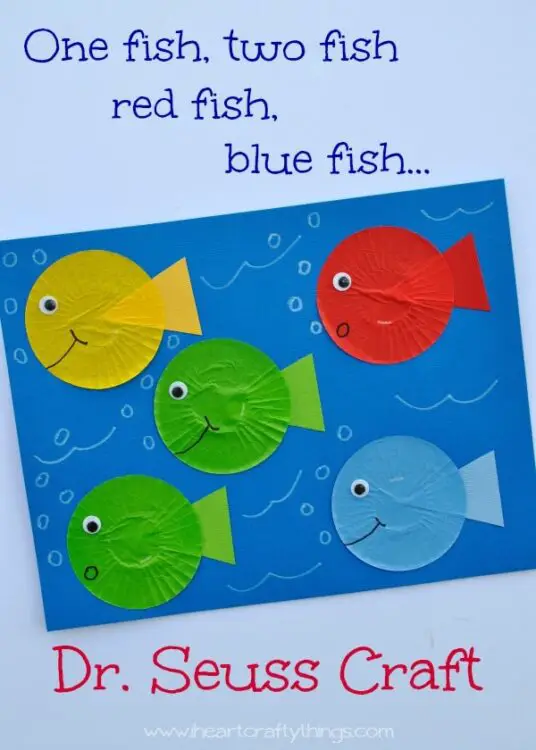
Make this craft to engage children with the book “One Fish, Two Fish, Red Fish, Blue Fish.” This craft is simple and easy to make, even for young children.
Like the book, colors and numbers can be learned with this craft. Make several sets of these fish in varying numbers for children to count. They can also compare which paper has more or fewer fish.
Children can also compare the attributes and find out the similarity and differences between sets of fish. Children may say, “There are different because there is no yellow fish in this group while the other group has two yellow fish.”
To make the fish, have the children flatten the cupcake liners. There should be two green and one each of the yellow, red, and blue liners. Prepare the tails by cutting out the triangles according to the color of the liners.
Attach the tails on the liners and glue them on blue cardstock. Next, glue the eyes and let these dry. Use the black marker to draw the mouth. Finally, draw some waves and bubbles using the white crayon.
For this activity, you will need:
- Colored mini-cupcake liners
- Cardstock
- Googly eyes
- Marker
- Scissors
- Glue
- White crayon
For more information on this activity, go to IHeartCraftyThings.com.
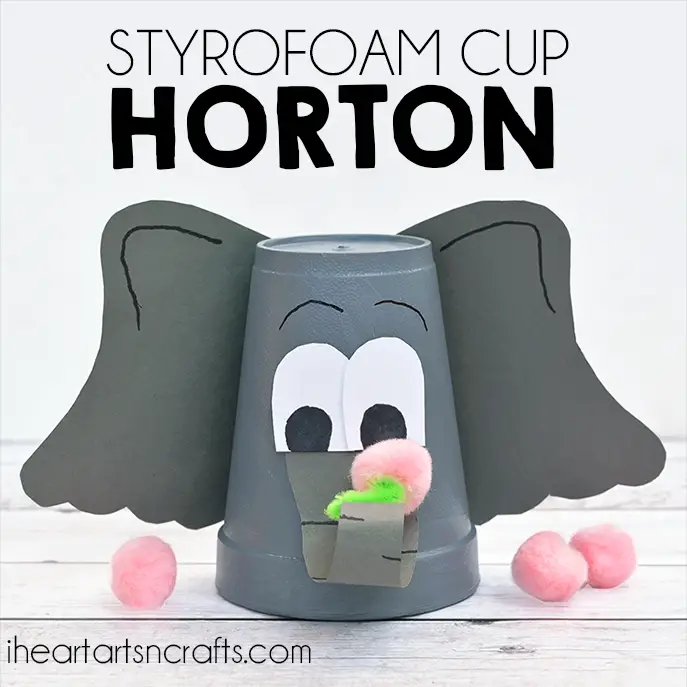
Make a cup version of Horton from the book “Horton Hears a Who!” The caring and loving gray elephant saved the town of Who-ville and the Whos living there.
With this craft, teach children empathy and mindfulness. Discuss some essential points, such as caring for others despite their color and size.
Have a science lesson on the sense of hearing with this craft. Horton, the elephant, could listen to the tiny voice in the book. Ask children to name different sounds.
Help children identify whether they are soft or loud sounds. Provide examples such as the fire truck’s siren or the little birds chirping.
Make Horton by painting the foam cup gray and allowing it to dry. Draw the ears and trunk on the gray cardstock and cut these out. There are no templates for these parts, so refer to the pictures on the site for this step.
Cut out two arches from the white cardstock and use the black marker to make the eyes. Glue these on the cup. Curl the trunk using a marker and attach it to the cup. Glue a pompom on the end of the trunk and attach the ears.
Finally, use the markers to add details such as lines on the ears, trunk, and eyebrows.
For this activity, you will need:
- Foam cups
- Gray paint
- Paintbrush
- Pink pompom
- Gray and white cardstock
- Marker
- Scissors
- Glue
- Googly eyes
For more information on this activity, go to IHeartArtsNCrafts.com. And if you’re up for more Horton crafting, check out our list of elephant crafts for kids!
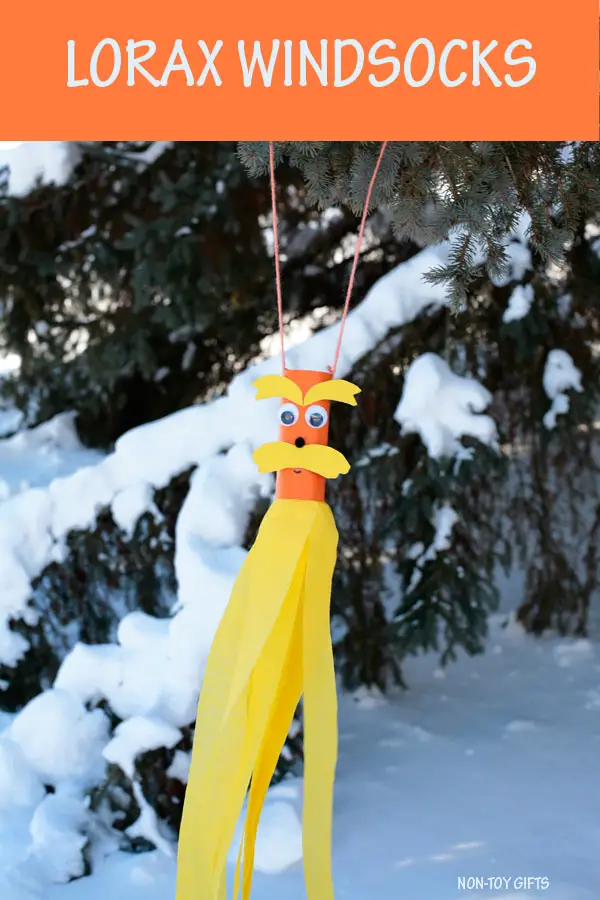
“The Lorax” is a story about taking care of the environment. A Lorax will remind children to value trees, animals, and mother nature. This craft is perfect for the Earth Day celebration.
Children will cut and glue the pieces together to complete the Lorax. Doing all these will help improve their fine motor skills. Teach children the different ways of caring for the environment with this craft.
Start by painting the toilet paper roll orange. Let this dry. Draw and cut out the mustache and eyebrows on the yellow construction paper. There are no templates for these parts. Refer to the pictures on the site for this step.
Stick the mustache on the toilet paper roll. Next, glue the googly eyes above the mustache, then attach the eyebrows. Glue the pompom in the middle of the mustache for the nose. Use a black marker to add the mouth.
Punch two holes on the paper roll and attach the yarn for hanging. Cut eight long crepe paper of the same and glue them on the inside part of the paper roll below the mouth.
For this activity, you will need:
- Toilet paper roll
- Construction paper
- Scissors
- Glue
- Googly eyes
- Paint
- Paintbrush
- Yarn
- Pompom
- Crepe paper
- Marker
For more information on this activity, go to NonToyGifts.com.
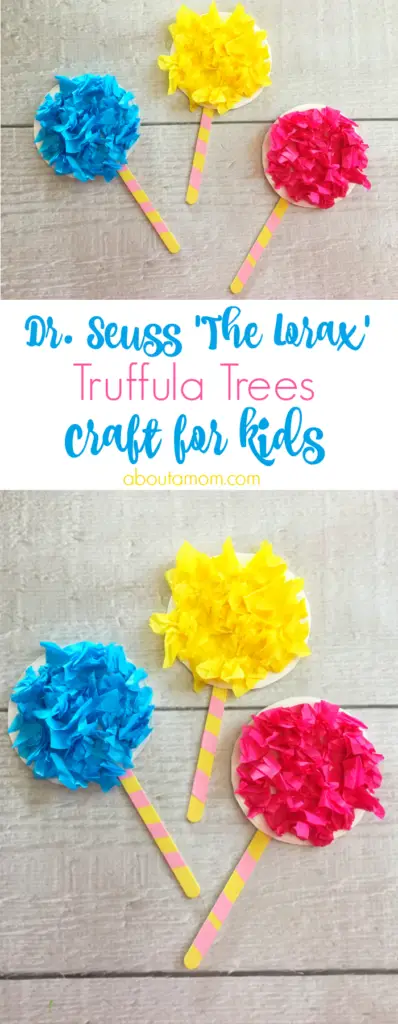
The trufulla trees from the book “The Lorax” were an indispensable part of nature. These colorful trees with striped trunks used to thrive in the unnamed town where the Grickle-grass grows.
They were the food source for the brown barboloots, resembling bears. They also seek the trees’ shade to rest.
Use this craft to teach color recognition to children. Make several of these for children to identify the colors, match, and learn about patterns. This sensory craft will allow children to explore the texture of the fluffy trees.
Paint each craft stick yellow. Once dry, add pink stripes and set aside. Next, cut the center part of the paper plate. Use this circle part as the trufulla. Cut out small squares from the tissue paper.
Crumple the tissue paper squares and stick them on the circle with the hot glue gun. Repeat the process until the whole circle is filled. Use one color for each circle. Make a truffula in blue, red, and yellow.
Finally, add the craft stick to the back of the truffula.
For this activity, you will need:
- Small paper plates
- Tissue papers
- Hot glue gun
- Craft sticks
- Paint
- Foam brush
For more information on this activity, go to AboutAMom.com.

“Put Me in the Zoo” is the story of an unusual animal wanting to belong in the zoo but is refused by the zookeepers. This animal met two children and showed off his skills of manipulating the spots on his body.
Teach children color recognition and counting with this craft. It can help children identify the pompoms’ colors, which resemble spots like in the book. They can also count the number of spots on the face of the animal.
Their fine motor skills will improve as children cut and crumple the tissue paper and bend the pipe cleaners.
Start by gluing the googly eyes on the paper plate. Next, cut a two-inch off the black piper cleaner. Bend the remaining pipe cleaner to form a smile. Glue the cut-off piece in the middle to form the animal’s muzzle.
Refer to the pictures on the site for this step. Cut off small squares from the yellow tissue paper. Use a pencil to twist the paper to create a textured look. Glue these on the paper plate, covering it entirely with yellow.
Once the glue dries, stick the colored pompoms on the face to complete the craft.
For this activity, you will need:
- Pompom
- Paper plate
- Pipe cleaner
- Scissors
- Glue
- Yellow tissue paper
- Googly eyes
- Pencil
For more information on this activity, go to NaturalBeachLiving.com.
See more: Zoo Books for Preschoolers
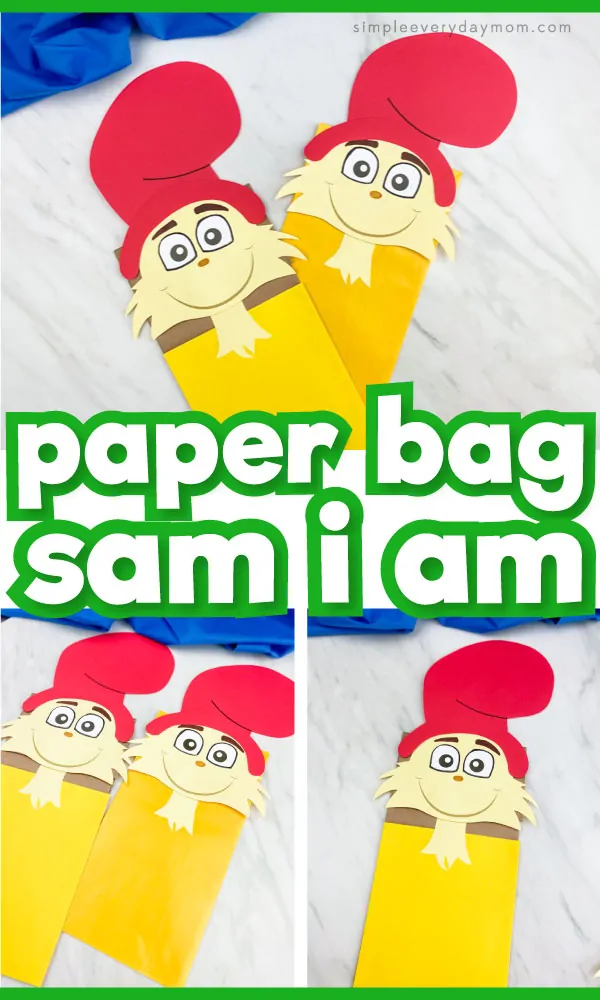
Sam-I-Am, the character from “Green Eggs and Ham,” is the main feature of this craft. His persistence and unwavering resolve made the man in the story try the green eggs and ham despite their unusual and unappetizing appearance.
This craft is the perfect tool for retelling the story. Use the craft’s body to practice rhyming words front the book, such as house and mouse, Sam and ham, or box and fox. Use pictures for these if possible.
Download and print the free template from the site. Cut these out and trace these onto the corresponding color of construction paper. Trace the hat on red and the face on light yellow or cream.
Glue the eyes on the face, the hat on the head, and the neck. Use the markers to highlight the eyes and eyebrows and to draw the mouth. Stick the head on the top flap of the paper bag.
Cut to size a yellow construction paper and stick it to cover the bottom part of the paper bag. This will become Sam-I-Am’s body. Let this dry before using.
For this activity, you will need:
- Printed Sam-I-Am template
- Brown paper bag
- Cardstock
- Glue
- Scissors
- Markers
For more information on this activity, go to SimpleEverydayMom.com.
See more: Green Eggs and Ham Preschool Activities
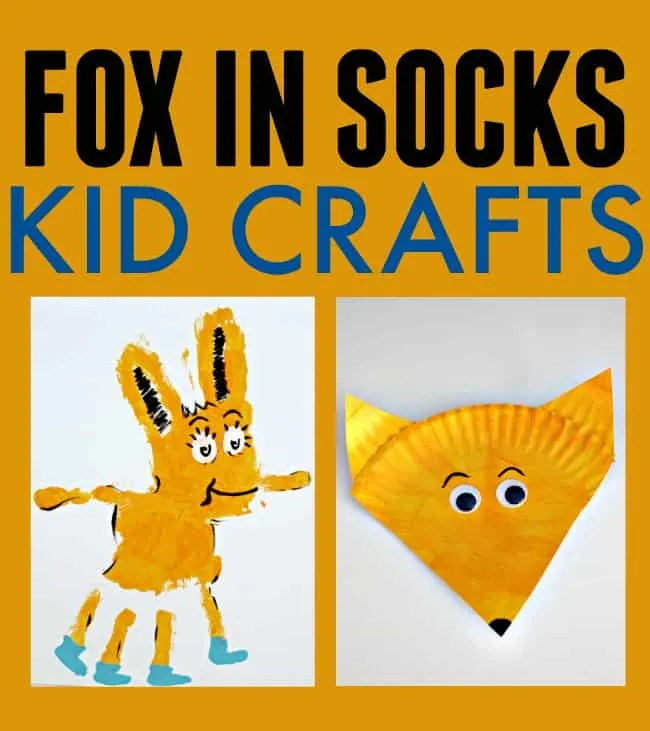
Named after the book “Fox in Socks,” this craft is a great way to teach children various preschool concepts. Children can improve their fine motor skills as they paint, cut, and paste together the pieces to form the fox.
Have children match rhyming words from the book. Write the words on strips of paper. Read the words to the children. Allow them to find the rhyming words.
Place one of the rhyming words on one of the fox’s ears. Place the matching word on the other ear. This task will help them develop their auditory discrimination skills.
To make the fox, paint the paper plate orange and let this dry. Cut a pie shape in the middle. For younger children, draw a big V as a guide for children to cut. Refer to the pictures on the site for this step.
Glue the googly eyes and use the black marker to draw the eyebrows and the nose. Cut two small triangles from the leftover pieces to make the ears and glue them to the back of the paper plate.
For this activity, you will need:
- Paper plate
- Paint
- Paintbrush
- Googly eyes
- Black marker
- Scissors
- Glue
For more information on this activity, go to TodaysCreativeIdeas.com. We also have more fox crafts for preschoolers you might want to check out!
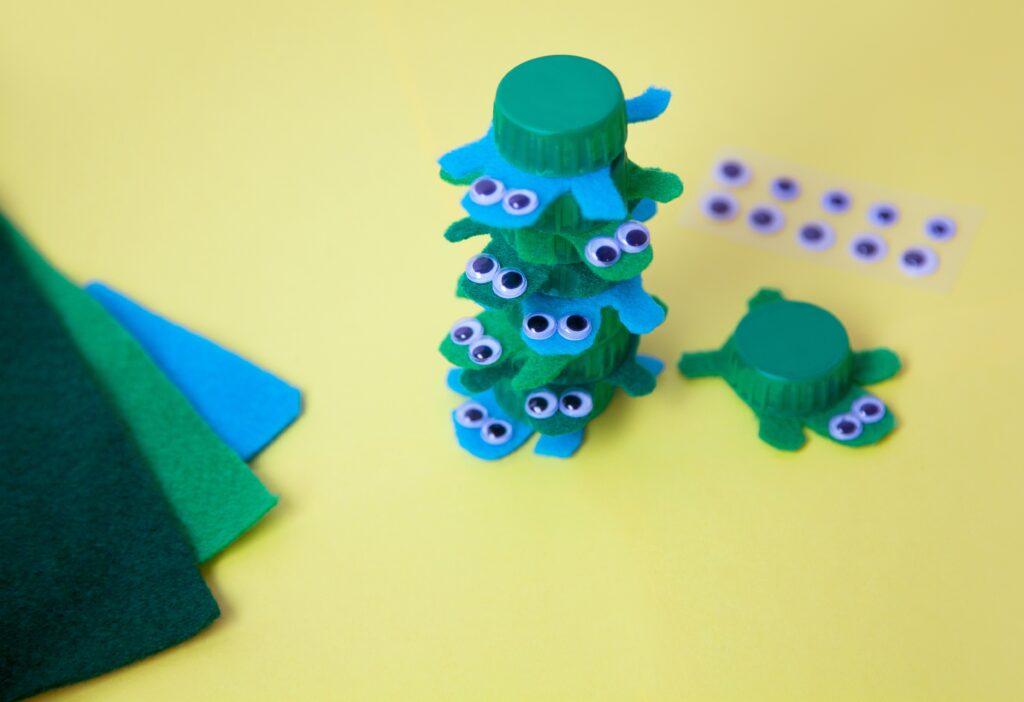
A height-obsessed turtle king named Yertle is the main character in the book “Yertle the Turtle.” He made all the turtles stack themselves, so he could sit up high and view his vast kingdom.
However, a turtle named Mack sneezed and made all the turtles topple. Yertle landed on the muddy part of the pond, and everyone was free.
This adorable craft is a great way to teach children fine motor control as they attempt to stack up the turtles as high as possible without making them fall.
Use different colors of felt or other colors of bottle caps and line them up to teach patterns. Write letters or numbers on the bottle caps for children to match.
Use clean and dry bottle caps for this activity. Outline the turtle’s body on the felt and cut them out. Glue the bottle caps on the felt and add the googly eyes. Allow this to dry. Use a marker to draw details such as the mouth and eyebrows.
For this activity, you will need:
- Felt
- Bottle caps
- Glue
- Scissors
- Googly eyes
- Marker
For more information on this activity, go to Kiwico.com.
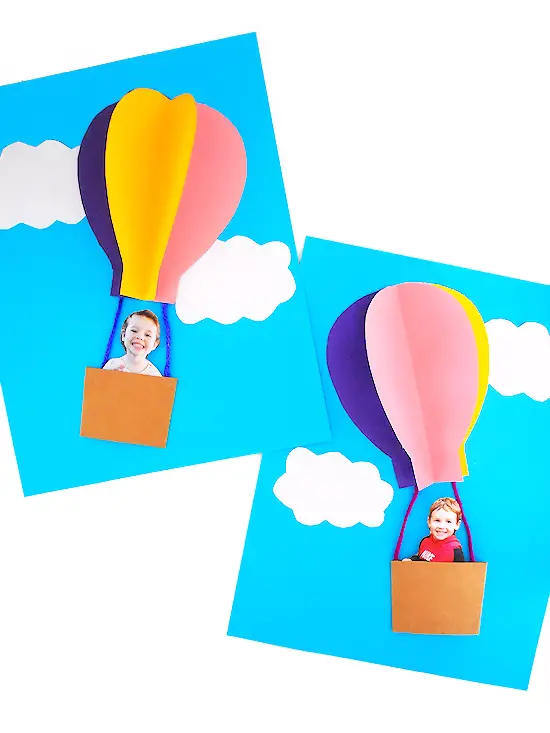
The colorful hot air balloon craft is based on the inspiring book, “Oh, The Places You’ll Go!” This craft gives the illusion of children floating in the sky as they ride the colorful 3D balloon.
This craft can teach color recognition by using different colors for the hot air balloon. Teach positional words from the book, such as up, down, back, behind, and under, by moving the craft around the room.
For example, place it behind a chair and ask the child where the balloon is. This activity will help improve children’s vocabulary and oral language skills.
Download and print the free balloon template from the site. Trace the template onto three different colors of cardstock and cut them out. Fold each balloon in the middle. Attach one side of the first balloon to the second.
Attach the second balloon to the third one to make a 3D version with movable flaps. Trace and cut out clouds from a white cardstock and a brown rectangle for the basket.
Fold the brown rectangle on the dotted lines. Refer to the picture on the site for this step. Next, cut two pieces of yarn and glue them on each fold. Stick the brown rectangle to the back of the child’s picture.
Glue this on a blue cardstock. Glue the balloon on top with the ends of the yarn hidden under it. Finally, glue the two clouds to the paper.
For this activity, you will need:
- Printed balloon template
- Cardstock
- Children’s photo
- Scissors
- Glue
- Yarn
For more information on this activity, go to OurKidThings.com.
Conclusion
Dr. Seuss’s books are fun and exciting for children. What better way to engage children in these stories than by making a matching craft that can be used to teach different lessons and build essential skills for children?
Let children explore and become fascinated with these stories that entertain and teach values to every listener.
Thank you for reading!


