Cars are a classic topic for the vehicle theme in preschool. They are fun and colorful and will go with any lesson. Children will have a blast making them to take home, play with, or just for decoration.
Bring out the inner driver in every child with this list of crafts that will excite them!
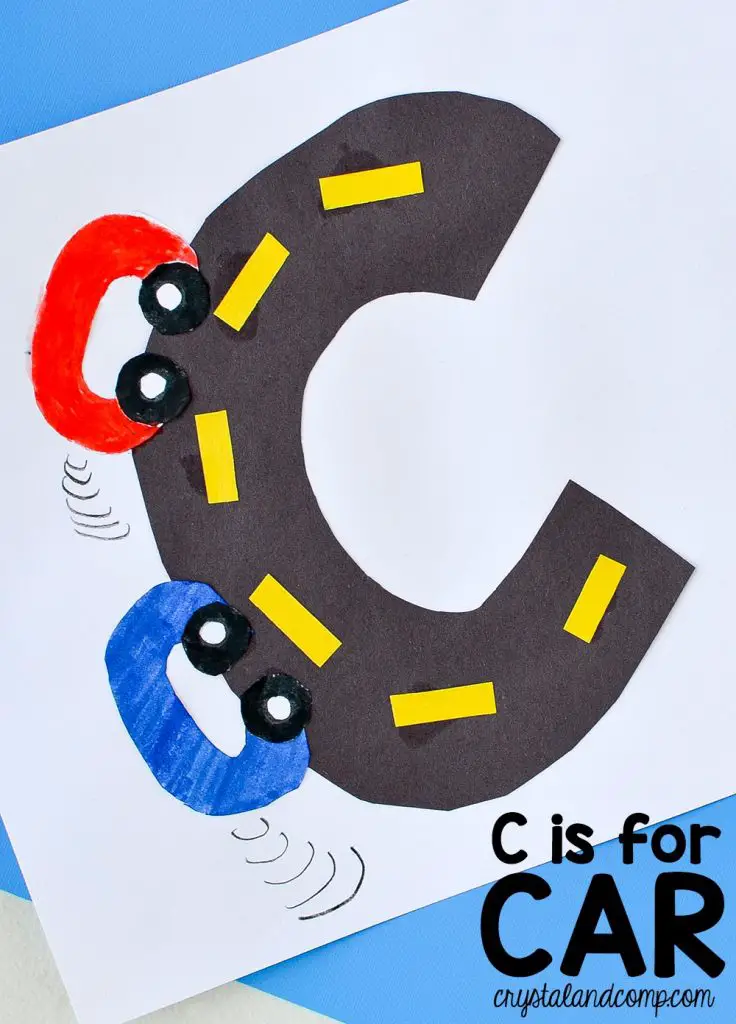
Cars and a road shaped like a letter C will amuse young children learning their ABCs. Use any vehicle-themed alphabet books to go with this craft.
This activity is perfect for learning the letter C, practicing cutting straight and curved lines, and pasting.
Cut a large letter C using black construction paper. Cut small strips from the yellow paper. Provide space between the yellow strips as children stick them on the letter C road. Assist children to ensure proper placement as they position the strips.
Glue the letter C road onto a sheet of white paper. Cut two smaller Cs from red and blue construction paper. Glue them on the road.
Use black circles cut from black paper as the wheels. Attach them to the cars. Dot stickers can also be used for this part. Add the hole reinforcement stickers in the middle of the wheel. This part is optional.
Lastly, ask children to make some letter Cs at the back of the car that resemble smoke with a black marker.
For this activity you will need:
- White paper
- Construction paper
- Black marker
- Glue
- Scissors
- Hole reinforcement stickers
For more information on this craft, go to CrystalAndComp.com
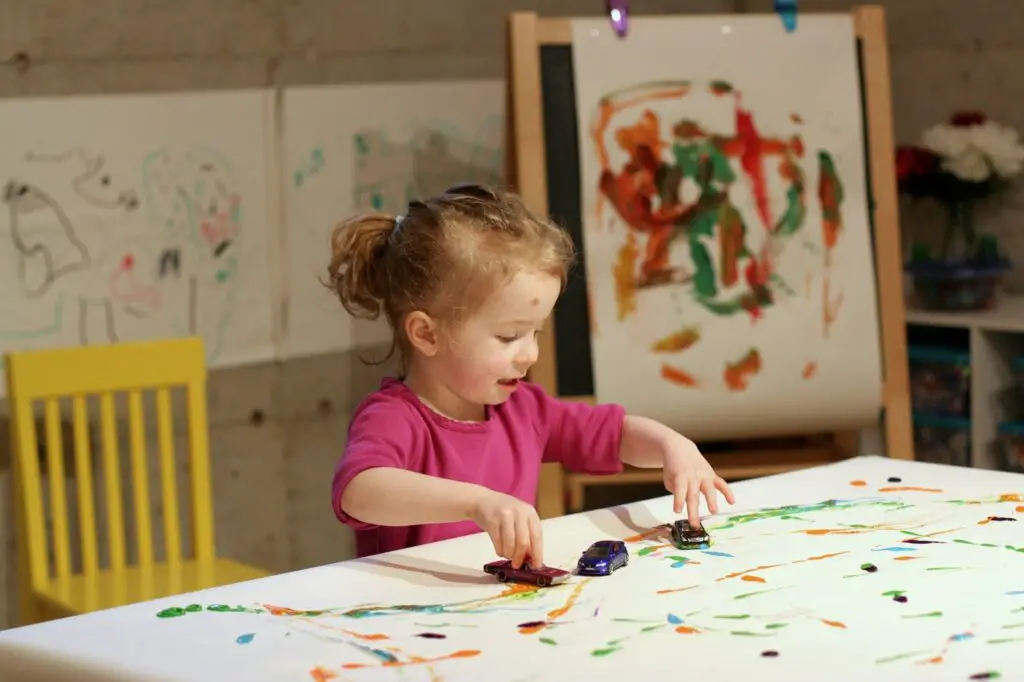
This painting activity for the budding artists will be spotlight-worthy! Use toy cars instead of a paintbrush to create this masterpiece that will wow everyone.
Start this activity by covering a table with butcher paper. Squeeze different paint colors on it. Spread the paint by making the cars zoom around.
The paint will mix and spread as the cars move, creating a fantastic array of colors. This activity is excellent for teaching colors.
Modify this activity by choosing which colors to use. First, put primary colors on one corner, such as yellow and blue. Ask the child to make the cars go over the paint. As the color green emerges, explain that combining colors will create new ones.
Do the same for yellow and red in one corner. In the other corner, drop blue and red paints for the cars to combine. Watch in awe as the child is fascinated with this new idea.
For this activity you will need:
- Butcher paper
- Paints
- Toy cars
For more information on this craft, go to FunAtHomeWithKids.com
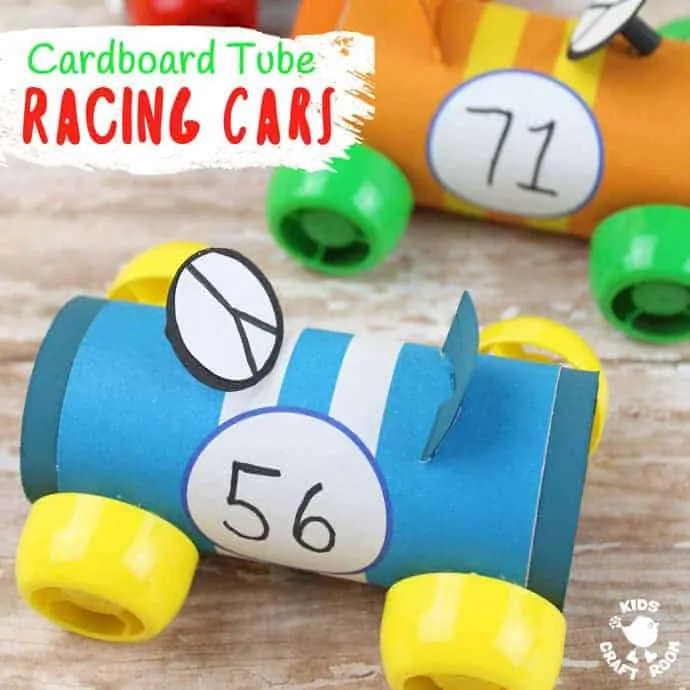
Customized racing cars are excellent toys for indoor play. Use these race cars to teach colors and numbers. These cars are perfect for retelling the story “Number One Sam” by Greg Pizzoli.
Make these race cars by downloading the free car sleeves from the site. Cut and glue on the toilet paper rolls. It is recommended that the toilet paper rolls be painted the same color as the sleeve if they are longer.
Use a hot glue gun to attach the bottle caps. Cut a piece of a rectangle from another toilet paper roll to make the back seat of the race car, paint it, and let it dry.
Make the steering wheel by cutting a circle from white paper and gluing to a round piece cut from your toilet paper roll scrap. Use the black marker to draw the outline of the circle and a cross in the middle.
Attach the backseat and steering wheel with a hot glue gun. Modify this into a game by writing numbers on the cars that children are trying to learn. Cover the circle with clear tape and use an erasable marker to reuse.
For this activity you will need:
- Printable Car sleeves
- Toilet paper rolls
- White paper
- Paints
- Paintbrush
- Bottle caps
- Glue
- Scissors
- Black marker
- Hot glue gun
For more information on this craft, go to KidsCraftRoom.com
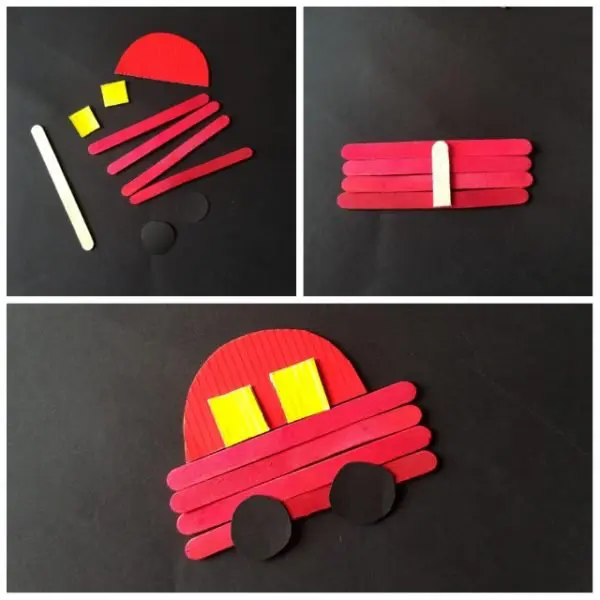
Colorful cars are on the run! These cars are simple to make, and there are two ways to put them together. These cars are great for teaching colors to young children.
First, an adult may assist in using a hot glue gun to attach the parts. This step will take lesser time to complete the craft. The second is just using regular craft glue, which requires time to dry before working on the next step.
Start with cutting the plain popsicle stick to the size of your colored sticks. Use a hot glue gun to stick the plain stick to the back of the colored sticks to hold them together. Refer to the pictures on the site for this step.
Next, use the cardstock to cut out the rest of the pieces. Cut two black circles for the wheels and two yellow squares for the windows. Cut red, blue, and green semi-circles to make the rest of the car.
Assemble the car by sticking the windows on the semi-circle. Use a hot glue gun to attach this to the popsicle sticks. Add the wheels.
Extend this activity by providing special roads for the cars to drive on. Have children cut strips of black paper. Let them use a white crayon to make road marks. Challenge them create a short and long route with these roads.
For this activity you will need:
- Four each of green, red, and blue popsicle sticks
- Two plain popsicle sticks
- Cardstock paper in red, blue, green, yellow, and black
- Hot glue gun
- Scissors
For more information on this craft, go to ArtCraftAndFun.com
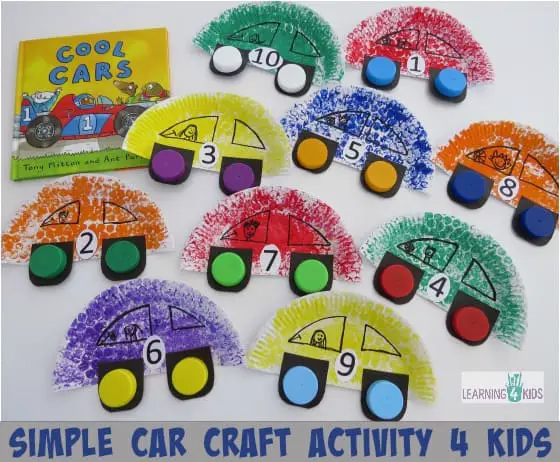
This craft is inspired by the book “Cool Cars” by Tony Mitton. It uses a painting technique called stamping to create an added texture. The result of this technique is a unique pattern on the cars.
If using unpainted wooden blocks, make sure that the bubble wrap covers every surface completely to prevent the paint from staining.
Once the blocks are wrapped, dip in the paint and stamp on the paper plate until it is covered with color. Repeat the process until all plates are painted. Let these cars dry thoroughly.
Print and cut out the free printable numbers from the site. Glue them onto the cars. Cut small arches or circles from black cardstock. Use a hot glue gun to attach the bottle caps to the cardstock. Stick them on the vehicles.
The site recommends personalizing the cars by drawing windows and people inside the cars.
Children are now ready to learn their numbers with these cars.
For this activity you will need:
- Five large paper plates cut in half
- Black cardstock
- Bottle caps
- Printed number symbols
- Hot glue gun
- Wooden blocks
- Bubble wrap
For more information on this craft, go to Learning4Kids.net
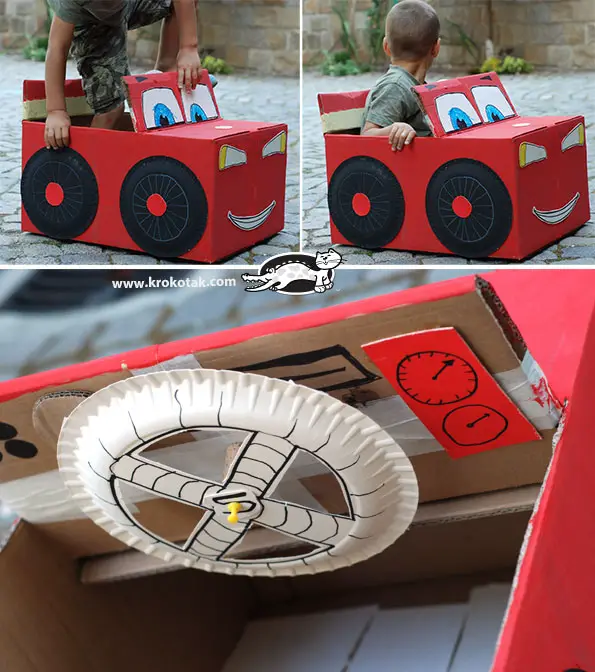
Children will not be able to contain their excitement when they see this kid-sized car. This project may require more effort, but it looks fantastic and is very inviting for young children. You can purchase a box from a home improvement store or use one you have on hand.
Use a box big enough for a child to fit in. Test if the child will be able to sit inside the box. Next, secure the bottom flaps inside and outside with masking tape. Flip the box over and cut off one of the vertical flaps.
Secure the two horizontal flaps with masking tape while keeping the other vertical flap facing outward. Next, make three sections for the horizontal flaps.
Fold the two sections closest to the vertical flap and secure them with tape. This part will be the windshield.
Fold the vertical flap into two to make the backrest. Secure with tape. Refer to the pictures on the site for this process.
Next, paint the outer part of the car with the child’s preferred color. Add paint to the four paper plates with black color to make the wheels.
Make a steering wheel by drawing a cross in the middle of a paper plate and cutting the triangle sections.
Assemble the car by using glue. Add details to the car, such as headlights and wipers. Wait for everything to dry before using.
For this activity you will need:
- One big box
- Five paper plates
- Masking tape
- Paint
- Cork stopper
- Push pin
- Craft glue
- Scissors
For more information on this craft, go to Krokotak.com
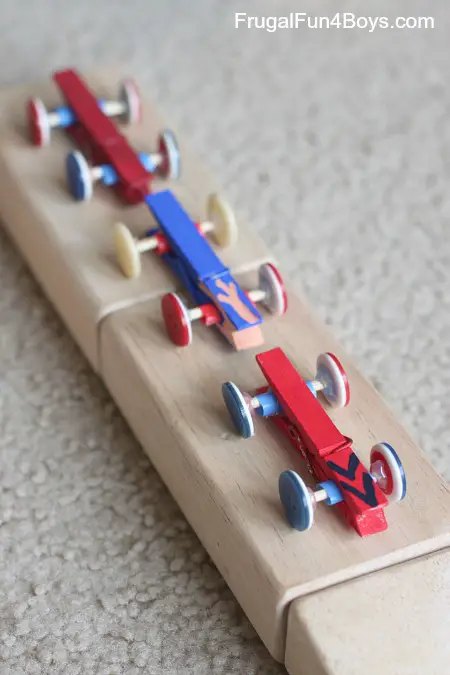
These cars may look simple, but man do they move! Children will enjoy playing with them, driving them around, parking them, and even racing them.
Use a narrow tip paintbrush to cover these clothespins with colors. Allow the children to customize their cars by using a combination of colors and by adding designs or patterns. Allow the paint to dry.
Next, cut the plastic straws and bamboo skewers to about an inch or more. Insert the skewer through the straw. Use a hot glue gun to secure button wheels to each skewer end. You can also use twist ties for this if you have them on hand.
Use the clothespin to clip the front wheels, but attach the back wheels using the hot glue gun. They are now ready for play!
Use these cars to teach prepositions. Make roads, garages, or different terrains for the vehicles to drive on. Give instructions such as turn left, turn right, go around, park under the tree, stop beside the blue car, etc.
Children will become familiar with these words as they play with these cars.
For this activity you will need:
- Wooden clothespins
- Paint
- Paintbrush
- Plastic straws
- Bamboo skewers
- Buttons
- Hot glue gun
For more information on this craft, go to FrugalFun4Boys.com
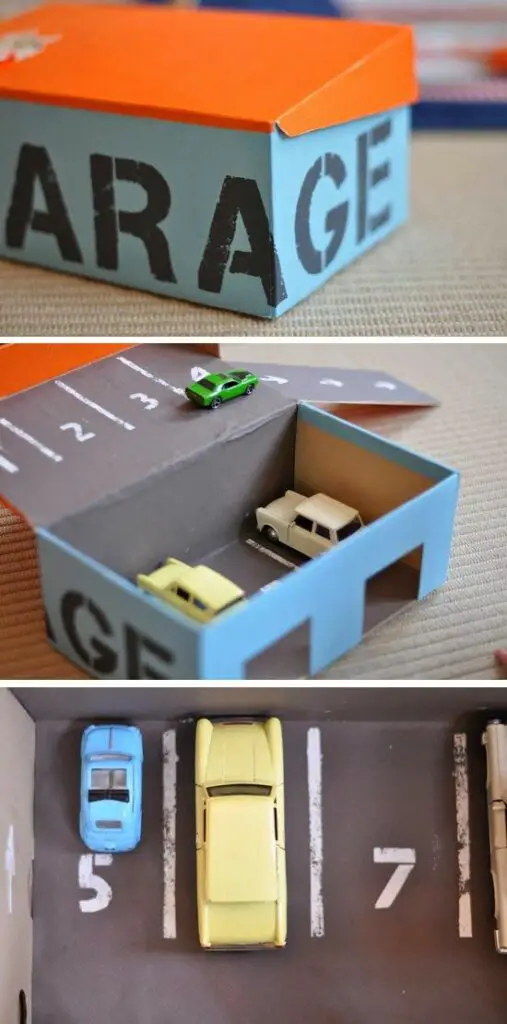
Real cars need a place to park. So do toy cars! Especially when there are too many of them to keep in one place. Misplaced cars may result in crying and even possible accidents.
Keep all toy cars organized by making this mini garage out of a shoe box. Use paint to make them eye-catching. This garage is the perfect spot for all those cars that go about missing after playing.
Paint the outer part of the shoe box with any color you like. Let this dry. Cut two rectangles on front of the box. This opening will be the entryway for cars.
Cut a wide strip from the cardboard. This will become the ramp for the second-floor parking spaces. Paint the cardboard black and draw a dotted white line down the center. Attach to the box flap.
Next, cut the black construction paper to fit inside the box. Glue this to cover the floors of the garage. Once dry, divide the space by marking them with white paint.
Use a stencil to write numbers on both floors. The cars are now ready to go home!
For this activity you will need:
- A large shoe box
- Paint
- Paintbrush
- Letters and numbers stencil
- Cardboard
- Craft knife
- Black construction paint
- Scissors
- Glue
For more information on this craft, go to FunCraftsKids.com
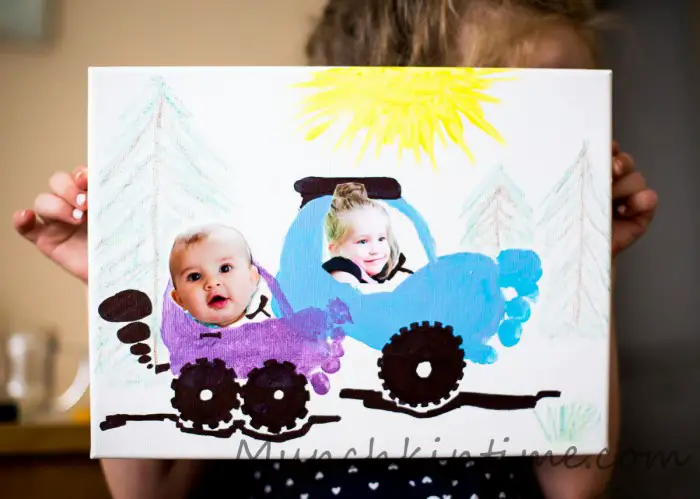
Footprint Cars are an excellent way to cap off the vehicle or car theme in preschool. These pictures will commemorate the children’s love affair with cars.
This can be made using cardstock or on canvas. No matter which of two is used for the base of this lovely picture, hang these and show them off for everyone to appreciate.
Use this craft with the book “Which Vehicles Do You Like?” by Jade Maitre. At the end of the book, it asks the reader or listeners if the family car is their favorite. This moment is an excellent opportunity for discussion about family rides.
Dip the child’s foot in the paint and carefully press on the canvas. Use the paintbrush to add the roof of the car. Extend a line from the heel to the ball part of the footprint. Let this dry.
Use paint to draw the details such as the sun, clouds, and trees. Use black marker to add shadows, smoke, and wheels.
Next, choose a picture of the child to fit inside the window. Cut the outline of the child’s picture, discarding any background in the process. Glue this on the window part of the car.
For this activity you will need:
- Cardstock or a canvas
- Paints
- Paintbrush
- Black marker
- Printed picture of the child
- Glue
- Scissors
For more information on this craft, go to MunchkinTime.com
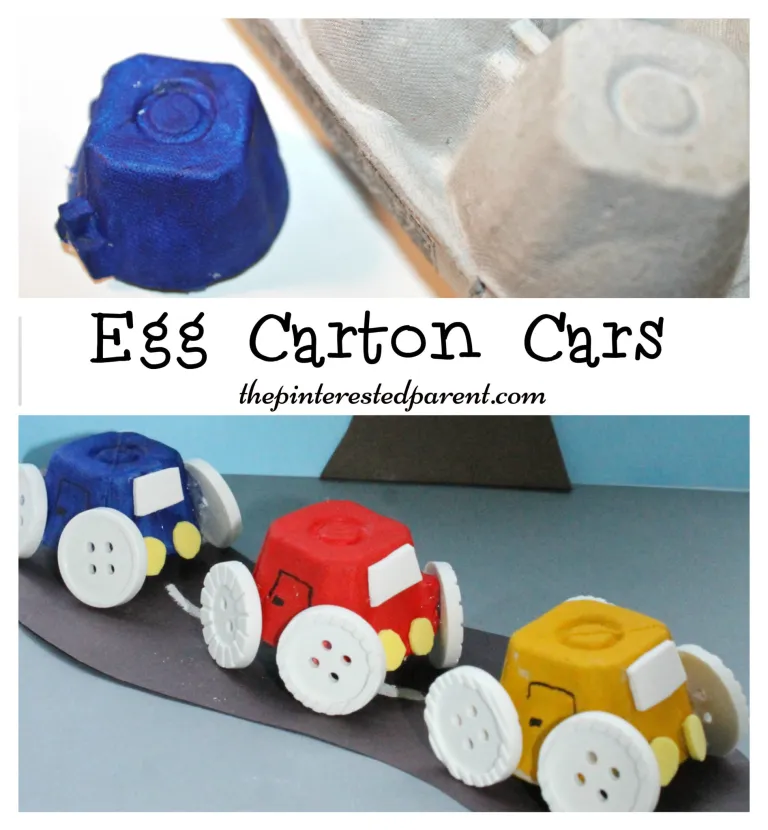
Here’s another quick and easy craft to make. These cars are great for teaching colors, numbers, shapes, and even letters. Just attach a tiny piece of paper with the number, shape, or letter on its roof.
This craft is also an excellent tool to use for teaching basic addition. Ask the children the total number of wheels in each car or the total number of headlights. Provide the necessary means to model how the process works.
Cut the egg cartons into individual cups. Trim off the edges. Flip the cups and paint them with different colors. Allow the paint to dry.
Cut small rectangles from a piece of cardstock. Use hole punchers to make circles for the headlights. Stick these details to the car. Lastly, add the buttons. Use a hot glue gun or craft glue if they do not adhere with regular glue.
Cut straight and curved strips of black paper to make the roads for these cars. Use white paint or white crayons to draw the markings.
For this activity you will need:
- Egg cartons
- Paint
- Paintbrush
- Buttons
- Construction paper
- Black marker
- White crayon
- Scissors
- Glue
For more information on this craft, go to ThePinterestedParent.com
Conclusion
Children in every generation always show an affinity for cars. These vehicles are classic toys that have stood the test of time.
This list provides crafts and activities to quench the desire of those speed-loving children. Try them at home or in school for endless fun and adventure.
We hope you like our list. Thank you for reading!
Other preschool crafts and activities you might like:


