Get ready to have some fun with your little ones! As a parent, it can be challenging to come up with engaging activities that are both educational and entertaining.
That’s why we’ve put together a list of 10 easy prep science activities for preschoolers that are sure to spark their curiosity and imagination. So, grab your lab coats, and let’s dive in!
Great Science Activities for Preschoolers
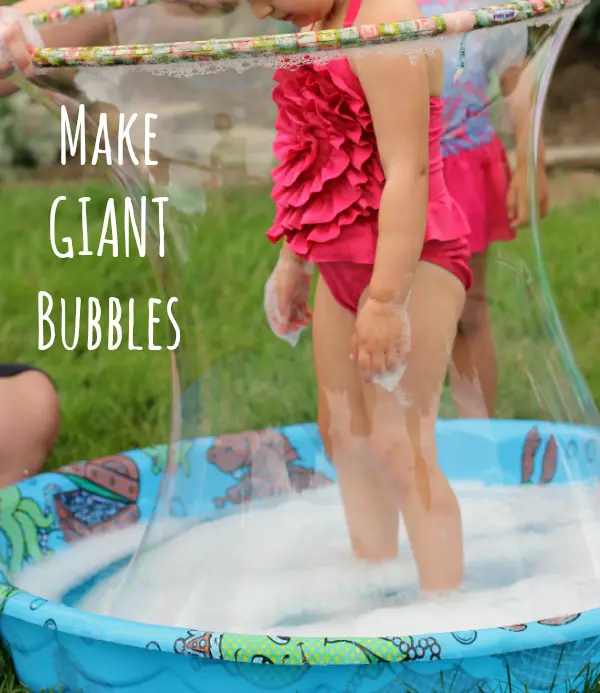
Engage your preschooler in an amazing activity that will fuel their imagination and curiosity – giant bubble-making! All you need is a:
- Hard-Shell Kiddie Pool
- Dish Soap
- Hula Hoop
First, fill the kiddie pool with water and mix in one or two cups of dish soap. Make sure that the soap and water are well blended. Take a hula hoop and immerse it in the soapy mixture. Have your child stand in the middle of the hula hoop, lift it up as evenly as possible, and voila! Your child will find themselves inside a giant bubble, giggling with excitement.
Watching the bubbles swirl and dance around your child is a spectacular sight to behold. You can experiment with moving the hula hoop faster, which will result in bigger bubbles. This activity is perfect for hot summer days when you want to stay cool and have fun with your little one.
Makeandtakes.com offers further insight into this resource, so be sure to visit the website for more information. We also rounded up more bubble activities you might want to check out!
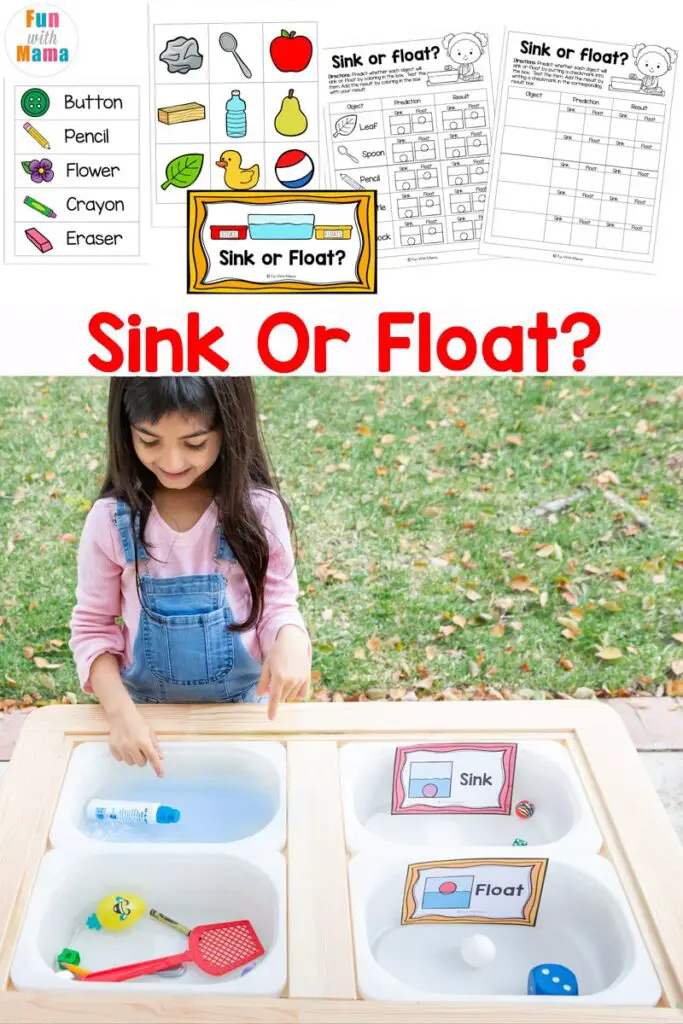
Let’s dive into an exciting science experiment that will teach your preschooler about buoyancy – the sink-or-float experiment! The materials needed are simple, and you can even use items from around your home. You will require:
- Cardstock
- Printer
- Water
- Water table/container
- Various households (rubber duck, crayon, leaf, apple, pencil, small ball, button, flower, pear, etc.)
Start by having your child select an object, feel its weight, and write it down on their worksheet. Next, have them make a prediction about whether it will sink or float. Once they’ve made their prediction, have them place the object in the water and record whether it sank or floated.
This experiment is an excellent opportunity to discuss the science behind why certain objects float while others sink. Extend the learning by encouraging your child to use two items at once and guess which will sink faster.
For more information about this resource, be sure to check out funwithmama.com.
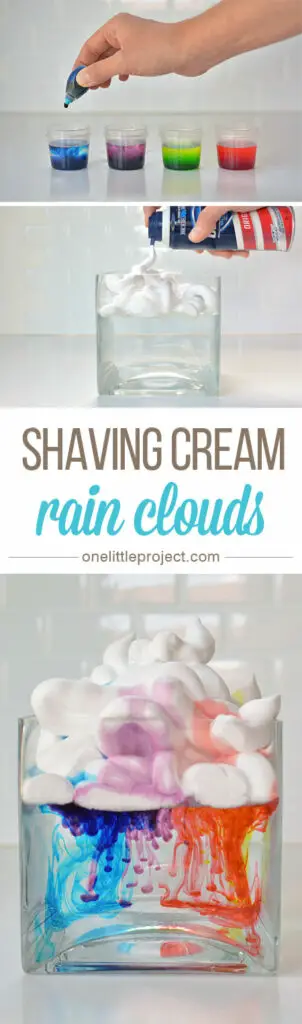
Here’s a fun activity that parents and teachers can do with their kids/students. You’ll need a few simple materials:
- Glasses Or Bowl
- Food Coloring
- Shaving Cream
- Small Bowls Or Containers
- Water
- Eye Dropper
- Measuring Spoon
Begin by filling up small containers with water and adding food coloring of different colors to each one. The more water you use, the more rain you can create, but the less water you use, the faster your “rain” will drop.
Afterward, fill a clear glass with water to around 2/3 full and apply a generous amount of shaving cream on top. You can then use an eye dropper to drip the various colors of water onto the shaving cream cloud, and the nearer you squeeze it to the edges, the quicker it will penetrate the shaving cream and fall down as rain.
You can explain to your kids that the water represents the air, and the shaving cream acts as the clouds. As the clouds become filled with water, they create rain. Observe the rain coming down from the clouds and enjoy this fun and effortless activity, which is an excellent way to spend time with your children while also learning about clouds and rain.
To get additional details about this resource, make sure to browse onelittleproject.com.
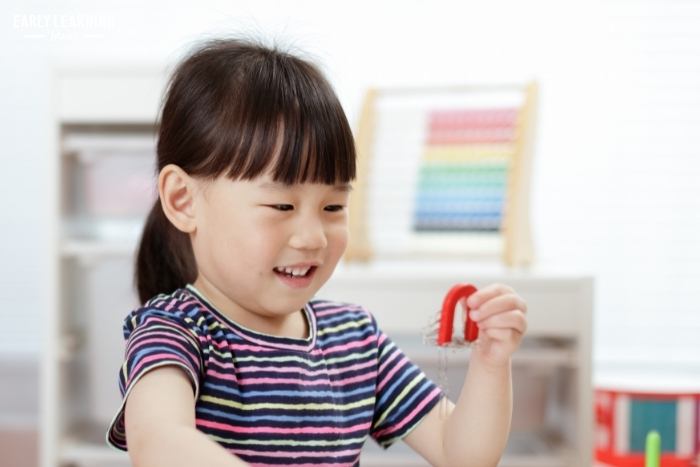
This next activity is a simple and fun way to teach preschoolers about the physical properties of magnets. All you need is a variety of objects, including some that are magnetic and some that are not, and a magnet.
Start by having your child pick up an object and make a prediction about whether it is magnetic or not. Then, hold the magnet up to each object and see if it is attracted or not. Were there any surprises?
This magnet activity can also be extended by having the child sort the objects into two groups – magnetic and non-magnetic. It’s a great way to help them develop their observation and classification skills.
You can use this experiment to spark their curiosity about magnets and how they work. Encourage them to explore the objects further and ask questions about why some objects are magnetic and others are not. This activity is not only educational but also interactive and engaging for preschoolers.
Earlylearningideas.com is the place to go if you need more information about this resource.

Germs are everywhere around us, and this science experiment is a great way to teach preschoolers about the importance of handwashing and hygiene. For this experiment, you’ll need:
- Bread
- Pocket Purifier
- Ziplock Baggies
To start, have your child rub their tongue onto two slices of bread and place it into a Ziplock baggie.
Spritz each slice with water and immediately place one slice into a plastic baggie. Take the other and use a UV purifier light to perform “light therapy” on it. Expose the bread to the light for roughly 15 seconds before putting it in a separate plastic baggie. Label each baggie to keep track of which is which..
Wait a few days and observe the changes that occur. Both pieces should grow mold but the one exposed to light therapy should have significantly less mold growth.
This is a great opportunity to talk about the importance of washing hands regularly, cleaning surfaces, and the use of UV lights to kill germs. Let your child go around the house with the UV light and sanitize objects that are likely to carry germs but are difficult to clean.
For more information about this resource, be sure to check out kidsactivitiesblog.com. Looking for more, similar activities? Check out our list of germs activities for preschool!
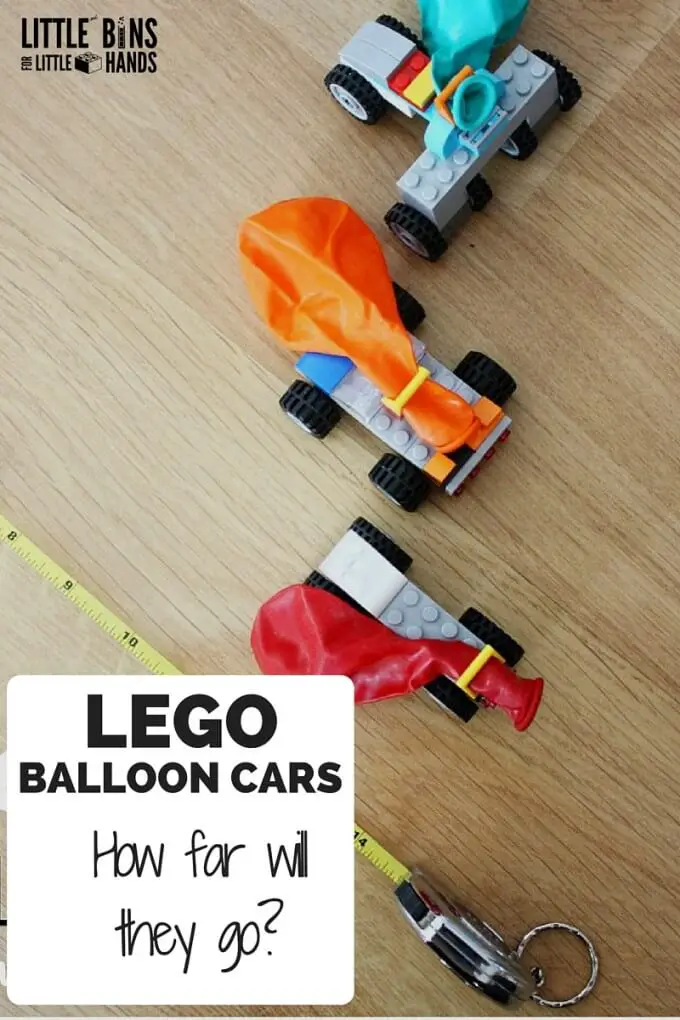
Creating a LEGO balloon car is a great way to engage your preschooler’s creativity and problem-solving skills. To get started, gather the materials such as:
- Basic Lego Bricks
- Balloon
- LEGO Education Wheels Set is a great addition
Start by building a car with LEGO bricks that have space for the balloon to be attached. Once you have made the car, attach the balloon to the back with tape. Blow up the balloon and then let the car go! Your preschooler will love watching the car zoom across the room, powered by the air escaping from the balloon.
Use a small tape measure to measure the distance that the car travels. This can be a fun way to incorporate early math skills into the activity.
Encourage your child to experiment with different designs and modifications to see how they affect the car’s speed and distance traveled. This activity is a great way to introduce basic engineering concepts to young children in a fun and engaging way.
If you want to learn more about this resource, don’t forget to visit littlebinsforlittlehands.com.
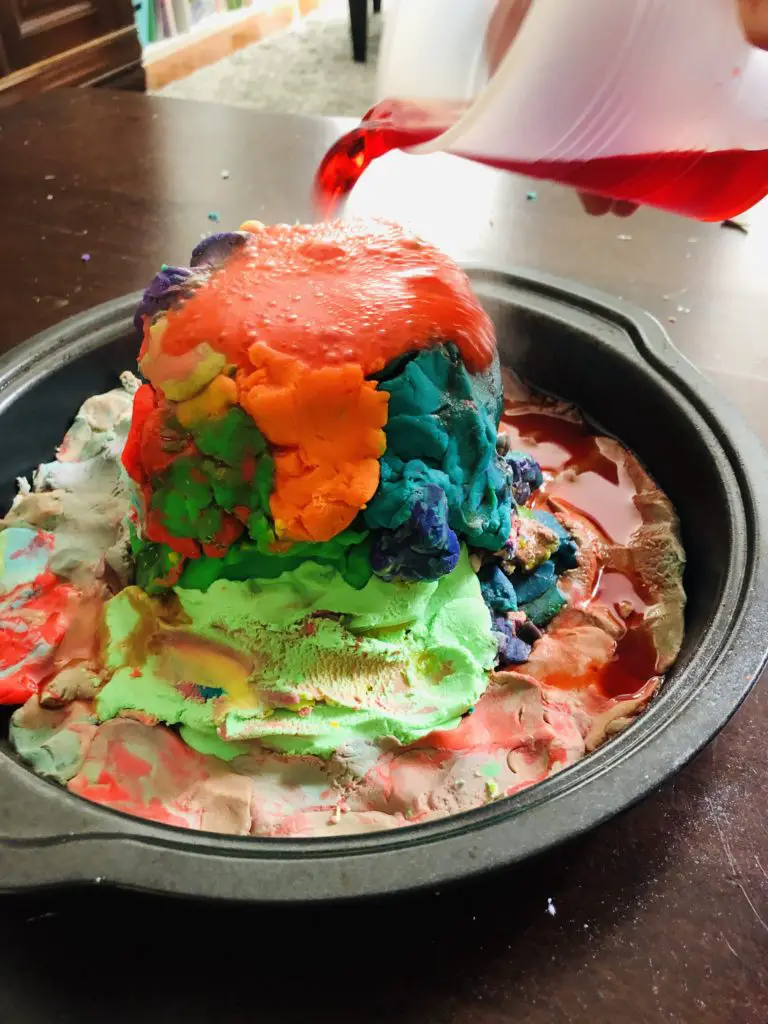
Let’s have some explosive fun with a Playdough Volcano science activity! You’ll need a:
- Cake Pan
- Playdough
- Small Disposable Cup
- Baking Soda
- Vinegar
- Red Food Coloring
First, mold the playdough around the disposable cup to create a volcano shape. Add a few drops of red food coloring to the cup to create a lava effect. Next, add 1-2 teaspoons of baking soda to the cup, making sure it doesn’t overflow.
Now, it’s time for the volcanic eruption! Pour in vinegar to the cup, and watch the chemical reaction take place. The baking soda and vinegar will react to create a bubbly and fizzy lava explosion!
This science experiment can also be used to teach your preschooler about volcanoes, how they erupt, and the science behind them. Your child will be fascinated to watch the eruption take place and learn about the reaction that causes it.
Glitteronadime.com offers further insight into this resource, so be sure to visit the website for more information.
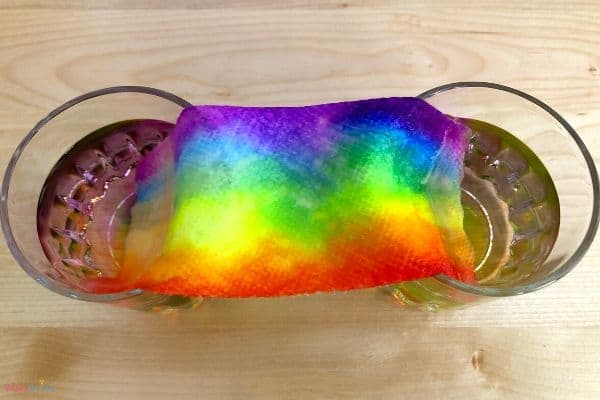
Growing a rainbow on a paper towel is an exciting and colorful science activity for preschoolers. Here are the materials you will need to get started:
- Paper towel
- Washable markers
- Water
- Two identical glasses
To begin the experiment, lay out a paper towel and have your preschooler draw a rainbow on it using washable markers. Be sure to leave a margin at the bottom of the paper towel.
Next, pour water into the two identical glasses until they are about 1/3 full. Add a few drops of food coloring to each glass – use different colors for each glass.
Now it’s time to watch the rainbow grow! Place one end of the paper towel in each glass, making sure that the bottom margin stays dry. As the paper towel absorbs the colored water, the colors will start to spread and mix, creating a beautiful rainbow effect.
Once the experiment is complete, hang the paper towel up to dry and marvel at the beautiful rainbow your preschooler has created!
If you’re seeking more information about this resource, mombrite.com is a great resource to consult.
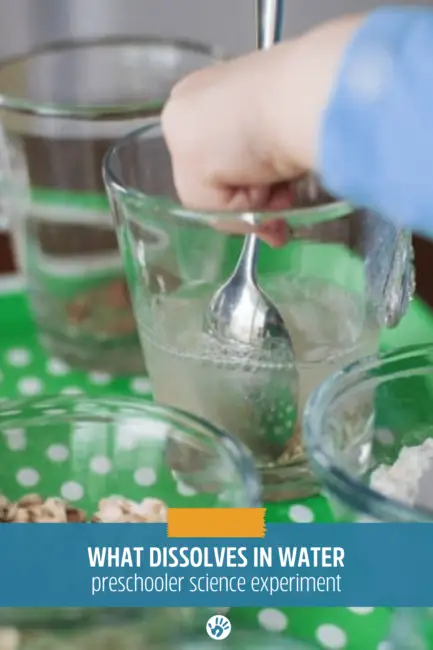
Let’s dive into the exciting world of dissolving! This is a fun and easy experiment that you can do right at home with items from your pantry. Your child will be surprised by what dissolves in water!
First, gather up some materials from your pantry like:
- Flour
- Sugar
- Brown Sugar
- Noodles
- Cornmeal
- Oatmeal
- Colored Sprinkles
Then, set up an experiment station to see which items dissolve and which don’t.
Grab some clear cups or jars and fill them with water. Then, take a spoonful of each item and drop it into the water. Let them stir the mixture and watch as the items start to dissolve or not.
Make predictions with your little ones and see how many of them are correct. Talk about why some items dissolve and others don’t. This experiment is a great way to teach children about the properties of matter and how substances interact with each other.
To fully comprehend this resource, visit handsonaswegrow.com for more details.
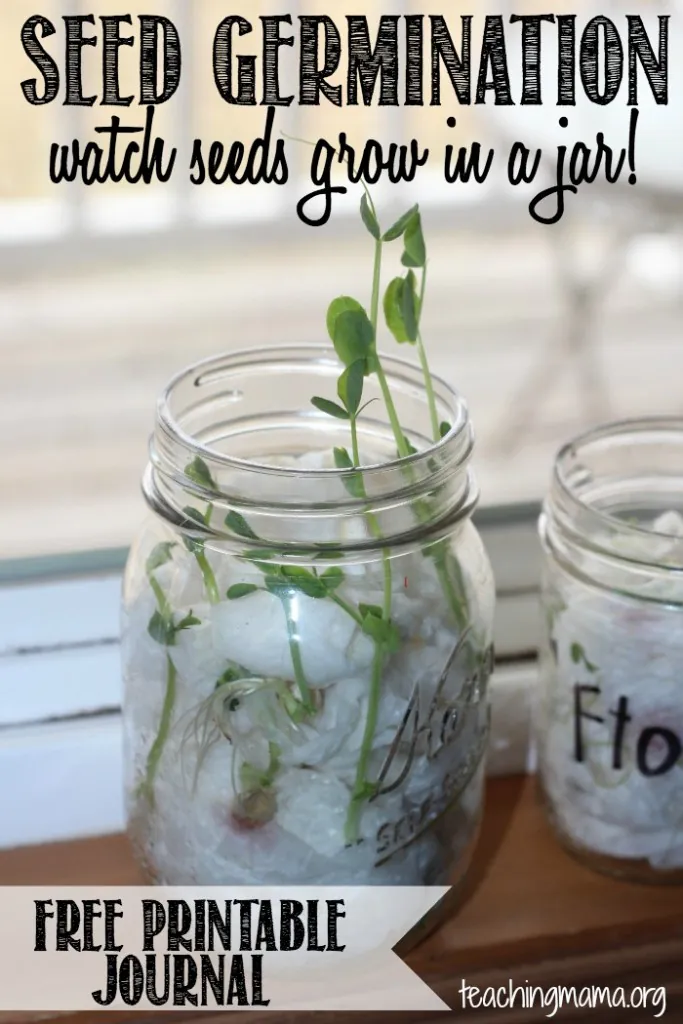
If you want to teach your kids about seeds in a fun and interactive way, you have to try this seed germination activity! All you need are simple materials you probably already have at home such as:
- Jars
- Wet paper towels
- Seeds
To begin the activity, put several wet paper towels in a jar and make sure to squeeze out any excess water. Place the seeds in the jar, close to the bottom half. If using multiple seeds, label the jars. Then, position the jars by a window and wait. The seeds should sprout within a couple of days, and after about a week, they will grow significantly.
This activity allows for the tracking of seed growth and observation of their development. Encourage children to maintain a journal and draw pictures of the seed as it evolves. This activity provides an excellent opportunity for children to experience the wonder of nature firsthand and is both fun and educational.
Don’t miss out on valuable information about this resource that can be found on teachingmama.org.
Conclusion
Science is all around us, and with these 10 easy prep science activities for preschoolers, you can bring them into your home or classroom.
Encourage your little ones to observe, explore, and ask questions as they learn about the world around them. With just a few simple materials and some creativity, you can spark a lifelong love of science in your young learners. Have fun experimenting!
Related activities and resources:


