The iconic character from the classic nursery rhyme has inspired many literary works, illustrations, music, and film. Highly fragile, Humpty Dumpty is a favorite rhyme in preschool that children recite.
Extend this timeless rhyme with these ten engaging and fun crafts that will surely delight the young.
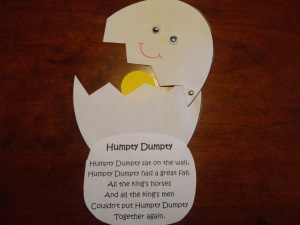
This Humpty Dumpty version features a cracked eggshell with the yolk peeking through. This craft is a great practice for children learning to cut complicated lines such as zigzags.
Modify this craft to teach children to shape recognition. Make several of these crafts, and Instead of a circle yolk, cut the yellow cardstock in a different shape. Make two identical yolks for children to match.
Another version is to turn this craft into a memory game. Draw the shape on the yolk of the egg. Cut another yellow circle, draw the identical shape, and let the child hold this. Let the child find the matching shape by opening the eggshell.
To make this craft, download and print the free egg template from the site. Cut this out and trace it on white cardstock. Cut out the egg outline and a zigzag line across the egg. Cut a small circle from yellow cardstock.
Punch a hole in the side of the eggshells. Attach a brass fastener. Glue the yolk onto the back part of the bottom half of the egg. Cut out the lyrics and glue them in front of the egg. Glue the googly eyes and use the marker to make the mouth.
For this activity, you will need:
- Printed egg template
- Cardstock
- Marker
- Scissors
- Googly eyes
- Glue
- Brass fastener
- Hole puncher
For more information on this activity, go to AllKidsNetwork.com.
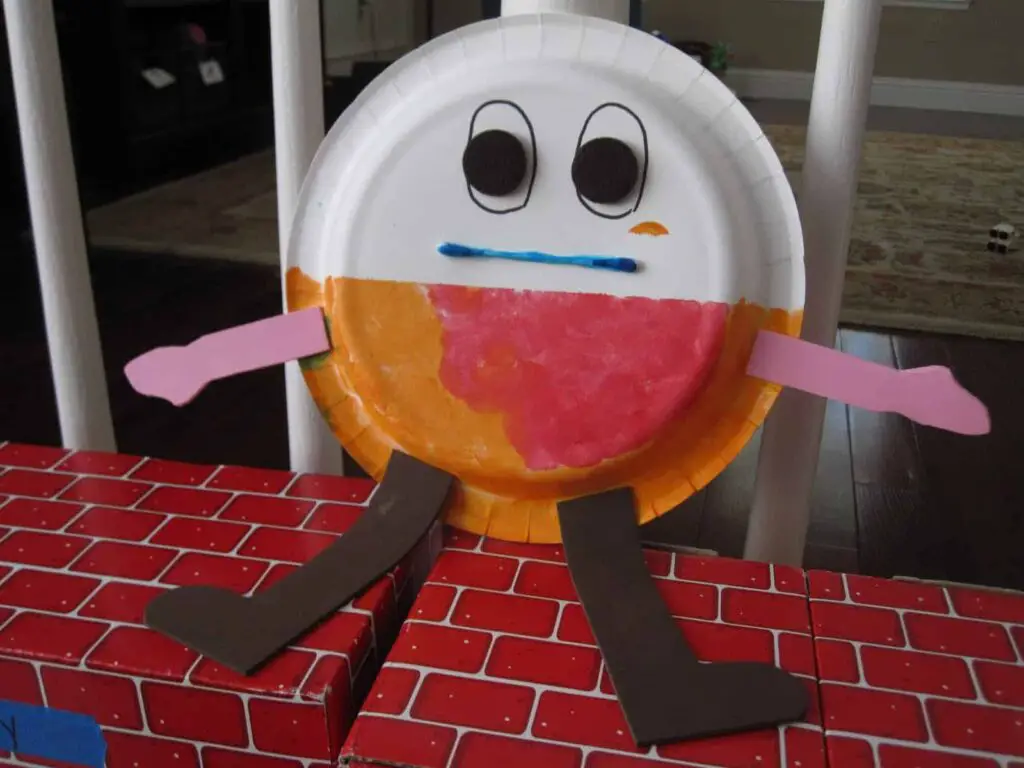
Reenact the story of Humpty Dumpty with this paper plate craft that even young children can make with limited assistance from adults. The cutting, painting, and pasting tasks will help children improve their fine motor skills.
The site suggests making a wall for Humpty Dumpty to sit on using boxes of different sizes. Stack these together to form a tall wall. Use this craft to teach children positional words. Ask children to place it in front, beside, or behind the wall.
Start by using painter’s tape to divide the paper plate. Place the tape in the middle of the paper plate. Cut the tape long enough to secure it on the table to keep it from moving while the child paints.
Paint half of the paper plate for Humpty’s pants. While the paint dries, cut out legs and arms from the foam sheets. Follow the pictures on the site since there are no templates for this step.
Take off the tape once the paint on the paper plate dries. Use the marker to draw two oblongs for the eyes. Glue the felt circles inside and a cotton swab under it. Next, glue the arms and legs on the plate.
For this activity, you will need:
- Foam sheets
- Markers
- Cotton swab
- Glue
- Painter’s tape
- Felt circles
- Paper plate
- Scissors
- Paint
- Paintbrush
For more information on this activity, go to ToddlerApproved.com.
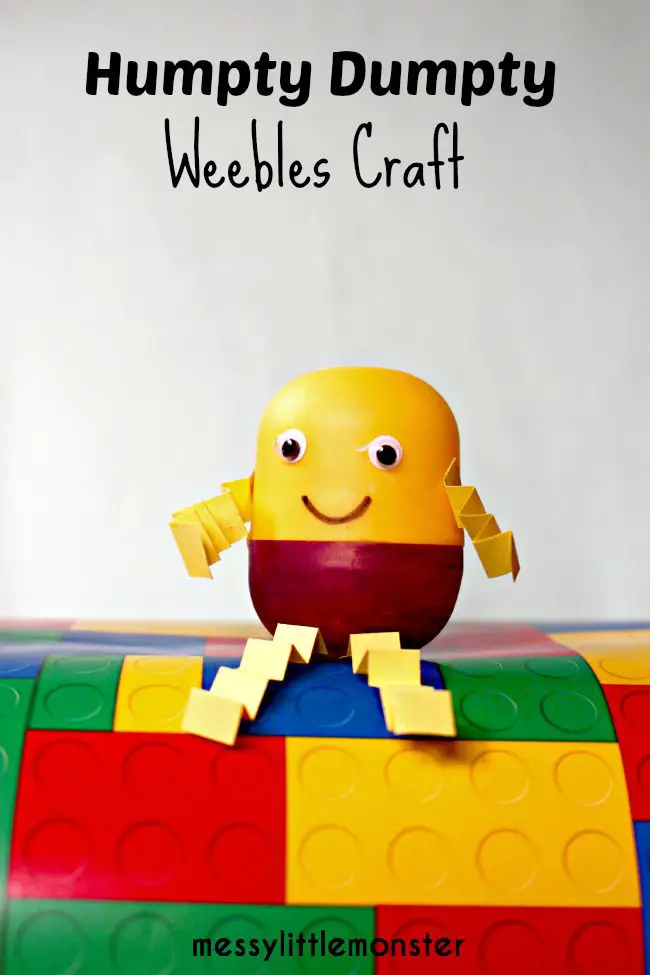
Recycle those plastic eggs from Easter to make this tiny yet adorable character that will go perfectly with the classic rhyme.
The tasks that children will do to complete this craft, such as folding the paper, twisting the egg, and coloring with marker, will help improve the children’s fine motor skills.
Use this craft not just to retell the story but also to teach beginning letter sounds. Write a letter on the egg and let the children have a scavenger hunt of objects with the same sound.
Start by adding weights to the egg to keep it stable. The site recommends taping three pennies and placing them inside the plastic egg. The weights should enable the egg to bounce back up when knocked down.
Next, color the bottom part of the egg using a colored marker. Once dry, glue the googly eyes. Cut four thin strips of paper and fold them into an accordion style. Stick these on the egg. Finally, use the marker to add the mouth.
For this activity, you will need:
- Plastic eggs
- Weights
- Paper
- Googly eyes
- Marker
- Scissors
- Glue
For more information on this activity, go to MessyLittleMonster.com.
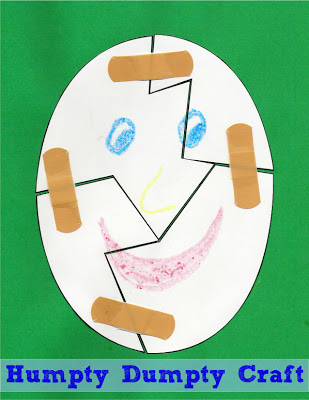
Here’s a wonderful attempt at putting together Humpty Dumpty back to its original appearance. Turn this craft into a STEM challenge for children to work on. Ask children what can be used to keep Humpty Dumpty from falling apart.
Prepare in advance several sets of this puzzle. Do not glue the pieces on cardstock; instead, attempt to find a way to keep the puzzle pieces together.
Take some objects such as clay, sticky tape, crayons, etc., and test if any of these is helpful. Make it more challenging for older children and see which items can hold the pieces for the longest time.
Download and print the free egg puzzle template from the site. Print it on a white cardstock and let the children cut out the pieces. Assemble the puzzle by gluing them on colored cardstock.
Add several band-aids to the egg. Use the crayon to add the mouth, nose, and eyes.
For this activity, you will need:
- Printed egg puzzle
- Cardstock
- Band-aids
- Scissors
- Glue
For more information on this activity, go to IHeartCraftyThings.com.
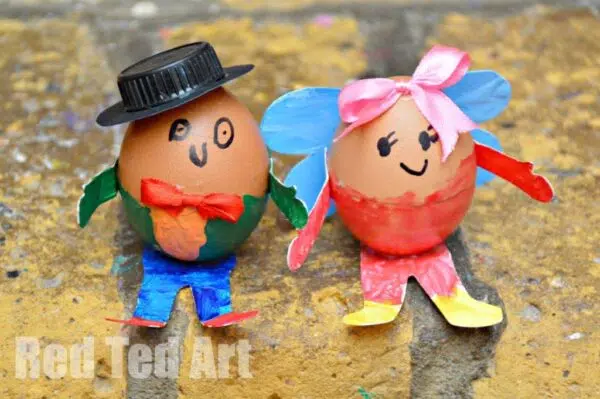
This Humpty Dumpty version is delicate and fragile but will make great decor for the nursery rhyme theme. This can also be hung as ornaments.
Teach social-emotional learning with this craft. Let children hold on to each Humpty Dumpty for a given period. Tell children to keep these special eggs from breaking apart by being mindful of where they are placed.
Knowing how to take care of things will help children learn to value them by paying extra attention to keep them away from situations that will cause these items damage.
To make the craft, prepare an egg by blowing on it. Prick each end of the egg with a thumbtack or needle. Blow on one end to force out the contents. The site suggests poking the egg yolk to make it easier to blow out.
Wash the eggshell under running water and let it dry. Head over to the site for detailed instructions and pictures for this step.
Next, use markers to color the bottom part of the egg and to add facial details. Cut out some cardstock to make the legs and arms. Color and stick these on the egg. Use available embellishments, such as ribbons, to decorate the egg.
For this activity, you will need:
- Egg
- Thumbtack
- Paints
- Markers
- Embellishments
- Cardstock
- Scissors
- Glue
For more information on this activity, go to RedTedArt.com.
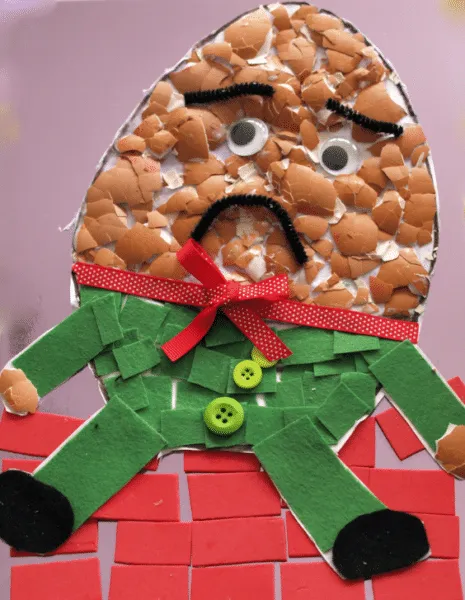
A Humpty Dumpty collage is a great way to recycle those eggshells in the kitchen. Ensure that these are thoroughly washed and dried to prevent contamination. This activity is a great way for children to practice their cutting skills.
This craft is a wonderful sensory activity that helps the children’s fine motor skills. The crumbly eggshell texture contrasts the smooth craft foam and the soft felt.
On a cardstock, draw Humpty Dumpty. Let the children use a paintbrush to apply the glue on the upper part of the egg outline. Cover this part with eggshell pieces. Press them well on the glue and let it dry.
Next, add the googly eyes and cut one black pipe cleaner into three pieces for the eyebrows and mouth. Glue this on Humpty. Cut the green felt into small rectangles and glue these on the lower part of the egg for Humpty’s pants.
Add ribbons and buttons on the body. Cut two oblong from black felt for the shoes. Glue this on Humpty. Finish this craft by adding cut-up rectangles from craft foam to make the wall Humpty is sitting on.
For this activity, you will need:
- Eggshells
- White cardstock
- Glue
- Scissors
- Paintbrush
- Googly eyes
- Pipe cleaners
- Felt
- Ribbons
- Buttons
- Craft foam
For more information on this activity, go to HereComeTheGirlsBlog.com.
7. Humpty Dumpty Polystyrene and Pipe Cleaner Egg Craft
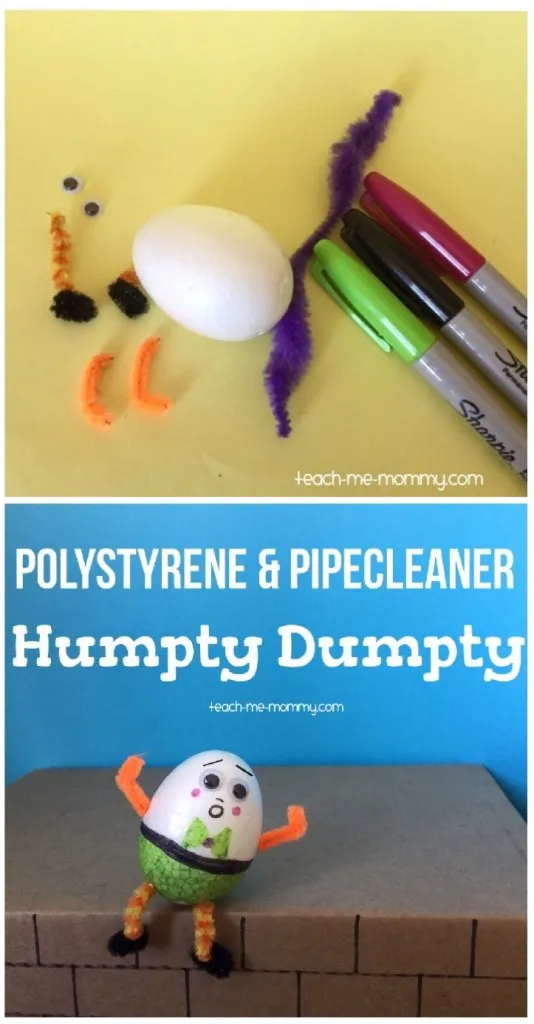
This fun egg craft is simple to make. Young children may require assistance with inserting pipe cleaners. Make several of these to teach children different emotions. Modify the mouth and eyebrows to create different expressions.
Change the color of the pants to teach color recognition and patterns. Bend the pipe cleaner differently for children to mimic the poses to teach balance and coordination.
Take the styrofoam egg and use the marker to color Humpty’s pants. If children find holding the egg and coloring it simultaneously difficult, stick a skewer in the egg to make it easier to handle.
Add a black line above the pants for the belt. Add additional designs, such as the bow. Glue the googly eyes and use the marker to draw the facial features.
Next, cut the pipe cleaner into four pieces. Stick two for the arms and the other two for the legs. Cut and twist two small black pipe cleaners on the legs to make the shoes.
For this activity, you will need:
- Styrofoam egg
- Pipe cleaner
- Googly eyes
- Markers
For more information on this activity, go to Teach-Me-Mommy.com.
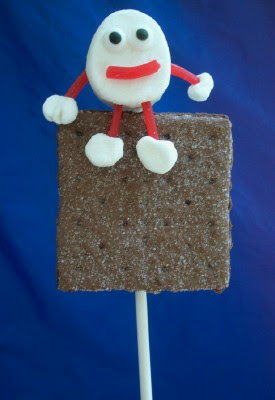
It is impossible to put this edible Humpty Dumpty together once consumed. They are wonderful to look at and to make. Aside from being a great snack, this activity will help children improve their listening skills as they follow directions.
Cut the cracker in different shapes, such as a rectangle or a triangle, to teach shape recognition. Use a different color of Twizzler to teach color recognition. Cut the Twizzler in varying lengths for children to compare.
Make the wall by cutting the graham crackers in half and squeezing some frosting. Next, microwave the square marshmallow to puff up and stick it on a lollipop stick. Place the graham crackers on each side to make a sandwich.
Cut the Twizzler into four pieces and poke holes in the large marshmallow. Stick the Twizzler to make the arms and legs. Cut each of the small marshmallows in half. Stick these on the arms and legs to make the hands and feet.
Use the frosting to stick the edible eye and a small piece of Twizzler for the mouth. Place the top of the graham crackers to make it look like it is sitting on the wall.
For this activity, you will need:
- Large and small marshmallows
- Square marshmallows
- Chocolate graham crackers
- Twizzler
- Chocolate frosting
- Edible eye balls
- Lollipop stick
- Toothpick
For more information on this activity, go to KitchenFunWithMy3Sons.com.
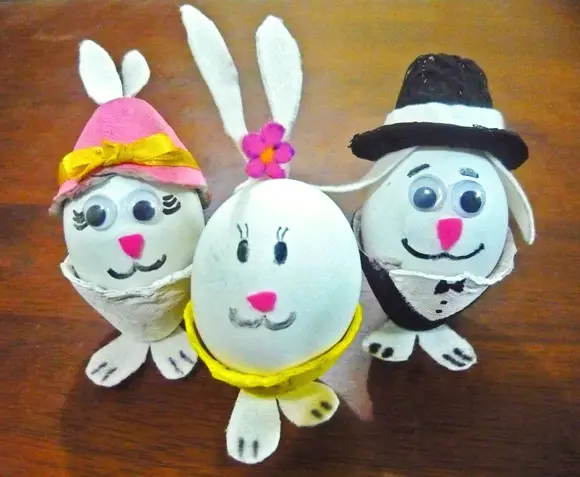
It is not a good idea to play with food, as parents would warn children. This hard-boiled egg is an exception, though. Turn this into adorable characters to entice children into eating this.
This craft is a great opportunity to improve the children’s fine motor skills when they draw, cut, and put together the craft. Use different colors for the egg cups to teach children color recognition.
Make the egg cups by cutting the egg carton into individual cups. Trim off the edges and paint it with the desired color. Use the cups to trace and outline the feet on white felt. Refer to the pictures on the site for this step.
Using another cup, paint it to make a hat and add details. Outline the ears on white felt and cut these. Stick the ears on the egg and the hat. Glue the googly eyes and use the black marker to add details, such as the mouth, eyebrows, and toes.
Place the egg on the cup and glue the pompom to the back.
For this activity, you will need:
- Egg carton
- Hard-boiled eggs
- Paint
- Paintbrush
- Felt
- White paper
- Marker
- Scissors
- Glue
- White pompoms
- Googly eyes
- Ribbon
For more information on this activity, go to Jumpstart.com.
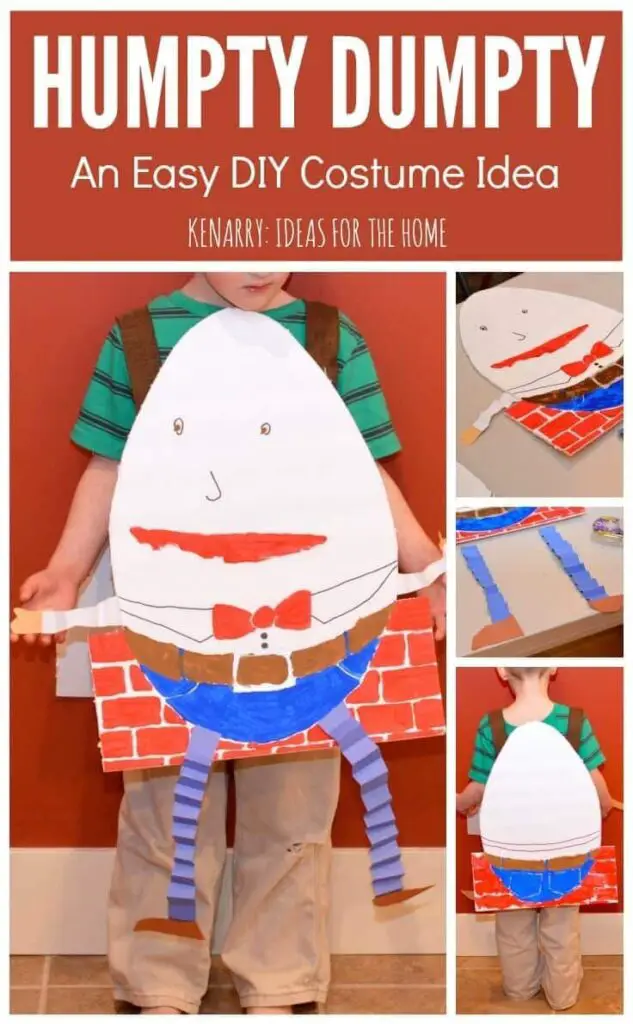
Here’s a great costume for Halloween, school play, or pretend play area. This costume can be customized to fit the child’s size and color preference.
Children can practice and improve their painting and cutting skills with this activity. Assist the children by precutting the foam board once the outline is finished, as this step will require using a craft knife.
Start with cutting the foam board in half. Modify the size if the child is bigger. Next, draw Humpty Dumpty on the foam board. No templates are provided for this activity. Refer to the pictures on the site for this step.
Cut the foam board and let the children add color by painting the walls red, Humpty’s pants blue, brown for the belt, and red for the mouth and bow. Let this dry.
Do the same process for the other foam board to make the Humpty’s back. See the pictures on the site for this.
Next, cut the construction paper into strips and fold it accordion style to make the legs and arms. Cut the hands and feet as well. Stick these on Humpty using clear packing tape. Use the markers to add facial details.
Next, cut the ribbon to size to fit the child. The site suggests using a ribbon no less than an inch in width. Attach this to the costume using the tape and let the children try it.
For this activity, you will need:
- Foam board
- Pencil
- Paint
- Paintbrush
- Scissors
- Clear packing tape
- Markers
- Craft knife
- Ruler
- Construction paper
For more information on this activity, go to Kenarry.com.
Conclusion
These Humpty Dumpty crafts are a great opportunity for children to learn and enhance different skills. These can be used to retell the story or make the rhyme more fun and exciting to recite.
Consider using these crafts that can be tailored to fit the child’s size, interests, and skills. Modify these to use as tools for learning in class.
Thank you for reading!
More crafts and activities you might want to check out:


