These gigantic monsters that once roamed the world are a favorite theme in preschool. Children will enjoy exploring the variety of dinosaurs while learning different concepts. The dinosaur theme is a great addition to lessons on reptiles.
Check out our wonderful preschool crafts list that will excite every child while exploring the world of dinosaurs.
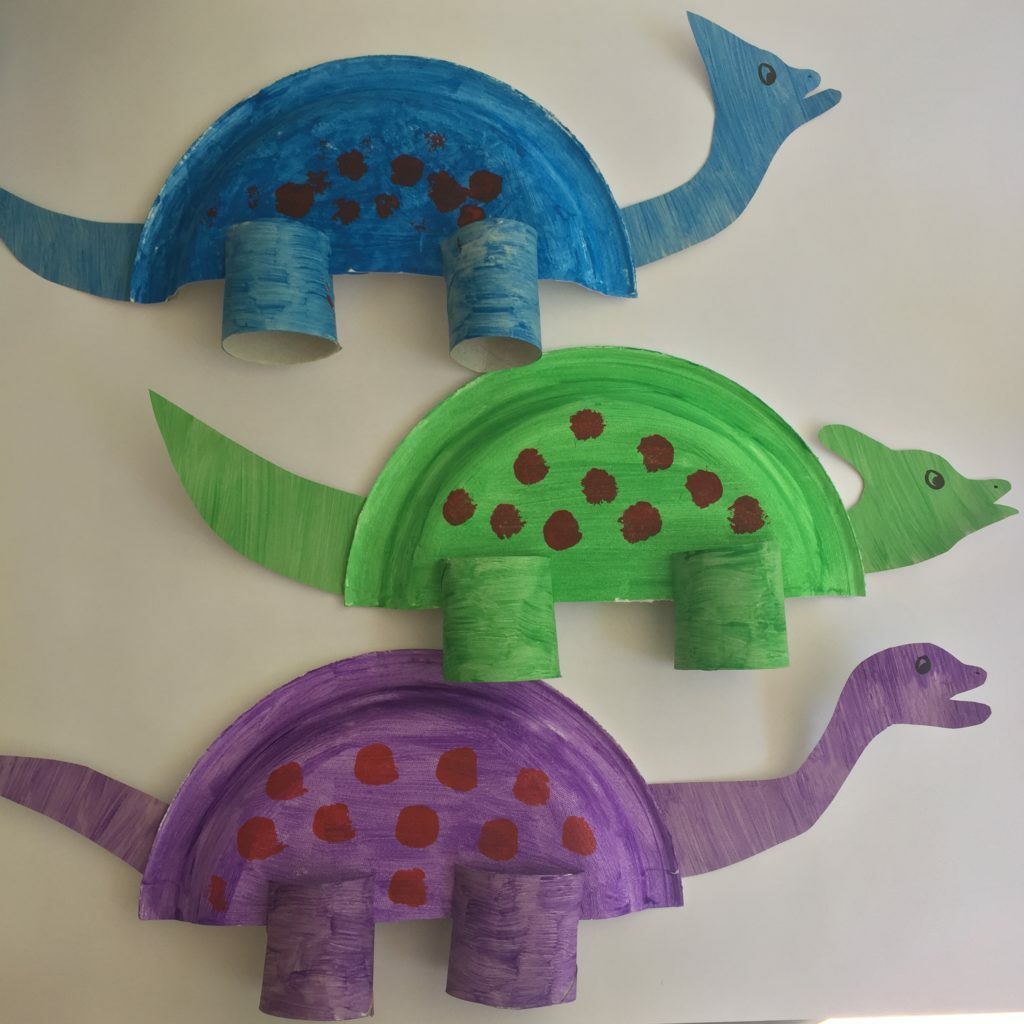
Turn simple paper plates into a herd of colorful dinosaurs with which children will love to play. This craft is simple and easy to make, requiring cutting, painting, and gluing the pieces together.
Working on this craft will help improve the children’s fine motor skills and increase their knowledge about the different types of dinosaurs.
Cut the paper plate in half and paint it with the desired color. Cut the toilet paper roll in half and paint it the same color as the paper plate. Once dry, cut two slits on each toilet paper roll and insert them on the straight edge part of the paper plate.
Paint a cardstock with the same color as the other parts. Outline and cut out the tail and head of the dinosaur. No template is provided for this step. Check the pictures on the site for ideas on the dinosaur’s head.
Cut out the head and tail and glue them onto the paper plate. Use a black marker to add the eyes. The site suggests adding spots on the dinosaur by clipping a pompom on a clothespin and using it as a stamp.
For this activity, you will need:
- Paper plate
- Toilet paper roll
- Paint
- Paintbrush
- Cardstock
- Scissors
- Marker
For more information on this activity, go to LivingForTheSunshine.com.

Create a textured dinosaur that will provide a sensory experience for children. The tissue paper must be crumpled or scrunched to fill the cardboard dinosaur.
Make several of these in different colors for color recognition. Make these in various sizes to teach seriation skills. Make these in two different sizes to introduce the concepts of big and small or in three different sizes for big, bigger, and biggest.
Outline a dinosaur on cardboard. No template is provided for this craft, but the site recommends printing a picture online and using it to trace onto the cardboard if free-hand drawing is not an option.
Cut out the dinosaur outline and set it aside. Cut small squares from the tissue paper. Ask the child to crumple these by pressing and rolling them between the palms. Make a lot of this crumpled paper and glue them onto the cardboard.
Use a different color of tissue paper to make the eye for better emphasis. Let this dry before using.
For this activity, you will need:
- Cardboard
- Scissors
- Glue
- Marker
- Tissue paper
For more information on this activity, go to MomUnleashed.com.

These terrific craft stick dinosaurs are a great addition to centers to teach colors and patterns. Make these with varying designs like dots, lines, and shapes.
Use these to help children develop their oral language skills as they discuss the similarities and differences between the dinosaurs. Provide sentence structures for this activity.
For example, say, “The blue dinosaur has bigger spots (change the features) than the yellow dinosaur” or “This dinosaur has zigzag lines (change the features) while this one has wavy lines.”
Each dinosaur requires one large craft stick and two regular-sized ones. Paint these in the preferred color. Paint two clothespins in the same color as well. Line up the craft sticks and glue them with the large one on the bottom part.
Next, cut out a half circle from the cardstock. Ensure that this is longer than craft sticks to make the tail visible. It should also be taller for the spikes to be easily seen.
Use markers and paints to paint the cardstock. Let this dry and attach it to the dinosaur.
For this activity, you will need:
- Craft sticks
- Clothespins
- Paint
- Paint brush
- Glue
- Scissors
- Cardstock googly eyes
- Marker
For more information on this activity, go to OurKidsThings.com.
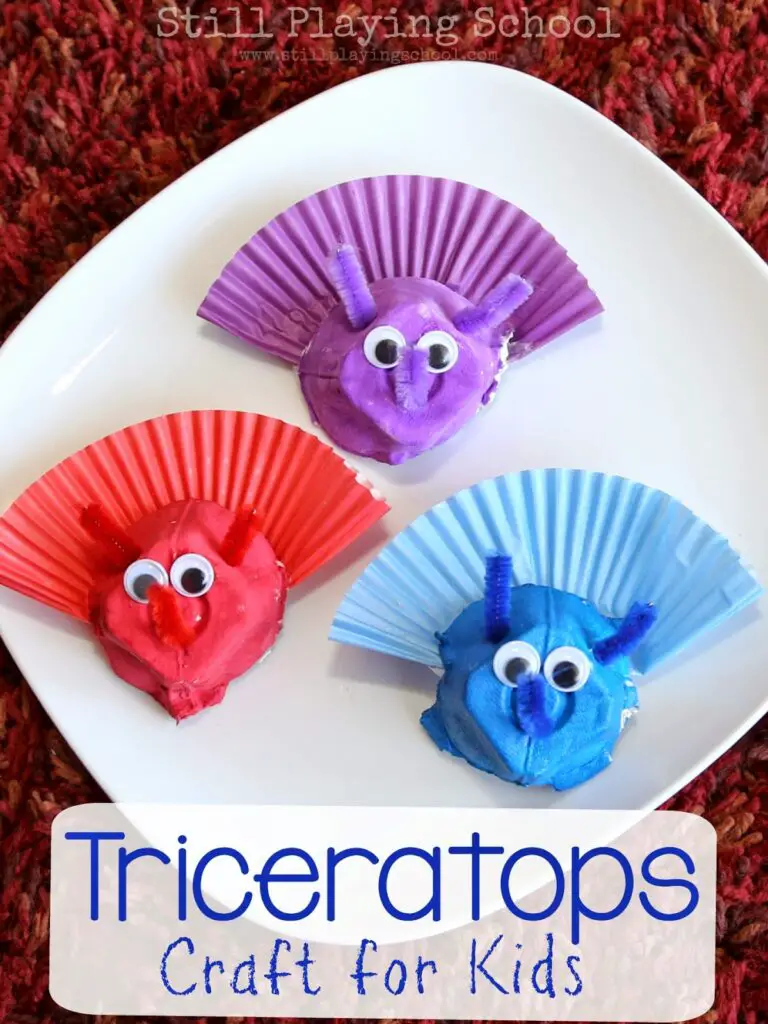
Inspired by the book “Dinosaurumpus” by Tony Mitton, this craft depicts one of the dinosaurs in the book that showed its dance moves. These triceratops heads are perfect for teaching colors and patterns to children.
These are great for centers to use as counters. Use these for children to match identical colors. Line these up to teach color patterns.
Help children improve their memory by taking one of the lined-up heads and letting them figure out the missing color.
Cut the egg carton into individual cups. Trim off the excess on the edges to let the cups sit on a flat surface. Paint these in different colors. Once dry, poke three holes in them and attach the googly eyes.
Make one hole for the horn between the eyes and two on the sides of the cups. Cut three small pieces of pipe cleaner. Insert two on the sides. Fold the third one before inserting it in the middle.
Take a colored cupcake liner with the same color as the cups. Fold this in half and attach it to the back of the cups.
For this activity, you will need:
- Googly eyes
- Egg carton cups
- Paint
- paintbrush
- Pipe cleaners
- Cupcake liners
- Scissors
- Glue
For more information on this activity, go to StillPlayingSchool.com.
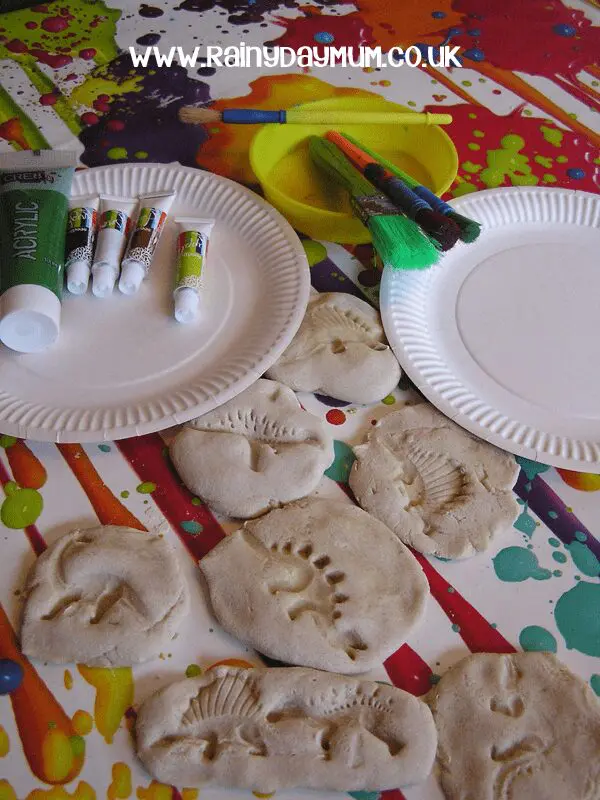
Fossils are important evidence of the existence of dinosaurs and other ancient creatures. Give children a taste of being an archeologist as they make this craft.
Kneading, pressing, and rolling the dough will help children improve their fine motor skills and hand muscle strength.
Hide these fossils in the sandbox and provide children brushes to unearth them. This is a wonderful sensory activity for children to enjoy.
Read the book “Bones, Bones, Dinosaur Bones” by Byron Barton to help reinforce the concept of archeology.
Start with a clean bowl. Mix the flour and salt. Next, add water gradually into the mixture. Mix until the dough comes together.
Lightly flour a surface for kneading. Dump the dough and knead until smooth. Divide the dough into small pieces, about the size of a cookie. Press the dinosaur toys into the dough balls to create indents.
Place these on a parchment-lined tray and bake for up to three hours in the oven’s lowest setting. Be reminded that time needs adjustment depending on the thickness of the clay.
For this activity, you will need:
- One cup of all-purpose flour
- Half cup of salt
- Half cup of water
- Bowl
- Dinosaur toys
For more information on this activity, go to RainyDayMom.co.uk.
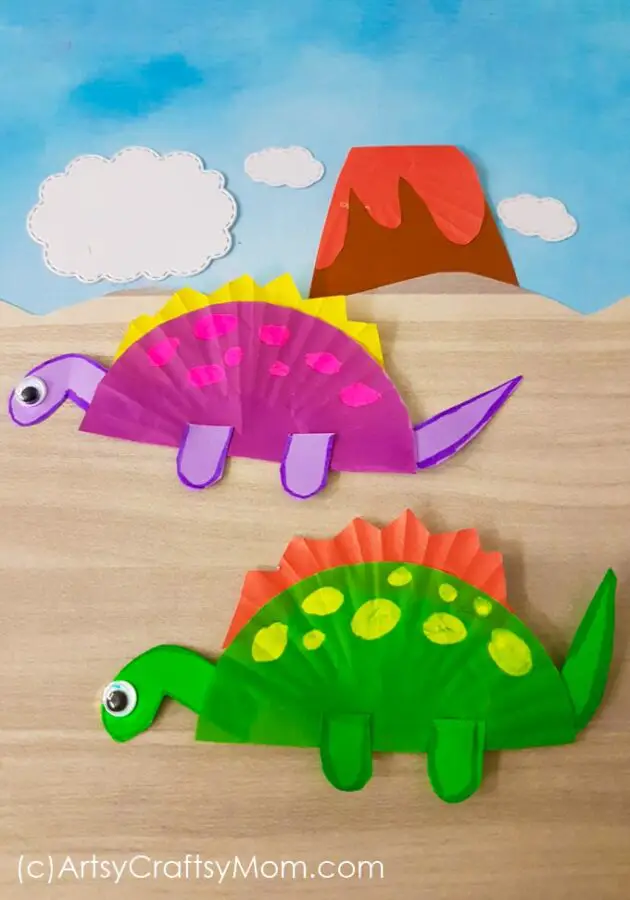
These awesome dinosaurs are perfect for teaching numbers and counting. Write a number on one of the dinosaurs. Make the spots equal to the written number on another dinosaur.
This one-to-one correspondence activity will help children match numbers with their equivalent quantity as they count the spots.
Instead of numbers, upper and lowercase letters can be written for children to match. This will help improve their letter recognition skills.
Use a combination of colors for this craft. Choose two different colors for the cupcake liner. Cut one in half and a zigzag on the ribbed part using another color for the dinosaur’s body and spikes.
Use craft paper the same color as the half circle to cut out the head, legs, and tail. Assemble the pieces and attach the googly eyes. Use a colored marker to outline the edges of the head, legs, and tail.
Use paint to add the spots on the body. The site recommends adding clouds and a volcano using craft paper to complete the pre-historic scene.
For this activity, you will need:
- Craft paper
- Cupcake liners
- Googly eyes
- Paint
- Paintbrush
- Scissors
- Glue
- Pencil
- Markers
For more information on this activity, go to ArtsyCraftsyMom.com.
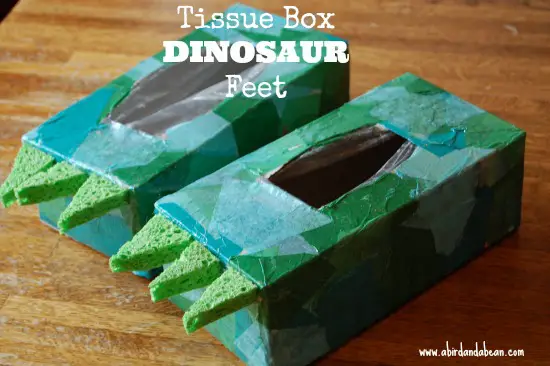
Get creative and recycle those empty tissue boxes instead of throwing them in the bin. These are great for children to work on their cutting and pasting skills. Use them as props for pretend play areas, as props for retelling stories, and for games.
Use these dinosaur feet to teach children different movements that will help improve their gross motor skills. For example, while wearing these dinosaur feet, have them stomp and walk like a T-rex or take small steps like a smaller one.
Empty and clean the tissue boxes. Use duct tape if the opening is too wide for the children’s feet. Next, let children cut out pieces of colored tissue paper and stick them on the box with a decoupage.
Cover the entire box with tissue paper and let it dry. The site also suggests painting these as an option instead of decoupaging them.
Next, cut out triangles from the dish sponge. Use a hot glue gun to attach these to the boxes. Refer to the pictures on the site for this step.
For this activity, you will need:
- Empty tissue boxes
- Duct tape
- Decoupage glue
- Sponge brush
- Dish sponge
- Tissue paper
- Scissors
- Hot glue gun
For more information on this activity, go to ABirdAndABean.com.
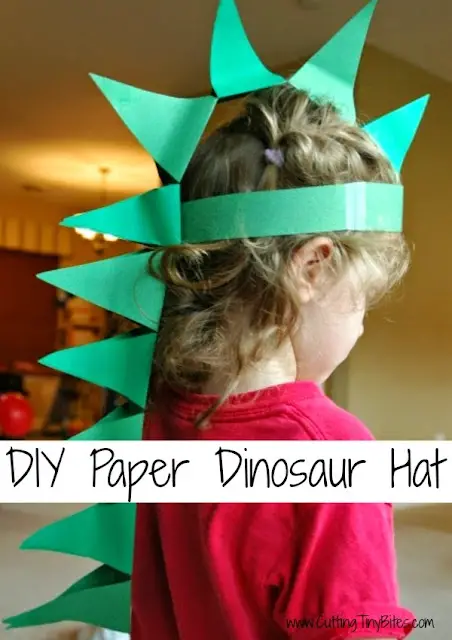
This headdress is a great addition to the pretend play area. Children can wear this during storytelling and as a prop for stage plays. This craft is also perfect for teaching the triangle shape to children.
This is a great activity for young children to practice their cutting skills since the pieces require cutting in straight lines.
Cut four strips from green construction paper. These should be about an inch wide. Attach two of these to form a ring for the head. Form one long strip by gluing together the remaining two.
Cut wider paper strips from the same color of paper. This time, they should be about two inches in width. Fold them in half and cut out triangles. Unfold these, and it should look like a stretched diamond. These are the spikes of the dinosaur.
Glue the spikes on the long strip, ensuring that the folds are centered. Join the triangles by gluing their pointy parts. Next, attach the spikes from the front part of the ring to the back using sticky tape.
For this activity, you will need:
- Construction paper
- Glue
- Scissors
- Tape
For more information on this activity, go to Paper-And-Glue.com.
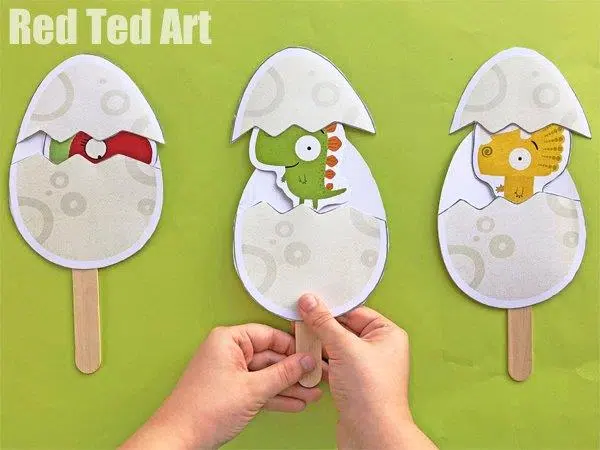
Make these adorable dinosaur puppets inspired by the book “Happy Hatchday” by Rob Biddulph. These are great for retelling the story. Children will also be able to practice their cutting skills through this activity.
There are three dinosaurs in this printable to make. Greg is a green dinosaur, Nancy is a red dinosaur, and Sue is a yellow dinosaur. Discuss their similarities and differences to improve children’s oral language skills.
Download and print the free dinosaur printable from the site and cut out the pieces. Glue the dinosaur on the craft stick and set it aside. Next, cut the zigzag line on the first egg.
Flip the second egg so that the printed part is at the bottom. Add glue on the sides of the bottom part of the egg. Attach the half part with the zigzag line to it. Next, attach the top part with the zigzag line to the dinosaur.
Finally, insert the dinosaur on a stick in the egg. See the pictures on the site for these steps. As the stick is moved upwards, the dinosaur hatchling is revealed.
For this activity, you will need:
- Dinosaur printable
- Craft stick
- Scissors
- Glue
For more information on this activity, go to RedTedArt.com.
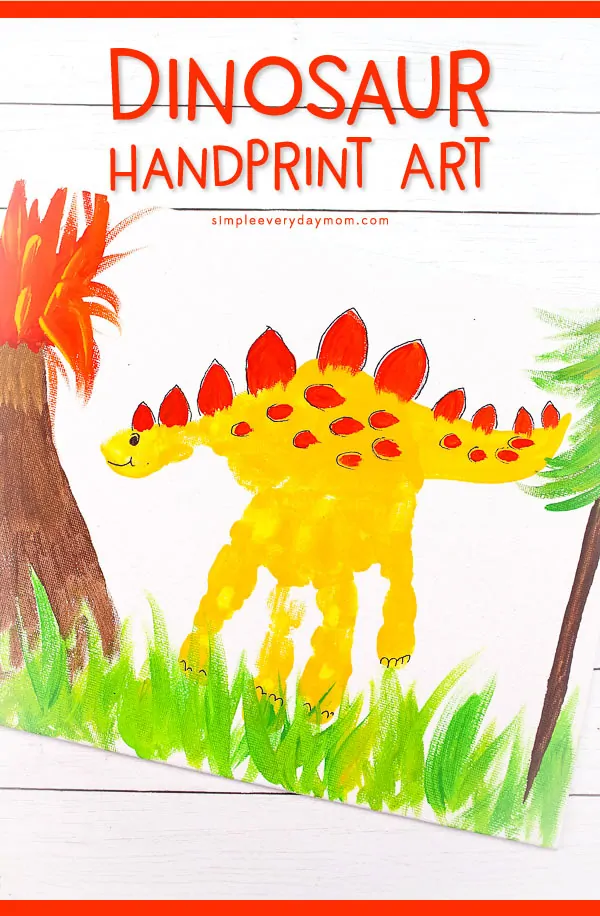
Create a simple dinosaur using the children’s handprints. This easy-to-make craft will provide a sensory experience for children. They will use different strokes during painting that will help improve their fine motor skills and coordination.
Apply some yellow paint to the child’s hand. Ensure that the whole palm is covered with color but should not be dripping wet. Gently press the child’s hand on the canvas. Thick art paper or cardstock can be an option if a canvas is unavailable.
Gently lift the child’s hand to keep the handprint intact and prevent the paint from smearing. Use the paintbrush to add the tail. Let this dry. Next, add details on the dinosaur’s body, such as spots and spikes.
Paint grass on the bottom part of the canvas using a combination of yellow and green. Add a volcano spewing lava to complete the scene.
Finally, add the eyes, mouth, toes, and some fine lines on the spots and spikes of the dinosaur.
For this activity, you will need:
- Canvas
- Paint
- Paint brush
- Marker
For more information on this activity, go to SimpleEverydayMom.com.
Conclusion
Dinosaurs are a classic theme in preschool. Children will love to explore the different types of these ancient animals. Use this opportunity to discuss their physical characteristics, abilities, and unique features.
If possible, let every learning opportunity be fun and exciting for children. This will encourage them to enjoy learning while keeping them interested in the topics.
Thank you for reading!
Other activities you might be interested in:


