Get ready for some fun and educational train-themed crafts with these 10 Terrific Train Crafts for Preschoolers. Each activity includes step-by-step instructions and is perfect for developing fine motor skills and exploring creativity.
These crafts will keep preschoolers entertained and engaged from cardboard roll trains to decorated cookies. Gather materials and let’s get crafting!
Great Train Crafts for Preschoolers
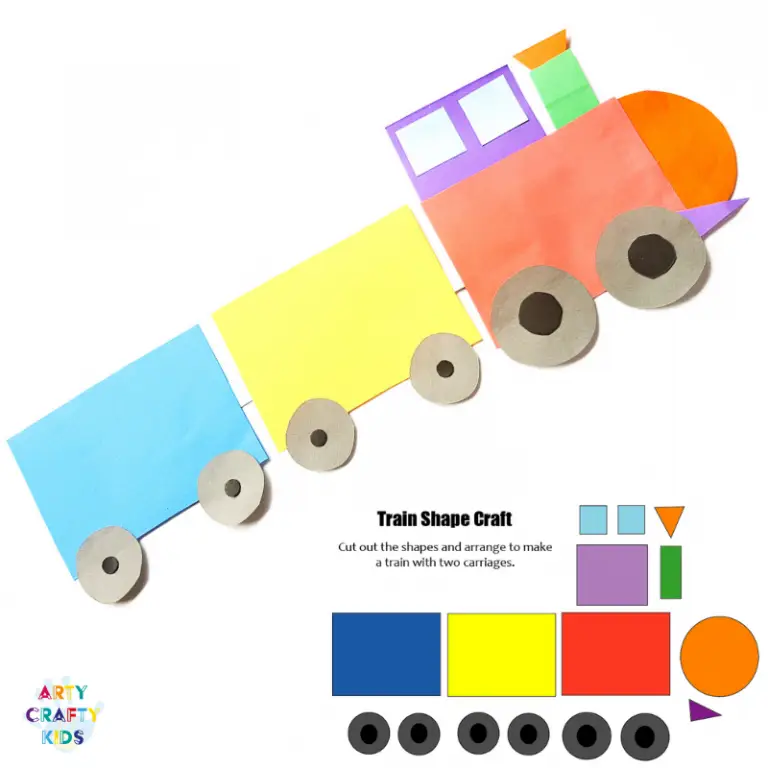
Hop on board the Shape Train! Get ready for a fun and educational ride where we’ll make our own trains using construction paper and some basic crafting supplies. Not only will we be building and creating, but we’ll also be learning all about 2D shapes!
As a parent or teacher, you can make learning fun by encouraging your little ones to identify the different shapes they see in the train templates and count the number of sides they have.
Get ready to be problem solvers as we work together to figure out how to assemble our trains. And don’t forget to ask questions like: ‘What’s the difference between a circle and a triangle?’ or ‘Can you order the shapes from biggest to smallest?’
All you need is:
- Card Stock
- Colorful Paper
- Scissors
- Glue Stick
- Optional: Pens, Coloring Pencils, or Paint
So, gather your materials, and let’s get started.
Cut out the shapes, glue the blue squares to the top of the purple rectangle for the train windows, add the orange triangular piece for the chimney, attach the orange circle to the red rectangle for the train’s body, and align the purple rectangle to the top right of the train’s body.
Don’t forget to add the wheels, chimney, and carriages.
For more information about this resource, be sure to check out artycraftykids.com

All aboard the Toilet Paper Roll Train Craft Express! This fun and easy craft is perfect for kids of all ages and uses simple materials that you probably already have in your recycling bin.
With a little bit of paint and some hot glue, you can turn toilet paper roll tubes and bottle caps into an adorable little train that’s sure to be a hit with your little ones.
Here are the materials you’ll need:
- 6 Toilet Paper Roll Tubes
- 2-3 Paper Towel Rolls or 6 Craft Rolls
- 1 Skinny Cardboard Tube
- 20 Lids (milk containers, Vitamin water, Gatorade)
- Craft Paint
- Foam Brushes
- Yarn
- Hole Punch or Something to Make a Hole in the Cardboard Tube
- Hot Glue Gun
- Scissors
First things first, grab your paint tubes and decorate your train cars with vibrant colors. Once the paint is dry, it’s time to start cutting!
Cut out C-shaped pieces from your cardboard to create the tops of your train cars (This needs to be done by an adult).
Next, take the cardboard roll tops and glue them onto the C-shaped pieces to complete the train car bodies.
Now grab your lids and glue them to the bottom of each train car.
Punch holes on both sides of the train cars, this is where we’ll thread the yarn through to connect the cars together. Take your yarn and weave it through the holes.
Finally, string all the cars together to complete your very own colorful train.
Perfect for kids of all ages and a great activity for parents and teachers to do with their kids in the classroom or at home. It helps kids to develop their creativity and fine motor skills. Let’s get crafting! Choo-choo!
For more information about this resource, be sure to check out kidsactivitiesblog.com
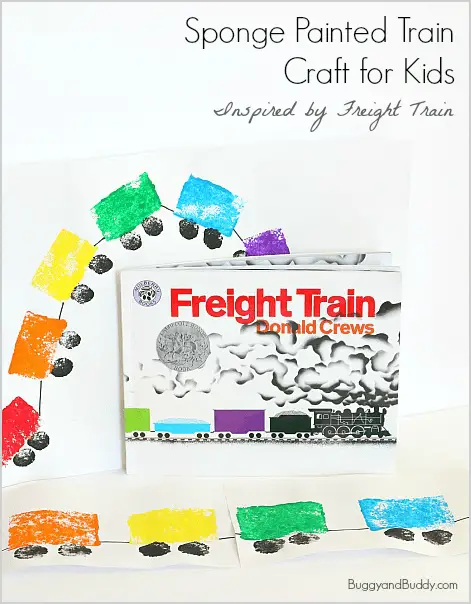
Come on the crafty train express! Prepare to make colorful sponge-stamped trains. You must first gather various materials, such as:
- Paper plates
- Sponges
- Tempera paint
This is perfect for little hands to develop fine motor skills, color recognition, creativity, and following instructions.
Next, squirt some paint onto the plates and have our little ones dip their sponges into the paint to stamp onto the paper. You can make long, straight trains or smaller, curvy trains by adjusting the paper size. And remember to make the wheels! Use small, circular sponges dipped in black paint to add wheels to each train car.
Once the trains are stamped and the wheels are added, use a black marker to connect each train car. Let it dry, and you’re done! You can hang it up to display and/or use it to retell the story!
For more information about this resource, be sure to check out buggyandbuddy.com
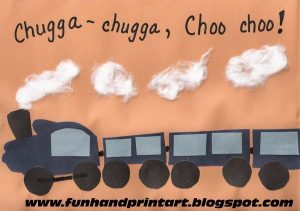
This handprint train craft is an exciting and fun activity for parents and teachers to do with their little ones. Not only will it keep them engaged and entertained, but it also allows children to express themselves and explore their artistic side.
This craft is perfect for children of all ages and can be tailored to fit their skill level. To start, gather these materials and prepare the workspace:
- paper
- pencil
- scissors
- glue
- paint or markers (optional)
- wheels, windows, smoke cutouts
Have the child dip their hand in paint and make a handprint on the paper (this will be the engine of the train). Use different colors of paint and have the child make handprints of different sizes to create the train cars.
Use different textures or materials to create the wheels of the train (optional). Let the handprints dry. Use markers or crayons to add details like windows, doors, and even people or animals inside the train cars (optional)
This craft can be a fun way to spend time with your child and also a great way to decorate a room or classroom. It can be a great keepsake for the child, and a memory you both will cherish for years to come.
For more information about this resource, be sure to check out funhandprintartblog.com
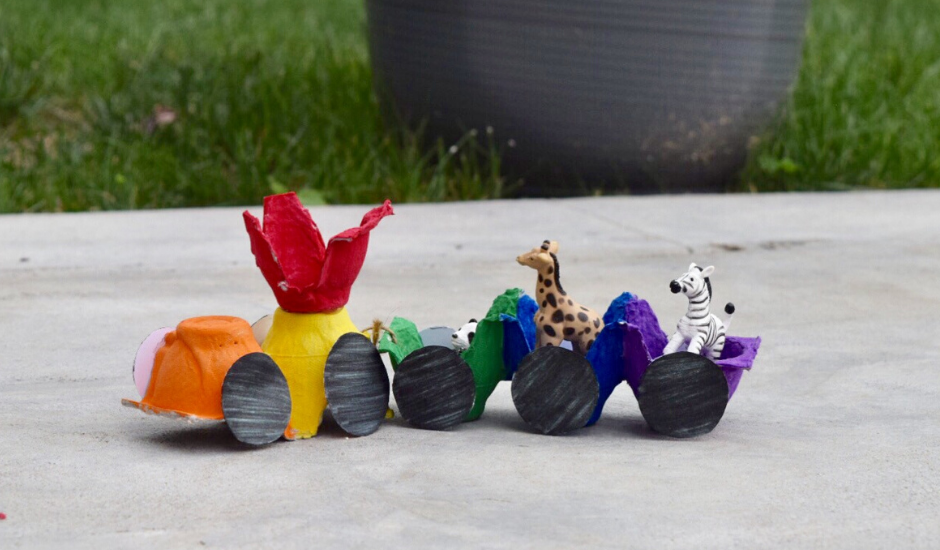
This recycled egg carton train craft is a fun and easy activity for parents and teachers to do with their little ones. Not only is it a great way to spend quality time together, but it also allows children to explore their creativity and use their imagination.
Plus, it’s an excellent opportunity to teach kids about recycling and the importance of taking care of the environment.
To start, gather all the materials you’ll need:
- a recycled egg carton
- paint, paintbrushes
- Scissors
- twine or string
- white card stock
- a shot glass or small cup for tracing the wheels
- a hole punch
- a hot glue gun
Here are the following steps once everything is ready:
- Cut the egg carton into six sections, which will be used to make one train.
- Have the kids paint the sections in different colors and let them dry.
- Use the shot glass or small cup to trace circles on the white card stock and cut them out. These will be the wheels of the train.
- Use the hole punch to make two holes in each section, and thread the twine or string through them to connect the sections and form the train
- Glue the wheels to the bottom of each section
And your recycled egg carton train is complete! It’s a great way to show kids that they can create something beautiful out of things that might have otherwise ended up in the trash.
For more information about this resource, be sure to check out momentsenriched.com
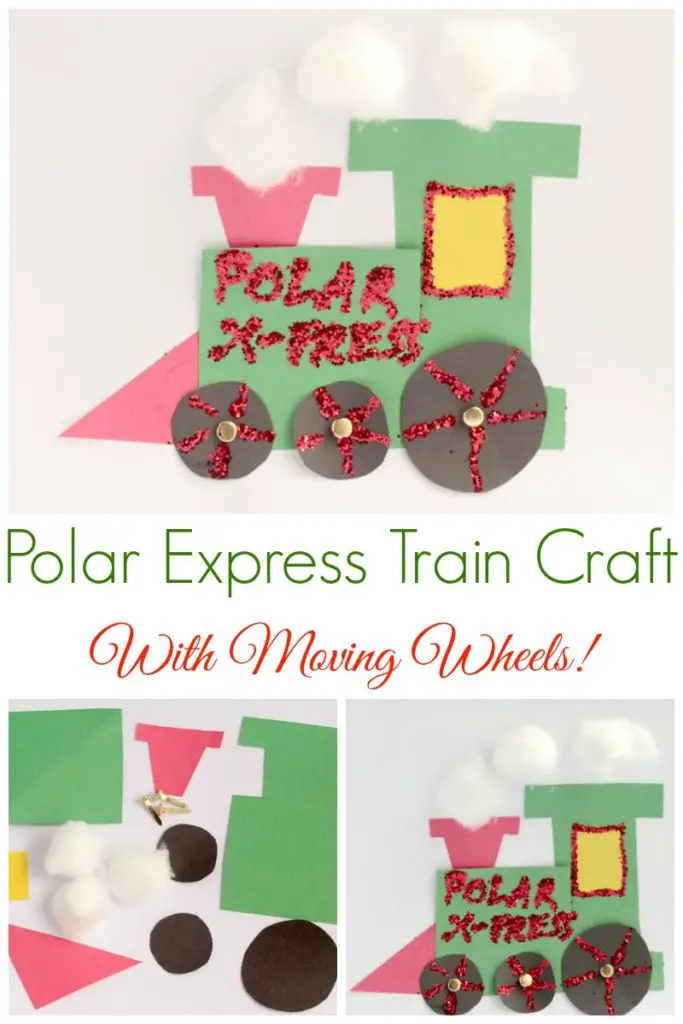
This train craft is perfect for preschool or kindergarten classrooms and is sure to get those imaginations chugging along.
To make this craft, gather your supplies:
- red, yellow, green, white, and black construction paper
- Glue
- Scissors
- 3 brads
- red glitter glue
- 3 cotton balls.
Cut out the shapes for the train and the wheels, and arrange them on a white piece of paper. But here’s the best part, the wheels really move! Just poke a brad through the center of each wheel and the train, and voila, your train is ready to roll.
Add a little puffy smoke coming out of the smokestack with cotton balls and decorate the train with glitter glue. Add the words “Polar Express” or “Polar X-Press” on the side of the train, and let the glue dry.
Once the glue is dry, let the kids take their train for a spin and let their imaginations run wild as they pretend, they’re chugging along to the North Pole to visit Santa. Choo, choo! All aboard the Polar Express craft train!
For more information about this resource, be sure to check out sightandsoundreading.com
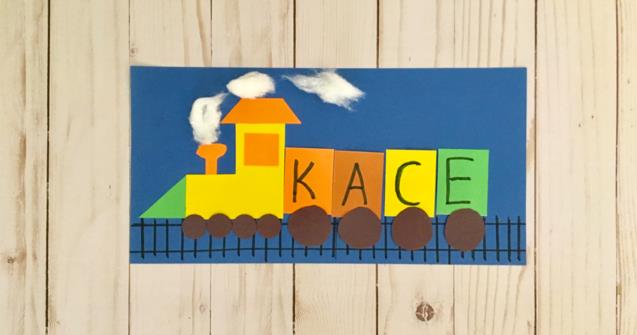
Get ready for a letter recognition adventure with our fun and easy paper train craft! Here’s what you’ll need:
- Colored paper
- Black marker
- Scissors
- Glue or glue stick
- Cotton balls
First, start by drawing a train track along the bottom of a piece of blue construction paper for each child. This will be the foundation for their letter recognition adventure! Next, create the train by drawing and cutting out different shapes. You’ll need rectangles for each letter in your name and a few other shapes to make the train look as cool as possible.
Now it’s time to add the letters! Using a black marker, write each letter of your name on a rectangle. This is where the real letter recognition fun begins! Lastly, it’s time to assemble your train! Glue your rectangles and shapes together and don’t forget to add some fluffy cotton ball clouds to make your train look like it’s chugging through the sky.
Congratulations, you’ve just created your very own paper train and learned how to spell your name in the process! It’s all fun and games when it comes to learning with paper crafts!
For more information about this resource, be sure to check out educatall.com
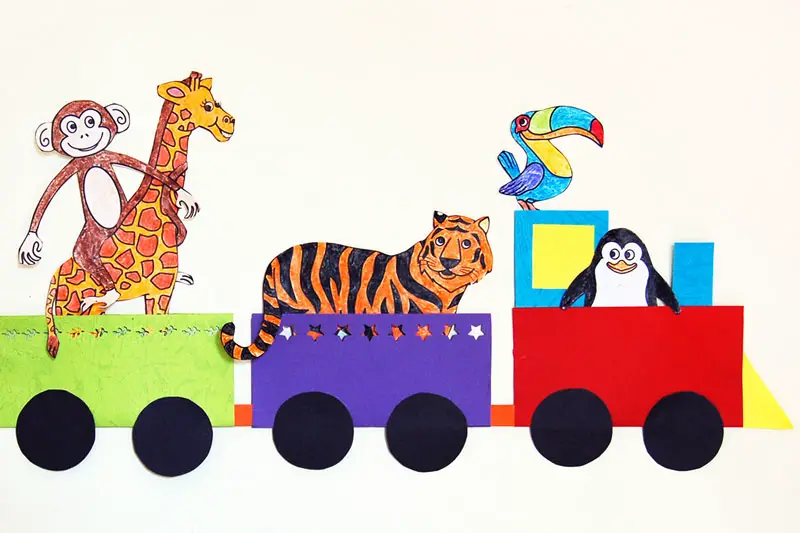
This animal train craft is a fun and educational activity for children of all ages. It’s a great way to teach them about different types of animals and their characteristics. Here’s what you’ll need:
- Construction paper in various colors
- Scissors
- Glue
- Markers
- Optional: small circles of paper (for wheels)
Here’s how to make the animal train:
- Gather all the materials and talk to your child about different animals and their features.
- Have your child cut out different animal shapes from the construction paper or coloring pages and decorate them with markers.
- Encourage them to be creative and let their imagination run wild.
- Once their animals are decorated, have your child use glue to attach the animals to a long piece of construction paper, creating a train of animals.
- If desired, add wheels to the bottom of the train using small circles of paper.
- Let the glue dry, and your child will have their very own animal train that they can be proud of.
As a teacher, you can use this activity in the classroom as a fun way to learn about animals, scissors skills, following instructions, and creativity.
You can also add a writing activity, where students write a story about the journey of their animal train or create a presentation about the animals they chose for the train.
For more information about this resource, be sure to check out firstpalette.com
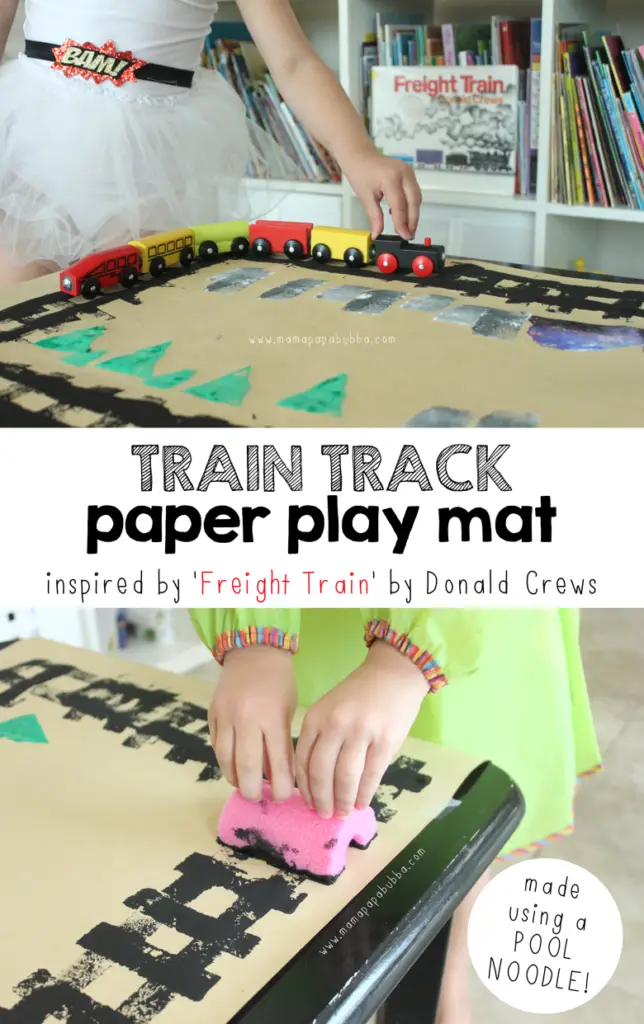
We’ll be using our love for art to create a fun and engaging activity for the little ones. Together we’ll be making a tabletop train track paper play mat using a pool noodle. It’s a simple and easy activity that’s sure to be a hit with the kids. Here’s what you’ll need:
- Train track paper play mat: serves as the base for your train track creation
- Freight cars: kids can choose from different types of freight cars to add to their train
- Scissors: to cut out the train track and freight cars
- Glue or tape: stick the train track and freight cars on the paper mat
- Colored pencils or markers (optional): to add some color and creativity to their creation.
Start by chopping off two chunks off of a hollow pool noodle and slicing them in half vertically to create four pieces (This needs to be done by an adult). Then, cover the table with brown craft paper and grab the tray and washable tempera paint.
Paint and stamp the pool noodle train tracks in a crisscross pattern, also add some fun scenery to your play mat.
Cut out basic building shapes and mountain shapes using kitchen sponges, and using paint to create a colorful and imaginative play mat.
Your child will love creating their own train tracks, and they’ll also learn about different types of freight cars and how they’re used in transportation.
For more information about this resource, be sure to check out mamapapabubba.com
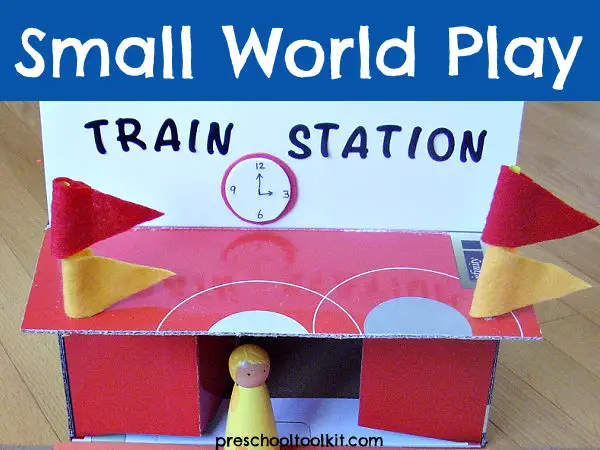
Do you want to build your very own train station with your little one? It’s a fun and easy project that the whole family can enjoy!
First, gather your materials. You’ll need a:
- cardboard shoe box with an attached lid
- some straws or dowels
- construction paper
Lay the box on its side so the lid becomes the awning and the flaps become the doors.
Trim the lid to make it slightly smaller for an awning.
Make holes in the box and the lid as shown in the photo to insert the straws.
Make a bend in the straw at about one-third of the length of the straw. Insert the short end in the awning and the long end into the side of the station.
Leave flaps to serve as a door that can be opened or closed, or remove completely to create a clear entrance.
Cut a rectangle from white cardstock for the sign and tape it above the awning. Bend the long side of the cardstock and glue or tape it onto the roof so the sign stands upright.
Apply ‘train station’ with self-adhesive letters or a black marker. You could also identify the name of the town.
Your very own train station is now complete and ready for hours of fun and imaginative play! Happy building!
For more information about this resource, be sure to check out preschooltoolkit.com
Conclusion
Train crafts for preschoolers are a great way to foster creativity and learning. These 10 terrific activities provide a fun and engaging way for children to learn about trains while having fun.
Give them a try and see the excitement on your child’s face!


